Merchant Hosted Checkout Integration - EFTNET
Collect payments using EFTNET (NEFT/RTGS) with Merchant Hosted Checkout integration as described in this section. After collecting the details from the customer, make the transaction request with the payment details to PayU.
To integrate with EFTNET:
Steps to Integrate
Before you begin:Register for an account with PayU before you start integration. For more information, refer to Register for a Merchant Account.
Step 1: Initiate the payment to PayU
Post request syntax & composition
  <body>
  <form action='https://test.payu.in/_payment' method='post'>
  <input type="hidden" name="key" value="JP***g" />
  <input type="hidden" name="txnid" value="t6svtqtjRdl34W" />
  <input type="hidden" name="productinfo" value="iPhone" />
  <input type="hidden" name="amount" value="10" />
  <input type="hidden" name="email" value="[email protected]" />
  <input type="hidden" name="firstname" value="Ashish" />
  <input type="hidden" name="lastname" value="Kumar" />
  <input type="hidden" name="pg" value="NEFTRTGS" />
  <input type="hidden" name="bankcode" value="EFTAXIS" />
  <input type="hidden" name="surl" value="your own success url" />
  <input type="hidden" name="furl" value="your own failure url" />
  <input type="hidden" name="phone" value="9988776655" />
  <input type="hidden" name="hash" value="eabec285da28fd0e3054d41a4d24fe9f7599c9d0b66646f7a9984303fd6124044b6206daf831e9a8bda28a6200d318293a13d6c193109b60bd4b4f8b09c90972" />
  <input type="submit" value="submit"> </form>
  </body>

</html>Note: The sample HTML code mentioned above is for Merchant Checkout integration with the NEFT/RTGS payment method call for the test environment.
Optional configuration for challan
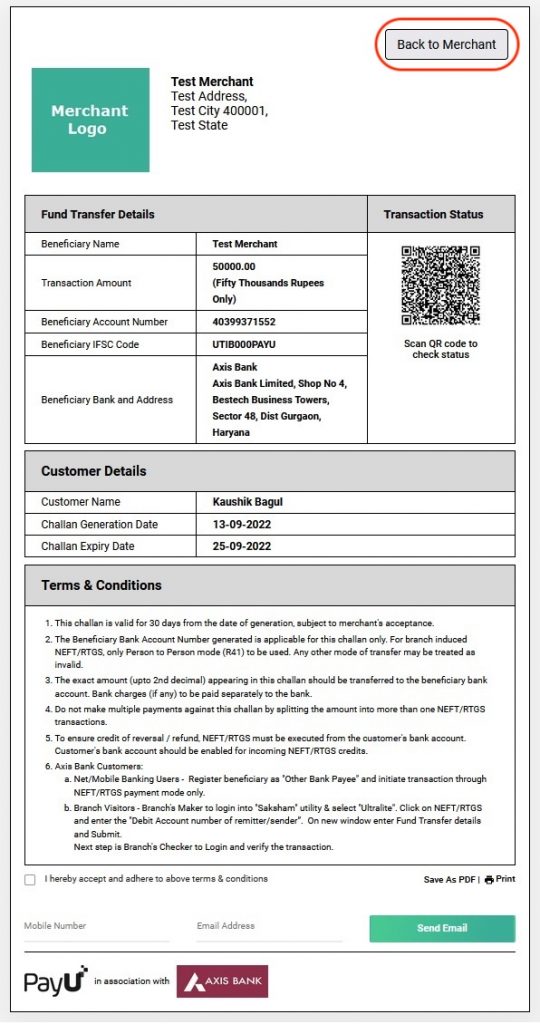
PayU provides an optional Back to Merchant button on the payment challan of a NEFT/RTGS payment. This button enables your customer to go back to the merchant portal once the transaction is done.
In this scenario, if a customer clicks on Back to Merchant button the merchant will receive the response on the furl shared in the Collect Payment API - Merchant Hosted Checkout.
Sample challan of a NEFT/RTGS transaction
Request parameters
The following parameters vary for the EFTNEFT payment mode in the Collect PaymentAPI (_payment API).
Environment
| Test Environment | https://test.payu.in/_payment |
| Production Environment | https://secure.payu.in/_payment |
| Parameter | Description | Example |
|---|---|---|
key mandatory | String - This parameter is the unique merchant key provided by PayU for your merchant account. For more information, refer to Generate Merchant Key and Salt. | 8488225 |
txnid mandatory | varchar - This parameter is known as Transaction ID (or OrderID). It is the order reference number generated at your (Merchant's) end. It is an identifier which you(merchant) would use to track a particular order. If a transaction using a particular transaction ID has already been successful at PayU, the usage of same Transaction ID again would fail. Hence, it is essential that you post us a unique transaction ID for every new transaction. | fd3e847h2 |
amount mandatory | float - This parameter should contain the payment amount of the particular transaction. Note: Type-cast the amount to float type | 10 |
productinfo mandatory | varchar - This parameter should contain a brief product description. It should be a string describing the product (The description type is entirely your choice). | T-shirt |
firstname mandatory | varchar - This parameter must contain the first name of the customer. | Ankit |
email mandatory | varchar - This parameter must contain the email of the customer | [email protected] |
phone mandatory | integer - Merchant needs to take the customer's GPay registered phone number and pass in this field. This field will be used for further mapping the customer VPA and initiate a collect request. | 9876543210 |
pg mandatory | string - The payment gateway is specified in this parameter. For EFTNET, specify NEFTRTGS. | NEFTRTGS |
bankcode mandatory | string - Each payment option is identified with a unique bank code at PayU. | EFTAXIS |
surl mandatory | The "surl" field is the success URL, which is the page PayU will redirect to if the transaction is successful. The merchant can handle the response at this URL after the customer is redirected there. | https://apiplayground-response.herokuapp.com/ |
furl mandatory | The "furl" field is the Failure URL, which is the page PayU will redirect to if the transaction is failed. The merchant can handle the response at this URL after the customer is redirected there. | https://apiplayground-response.herokuapp.com/ |
hash mandatory | string - The hash calculated by the merchant using the key and salt provided by PayU. The format for calculating the hash: sha512(key\|txnid\|amount\|productinfo\|firstname\|email\|udf1\|udf2\|udf3\|udf4\|udf5\|\|\|\|\|SALT) For more information, refer to Generate Hash. | calculated_hash_value |
lastname optional | string - The last name of the customer. | Kumar |
address1 optional | string - The first line of the billing address. | 123 Main St |
address2 optional | string - The second line of the billing address. | Apt 4B |
city optional | string - The city where your customer resides as part of the billing address. | Mumbai |
state optional | string - The state where your customer resides as part of the billing address. | Maharashtra |
country optional | string - The country where your customer resides. | India |
zipcode optional | string - Billing address zip code is mandatory for the cardless EMI option. | 400001 |
udf1 optional | string - This parameter has been made for you to keep any information corresponding to the transaction. | custom_data_1 |
udf2 optional | string - This parameter has been made for you to keep any information corresponding to the transaction. | custom_data_2 |
udf3 optional | string - This parameter has been made for you to keep any information corresponding to the transaction. | custom_data_3 |
udf4 optional | string - This parameter has been made for you to keep any information corresponding to the transaction. | custom_data_4 |
udf5 optional | string - This parameter has been made for you to keep any information corresponding to the transaction. | custom_data_5 |
Understanding Hashing and sample code
Hashing
You must hash the request parameters using the following hash logic:
sha512(key|txnid|amount|productinfo|firstname|email|udf1|udf2|udf3|udf4|udf5||||||SALT)For more information, refer to Generate Hash.
Hashing Sample Code
<?php
function generateHash($params, $salt) {
    // Extract parameters or use empty string if not provided
    $key = $params['key'];
    $txnid = $params['txnid'];
    $amount = $params['amount'];
    $productinfo = $params['productinfo'];
    $firstname = $params['firstname'];
    $email = $params['email'];
    $udf1 = isset($params['udf1']) ? $params['udf1'] : '';
    $udf2 = isset($params['udf2']) ? $params['udf2'] : '';
    $udf3 = isset($params['udf3']) ? $params['udf3'] : '';
    $udf4 = isset($params['udf4']) ? $params['udf4'] : '';
    $udf5 = isset($params['udf5']) ? $params['udf5'] : '';

    // Construct hash string with exact parameter sequence
    $hashString = $key . '|' . $txnid . '|' . $amount . '|' . $productinfo . '|' .
                  $firstname . '|' . $email . '|' . $udf1 . '|' . $udf2 . '|' .
                  $udf3 . '|' . $udf4 . '|' . $udf5 . '||||||' . $salt;

    // Generate hash and convert to lowercase
    return strtolower(hash('sha512', $hashString));
}

// Example usage
$params = [
    'key' => 'yourKey',
    'txnid' => 'yourTxnId',
    'amount' => 'yourAmount',
    'productinfo' => 'yourProductInfo',
    'firstname' => 'yourFirstName',
    'email' => 'yourEmail',
    'udf1' => 'optional_value1'
    // udf2, udf3, udf4, udf5 not provided - will be empty strings
];
$salt = 'yourSalt';

$hash = generateHash($params, $salt);
echo 'Generated Hash: ' . $hash;
?>
import java.nio.charset.StandardCharsets;
import java.security.MessageDigest;
import java.security.NoSuchAlgorithmException;
import java.util.HashMap;
import java.util.Map;

public class ImprovedHashGenerator {

    public static String generateHash(Map<String, String> params, String salt) {
        // Extract parameters or use empty string if not provided
        String key = params.get("key");
        String txnid = params.get("txnid");
        String amount = params.get("amount");
        String productinfo = params.get("productinfo");
        String firstname = params.get("firstname");
        String email = params.get("email");
        String udf1 = params.getOrDefault("udf1", "");
        String udf2 = params.getOrDefault("udf2", "");
        String udf3 = params.getOrDefault("udf3", "");
        String udf4 = params.getOrDefault("udf4", "");
        String udf5 = params.getOrDefault("udf5", "");

        // Construct hash string with exact parameter sequence
        String hashString = key + "|" + txnid + "|" + amount + "|" + productinfo + "|" +
                         firstname + "|" + email + "|" + udf1 + "|" + udf2 + "|" +
                         udf3 + "|" + udf4 + "|" + udf5 + "||||||" + salt;

        return sha512(hashString);
    }

    private static String sha512(String input) {
        try {
            MessageDigest md = MessageDigest.getInstance("SHA-512");
            byte[] hashBytes = md.digest(input.getBytes(StandardCharsets.UTF_8));
            StringBuilder sb = new StringBuilder();
            for (byte b : hashBytes) {
                sb.append(String.format("%02x", b));
            }
            return sb.toString().toLowerCase();
        } catch (NoSuchAlgorithmException e) {
            throw new RuntimeException(e);
        }
    }

    public static void main(String[] args) {
        // Example usage with parameters map
        Map<String, String> params = new HashMap<>();
        params.put("key", "yourKey");
        params.put("txnid", "yourTxnId");
        params.put("amount", "yourAmount");
        params.put("productinfo", "yourProductInfo");
        params.put("firstname", "yourFirstName");
        params.put("email", "yourEmail");
        params.put("udf1", "optional_value1");
        // udf2, udf3, udf4, udf5 not provided - will be empty strings

        String salt = "yourSalt";

        String hash = generateHash(params, salt);
        System.out.println("Generated Hash: " + hash);
    }
}
using System;
using System.Collections.Generic;
using System.Security.Cryptography;
using System.Text;

public class ImprovedHashGenerator
{
    public static string GenerateHash(Dictionary<string, string> parameters, string salt)
    {
        // Extract parameters or use empty string if not provided
        string key = parameters["key"];
        string txnid = parameters["txnid"];
        string amount = parameters["amount"];
        string productinfo = parameters["productinfo"];
        string firstname = parameters["firstname"];
        string email = parameters["email"];

        // Get UDF values if present, otherwise use empty string
        string udf1 = parameters.ContainsKey("udf1") ? parameters["udf1"] : "";
        string udf2 = parameters.ContainsKey("udf2") ? parameters["udf2"] : "";
        string udf3 = parameters.ContainsKey("udf3") ? parameters["udf3"] : "";
        string udf4 = parameters.ContainsKey("udf4") ? parameters["udf4"] : "";
        string udf5 = parameters.ContainsKey("udf5") ? parameters["udf5"] : "";

        // Construct hash string with exact parameter sequence
        string hashString = $"{key}|{txnid}|{amount}|{productinfo}|{firstname}|{email}|{udf1}|{udf2}|{udf3}|{udf4}|{udf5}||||||{salt}";

        return Sha512(hashString);
    }

    private static string Sha512(string input)
    {
        using (SHA512 sha512 = SHA512.Create())
        {
            byte[] bytes = sha512.ComputeHash(Encoding.UTF8.GetBytes(input));
            StringBuilder sb = new StringBuilder();
            foreach (byte b in bytes)
            {
                sb.Append(b.ToString("x2"));
            }
            return sb.ToString().ToLower();
        }
    }

    public static void Main(string[] args)
    {
        // Example usage with parameters dictionary
        Dictionary<string, string> parameters = new Dictionary<string, string>
        {
            ["key"] = "yourKey",
            ["txnid"] = "yourTxnId",
            ["amount"] = "yourAmount",
            ["productinfo"] = "yourProductInfo",
            ["firstname"] = "yourFirstName",
            ["email"] = "yourEmail",
            ["udf1"] = "optional_value1"
            // udf2, udf3, udf4, udf5 not provided - will be empty strings
        };

        string salt = "yourSalt";

        string hash = GenerateHash(parameters, salt);
        Console.WriteLine("Generated Hash: " + hash);
    }
}
import hashlib
def generate_hash(params, salt):
# Extract parameters or use empty string if not provided
key = params['key']
txnid = params['txnid']
amount = params['amount']
productinfo = params['productinfo']
firstname = params['firstname']
email = params['email']
udf1 = params.get('udf1', '')
udf2 = params.get('udf2', '')
udf3 = params.get('udf3', '')
udf4 = params.get('udf4', '')
udf5 = params.get('udf5', '')
# Construct hash string with exact parameter sequence
hash_string = f"{key}|{txnid}|{amount}|{productinfo}|{firstname}|{email}|{udf1}|{udf2}|{udf3}|{udf4}|{udf5}||||||{salt}"
# Generate SHA-512 hash
return hashlib.sha512(hash_string.encode('utf-8')).hexdigest()
# Example usage
params = {
'key': 'yourKey',
'txnid': 'yourTxnId',
'amount': 'yourAmount',
'productinfo': 'yourProductInfo',
'firstname': 'yourFirstName',
'email': 'yourEmail',
'udf1': 'optional_value1'
# udf2, udf3, udf4, udf5 not provided - will default to empty strings
}
salt = 'yourSalt'
hash_value = generate_hash(params, salt)
print("Generated Hash:", hash_value)
const crypto = require('crypto');

function generateHash(params, salt) {
    // Extract parameters or use empty string if not provided
    const key = params.key;
    const txnid = params.txnid;
    const amount = params.amount;
    const productinfo = params.productinfo;
    const firstname = params.firstname;
    const email = params.email;
    const udf1 = params.udf1 || '';
    const udf2 = params.udf2 || '';
    const udf3 = params.udf3 || '';
    const udf4 = params.udf4 || '';
    const udf5 = params.udf5 || '';

    // Construct hash string with exact parameter sequence
    const hashString = `${key}|${txnid}|${amount}|${productinfo}|${firstname}|${email}|${udf1}|${udf2}|${udf3}|${udf4}|${udf5}||||||${salt}`;

    // Generate SHA-512 hash
    return crypto.createHash('sha512').update(hashString).digest('hex');
}

// Example usage
const params = {
    key: 'yourKey',
    txnid: 'yourTxnId',
    amount: 'yourAmount',
    productinfo: 'yourProductInfo',
    firstname: 'yourFirstName',
    email: 'yourEmail',
    udf1: 'optional_value1'
    // udf2, udf3, udf4, udf5 not provided - will default to empty strings
};
const salt = 'yourSalt';

const hash = generateHash(params, salt);
console.log("Generated Hash:", hash);
Sample request
curl -X POST "https://test.payu.in/_payment" -H "accept: application/json" -H "Content-Type: application/x-www-form-urlencoded" -d "key=J****g&txnid=aI1UM19ONxLgPz&amount=10.00&firstname=Ashish&[email protected]&phone=9876543210&productinfo=iPhone&pg=NEFTRTGS&bankcode=EFTAXIS&surl=https://apiplayground-response.herokuapp.com/&furl=https://apiplayground-response.herokuapp.com/&hash=6840ba0d1a14554f7ee5d20966dfbac6b221718e72dd823f05b6da01420286315b4956c28325898b66520b111604020ea2c547608606674766eb7e4164dc0baa"import requests
url = "https://test.payu.in/_payment"
headers = {
"accept": "application/json",
"Content-Type": "application/x-www-form-urlencoded"
}
data = {
"key": "J****g",
"txnid": "aI1UM19ONxLgPz",
"amount": "10.00",
"firstname": "Ashish",
"email": "[email protected]",
"phone": "9876543210",
"productinfo": "iPhone",
"pg": "NEFTRTGS",
"bankcode": "EFTAXIS",
"surl": "https://apiplayground-response.herokuapp.com/",
"furl": "https://apiplayground-response.herokuapp.com/",
"hash": "6840ba0d1a14554f7ee5d20966dfbac6b221718e72dd823f05b6da01420286315b4956c28325898b66520b111604020ea2c547608606674766eb7e4164dc0baa"
}
response = requests.post(url, headers=headers, data=data)
print(response.status_code)
print(response.text)using System;
using System.Collections.Generic;
using System.Net.Http;
using System.Threading.Tasks;
class Program
{
static async Task Main(string[] args)
{
using (var client = new HttpClient())
{
var url = "https://test.payu.in/_payment";
client.DefaultRequestHeaders.Add("accept", "application/json");
var formData = new List<KeyValuePair<string, string>>
{
new KeyValuePair<string, string>("key", "J****g"),
new KeyValuePair<string, string>("txnid", "aI1UM19ONxLgPz"),
new KeyValuePair<string, string>("amount", "10.00"),
new KeyValuePair<string, string>("firstname", "Ashish"),
new KeyValuePair<string, string>("email", "[email protected]"),
new KeyValuePair<string, string>("phone", "9876543210"),
new KeyValuePair<string, string>("productinfo", "iPhone"),
new KeyValuePair<string, string>("pg", "NEFTRTGS"),
new KeyValuePair<string, string>("bankcode", "EFTAXIS"),
new KeyValuePair<string, string>("surl", "https://apiplayground-response.herokuapp.com/"),
new KeyValuePair<string, string>("furl", "https://apiplayground-response.herokuapp.com/"),
new KeyValuePair<string, string>("hash", "6840ba0d1a14554f7ee5d20966dfbac6b221718e72dd823f05b6da01420286315b4956c28325898b66520b111604020ea2c547608606674766eb7e4164dc0baa")
};
var formContent = new FormUrlEncodedContent(formData);
var response = await client.PostAsync(url, formContent);
var responseBody = await response.Content.ReadAsStringAsync();
Console.WriteLine($"Status: {response.StatusCode}");
Console.WriteLine($"Response: {responseBody}");
}
}
}async function makeBankTransferPayment() {
const url = "https://test.payu.in/_payment";
const headers = {
"accept": "application/json",
"Content-Type": "application/x-www-form-urlencoded"
};
const formData = new URLSearchParams({
"key": "J****g",
"txnid": "aI1UM19ONxLgPz",
"amount": "10.00",
"firstname": "Ashish",
"email": "[email protected]",
"phone": "9876543210",
"productinfo": "iPhone",
"pg": "NEFTRTGS",
"bankcode": "EFTAXIS",
"surl": "https://apiplayground-response.herokuapp.com/",
"furl": "https://apiplayground-response.herokuapp.com/",
"hash": "6840ba0d1a14554f7ee5d20966dfbac6b221718e72dd823f05b6da01420286315b4956c28325898b66520b111604020ea2c547608606674766eb7e4164dc0baa"
});
try {
const response = await fetch(url, {
method: "POST",
headers: headers,
body: formData
});
const data = await response.text();
console.log("Status:", response.status);
console.log("Response:", data);
return data;
} catch (error) {
console.error("Error:", error);
throw error;
}
}
// Call the function
makeBankTransferPayment();import java.io.IOException;
import java.net.URI;
import java.net.http.HttpClient;
import java.net.http.HttpRequest;
import java.net.http.HttpResponse;
import java.util.HashMap;
import java.util.Map;
import java.util.stream.Collectors;
public class BankTransferPayment {
public static void main(String[] args) throws IOException, InterruptedException {
String url = "https://test.payu.in/_payment";
Map<String, String> formData = new HashMap<>();
formData.put("key", "J****g");
formData.put("txnid", "aI1UM19ONxLgPz");
formData.put("amount", "10.00");
formData.put("firstname", "Ashish");
formData.put("email", "[email protected]");
formData.put("phone", "9876543210");
formData.put("productinfo", "iPhone");
formData.put("pg", "NEFTRTGS");
formData.put("bankcode", "EFTAXIS");
formData.put("surl", "https://apiplayground-response.herokuapp.com/");
formData.put("furl", "https://apiplayground-response.herokuapp.com/");
formData.put("hash", "6840ba0d1a14554f7ee5d20966dfbac6b221718e72dd823f05b6da01420286315b4956c28325898b66520b111604020ea2c547608606674766eb7e4164dc0baa");
String formBody = formData.entrySet()
.stream()
.map(entry -> entry.getKey() + "=" + entry.getValue())
.collect(Collectors.joining("&"));
HttpClient client = HttpClient.newHttpClient();
HttpRequest request = HttpRequest.newBuilder()
.uri(URI.create(url))
.header("accept", "application/json")
.header("Content-Type", "application/x-www-form-urlencoded")
.POST(HttpRequest.BodyPublishers.ofString(formBody))
.build();
HttpResponse<String> response = client.send(request, HttpResponse.BodyHandlers.ofString());
System.out.println("Status Code: " + response.statusCode());
System.out.println("Response Body: " + response.body());
}
}
$url = "https://test.payu.in/_payment";

$data = array(
    'key' => 'J****g',
    'txnid' => 'aI1UM19ONxLgPz',
    'amount' => '10.00',
    'firstname' => 'Ashish',
    'email' => '[email protected]',
    'phone' => '9876543210',
    'productinfo' => 'iPhone',
    'pg' => 'NEFTRTGS',
    'bankcode' => 'EFTAXIS',
    'surl' => 'https://apiplayground-response.herokuapp.com/',
    'furl' => 'https://apiplayground-response.herokuapp.com/',
    'hash' => '6840ba0d1a14554f7ee5d20966dfbac6b221718e72dd823f05b6da01420286315b4956c28325898b66520b111604020ea2c547608606674766eb7e4164dc0baa'
);

$options = array(
    'http' => array(
        'header' => "accept: application/json\r\n" .
                   "Content-Type: application/x-www-form-urlencoded\r\n",
        'method' => 'POST',
        'content' => http_build_query($data)
    )
);

$context = stream_context_create($options);
$response = file_get_contents($url, false, $context);

if ($response === FALSE) {
    echo "Error occurred";
} else {
    echo "Response: " . $response;
}

// Alternative using cURL
/*
$ch = curl_init();
curl_setopt($ch, CURLOPT_URL, $url);
curl_setopt($ch, CURLOPT_POST, true);
curl_setopt($ch, CURLOPT_POSTFIELDS, http_build_query($data));
curl_setopt($ch, CURLOPT_RETURNTRANSFER, true);
curl_setopt($ch, CURLOPT_HTTPHEADER, array(
    'accept: application/json',
    'Content-Type: application/x-www-form-urlencoded'
));

$response = curl_exec($ch);
$httpCode = curl_getinfo($ch, CURLINFO_HTTP_CODE);
curl_close($ch);

echo "HTTP Code: " . $httpCode . "\n";
echo "Response: " . $response;
*/
Step 2: Check response from PayU
Hash validation logic for payment response (Reverse Hashing)
While sending the response, PayU takes the exact same parameters that were sent in the request (in reverse order) to calculate the hash and returns it to you. You must verify the hash and then mark a transaction as a success or failure. This is to make sure the transaction has not tampered within the response.
The order of the parameters is similar to the following code block:
sha512(SALT|status||||||udf5|udf4|udf3|udf2|udf1|email|firstname|productinfo|amount|txnid|key)Note on Response: For security reasons, the sample response or URL is not included here.
Step 3: Verify the payment
Upon receiving the response, PayU recommends you performing a reconciliation step to validate all transaction details.
You can verify your payments using either of the following methods:
Configure the webhooks to monitor the status of payments.
Webhooks enable a server to communicate with another server by sending an HTTP callback or message.
These callbacks are triggered by specific events or instances and operate at the server-to-server (S2S) level.
Know how to manage Webhooks for Payments.