BNPL Link and Pay
BNPL like Lazypay allow your customers to checkout in "Click and Pay Later" with no hidden charges, while you get paid upfront.
You can integrate with PayU’s Pay Later stack to enable the one-click checkout feature on the payment page, across BNPLs that support link and pay flow.
Benefits and Customer Journey
Benefits for your customers
- 100% secure payments.
- Frictionless one-tap checkout experience.
- Pay later with 0% interest and no hidden charges.
- An easy sign-up process.
Advantages
- 90%+ payment success rates.
-
Increase in cart conversion rates.
-
Improve user retention by providing a seamless checkout experience.
-
Bump in average order value.
Note:- PayU will extend this solution for other payment options within BNPL and be expanded to wallet partners shortly.
- The same integration will enable you to integrate all such supported payment options.
-
Customer Journey
The customer journey involves the First-time User and Repeat User flows:
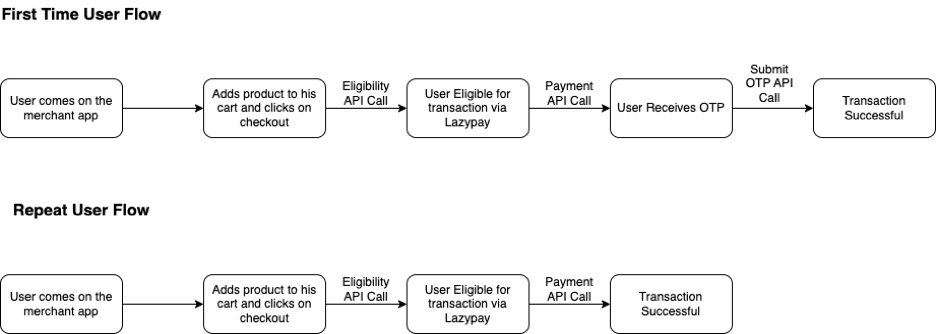
The following steps demonstrate how Rahul (for example) makes his first transaction using Pay Later on your website or mobile app (let’s call it Demoshop):
First Time Flow
- Rahul logs in to your Demoshop, adds products/services to the cart, and proceeds to the checkout page.
- Even before landing on the checkout page, Demoshop initiates Eligibility API to check if Rahul is eligible.
- Post getting a successful eligibility response, the respective BNPL option will be shown to Rahul. (In case Rahul is not eligible, the respective lender option will be hidden/disabled on Demoshop.)
- Rahul clicks on his preferred BNPL lender’s button for which he is eligible, say Lazypay in this case. If Rahul is transacting for the first time on your Demostore, he will have to link his Lazypay account with Demoshop. (While for subsequent transactions, the transactions would be 1-click)
- Rahul will continue his transaction and go in the OTP authentication step.
- Lazypay sends an OTP for verification which John enters as part of the linking flow and also to complete his first transaction
- Once the linking is completed successfully, Lazypay shares an access token which is used for further subsequent transactions.
Repeat User Flow
The following steps demonstrate how Rahul makes his subsequent transactions using Lazypay on Demoshop:
- Rahul comes to Demoshop again. Demoshop initiates the eligibility API of the checkout page to check for his present status. Lazypay sends the current eligibility status as success.
- Rahul clicks on Lazypay and Demoshop initiates the transaction directly. Demoshop initiates the payment call to successfully place the order.
Note: User credentials will be the unique identifier for each user that will have to be passed by the merchant and will be used to identify each unique user. It will be string with the following format. abc:xyz (data type: string),abc corresponds to the merchant key and xyz corresponds to the user identifier. For example, BmzSVc:userid
The following steps are involved when collecting payment with <<glossary:BNPL>> using Link and Pay:
Steps to Integrate
Verify customer eligibility for Buy Now Pay Later options using PayU hosted checkout
Start the payment process using PayU hosted checkout integration with offers
Handle and process the response received from PayU after payment initiation
Submit and validate OTP for first-time users in the BNPL flow
Confirm the payment status and ensure successful transaction completion
Step 1: Check the BNPL eligibility
Before you can initiate payment with PayU, you can check the eligibility using the Get EMI Checkout Details API. For more information, refer to Get EMI Checkout Details API.
Environment
| Test Environment | <https://test.payu.in/info/linkAndPay/get_emi_checkout_details> |
| Production Environment | <https://info.payu.in/linkAndPay/get_emi_checkout_details> |
Sample request
curl --location --request POST 'https://test.payu.in/info/linkAndPay/get_emi_checkout_details' \
--header 'Authorization: hmac username="yFbXg3", algorithm="sha512", headers="date", signature="cd1e0a382807ef7be094dedc4d2fc4cd34906197d3933485b8fab37aef2e5483df3517a711619444715fe795ffddb438e4279637782d0c5d5c1b69986c231af3"' \
--header 'date: Thu, 21 Aug 2025 10:22:41 GMT' \
--header 'x-credential-username: yFbXg3' \
--header 'Content-Type: application/json' \
--header 'Cookie: PHPSESSID=hhf3u8oqp22tfav02ntm79a28i; USERTXNINFO=687a1526838964.48910574; PHPSESSID=68a6f3eccd4dc' \
--data '{
  "Key": "yFbXg3",
  "amount": 21,
  "userCredentials": "yFbXg3:test_sud",
  "phone": "9999999999",
  "bankCode": "LAZYPAY",
  "payuToken": null,
  "requestId": "Testing_111"
}'
import requests
import json
import hashlib
import hmac
from datetime import datetime
url = "https://test.payu.in/info/linkAndPay/get_emi_checkout_details"
# Generate date header in RFC 1123 format
date_header = datetime.utcnow().strftime('%a, %d %b %Y %H:%M:%S GMT')
# HMAC signature (replace with your actual signature generation logic)
authorization = 'hmac username="x0i6r2", algorithm="sha512", headers="date", signature="0e0ebc518c085d8ff49058b7c232bfe2e8779e9e9cafd34a4cdf1c11114035eea75b0e404a9b9e152757dbcc4926f78b6f18ba7f6643e2bf687a65942d3bde38"'
headers = {
"x-credential-username": "smsplus",
"Content-Type": "application/json",
"authorization": authorization,
"date": date_header
}
payload = {
"Key": "yFbXg3",
"amount": 21,
"userCredentials": "yFbXg3:test_sud",
"phone": "9999999999",
"bankCode": "LAZYPAY",
"payuToken": None,
"requestId": "Testing_111",
}
response = requests.post(url, headers=headers, json=payload)
print("Status Code:", response.status_code)
print("Response:", response.json())import java.io.IOException;
import java.net.URI;
import java.net.http.HttpClient;
import java.net.http.HttpRequest;
import java.net.http.HttpResponse;
import java.time.ZonedDateTime;
import java.time.format.DateTimeFormatter;
import java.util.Locale;
public class PayUEMICheckoutDetails {
public static void main(String[] args) throws IOException, InterruptedException {
String url = "https://test.payu.in/info/linkAndPay/get_emi_checkout_details";
// Generate date header in RFC 1123 format
String dateHeader = DateTimeFormatter
.ofPattern("EEE, dd MMM yyyy HH:mm:ss 'GMT'", Locale.ENGLISH)
.format(ZonedDateTime.now());
// HMAC authorization header (replace with your actual signature)
String authorization = "hmac username=\"x0i6r2\", algorithm=\"sha512\", headers=\"date\", signature=\"0e0ebc518c085d8ff49058b7c232bfe2e8779e9e9cafd34a4cdf1c11114035eea75b0e404a9b9e152757dbcc4926f78b6f18ba7f6643e2bf687a65942d3bde38\"";
String jsonPayload = """
{
"Key": "yFbXg3",
"amount": 21,
"userCredentials": "yFbXg3:test_sud",
"phone": "9999999999",
"bankCode": "LAZYPAY",
"payuToken": null,
"requestId": "Testing_111"
}
""";
HttpClient client = HttpClient.newHttpClient();
HttpRequest request = HttpRequest.newBuilder()
.uri(URI.create(url))
.header("x-credential-username", "smsplus")
.header("Content-Type", "application/json")
.header("authorization", authorization)
.header("date", dateHeader)
.POST(HttpRequest.BodyPublishers.ofString(jsonPayload))
.build();
HttpResponse<String> response = client.send(request, HttpResponse.BodyHandlers.ofString());
System.out.println("Status Code: " + response.statusCode());
System.out.println("Response: " + response.body());
}
}<?php
$url = "https://test.payu.in/info/linkAndPay/get_emi_checkout_details";
// Generate date header in RFC 1123 format
$dateHeader = gmdate('D, d M Y H:i:s') . ' GMT';
// HMAC authorization header (replace with your actual signature)
$authorization = 'hmac username="x0i6r2", algorithm="sha512", headers="date", signature="0e0ebc518c085d8ff49058b7c232bfe2e8779e9e9cafd34a4cdf1c11114035eea75b0e404a9b9e152757dbcc4926f78b6f18ba7f6643e2bf687a65942d3bde38"';
$payload = array(
'Key' => 'yFbXg3',
'amount' => 21,
'userCredentials' => 'yFbXg3:test_sud',
'phone' => '9999999999',
'bankCode' => 'LAZYPAY',
'payuToken' => null,
'requestId' => 'Testing_111',
);
$ch = curl_init();
curl_setopt($ch, CURLOPT_URL, $url);
curl_setopt($ch, CURLOPT_POST, true);
curl_setopt($ch, CURLOPT_POSTFIELDS, json_encode($payload));
curl_setopt($ch, CURLOPT_RETURNTRANSFER, true);
curl_setopt($ch, CURLOPT_HTTPHEADER, array(
'x-credential-username: smsplus',
'Content-Type: application/json',
'authorization: ' . $authorization,
'date: ' . $dateHeader
));
$response = curl_exec($ch);
$httpCode = curl_getinfo($ch, CURLINFO_HTTP_CODE);
$error = curl_error($ch);
curl_close($ch);
if ($error) {
echo "cURL Error: " . $error . "\n";
} else {
echo "Status Code: " . $httpCode . "\n";
echo "Response: " . $response . "\n";
// Parse JSON response
$jsonResponse = json_decode($response, true);
print_r($jsonResponse);
}
?>#!/usr/bin/perl
use strict;
use warnings;
use LWP::UserAgent;
use HTTP::Request;
use JSON;
use POSIX qw(strftime);
my $url = "https://test.payu.in/info/linkAndPay/get_emi_checkout_details";
# Generate date header in RFC 1123 format
my $date_header = strftime("%a, %d %b %Y %H:%M:%S GMT", gmtime());
# HMAC authorization header (replace with your actual signature)
my $authorization = 'hmac username="x0i6r2", algorithm="sha512", headers="date", signature="0e0ebc518c085d8ff49058b7c232bfe2e8779e9e9cafd34a4cdf1c11114035eea75b0e404a9b9e152757dbcc4926f78b6f18ba7f6643e2bf687a65942d3bde38"';
my $payload = {
Key => 'yFbXg3',
amount => 21,
userCredentials => 'yFbXg3:test_sud',
phone => '9999999999',
bankCode => 'LAZYPAY',
payuToken => undef,
requestId => 'Testing_111',
};
my $json_payload = encode_json($payload);
my $ua = LWP::UserAgent->new;
$ua->timeout(30);
my $req = HTTP::Request->new('POST', $url);
$req->header('x-credential-username' => 'smsplus');
$req->header('Content-Type' => 'application/json');
$req->header('authorization' => $authorization);
$req->header('date' => $date_header);
$req->content($json_payload);
my $response = $ua->request($req);
if ($response->is_success) {
print "Status Code: " . $response->code . "\n";
print "Response: " . $response->decoded_content . "\n";
my $json_response = decode_json($response->decoded_content);
use Data::Dumper;
print Dumper($json_response);
} else {
print "Error: " . $response->status_line . "\n";
print "Response: " . $response->decoded_content . "\n";
}Sample response
{
     "bnpl": {
         "all": [
             {
                 "Lazypay": {
                     "status": 1,
                     "kfsLink": https://www.somekfsLink.com, // only if applicable
                     "eligible": true,
                     "customerLinked": true,

                      “PayuToken”: “Token12345”
                 }
             }
         ]
     }
 }
Step 2: Initiate the payment
You can initiate the payment using the _payment API along with the following additional parameters as in Merchant Hosted Checkout Integration for BNPL. For complete list of parameters and "Try It" experience on API Reference, refer to Collect Payment API - S2S Link and Pay.
Notes:
- The txn_s2s_flow parameter must be passed with the value 4 for OneClick checkout flow.
- User credentials is a request parameter in the payment request which will be the unique identifier for each user that will have to be passed by the merchant and will be used to identify each unique user. It can be string with the following format. abc:xyz (data type: string), abc corresponds to the merchant key and xyz corresponds to the user identifier. For example, BmzSVc: userid
Environment
| Test Environment | https://test.payu.in/_payment |
| Production Environment | https://secure.payu.in/_payment |
Request parameters
Reference: For Try It experience, refer to Collect Payments API - BNPL under API Reference.
| Parameter | Description | Example |
|---|---|---|
key |
|
JPg***r |
txnid |
|
ypl938459435 |
amount |
|
10.00 |
productinfo |
|
iPhone |
firstname |
|
Ashish |
email |
|
|
phone |
|
|
pg |
String It defines the payment category using the Merchant Hosted Checkout integration. For a BNPL payment, "BNPL" must be specified in the pg parameter. |
BNPL |
bankcode |
|
LAZYPAY |
furl |
|
|
surl |
|
|
txn_s2s_flow |
|
4 |
linkAndPayFlowType |
|
1 |
linkAndPayFlowDetails |
|
abc:xyz |
storecard_token_type |
|
1 |
storecard_token |
|
123456 |
user_credentials |
String` Unique user credential mapped against each user, to be passed by the merchant.. |
|
hash |
|
|
address1 |
|
|
address2 |
|
|
city |
|
|
state |
|
|
country |
|
|
zipcode |
|
|
udf1 |
|
|
udf2 |
|
|
udf3 |
|
|
udf4 |
|
|
udf5 |
|
<HashingRequestParameters />Sample request
curl --location --request POST 'https://test.payu.in/_payment' \
--header 'accept: application/json' \
--header 'Content-Type: application/x-www-form-urlencoded' \
--data-urlencode 'key=a4vGC2' \
--data-urlencode 'txnid=my_order_30827' \
--data-urlencode 'amount=5000' \
--data-urlencode 'firstname=Payu-Admin' \
--data-urlencode '[email protected]' \
--data-urlencode 'phone=9999999999' \
--data-urlencode 'productinfo=productinfo' \
--data-urlencode 'pg=BNPL' \
--data-urlencode 'bankcode=LAZYPAY' \
--data-urlencode 'linkAndPayFlowType=1' \
--data-urlencode 'surl=https://test.payu.in/admin/test_response' \
--data-urlencode 'furl=https://test.payu.in/admin/test_response' \
--data-urlencode 'hash={{hash_value}}' \
--data-urlencode 'udf1=udf1' \
--data-urlencode 'udf2=udf2' \
--data-urlencode 'udf3=udf3' \
--data-urlencode 'udf4=udf4' \
--data-urlencode 'udf5=udf5' \
--data-urlencode 's2s_client_ip=10.100.241' \
--data-urlencode 's2s_device_info=MAC' \
--data-urlencode 'txn_s2s_flow=4' \
--data-urlencode 'user_credentials=a4vGC2:SLP3'
import requests
url = "https://test.payu.in/_payment"
headers = {
"accept": "application/json",
"content-type": "application/x-www-form-urlencoded"
}
data = {
"key": "a4vGC2",
"txnid": "my_order_30827",
"amount": "5000",
"firstname": "Payu-Admin",
"email": "[email protected]",
"phone": "9999999999",
"productinfo": "productinfo",
"pg": "BNPL",
"bankcode": "LAZYPAY",
"linkAndPayFlowType": "1",
"surl": "https://test.payu.in/admin/test_response",
"furl": "https://test.payu.in/admin/test_response",
"hash": "7e365d44567e2980b1ff8e0404ee0b7a16d6b8763bb2c253ad2ed9ee7a067c5b6b2f0682d230ebb30ae3b1b618f9e7bb16d2cf556d79f1c4acc8a24111c4bdfb",
"udf1": "udf1",
"udf2": "udf2",
"udf3": "udf3",
"udf4": "udf4",
"udf5": "udf5",
"s2s_client_ip": "10.100.241",
"s2s_device_info": "MAC",
"txn_s2s_flow": "4",
"user_credentials": "a4vGC2:SLP3",
}
response = requests.post(url, headers=headers, data=data)
print("Status Code:", response.status_code)
print("Response:", response.text)import java.io.IOException;
import java.net.URI;
import java.net.URLEncoder;
import java.net.http.HttpClient;
import java.net.http.HttpRequest;
import java.net.http.HttpResponse;
import java.nio.charset.StandardCharsets;
import java.util.HashMap;
import java.util.Map;
import java.util.stream.Collectors;
public class PayUBNPLLinkAndPay {
public static void main(String[] args) throws IOException, InterruptedException {
String url = "https://test.payu.in/_payment";
Map<String, String> params = new HashMap<>();
Map.entry("key", "a4vGC2"),
Map.entry("txnid", "my_order_30827"),
Map.entry("amount", "5000"),
Map.entry("firstname", "Payu-Admin"),
Map.entry("email", "[email protected]"),
Map.entry("phone", "9999999999"),
Map.entry("productinfo", "productinfo"),
Map.entry("pg", "BNPL"),
Map.entry("bankcode", "LAZYPAY"),
Map.entry("linkAndPayFlowType", "1"),
Map.entry("surl", "https://test.payu.in/admin/test_response"),
Map.entry("furl", "https://test.payu.in/admin/test_response"),
Map.entry("hash", "7e365d44567e2980b1ff8e0404ee0b7a16d6b8763bb2c253ad2ed9ee7a067c5b6b2f0682d230ebb30ae3b1b618f9e7bb16d2cf556d79f1c4acc8a24111c4bdfb"),
Map.entry("udf1", "udf1"),
Map.entry("udf2", "udf2"),
Map.entry("udf3", "udf3"),
Map.entry("udf4", "udf4"),
Map.entry("udf5", "udf5"),
Map.entry("s2s_client_ip", "10.100.241"),
Map.entry("s2s_device_info", "MAC"),
Map.entry("txn_s2s_flow", "4"),
Map.entry("user_credentials", "a4vGC2:SLP3");
params.put("user_credentials", "abc:xyz");
String formData = params.entrySet().stream()
.map(e -> URLEncoder.encode(e.getKey(), StandardCharsets.UTF_8) + "="
+ URLEncoder.encode(e.getValue(), StandardCharsets.UTF_8))
.collect(Collectors.joining("&"));
HttpClient client = HttpClient.newHttpClient();
HttpRequest request = HttpRequest.newBuilder()
.uri(URI.create(url))
.header("accept", "application/json")
.header("content-type", "application/x-www-form-urlencoded")
.POST(HttpRequest.BodyPublishers.ofString(formData))
.build();
HttpResponse<String> response = client.send(request, HttpResponse.BodyHandlers.ofString());
System.out.println("Status Code: " + response.statusCode());
System.out.println("Response: " + response.body());
}
}<?php
$url = "https://test.payu.in/_payment";
$data = array(
'key' => 'a4vGC2',
'txnid' => 'my_order_30827',
'amount' => '5000',
'firstname' => 'Payu-Admin',
'email' => '[email protected]',
'phone' => '9999999999',
'productinfo' => 'productinfo',
'pg' => 'BNPL',
'bankcode' => 'LAZYPAY',
'linkAndPayFlowType' => '1',
'surl' => 'https://test.payu.in/admin/test_response',
'furl' => 'https://test.payu.in/admin/test_response',
'hash' => '7e365d44567e2980b1ff8e0404ee0b7a16d6b8763bb2c253ad2ed9ee7a067c5b6b2f0682d230ebb30ae3b1b618f9e7bb16d2cf556d79f1c4acc8a24111c4bdfb',
'udf1' => 'udf1',
'udf2' => 'udf2',
'udf3' => 'udf3',
'udf4' => 'udf4',
'udf5' => 'udf5',
's2s_client_ip' => '10.100.241',
's2s_device_info' => 'MAC',
'txn_s2s_flow' => '4',
'user_credentials' => 'a4vGC2:SLP3',
);
$ch = curl_init();
curl_setopt($ch, CURLOPT_URL, $url);
curl_setopt($ch, CURLOPT_POST, true);
curl_setopt($ch, CURLOPT_POSTFIELDS, http_build_query($data));
curl_setopt($ch, CURLOPT_RETURNTRANSFER, true);
curl_setopt($ch, CURLOPT_HTTPHEADER, array(
'accept: application/json',
'content-type: application/x-www-form-urlencoded'
));
$response = curl_exec($ch);
$httpCode = curl_getinfo($ch, CURLINFO_HTTP_CODE);
curl_close($ch);
echo "Status Code: " . $httpCode . "\n";
echo "Response: " . $response . "\n";
$jsonResponse = json_decode($response, true);
print_r($jsonResponse);
?>#!/usr/bin/perl
use strict;
use warnings;
use LWP::UserAgent;
use HTTP::Request::Common;
my $url = "https://test.payu.in/_payment";
my %data = #!/usr/bin/env perl
use strict;
use warnings;
use LWP::UserAgent;
use HTTP::Request;
my $url = 'https://test.payu.in/_payment';
my $form_data = (
key => 'a4vGC2',
txnid => 'my_order_30827',
amount => '5000',
firstname => 'Payu-Admin',
email => '[email protected]',
phone => '9999999999',
productinfo => 'productinfo',
pg => 'BNPL',
bankcode => 'LAZYPAY',
linkAndPayFlowType => '1',
surl => 'https://test.payu.in/admin/test_response',
furl => 'https://test.payu.in/admin/test_response',
hash => '7e365d44567e2980b1ff8e0404ee0b7a16d6b8763bb2c253ad2ed9ee7a067c5b6b2f0682d230ebb30ae3b1b618f9e7bb16d2cf556d79f1c4acc8a24111c4bdfb',
udf1 => 'udf1',
udf2 => 'udf2',
udf3 => 'udf3',
udf4 => 'udf4',
udf5 => 'udf5',
s2s_client_ip => '10.100.241',
s2s_device_info => 'MAC',
txn_s2s_flow => '4',
user_credentials => 'a4vGC2:SLP3',
);
my $ua = LWP::UserAgent->new;
$ua->timeout(30);
my $response = $ua->post($url,
Content_Type => 'application/x-www-form-urlencoded',
Content => \%data
);
if ($response->is_success) {
print "Status Code: " . $response->code . "\n";
print "Response: " . $response->decoded_content . "\n";
} else {
print "Error: " . $response->status_line . "\n";
print "Response: " . $response->decoded_content . "\n";
}Step 3: Check the response from PayU
Sample response
Notes:There will be different scenarios and the response according to different scenarios:
- Repeat User Flow: If the customer’s account is linked and auto-debit is success:
- Repeat User Flow: If the customer’s account is linked and auto debit fails (eg. Customer not eligible, Failed at Payment Option’s end)
- First Time User Flow: If customer is eligible, but is not linked: This is the registration flow, where a first-time user is paying on a merchant with the specific payment option
Success scenario
- Repeat User Flow: Auto-debit Successful
This is the case where Customer’s account is liked & Auto debit is also successful
{
  "metaData": {
    "message": "No Error",
    "referenceId": "748e033af87f1bb7b6aefd405bec9473",
    "statusCode": "E000",
    "txnId": "951bccfde0ac54f75612",
    "unmappedStatus": "success",
    "submitOtp": {
      "status": "success"
    }
  },
  "result": {
    "link_and_pay": {
      "customerLinked": "true",
      "payuToken": "token12345"
    },
    "mihpayid": "18828133385",
    "mode": "BNPL",
    "status": "success",
    "key": "smsplus",
    "txnid": "951bccfde0ac54f75612",
    "amount": "2.00",
    "addedon": "2023-12-27 18:13:41",
    "productinfo": "Product Info",
    "firstname": "Ashish",
    "lastname": "",
    "address1": "",
    "address2": "",
    "city": "",
    "state": "",
    "country": "",
    "zipcode": "",
    "email": "[email protected]",
    "phone": "9123412345",
    "udf1": "",
    "udf2": "",
    "udf3": "",
    "udf4": "",
    "udf5": "",
    "udf6": "",
    "udf7": "",
    "udf8": "",
    "udf9": "",
    "udf10": "",
    "card_token": "",
    "card_no": "",
    "field0": "",
    "field1": "9582567614",
    "field2": "EMI1014338639070843702",
    "field3": "Transaction is successful",
    "field4": "bnpl",
    "field5": "VFhOMzk2MjA3ODY2",
    "field6": "TXN396207866",
    "field7": "PAYMENT_SUCCESSFUL",
    "field8": "SUCCESS",
    "field9": "Transaction is successful",
    "payment_source": "payuPureS2S",
    "PG_TYPE": "BNPL-PG",
    "error": "E000",
    "error_Message": "No Error",
    "net_amount_debit": "2.07",
    "discount": "0.00",
    "offer_key": "",
    "offer_availed": "",
    "additionalCharges": "0.07",
    "unmappedstatus": "captured",
    "hash": "3a7742e5d9284e4f43d349bf1a5ff04353a099920ced98330fab15728841b6c772f00f83163c491d8954ead0c9a1dee7af94d67ddc539ff6cb2d0246baed8148",
    "bank_ref_no": "TXN396207866",
    "bank_ref_num": "TXN396207866",
    "bankcode": "LAZYPAY",
    "surl": "https://admin.payu.in/test_response",
    "curl": "https://admin.payu.in/test_response",
    "furl": "https://admin.payu.in/test_response"
  }
}
Failure scenario
- Repeat User Flow: Auto-debit Failed
{
  "metaData": {
    "message": "The customer is not eligible for this transaction",
    "referenceId": "423fe9bfebdb2f92b8ae95a125aff397",
    "statusCode": "E2401",
    "txnId": "4223974b64f88ab4e3a1",
    "txnStatus": "failed",
    "unmappedStatus": "failure"
  },
  "result": {
    "link_and_pay": {
      "customerLinked": "true",
      "payuToken": "token12345"
    }
  }
}- Failed at Payment option’s end
{
  "metaData": {
    "message": "Transaction Failed at bank end.",
    "referenceId": "ea68a970115a9d87c6ece8d0218e6c2a",
    "statusCode": "E308",
    "txnId": "54d2d883f8e4a3fff6ba",
    "txnStatus": "failed",
    "unmappedStatus": "failure"
  },
  "result": {
    "link_and_pay": {
      "customerLinked": "true",
      "payuToken": "token12345" // can be null or "" <empty string>
    }
  }
}
Handling response
Notes:To request OTP on a page, you can utilize the URLs in the response itself. There are two URLs to use:
- otpPostUrl (Merchant Hosted OTP page)
- acsTemplate (PayU Hosted OTP page) which acts as a fallback
If you are getting a URL in otpPostUrl, use otpPostUrl, otherwise, you can use acsTemplate, which acts as a fallback. In this scenario, use PayU (or WebView or Checkout) OTP page as this is a fallback case.
Hence, for cases where the above response is not successful, it could either be Failed or Pending. In the Pending state, you can send a fallback URL (as above) which can be shown to the customer.
Step 4: Submit the OTP (for First time Flow only)
You can submit the OTP using any of the following methods:
- Capture the OTP natively on your interface
- Use fallback option to redirect to Payu page to capture OTP
Capture the OTP natively on your interface
After you have collected the OTP from the customer, the reference ID can be found in the Collect Payment API (_payment) response. Submit the OTP that is entered by the customer is submitted along with the reference ID using the Submit OTP API. For more information, refer to Submit OTP API.
Handling incorrect OTP submission
Incorrect OTP Submission is allowed 3 times in total (1 + 2 retries), post which the transaction fails. Scenarios are described as follows:
Note: If the customer enters the incorrect OTP or OTP has expired, you need to resend the OTP to the customer using the Resend OTP API and then submit using the Submit OTP API. For more information, refer to Collect Payments with BNPL-Merchant Hosted Checkout
- Case 1: With 1st Incorrect retry OTP attempt
{
    "metaData": {
        "message": "Unauthorized",
        "referenceId": "ac2155676982514fd2e3199e83a9c9ec",
        "txnId": "ad5a54b6af3e52ab24d6",
        "unmappedStatus": "in progress",
        "submitOtp": {
            "status": "in progress",
            "retryAttemptCount": "2"
        }
    },
    "result": null
}
- Case 2: With 2nd Incorrect retry OTP attempt
{
    "metaData": {
        "message": "Unauthorized",
        "referenceId": "ac2155676982514fd2e3199e83a9c9ec",
        "txnId": "ad5a54b6af3e52ab24d6",
        "unmappedStatus": "in progress",
        "submitOtp": {
            "status": "in progress",
            "retryAttemptCount": "1"
        }
    },
    "result": null
}
Note: The driving factor here is retryAttemptCount. In case 1, retryAttemptCount was 2, whereas it is 1 in case 2.
Reference: If your customer fails to authorize the payment due to incorrect OTP submission or the OTP was submitted after OTP had expired, they can request another OTP based on the number of retry attempts remaining using the Resend OTP API. For more information, refer to Resend OTP API.
Step 5: Verify the payment
Upon receiving the response, we recommend performing a reconciliation step to validate all transaction details.
You can verify your payments using either of the following methods:
Updated 3 months ago