UPI Bolt UI SDK Integration -Capacitor-Ionic
Merchants who want to integrate only PayU UPI Bolt with their app. They can manage the checkout options on their checkout screen. Although they can use PayU UPI Bolt UI SDK for customer registration, payment, and profile management.
Steps to Integrate PayU Bolt SDK
Prerequisites
Supported iOS deployment target - iOS 17 and above.
To include the PayU UPI Bolt UI SDK in your project, add the following dependency to your package.json file:
UAT:
npm add [email protected]PRODUCTION:
npm add [email protected]Ensure that the application's minimum development target is set to version 13 or higher.
iOS Integration
To include the PayU UPI Bolt UI SDK in your project, add the following code snippet to your podfile.
Supported iOS deployment target - iOS 17 and above.
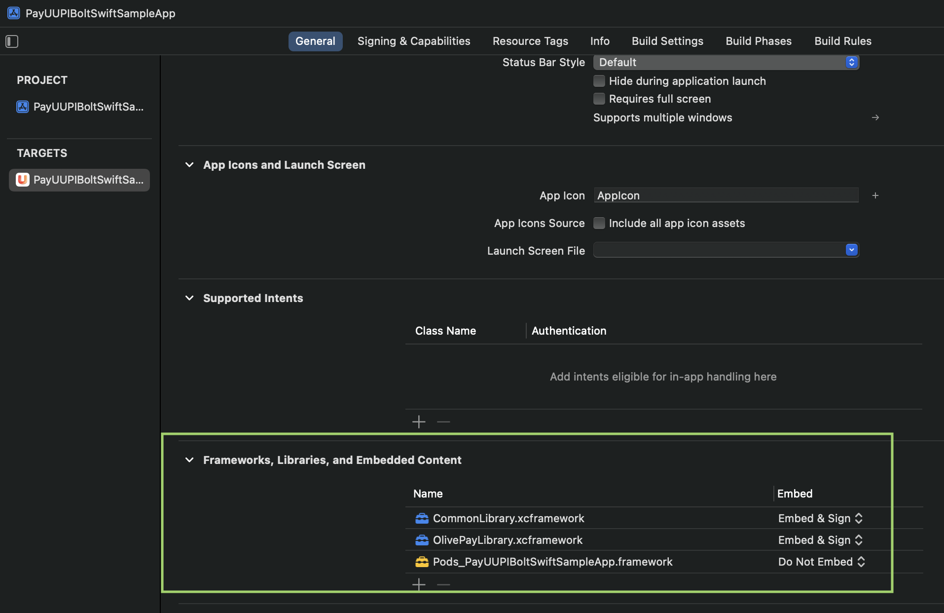
The following xcframework files will be provided by PayU during onboarding:
- NPCI - CommonLibrary.xcframework
- AXIS - OlivePayLibrary.xcframework
Add these framework in your project. The added framework is similar to the following screeshot:
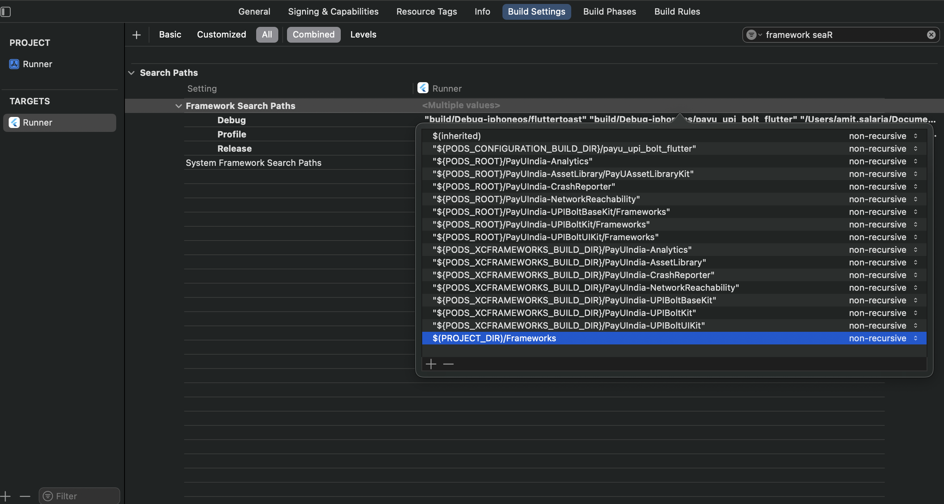
In Build Settings > Framework Search Path, add $(PROJECT_DIR)/Frameworks if it is not added automatically by Xcode.
Also, add the following dependency to the podfile of your Xcode app if not exists.
UAT:
pod 'PayUIndia-UPIBoltCoreKit', '3.0.0-alpha.1'PRODUCTION:
pod 'PayUIndia-UPIBoltCoreKit', '1.1.0'Android Integration
Add the following permissions in your AndroidManifest file.
<uses-permission android:name="android.permission.SEND_SMS"/>
<uses-permission android:name="android.permission.ACCESS_NETWORK_STATE" />
<uses-permission android:name="android.permission.INTERNET" />
<uses-permission android:name="android.permission.READ_PHONE_STATE" />
<uses-permission android:name="android.permission.READ_PHONE_NUMBERS" />
<uses-permission android:name="android.permission.ACCESS_COARSE_LOCATION" />
<uses-permission android:name="android.permission.ACCESS_FINE_LOCATION" />
UAT:
implementation 'in.payu:payu-upi-bolt-core-sdk:0.0.6-SNAPSHOT'Project-level build.gradle :
allprojects {
 repositories {
        maven {url "https://central.sonatype.com/repository/maven-snapshots/"}
   }
}
PRODUCTION:
implementation 'in.payu:payu-upi-bolt-core-sdk:0.0.5’Add the following dependency in the build.gradle file of your android app module:
implementation(files('libs/SecureComponent-release-prod_05062024_9d3904ab.aar'))Add the given aar file in the libs folder of your android app module:
<your_project>/android/app/libs/SecureComponent-release-prod_05062024_9d3904ab.aarStep 1: Initialize SDK
Import the Plugin
import { PayUUPIBoltUICapacitorPlugin } from 'payu-upi-bolt-ui-capacitor';Configuration Parameters
| Parameter | Description |
|---|---|
merchantNamemandatory
|
StringMerchant's name. |
merchantKeymandatory
|
StringMerchant key provided by PayU. |
phonemandatory
|
StringCustomer's phone number for registration. |
emailmandatory
|
StringCustomer email address. |
refIdmandatory
|
StringUnique reference ID for tracking the transaction. |
pluginTypesmandatory
|
Array<String>Supported plugin types (e.g., AXIS, HDFC, BHIM). |
clientIdmandatory
|
StringUnique client ID. |
issuingBanksoptional
|
Array<String>List of issuing banks supported (e.g., AXIS or HDFC). |
excludedBanksIINsoptional
|
Array<String>List of banks to exclude using IIN values. |
isProductionmandatory
|
BooleanEnvironment configuration: true for production, false for staging. |
Sample Code
const config = {
  merchantName: "<merchantName>",
  merchantKey: "<merchantKey>",
  phone: "<phone>",
  email: "<email>",
  refId: "<refId>",
  pluginTypes: ["<pluginType>"],
  clientId: "<clientId>",
  issuingBanks: ["<issuingBanks>"],
  excludedBanksIINs: ["<excludedBanksIIN>"],
  isProduction: <isProduction>,
};

// Initialize the SDK
PayUUPIBoltUICapacitorPlugin.initSDK({ config: JSON.stringify(config) });

// Clear SDK Instance
PayUUPIBoltUICapacitorPlugin.reset();
Step 2: Clear SDK Cache
PayUUPIBoltUICapacitorPlugin.clearCache({ pg: "<pg>" });Request Parameters
| Parameter | Description |
|---|---|
pgmandatory
|
StringPG value to check pg specific registration status |
Plugin Registration Status
PayUUPIBoltUICapacitorPlugin.isRegistered({ pg: "<pg>" });Request Parameters
| Parameter | Description |
|---|---|
pgmandatory
|
StringPG value to check pg specific registration status |
Step 3:isUPIBoltEnabled
This method is used to check whether the upi bolt is enabled for the merchant or not.
PayUUPIBoltUICapacitorPlugin.isUPIBoltEnabled();Step 4: Register and Pay
Payment Parameters
| Parameter | Description |
|---|---|
amountmandatory
|
StringTransaction amount. |
productInfomandatory
|
StringInformation about the product or service. |
firstNamemandatory
|
StringCustomer's first name. |
surlmandatory
|
StringAndroid success URL. |
furlmandatory
|
StringAndroid failure URL. |
ios_surlmandatory
|
StringiOS success URL. |
ios_furlmandatory
|
StringiOS failure URL. |
initiationModemandatory
|
StringMode of initiation (e.g., "10"). |
purposemandatory
|
StringPurpose code (e.g., "00"). |
txnIdmandatory
|
StringUnique transaction ID. |
udf1 - udf6optional
|
AnyUser-defined fields for additional transaction metadata. |
isCCTxnEnabledoptional
|
BooleanEnables card fallback if supported – true or false. |
Sample Code
const paymentParams = {
  amount: "<amount>",
  productInfo: "<productInfo>",
  firstName: "<firstName>",
  surl: "<successUrl>",
  furl: "<failureUrl>",
  ios_surl: "<iosSuccessUrl>",
  ios_furl: "<iosFailureUrl>",
  initiationMode: "<initiationMode>",
  purpose: "<purpose>",
  txnId: "<txnId>",
  isCCTxnEnabled: <trueOrFalse>,
};

PayUUPIBoltUICapacitorPlugin.registerAndPay({ paymentParams: JSON.stringify(paymentParams)});
Step 5: UPI Management
PayUUPIBoltUICapacitorPlugin.openUPIManagement({ screenType: "<screenType>" });Request Parameters
| Parameter | Description |
|---|---|
screenTypemandatory
|
StringSpecifies the type of management screen. Valid values: • ALL • TRANSACTIONHISTORY • MANAGEUPIACCOUNTS • DISPUTE • DEREGISTERUPI |
Step 6 : Listener Implementation
The listener/callback contains following methods where the merchant app will get the API response and hash-related callbacks.
Setup Event Listeners
useEffect(() => {
// List of listener registrations
const listeners: { remove: () => void }[] = [];

// Helper to register and store listeners
const addListener = (eventName: string, handler: (data: any) => void) => {
  const listener = Plugins.PayUUPIBoltUICapacitorPlugin.addListener(eventName, handler);
  listeners.push(listener);
};

// Event: generateHash - handled separately
addListener('generateHash', handleHashGeneration);

// Common handler for other events - just alert JSON response
const alertHandler = (data: any) => {
  presentAlert(JSON.stringify(data));
};

// Register all event listeners using the shared alert handler
addListener('onPayUSuccess', alertHandler);
addListener('onPayUCancel', alertHandler);
addListener('onPayUFailure', alertHandler);
addListener('reset', alertHandler);
addListener('clearCache', alertHandler);
addListener('isRegistered', alertHandler);
addListener('isUPIBoltEnabled', alertHandler);

// Cleanup all listeners on component unmount
return () => {
  listeners.forEach(listener => listener.remove());
};
}, []);
Step 7: Hash Generation
The PayU SDKs use hashes to ensure the security of the transaction and prevent any unauthorized intrusion or modification.
For generating and passing dynamic hashes, the merchant will receive a call from the generateHash method of PayUUPIBoltUiListener. The generateHash() method is called by the SDK each time it needs an individual hash.
Hash Parameters
| Parameter | Description |
|---|---|
hashStringmandatory
|
StringString to be signed dynamically. |
hashNamemandatory
|
StringIndicates the type of hash. |
postSaltoptional
|
StringAdditional salt that can be appended to the hash if provided. |
Sample Code
const handleHashGeneration = async (map) => {
  const hashData = map.hashString;
  const hashName = map.hashName;
  // Fetch hash from your server
  const hash = <fetch_hash_from_server>;
  const hashMap = {
    hashName: hashName,
    [hashName]: hash
  };
  PayUUPIBoltUICapacitorPlugin.hashGenerated({ hashData: JSON.stringify(hashMap) });
};
Error Codes and Messages
Response Codes
| Code | Message |
|---|---|
| 0 | Success |
| 1 | Fail / Invalid Response / Missing params |
| 2 | User cancelled the transaction |
| 100 | Transaction timeout |
| 103 | Handshake failed |
| 104 | UPI bolt not supported |
| 105 | Device not supported for UPI Bolt |
| 500 | Something went wrong |
| 501 | No internet connection |
| 502 | SDK not found |
SMS Hash Generation for Android OTP Auto-Read
To enable OTP auto-read functionality on Android, you need to generate an SMS hash for your application. Copy the following AppSignatureHelper class to your Android project:
Sample Code to Enable OTP auto-read functionality on Android
package com.payu.upipluginsampleapp;

import android.content.Context;
import android.content.ContextWrapper;
import android.content.pm.PackageManager;
import android.content.pm.Signature;
import android.util.Base64;
import android.util.Log;

import java.nio.charset.StandardCharsets;
import java.security.MessageDigest;
import java.security.NoSuchAlgorithmException;
import java.util.ArrayList;
import java.util.Arrays;

public class AppSignatureHelper extends ContextWrapper {
    public static final String TAG = AppSignatureHelper.class.getSimpleName();

    private static final String HASH_TYPE = "SHA-256";
    public static final int NUM_HASHED_BYTES = 9;
    public static final int NUM_BASE64_CHAR = 11;

    public AppSignatureHelper(Context context) {
        super(context);
    }

    /**
     * Get all the app signatures for the current package
     * @return ArrayList of app signatures
     */
    public ArrayList<String> getAppSignatures() {
        ArrayList<String> appCodes = new ArrayList<>();

        try {
            String packageName = getPackageName();
            PackageManager packageManager = getPackageManager();
            Signature[] signatures = packageManager.getPackageInfo(packageName,
                    PackageManager.GET_SIGNATURES).signatures;

            for (Signature signature : signatures) {
                String hash = hash(packageName, signature.toCharsString());
                if (hash != null) {
                    appCodes.add(String.format("%s", hash));
                }
            }
        } catch (PackageManager.NameNotFoundException e) {
            Log.e(TAG, "Unable to find package to obtain hash.", e);
        }
        return appCodes;
    }

    private static String hash(String packageName, String signature) {
        String appInfo = packageName + " " + signature;
        try {
            MessageDigest messageDigest = MessageDigest.getInstance(HASH_TYPE);
            messageDigest.update(appInfo.getBytes(StandardCharsets.UTF_8));
            byte[] hashSignature = messageDigest.digest();

            // truncated into NUM_HASHED_BYTES
            hashSignature = Arrays.copyOfRange(hashSignature, 0, NUM_HASHED_BYTES);
            // encode into Base64
            String base64Hash = Base64.encodeToString(hashSignature, Base64.NO_PADDING | Base64.NO_WRAP);
            base64Hash = base64Hash.substring(0, NUM_BASE64_CHAR);

            Log.d(TAG, String.format("pkg: %s -- hash: %s", packageName, base64Hash));
            return base64Hash;
        } catch (NoSuchAlgorithmException e) {
            Log.e(TAG, "hash:NoSuchAlgorithm", e);
        }
        return null;
    }
}
Usage Example
// In your Android activity or application class
AppSignatureHelper appSignatureHelper = new AppSignatureHelper(this);
ArrayList<String> appSignatures = appSignatureHelper.getAppSignatures();

// Share the generated hash with PayU for configuration
for (String signature : appSignatures) {
    Log.d("SMS_HASH", "App Signature: " + signature);
}Note: Share the generated SMS hash with PayU team for configuration to enable OTP auto-read functionality.
Updated 9 days ago