Customize PayU Payment Page
After you complete PayU Hosted Checkout integration, you will be able to see the PayU Payment page similar to the following screenshot when calling the Collect Payment API:
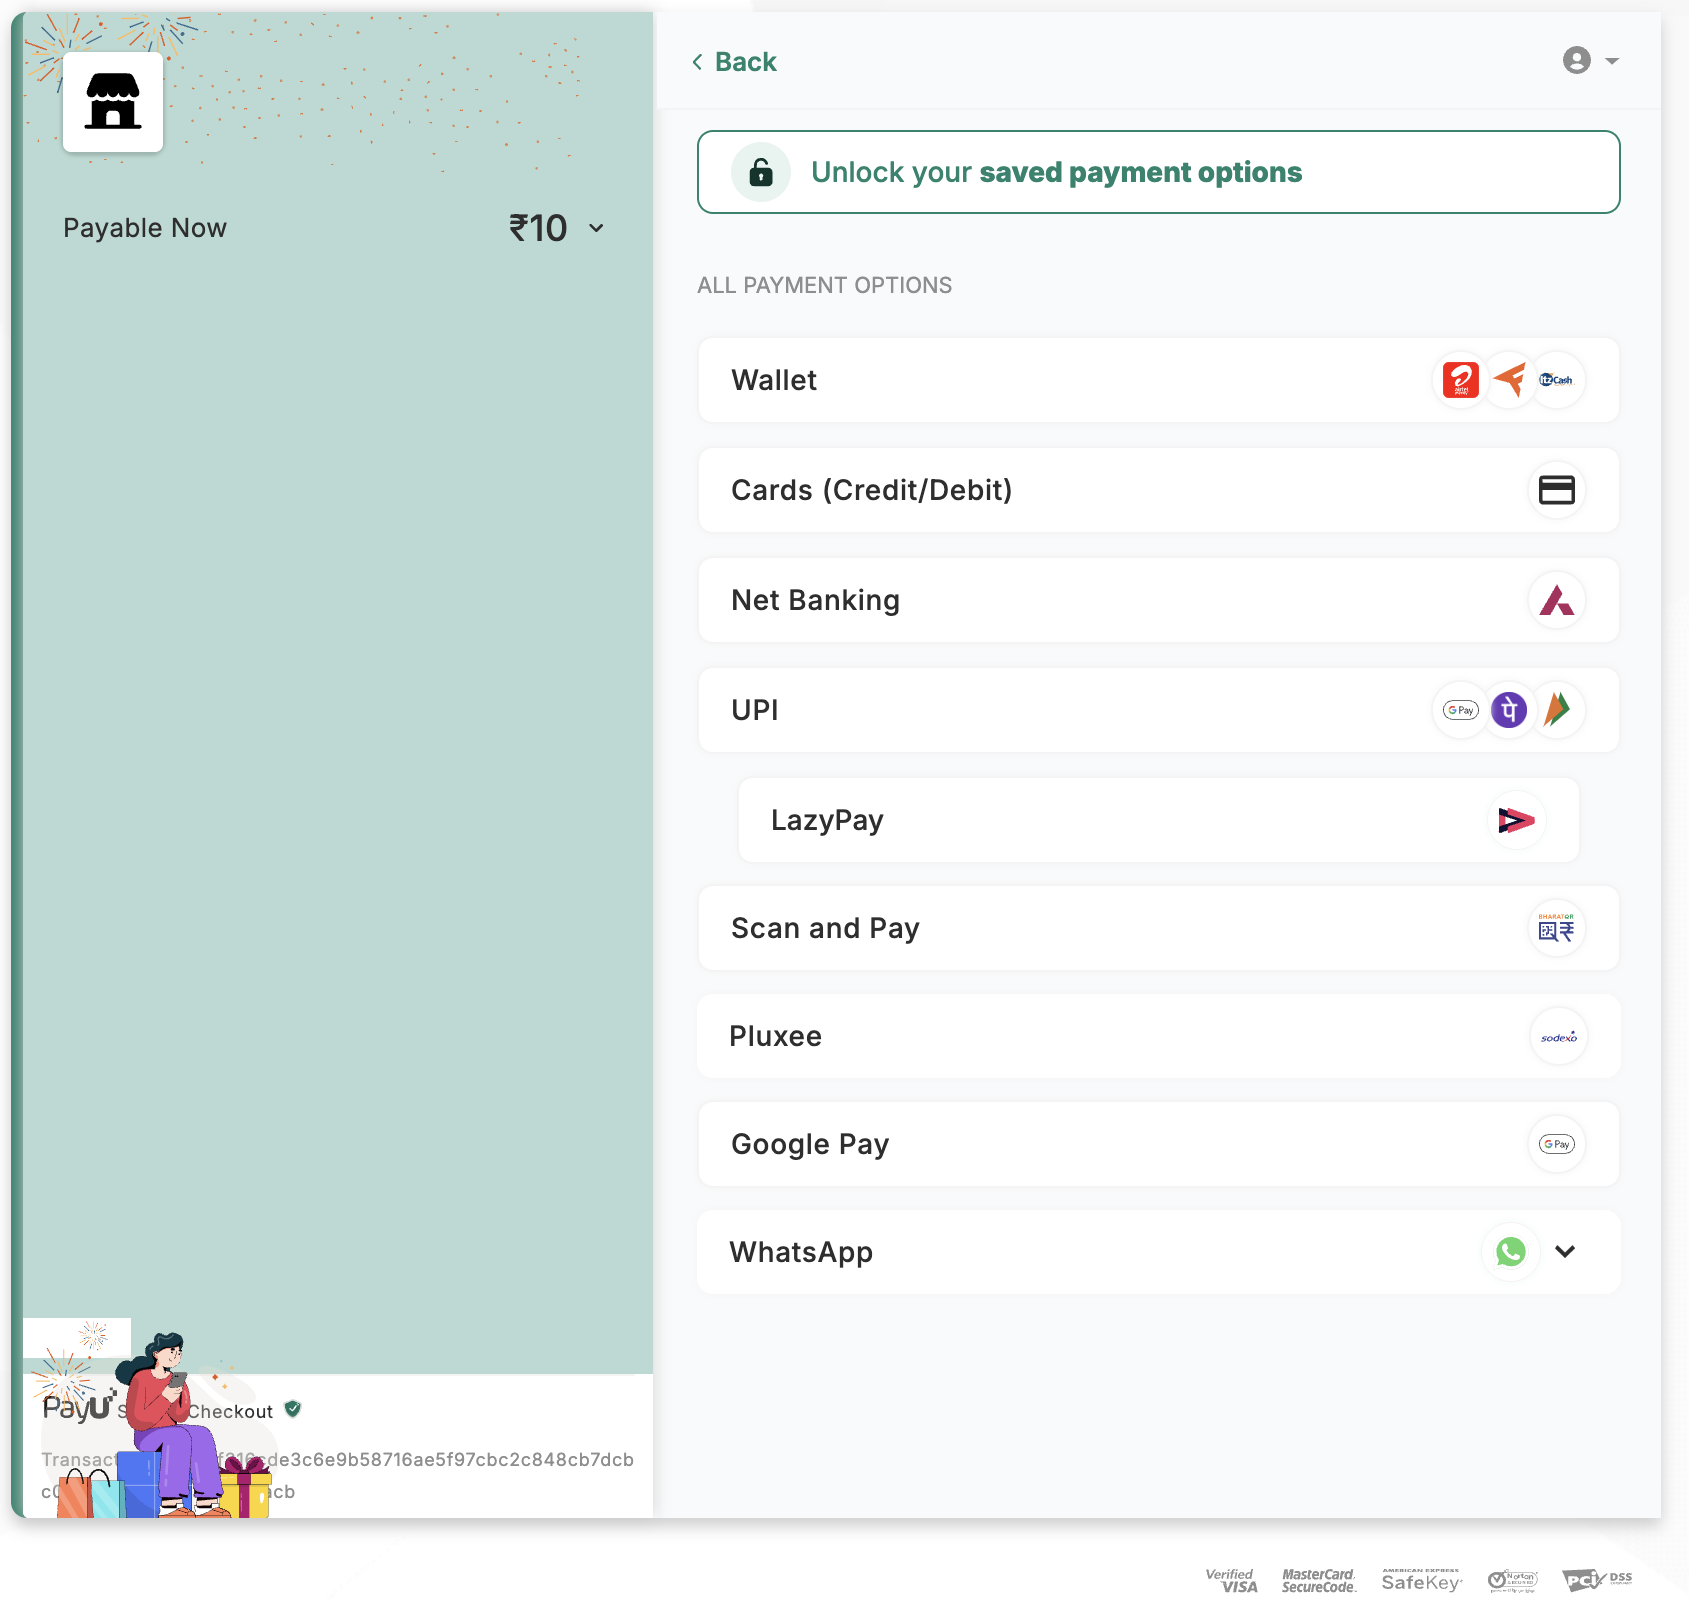
You can customize the following in the Checkout page:
- Enforce Pay Method or Remove Category
- Change the Language
- Configure Payment Method and Checkout Settings
Enforce Pay Method or Remove Category
Note: Before implementing on your Production environment, PayU strongly recommends you to enforce the payment parameters described in this section on the Test environment.
You can append the parameter names in your transaction request to opt for all or some of the payment modes.
Enforce payment customization
Parameter name: enforce_paymethod
This parameter allows you to customize the payment options for each transaction. You can enforce specific payment modes, cards scheme, and specific banks under Net Banking using this method.
You need to include the necessary payment options in this parameter and POST them to PayU at the transaction time. All the categories and sub-categories have specific values that need to be included in this string.
The categories and sub-categories are as follows:
| Category | Sub-category |
|---|---|
| Credit Card | MasterCard, Amex, Diners, etc. |
| Debit Card | Visa, MasterCard, Maestro, etc. |
| Net Banking | SBI Net Banking, HDFC Net Banking, etc |
| EMI | CITI 3 Months EMI, HFC 6 Months EMI, etc. |
| Wallet | Airtel Money, YPay, ITZ, Cash Card, etc. |
| UPI | GooglePay, PhonePe, UPI, etc. |
To enforce complete categories, use the values as described in the following table:
| Category | Value of enforce_paymethod |
|---|---|
| Credit Card | creditcard |
| Debit Card | debitcard |
| Net Banking | netbanking |
| NEFT/RTGS | neftrtgs |
| EMI | emi |
| UPI | upi |
| Wallet | cashcard |
| Sodexo | SODEXO |
| BNPL | bnpl |
| QR | qr |
To enforce sub-categories, use the respective bank codes for them. Contact PayU Support or at help.payu.in to get the respective bank codes.
Note: Ensure that you are using the delimiter as pipe (|) character between the values in these examples.
Usage examples
creditcard|debitcard
All the credit card and debit card options are displayed (as the whole category is enforced). The rest of the categories will not be displayed, that is, EMI, cash card, credit card, debit card, etc. – as they are not being mentioned in the string.
Sample request with single category
Credit Card only (creditcard)
# PayU Hosted Checkout - enforce payment method customization
curl -X POST "https://test.payu.in/_payment" \
      -H "accept: application/json" \
      -H "Content-Type: application/x-www-form-urlencoded" \
      -d "key=JP***g&txnid=ENFCC001&amount=10.00&firstname=PayU%20User&[email protected]&phone=9876543210&productinfo=iPhone&surl=https://apiplayground-response.herokuapp.com/&furl=https://apiplayground-response.herokuapp.com/&enforce_paymethod=creditcard&hash=REPLACE_WITH_GENERATED_HASH"
# Parameters include key, txnid, amount, surl, furl, hash; enforce_paymethod=creditcard
import requests
# PayU Hosted Checkout - enforce payment method customization
# PayU Hosted Checkout Collect Payment API endpoint (test environment)
url = "https://test.payu.in/_payment"
headers = {
"accept": "application/json",
"Content-Type": "application/x-www-form-urlencoded"
}
payload = {
'key': 'JP***g', # Merchant key provided by PayU
'txnid': 'ENFCC001', # Unique transaction ID generated by merchant
'amount': '10.00', # Transaction amount
'firstname': 'PayU User', # Customer first name
'email': '[email protected]', # Customer email address
'phone': '9876543210', # Customer phone number
'productinfo': 'iPhone', # Product or order description
'surl': 'https://apiplayground-response.herokuapp.com/', # Success callback URL
'furl': 'https://apiplayground-response.herokuapp.com/', # Failure callback URL
'enforce_paymethod': 'creditcard', # Enforce payment method(s): creditcard
'hash': 'REPLACE_WITH_GENERATED_HASH', # SHA-512 hash generated on server
}
response = requests.post(url, headers=headers, data=payload)
print(response.text)using System;
using System.Net.Http;
using System.Collections.Generic;
using System.Threading.Tasks;
class Program
{
static async Task Main(string[] args)
{
// PayU Hosted Checkout - enforce payment method customization
using var client = new HttpClient();
var url = "https://test.payu.in/_payment";
client.DefaultRequestHeaders.Add("accept", "application/json");
var payload = new Dictionary<string, string>
{
{ "key", "JP***g" }, // Merchant key provided by PayU
{ "txnid", "ENFCC001" }, // Unique transaction ID generated by merchant
{ "amount", "10.00" }, // Transaction amount
{ "firstname", "PayU User" }, // Customer first name
{ "email", "[email protected]" }, // Customer email address
{ "phone", "9876543210" }, // Customer phone number
{ "productinfo", "iPhone" }, // Product or order description
{ "surl", "https://apiplayground-response.herokuapp.com/" }, // Success callback URL
{ "furl", "https://apiplayground-response.herokuapp.com/" }, // Failure callback URL
{ "enforce_paymethod", "creditcard" }, // Enforce payment method(s): creditcard
{ "hash", "REPLACE_WITH_GENERATED_HASH" }, // SHA-512 hash generated on server
};
var content = new FormUrlEncodedContent(payload);
var response = await client.PostAsync(url, content);
var result = await response.Content.ReadAsStringAsync();
Console.WriteLine(result);
}
}const axios = require('axios');
const qs = require('querystring');
// PayU Hosted Checkout - enforce payment method customization
// PayU Hosted Checkout Collect Payment API endpoint (test environment)
const url = 'https://test.payu.in/_payment';
const headers = {
'accept': 'application/json',
'Content-Type': 'application/x-www-form-urlencoded'
};
const payload = {
'key': 'JP***g', // Merchant key provided by PayU
'txnid': 'ENFCC001', // Unique transaction ID generated by merchant
'amount': '10.00', // Transaction amount
'firstname': 'PayU User', // Customer first name
'email': '[email protected]', // Customer email address
'phone': '9876543210', // Customer phone number
'productinfo': 'iPhone', // Product or order description
'surl': 'https://apiplayground-response.herokuapp.com/', // Success callback URL
'furl': 'https://apiplayground-response.herokuapp.com/', // Failure callback URL
'enforce_paymethod': 'creditcard', // Enforce payment method(s): creditcard
'hash': 'REPLACE_WITH_GENERATED_HASH' // SHA-512 hash generated on server
};
axios.post(url, qs.stringify(payload), { headers: headers })
.then(response => {
console.log(response.data);
})
.catch(error => {
console.error(error);
});import java.io.*;
import java.net.*;
import java.net.http.*;
public class PayUPayment {
public static void main(String[] args) throws IOException, InterruptedException {
// PayU Hosted Checkout - enforce payment method customization
HttpClient client = HttpClient.newHttpClient();
// Request body: key, txnid, amount, surl, furl, hash; enforce_paymethod=creditcard
String formData = "key=JP***g&txnid=ENFCC001&amount=10.00&firstname=PayU%20User&[email protected]&phone=9876543210&productinfo=iPhone&surl=https://apiplayground-response.herokuapp.com/&furl=https://apiplayground-response.herokuapp.com/&enforce_paymethod=creditcard&hash=REPLACE_WITH_GENERATED_HASH";
HttpRequest request = HttpRequest.newBuilder()
.uri(URI.create("https://test.payu.in/_payment"))
.header("accept", "application/json")
.header("Content-Type", "application/x-www-form-urlencoded")
.POST(HttpRequest.BodyPublishers.ofString(formData))
.build();
HttpResponse<String> response = client.send(request,
HttpResponse.BodyHandlers.ofString());
System.out.println(response.body());
}
}<?php
// PayU Hosted Checkout - enforce payment method customization
$url = 'https://test.payu.in/_payment';
$headers = array(
'accept: application/json',
'Content-Type: application/x-www-form-urlencoded'
);
$payload = array(
'key' => 'JP***g', // Merchant key provided by PayU
'txnid' => 'ENFCC001', // Unique transaction ID generated by merchant
'amount' => '10.00', // Transaction amount
'firstname' => 'PayU User', // Customer first name
'email' => '[email protected]', // Customer email address
'phone' => '9876543210', // Customer phone number
'productinfo' => 'iPhone', // Product or order description
'surl' => 'https://apiplayground-response.herokuapp.com/', // Success callback URL
'furl' => 'https://apiplayground-response.herokuapp.com/', // Failure callback URL
'enforce_paymethod' => 'creditcard', // Enforce payment method(s): creditcard
'hash' => 'REPLACE_WITH_GENERATED_HASH' // SHA-512 hash generated on server
);
$ch = curl_init();
curl_setopt($ch, CURLOPT_URL, $url);
curl_setopt($ch, CURLOPT_POST, 1);
curl_setopt($ch, CURLOPT_POSTFIELDS, http_build_query($payload));
curl_setopt($ch, CURLOPT_HTTPHEADER, $headers);
curl_setopt($ch, CURLOPT_RETURNTRANSFER, true);
$response = curl_exec($ch);
curl_close($ch);
echo $response;
?>use strict;
use warnings;
use LWP::UserAgent;
use HTTP::Request::Common;
# PayU Hosted Checkout - enforce payment method customization
my $url = 'https://test.payu.in/_payment';
my $ua = LWP::UserAgent->new;
my %payload = (
key => 'JP***g', # Merchant key provided by PayU
txnid => 'ENFCC001', # Unique transaction ID generated by merchant
amount => '10.00', # Transaction amount
firstname => 'PayU User', # Customer first name
email => '[email protected]', # Customer email address
phone => '9876543210', # Customer phone number
productinfo => 'iPhone', # Product or order description
surl => 'https://apiplayground-response.herokuapp.com/', # Success callback URL
furl => 'https://apiplayground-response.herokuapp.com/', # Failure callback URL
enforce_paymethod => 'creditcard', # Enforce payment method(s): creditcard
hash => 'REPLACE_WITH_GENERATED_HASH' # SHA-512 hash generated on server
);
my $response = $ua->post(
$url,
'accept' => 'application/json',
'Content-Type' => 'application/x-www-form-urlencoded',
Content => \%payload
);
print $response->content;Debit Card only (debitcard)
# PayU Hosted Checkout - enforce payment method customization
curl -X POST "https://test.payu.in/_payment" \
      -H "accept: application/json" \
      -H "Content-Type: application/x-www-form-urlencoded" \
      -d "key=JP***g&txnid=ENFDC001&amount=10.00&firstname=PayU%20User&[email protected]&phone=9876543210&productinfo=iPhone&surl=https://apiplayground-response.herokuapp.com/&furl=https://apiplayground-response.herokuapp.com/&enforce_paymethod=debitcard&hash=REPLACE_WITH_GENERATED_HASH"
# Parameters include key, txnid, amount, surl, furl, hash; enforce_paymethod=debitcard
import requests
# PayU Hosted Checkout - enforce payment method customization
# PayU Hosted Checkout Collect Payment API endpoint (test environment)
url = "https://test.payu.in/_payment"
headers = {
"accept": "application/json",
"Content-Type": "application/x-www-form-urlencoded"
}
payload = {
'key': 'JP***g', # Merchant key provided by PayU
'txnid': 'ENFDC001', # Unique transaction ID generated by merchant
'amount': '10.00', # Transaction amount
'firstname': 'PayU User', # Customer first name
'email': '[email protected]', # Customer email address
'phone': '9876543210', # Customer phone number
'productinfo': 'iPhone', # Product or order description
'surl': 'https://apiplayground-response.herokuapp.com/', # Success callback URL
'furl': 'https://apiplayground-response.herokuapp.com/', # Failure callback URL
'enforce_paymethod': 'debitcard', # Enforce payment method(s): debitcard
'hash': 'REPLACE_WITH_GENERATED_HASH', # SHA-512 hash generated on server
}
response = requests.post(url, headers=headers, data=payload)
print(response.text)using System;
using System.Net.Http;
using System.Collections.Generic;
using System.Threading.Tasks;
class Program
{
static async Task Main(string[] args)
{
// PayU Hosted Checkout - enforce payment method customization
using var client = new HttpClient();
var url = "https://test.payu.in/_payment";
client.DefaultRequestHeaders.Add("accept", "application/json");
var payload = new Dictionary<string, string>
{
{ "key", "JP***g" }, // Merchant key provided by PayU
{ "txnid", "ENFDC001" }, // Unique transaction ID generated by merchant
{ "amount", "10.00" }, // Transaction amount
{ "firstname", "PayU User" }, // Customer first name
{ "email", "[email protected]" }, // Customer email address
{ "phone", "9876543210" }, // Customer phone number
{ "productinfo", "iPhone" }, // Product or order description
{ "surl", "https://apiplayground-response.herokuapp.com/" }, // Success callback URL
{ "furl", "https://apiplayground-response.herokuapp.com/" }, // Failure callback URL
{ "enforce_paymethod", "debitcard" }, // Enforce payment method(s): debitcard
{ "hash", "REPLACE_WITH_GENERATED_HASH" }, // SHA-512 hash generated on server
};
var content = new FormUrlEncodedContent(payload);
var response = await client.PostAsync(url, content);
var result = await response.Content.ReadAsStringAsync();
Console.WriteLine(result);
}
}const axios = require('axios');
const qs = require('querystring');
// PayU Hosted Checkout - enforce payment method customization
// PayU Hosted Checkout Collect Payment API endpoint (test environment)
const url = 'https://test.payu.in/_payment';
const headers = {
'accept': 'application/json',
'Content-Type': 'application/x-www-form-urlencoded'
};
const payload = {
'key': 'JP***g', // Merchant key provided by PayU
'txnid': 'ENFDC001', // Unique transaction ID generated by merchant
'amount': '10.00', // Transaction amount
'firstname': 'PayU User', // Customer first name
'email': '[email protected]', // Customer email address
'phone': '9876543210', // Customer phone number
'productinfo': 'iPhone', // Product or order description
'surl': 'https://apiplayground-response.herokuapp.com/', // Success callback URL
'furl': 'https://apiplayground-response.herokuapp.com/', // Failure callback URL
'enforce_paymethod': 'debitcard', // Enforce payment method(s): debitcard
'hash': 'REPLACE_WITH_GENERATED_HASH' // SHA-512 hash generated on server
};
axios.post(url, qs.stringify(payload), { headers: headers })
.then(response => {
console.log(response.data);
})
.catch(error => {
console.error(error);
});import java.io.*;
import java.net.*;
import java.net.http.*;
public class PayUPayment {
public static void main(String[] args) throws IOException, InterruptedException {
// PayU Hosted Checkout - enforce payment method customization
HttpClient client = HttpClient.newHttpClient();
// Request body: key, txnid, amount, surl, furl, hash; enforce_paymethod=debitcard
String formData = "key=JP***g&txnid=ENFDC001&amount=10.00&firstname=PayU%20User&[email protected]&phone=9876543210&productinfo=iPhone&surl=https://apiplayground-response.herokuapp.com/&furl=https://apiplayground-response.herokuapp.com/&enforce_paymethod=debitcard&hash=REPLACE_WITH_GENERATED_HASH";
HttpRequest request = HttpRequest.newBuilder()
.uri(URI.create("https://test.payu.in/_payment"))
.header("accept", "application/json")
.header("Content-Type", "application/x-www-form-urlencoded")
.POST(HttpRequest.BodyPublishers.ofString(formData))
.build();
HttpResponse<String> response = client.send(request,
HttpResponse.BodyHandlers.ofString());
System.out.println(response.body());
}
}<?php
// PayU Hosted Checkout - enforce payment method customization
$url = 'https://test.payu.in/_payment';
$headers = array(
'accept: application/json',
'Content-Type: application/x-www-form-urlencoded'
);
$payload = array(
'key' => 'JP***g', // Merchant key provided by PayU
'txnid' => 'ENFDC001', // Unique transaction ID generated by merchant
'amount' => '10.00', // Transaction amount
'firstname' => 'PayU User', // Customer first name
'email' => '[email protected]', // Customer email address
'phone' => '9876543210', // Customer phone number
'productinfo' => 'iPhone', // Product or order description
'surl' => 'https://apiplayground-response.herokuapp.com/', // Success callback URL
'furl' => 'https://apiplayground-response.herokuapp.com/', // Failure callback URL
'enforce_paymethod' => 'debitcard', // Enforce payment method(s): debitcard
'hash' => 'REPLACE_WITH_GENERATED_HASH' // SHA-512 hash generated on server
);
$ch = curl_init();
curl_setopt($ch, CURLOPT_URL, $url);
curl_setopt($ch, CURLOPT_POST, 1);
curl_setopt($ch, CURLOPT_POSTFIELDS, http_build_query($payload));
curl_setopt($ch, CURLOPT_HTTPHEADER, $headers);
curl_setopt($ch, CURLOPT_RETURNTRANSFER, true);
$response = curl_exec($ch);
curl_close($ch);
echo $response;
?>use strict;
use warnings;
use LWP::UserAgent;
use HTTP::Request::Common;
# PayU Hosted Checkout - enforce payment method customization
my $url = 'https://test.payu.in/_payment';
my $ua = LWP::UserAgent->new;
my %payload = (
key => 'JP***g', # Merchant key provided by PayU
txnid => 'ENFDC001', # Unique transaction ID generated by merchant
amount => '10.00', # Transaction amount
firstname => 'PayU User', # Customer first name
email => '[email protected]', # Customer email address
phone => '9876543210', # Customer phone number
productinfo => 'iPhone', # Product or order description
surl => 'https://apiplayground-response.herokuapp.com/', # Success callback URL
furl => 'https://apiplayground-response.herokuapp.com/', # Failure callback URL
enforce_paymethod => 'debitcard', # Enforce payment method(s): debitcard
hash => 'REPLACE_WITH_GENERATED_HASH' # SHA-512 hash generated on server
);
my $response = $ua->post(
$url,
'accept' => 'application/json',
'Content-Type' => 'application/x-www-form-urlencoded',
Content => \%payload
);
print $response->content;Net Banking only (netbanking)
# PayU Hosted Checkout - enforce payment method customization
curl -X POST "https://test.payu.in/_payment" \
      -H "accept: application/json" \
      -H "Content-Type: application/x-www-form-urlencoded" \
      -d "key=JP***g&txnid=ENFNB001&amount=10.00&firstname=PayU%20User&[email protected]&phone=9876543210&productinfo=iPhone&surl=https://apiplayground-response.herokuapp.com/&furl=https://apiplayground-response.herokuapp.com/&enforce_paymethod=netbanking&hash=REPLACE_WITH_GENERATED_HASH"
# Parameters include key, txnid, amount, surl, furl, hash; enforce_paymethod=netbanking
import requests
# PayU Hosted Checkout - enforce payment method customization
# PayU Hosted Checkout Collect Payment API endpoint (test environment)
url = "https://test.payu.in/_payment"
headers = {
"accept": "application/json",
"Content-Type": "application/x-www-form-urlencoded"
}
payload = {
'key': 'JP***g', # Merchant key provided by PayU
'txnid': 'ENFNB001', # Unique transaction ID generated by merchant
'amount': '10.00', # Transaction amount
'firstname': 'PayU User', # Customer first name
'email': '[email protected]', # Customer email address
'phone': '9876543210', # Customer phone number
'productinfo': 'iPhone', # Product or order description
'surl': 'https://apiplayground-response.herokuapp.com/', # Success callback URL
'furl': 'https://apiplayground-response.herokuapp.com/', # Failure callback URL
'enforce_paymethod': 'netbanking', # Enforce payment method(s): netbanking
'hash': 'REPLACE_WITH_GENERATED_HASH', # SHA-512 hash generated on server
}
response = requests.post(url, headers=headers, data=payload)
print(response.text)using System;
using System.Net.Http;
using System.Collections.Generic;
using System.Threading.Tasks;
class Program
{
static async Task Main(string[] args)
{
// PayU Hosted Checkout - enforce payment method customization
using var client = new HttpClient();
var url = "https://test.payu.in/_payment";
client.DefaultRequestHeaders.Add("accept", "application/json");
var payload = new Dictionary<string, string>
{
{ "key", "JP***g" }, // Merchant key provided by PayU
{ "txnid", "ENFNB001" }, // Unique transaction ID generated by merchant
{ "amount", "10.00" }, // Transaction amount
{ "firstname", "PayU User" }, // Customer first name
{ "email", "[email protected]" }, // Customer email address
{ "phone", "9876543210" }, // Customer phone number
{ "productinfo", "iPhone" }, // Product or order description
{ "surl", "https://apiplayground-response.herokuapp.com/" }, // Success callback URL
{ "furl", "https://apiplayground-response.herokuapp.com/" }, // Failure callback URL
{ "enforce_paymethod", "netbanking" }, // Enforce payment method(s): netbanking
{ "hash", "REPLACE_WITH_GENERATED_HASH" }, // SHA-512 hash generated on server
};
var content = new FormUrlEncodedContent(payload);
var response = await client.PostAsync(url, content);
var result = await response.Content.ReadAsStringAsync();
Console.WriteLine(result);
}
}const axios = require('axios');
const qs = require('querystring');
// PayU Hosted Checkout - enforce payment method customization
// PayU Hosted Checkout Collect Payment API endpoint (test environment)
const url = 'https://test.payu.in/_payment';
const headers = {
'accept': 'application/json',
'Content-Type': 'application/x-www-form-urlencoded'
};
const payload = {
'key': 'JP***g', // Merchant key provided by PayU
'txnid': 'ENFNB001', // Unique transaction ID generated by merchant
'amount': '10.00', // Transaction amount
'firstname': 'PayU User', // Customer first name
'email': '[email protected]', // Customer email address
'phone': '9876543210', // Customer phone number
'productinfo': 'iPhone', // Product or order description
'surl': 'https://apiplayground-response.herokuapp.com/', // Success callback URL
'furl': 'https://apiplayground-response.herokuapp.com/', // Failure callback URL
'enforce_paymethod': 'netbanking', // Enforce payment method(s): netbanking
'hash': 'REPLACE_WITH_GENERATED_HASH' // SHA-512 hash generated on server
};
axios.post(url, qs.stringify(payload), { headers: headers })
.then(response => {
console.log(response.data);
})
.catch(error => {
console.error(error);
});import java.io.*;
import java.net.*;
import java.net.http.*;
public class PayUPayment {
public static void main(String[] args) throws IOException, InterruptedException {
// PayU Hosted Checkout - enforce payment method customization
HttpClient client = HttpClient.newHttpClient();
// Request body: key, txnid, amount, surl, furl, hash; enforce_paymethod=netbanking
String formData = "key=JP***g&txnid=ENFNB001&amount=10.00&firstname=PayU%20User&[email protected]&phone=9876543210&productinfo=iPhone&surl=https://apiplayground-response.herokuapp.com/&furl=https://apiplayground-response.herokuapp.com/&enforce_paymethod=netbanking&hash=REPLACE_WITH_GENERATED_HASH";
HttpRequest request = HttpRequest.newBuilder()
.uri(URI.create("https://test.payu.in/_payment"))
.header("accept", "application/json")
.header("Content-Type", "application/x-www-form-urlencoded")
.POST(HttpRequest.BodyPublishers.ofString(formData))
.build();
HttpResponse<String> response = client.send(request,
HttpResponse.BodyHandlers.ofString());
System.out.println(response.body());
}
}<?php
// PayU Hosted Checkout - enforce payment method customization
$url = 'https://test.payu.in/_payment';
$headers = array(
'accept: application/json',
'Content-Type: application/x-www-form-urlencoded'
);
$payload = array(
'key' => 'JP***g', // Merchant key provided by PayU
'txnid' => 'ENFNB001', // Unique transaction ID generated by merchant
'amount' => '10.00', // Transaction amount
'firstname' => 'PayU User', // Customer first name
'email' => '[email protected]', // Customer email address
'phone' => '9876543210', // Customer phone number
'productinfo' => 'iPhone', // Product or order description
'surl' => 'https://apiplayground-response.herokuapp.com/', // Success callback URL
'furl' => 'https://apiplayground-response.herokuapp.com/', // Failure callback URL
'enforce_paymethod' => 'netbanking', // Enforce payment method(s): netbanking
'hash' => 'REPLACE_WITH_GENERATED_HASH' // SHA-512 hash generated on server
);
$ch = curl_init();
curl_setopt($ch, CURLOPT_URL, $url);
curl_setopt($ch, CURLOPT_POST, 1);
curl_setopt($ch, CURLOPT_POSTFIELDS, http_build_query($payload));
curl_setopt($ch, CURLOPT_HTTPHEADER, $headers);
curl_setopt($ch, CURLOPT_RETURNTRANSFER, true);
$response = curl_exec($ch);
curl_close($ch);
echo $response;
?>use strict;
use warnings;
use LWP::UserAgent;
use HTTP::Request::Common;
# PayU Hosted Checkout - enforce payment method customization
my $url = 'https://test.payu.in/_payment';
my $ua = LWP::UserAgent->new;
my %payload = (
key => 'JP***g', # Merchant key provided by PayU
txnid => 'ENFNB001', # Unique transaction ID generated by merchant
amount => '10.00', # Transaction amount
firstname => 'PayU User', # Customer first name
email => '[email protected]', # Customer email address
phone => '9876543210', # Customer phone number
productinfo => 'iPhone', # Product or order description
surl => 'https://apiplayground-response.herokuapp.com/', # Success callback URL
furl => 'https://apiplayground-response.herokuapp.com/', # Failure callback URL
enforce_paymethod => 'netbanking', # Enforce payment method(s): netbanking
hash => 'REPLACE_WITH_GENERATED_HASH' # SHA-512 hash generated on server
);
my $response = $ua->post(
$url,
'accept' => 'application/json',
'Content-Type' => 'application/x-www-form-urlencoded',
Content => \%payload
);
print $response->content;NEFT/RTGS only (neftrtgs)
# PayU Hosted Checkout - enforce payment method customization
curl -X POST "https://test.payu.in/_payment" \
      -H "accept: application/json" \
      -H "Content-Type: application/x-www-form-urlencoded" \
      -d "key=JP***g&txnid=ENFNEFT001&amount=10.00&firstname=PayU%20User&[email protected]&phone=9876543210&productinfo=iPhone&surl=https://apiplayground-response.herokuapp.com/&furl=https://apiplayground-response.herokuapp.com/&enforce_paymethod=neftrtgs&hash=REPLACE_WITH_GENERATED_HASH"
# Parameters include key, txnid, amount, surl, furl, hash; enforce_paymethod=neftrtgs
import requests
# PayU Hosted Checkout - enforce payment method customization
# PayU Hosted Checkout Collect Payment API endpoint (test environment)
url = "https://test.payu.in/_payment"
headers = {
"accept": "application/json",
"Content-Type": "application/x-www-form-urlencoded"
}
payload = {
'key': 'JP***g', # Merchant key provided by PayU
'txnid': 'ENFNEFT001', # Unique transaction ID generated by merchant
'amount': '10.00', # Transaction amount
'firstname': 'PayU User', # Customer first name
'email': '[email protected]', # Customer email address
'phone': '9876543210', # Customer phone number
'productinfo': 'iPhone', # Product or order description
'surl': 'https://apiplayground-response.herokuapp.com/', # Success callback URL
'furl': 'https://apiplayground-response.herokuapp.com/', # Failure callback URL
'enforce_paymethod': 'neftrtgs', # Enforce payment method(s): neftrtgs
'hash': 'REPLACE_WITH_GENERATED_HASH', # SHA-512 hash generated on server
}
response = requests.post(url, headers=headers, data=payload)
print(response.text)using System;
using System.Net.Http;
using System.Collections.Generic;
using System.Threading.Tasks;
class Program
{
static async Task Main(string[] args)
{
// PayU Hosted Checkout - enforce payment method customization
using var client = new HttpClient();
var url = "https://test.payu.in/_payment";
client.DefaultRequestHeaders.Add("accept", "application/json");
var payload = new Dictionary<string, string>
{
{ "key", "JP***g" }, // Merchant key provided by PayU
{ "txnid", "ENFNEFT001" }, // Unique transaction ID generated by merchant
{ "amount", "10.00" }, // Transaction amount
{ "firstname", "PayU User" }, // Customer first name
{ "email", "[email protected]" }, // Customer email address
{ "phone", "9876543210" }, // Customer phone number
{ "productinfo", "iPhone" }, // Product or order description
{ "surl", "https://apiplayground-response.herokuapp.com/" }, // Success callback URL
{ "furl", "https://apiplayground-response.herokuapp.com/" }, // Failure callback URL
{ "enforce_paymethod", "neftrtgs" }, // Enforce payment method(s): neftrtgs
{ "hash", "REPLACE_WITH_GENERATED_HASH" }, // SHA-512 hash generated on server
};
var content = new FormUrlEncodedContent(payload);
var response = await client.PostAsync(url, content);
var result = await response.Content.ReadAsStringAsync();
Console.WriteLine(result);
}
}const axios = require('axios');
const qs = require('querystring');
// PayU Hosted Checkout - enforce payment method customization
// PayU Hosted Checkout Collect Payment API endpoint (test environment)
const url = 'https://test.payu.in/_payment';
const headers = {
'accept': 'application/json',
'Content-Type': 'application/x-www-form-urlencoded'
};
const payload = {
'key': 'JP***g', // Merchant key provided by PayU
'txnid': 'ENFNEFT001', // Unique transaction ID generated by merchant
'amount': '10.00', // Transaction amount
'firstname': 'PayU User', // Customer first name
'email': '[email protected]', // Customer email address
'phone': '9876543210', // Customer phone number
'productinfo': 'iPhone', // Product or order description
'surl': 'https://apiplayground-response.herokuapp.com/', // Success callback URL
'furl': 'https://apiplayground-response.herokuapp.com/', // Failure callback URL
'enforce_paymethod': 'neftrtgs', // Enforce payment method(s): neftrtgs
'hash': 'REPLACE_WITH_GENERATED_HASH' // SHA-512 hash generated on server
};
axios.post(url, qs.stringify(payload), { headers: headers })
.then(response => {
console.log(response.data);
})
.catch(error => {
console.error(error);
});import java.io.*;
import java.net.*;
import java.net.http.*;
public class PayUPayment {
public static void main(String[] args) throws IOException, InterruptedException {
// PayU Hosted Checkout - enforce payment method customization
HttpClient client = HttpClient.newHttpClient();
// Request body: key, txnid, amount, surl, furl, hash; enforce_paymethod=neftrtgs
String formData = "key=JP***g&txnid=ENFNEFT001&amount=10.00&firstname=PayU%20User&[email protected]&phone=9876543210&productinfo=iPhone&surl=https://apiplayground-response.herokuapp.com/&furl=https://apiplayground-response.herokuapp.com/&enforce_paymethod=neftrtgs&hash=REPLACE_WITH_GENERATED_HASH";
HttpRequest request = HttpRequest.newBuilder()
.uri(URI.create("https://test.payu.in/_payment"))
.header("accept", "application/json")
.header("Content-Type", "application/x-www-form-urlencoded")
.POST(HttpRequest.BodyPublishers.ofString(formData))
.build();
HttpResponse<String> response = client.send(request,
HttpResponse.BodyHandlers.ofString());
System.out.println(response.body());
}
}<?php
// PayU Hosted Checkout - enforce payment method customization
$url = 'https://test.payu.in/_payment';
$headers = array(
'accept: application/json',
'Content-Type: application/x-www-form-urlencoded'
);
$payload = array(
'key' => 'JP***g', // Merchant key provided by PayU
'txnid' => 'ENFNEFT001', // Unique transaction ID generated by merchant
'amount' => '10.00', // Transaction amount
'firstname' => 'PayU User', // Customer first name
'email' => '[email protected]', // Customer email address
'phone' => '9876543210', // Customer phone number
'productinfo' => 'iPhone', // Product or order description
'surl' => 'https://apiplayground-response.herokuapp.com/', // Success callback URL
'furl' => 'https://apiplayground-response.herokuapp.com/', // Failure callback URL
'enforce_paymethod' => 'neftrtgs', // Enforce payment method(s): neftrtgs
'hash' => 'REPLACE_WITH_GENERATED_HASH' // SHA-512 hash generated on server
);
$ch = curl_init();
curl_setopt($ch, CURLOPT_URL, $url);
curl_setopt($ch, CURLOPT_POST, 1);
curl_setopt($ch, CURLOPT_POSTFIELDS, http_build_query($payload));
curl_setopt($ch, CURLOPT_HTTPHEADER, $headers);
curl_setopt($ch, CURLOPT_RETURNTRANSFER, true);
$response = curl_exec($ch);
curl_close($ch);
echo $response;
?>use strict;
use warnings;
use LWP::UserAgent;
use HTTP::Request::Common;
# PayU Hosted Checkout - enforce payment method customization
my $url = 'https://test.payu.in/_payment';
my $ua = LWP::UserAgent->new;
my %payload = (
key => 'JP***g', # Merchant key provided by PayU
txnid => 'ENFNEFT001', # Unique transaction ID generated by merchant
amount => '10.00', # Transaction amount
firstname => 'PayU User', # Customer first name
email => '[email protected]', # Customer email address
phone => '9876543210', # Customer phone number
productinfo => 'iPhone', # Product or order description
surl => 'https://apiplayground-response.herokuapp.com/', # Success callback URL
furl => 'https://apiplayground-response.herokuapp.com/', # Failure callback URL
enforce_paymethod => 'neftrtgs', # Enforce payment method(s): neftrtgs
hash => 'REPLACE_WITH_GENERATED_HASH' # SHA-512 hash generated on server
);
my $response = $ua->post(
$url,
'accept' => 'application/json',
'Content-Type' => 'application/x-www-form-urlencoded',
Content => \%payload
);
print $response->content;EMI only (emi)
# PayU Hosted Checkout - enforce payment method customization
curl -X POST "https://test.payu.in/_payment" \
      -H "accept: application/json" \
      -H "Content-Type: application/x-www-form-urlencoded" \
      -d "key=JP***g&txnid=ENFEMI001&amount=10.00&firstname=PayU%20User&[email protected]&phone=9876543210&productinfo=iPhone&surl=https://apiplayground-response.herokuapp.com/&furl=https://apiplayground-response.herokuapp.com/&enforce_paymethod=emi&hash=REPLACE_WITH_GENERATED_HASH"
# Parameters include key, txnid, amount, surl, furl, hash; enforce_paymethod=emi
import requests
# PayU Hosted Checkout - enforce payment method customization
# PayU Hosted Checkout Collect Payment API endpoint (test environment)
url = "https://test.payu.in/_payment"
headers = {
"accept": "application/json",
"Content-Type": "application/x-www-form-urlencoded"
}
payload = {
'key': 'JP***g', # Merchant key provided by PayU
'txnid': 'ENFEMI001', # Unique transaction ID generated by merchant
'amount': '10.00', # Transaction amount
'firstname': 'PayU User', # Customer first name
'email': '[email protected]', # Customer email address
'phone': '9876543210', # Customer phone number
'productinfo': 'iPhone', # Product or order description
'surl': 'https://apiplayground-response.herokuapp.com/', # Success callback URL
'furl': 'https://apiplayground-response.herokuapp.com/', # Failure callback URL
'enforce_paymethod': 'emi', # Enforce payment method(s): emi
'hash': 'REPLACE_WITH_GENERATED_HASH', # SHA-512 hash generated on server
}
response = requests.post(url, headers=headers, data=payload)
print(response.text)using System;
using System.Net.Http;
using System.Collections.Generic;
using System.Threading.Tasks;
class Program
{
static async Task Main(string[] args)
{
// PayU Hosted Checkout - enforce payment method customization
using var client = new HttpClient();
var url = "https://test.payu.in/_payment";
client.DefaultRequestHeaders.Add("accept", "application/json");
var payload = new Dictionary<string, string>
{
{ "key", "JP***g" }, // Merchant key provided by PayU
{ "txnid", "ENFEMI001" }, // Unique transaction ID generated by merchant
{ "amount", "10.00" }, // Transaction amount
{ "firstname", "PayU User" }, // Customer first name
{ "email", "[email protected]" }, // Customer email address
{ "phone", "9876543210" }, // Customer phone number
{ "productinfo", "iPhone" }, // Product or order description
{ "surl", "https://apiplayground-response.herokuapp.com/" }, // Success callback URL
{ "furl", "https://apiplayground-response.herokuapp.com/" }, // Failure callback URL
{ "enforce_paymethod", "emi" }, // Enforce payment method(s): emi
{ "hash", "REPLACE_WITH_GENERATED_HASH" }, // SHA-512 hash generated on server
};
var content = new FormUrlEncodedContent(payload);
var response = await client.PostAsync(url, content);
var result = await response.Content.ReadAsStringAsync();
Console.WriteLine(result);
}
}const axios = require('axios');
const qs = require('querystring');
// PayU Hosted Checkout - enforce payment method customization
// PayU Hosted Checkout Collect Payment API endpoint (test environment)
const url = 'https://test.payu.in/_payment';
const headers = {
'accept': 'application/json',
'Content-Type': 'application/x-www-form-urlencoded'
};
const payload = {
'key': 'JP***g', // Merchant key provided by PayU
'txnid': 'ENFEMI001', // Unique transaction ID generated by merchant
'amount': '10.00', // Transaction amount
'firstname': 'PayU User', // Customer first name
'email': '[email protected]', // Customer email address
'phone': '9876543210', // Customer phone number
'productinfo': 'iPhone', // Product or order description
'surl': 'https://apiplayground-response.herokuapp.com/', // Success callback URL
'furl': 'https://apiplayground-response.herokuapp.com/', // Failure callback URL
'enforce_paymethod': 'emi', // Enforce payment method(s): emi
'hash': 'REPLACE_WITH_GENERATED_HASH' // SHA-512 hash generated on server
};
axios.post(url, qs.stringify(payload), { headers: headers })
.then(response => {
console.log(response.data);
})
.catch(error => {
console.error(error);
});import java.io.*;
import java.net.*;
import java.net.http.*;
public class PayUPayment {
public static void main(String[] args) throws IOException, InterruptedException {
// PayU Hosted Checkout - enforce payment method customization
HttpClient client = HttpClient.newHttpClient();
// Request body: key, txnid, amount, surl, furl, hash; enforce_paymethod=emi
String formData = "key=JP***g&txnid=ENFEMI001&amount=10.00&firstname=PayU%20User&[email protected]&phone=9876543210&productinfo=iPhone&surl=https://apiplayground-response.herokuapp.com/&furl=https://apiplayground-response.herokuapp.com/&enforce_paymethod=emi&hash=REPLACE_WITH_GENERATED_HASH";
HttpRequest request = HttpRequest.newBuilder()
.uri(URI.create("https://test.payu.in/_payment"))
.header("accept", "application/json")
.header("Content-Type", "application/x-www-form-urlencoded")
.POST(HttpRequest.BodyPublishers.ofString(formData))
.build();
HttpResponse<String> response = client.send(request,
HttpResponse.BodyHandlers.ofString());
System.out.println(response.body());
}
}<?php
// PayU Hosted Checkout - enforce payment method customization
$url = 'https://test.payu.in/_payment';
$headers = array(
'accept: application/json',
'Content-Type: application/x-www-form-urlencoded'
);
$payload = array(
'key' => 'JP***g', // Merchant key provided by PayU
'txnid' => 'ENFEMI001', // Unique transaction ID generated by merchant
'amount' => '10.00', // Transaction amount
'firstname' => 'PayU User', // Customer first name
'email' => '[email protected]', // Customer email address
'phone' => '9876543210', // Customer phone number
'productinfo' => 'iPhone', // Product or order description
'surl' => 'https://apiplayground-response.herokuapp.com/', // Success callback URL
'furl' => 'https://apiplayground-response.herokuapp.com/', // Failure callback URL
'enforce_paymethod' => 'emi', // Enforce payment method(s): emi
'hash' => 'REPLACE_WITH_GENERATED_HASH' // SHA-512 hash generated on server
);
$ch = curl_init();
curl_setopt($ch, CURLOPT_URL, $url);
curl_setopt($ch, CURLOPT_POST, 1);
curl_setopt($ch, CURLOPT_POSTFIELDS, http_build_query($payload));
curl_setopt($ch, CURLOPT_HTTPHEADER, $headers);
curl_setopt($ch, CURLOPT_RETURNTRANSFER, true);
$response = curl_exec($ch);
curl_close($ch);
echo $response;
?>use strict;
use warnings;
use LWP::UserAgent;
use HTTP::Request::Common;
# PayU Hosted Checkout - enforce payment method customization
my $url = 'https://test.payu.in/_payment';
my $ua = LWP::UserAgent->new;
my %payload = (
key => 'JP***g', # Merchant key provided by PayU
txnid => 'ENFEMI001', # Unique transaction ID generated by merchant
amount => '10.00', # Transaction amount
firstname => 'PayU User', # Customer first name
email => '[email protected]', # Customer email address
phone => '9876543210', # Customer phone number
productinfo => 'iPhone', # Product or order description
surl => 'https://apiplayground-response.herokuapp.com/', # Success callback URL
furl => 'https://apiplayground-response.herokuapp.com/', # Failure callback URL
enforce_paymethod => 'emi', # Enforce payment method(s): emi
hash => 'REPLACE_WITH_GENERATED_HASH' # SHA-512 hash generated on server
);
my $response = $ua->post(
$url,
'accept' => 'application/json',
'Content-Type' => 'application/x-www-form-urlencoded',
Content => \%payload
);
print $response->content;UPI only (upi)
# PayU Hosted Checkout - enforce payment method customization
curl -X POST "https://test.payu.in/_payment" \
      -H "accept: application/json" \
      -H "Content-Type: application/x-www-form-urlencoded" \
      -d "key=JP***g&txnid=ENFUPI001&amount=10.00&firstname=PayU%20User&[email protected]&phone=9876543210&productinfo=iPhone&surl=https://apiplayground-response.herokuapp.com/&furl=https://apiplayground-response.herokuapp.com/&enforce_paymethod=upi&hash=REPLACE_WITH_GENERATED_HASH"
# Parameters include key, txnid, amount, surl, furl, hash; enforce_paymethod=upi
import requests
# PayU Hosted Checkout - enforce payment method customization
# PayU Hosted Checkout Collect Payment API endpoint (test environment)
url = "https://test.payu.in/_payment"
headers = {
"accept": "application/json",
"Content-Type": "application/x-www-form-urlencoded"
}
payload = {
'key': 'JP***g', # Merchant key provided by PayU
'txnid': 'ENFUPI001', # Unique transaction ID generated by merchant
'amount': '10.00', # Transaction amount
'firstname': 'PayU User', # Customer first name
'email': '[email protected]', # Customer email address
'phone': '9876543210', # Customer phone number
'productinfo': 'iPhone', # Product or order description
'surl': 'https://apiplayground-response.herokuapp.com/', # Success callback URL
'furl': 'https://apiplayground-response.herokuapp.com/', # Failure callback URL
'enforce_paymethod': 'upi', # Enforce payment method(s): upi
'hash': 'REPLACE_WITH_GENERATED_HASH', # SHA-512 hash generated on server
}
response = requests.post(url, headers=headers, data=payload)
print(response.text)using System;
using System.Net.Http;
using System.Collections.Generic;
using System.Threading.Tasks;
class Program
{
static async Task Main(string[] args)
{
// PayU Hosted Checkout - enforce payment method customization
using var client = new HttpClient();
var url = "https://test.payu.in/_payment";
client.DefaultRequestHeaders.Add("accept", "application/json");
var payload = new Dictionary<string, string>
{
{ "key", "JP***g" }, // Merchant key provided by PayU
{ "txnid", "ENFUPI001" }, // Unique transaction ID generated by merchant
{ "amount", "10.00" }, // Transaction amount
{ "firstname", "PayU User" }, // Customer first name
{ "email", "[email protected]" }, // Customer email address
{ "phone", "9876543210" }, // Customer phone number
{ "productinfo", "iPhone" }, // Product or order description
{ "surl", "https://apiplayground-response.herokuapp.com/" }, // Success callback URL
{ "furl", "https://apiplayground-response.herokuapp.com/" }, // Failure callback URL
{ "enforce_paymethod", "upi" }, // Enforce payment method(s): upi
{ "hash", "REPLACE_WITH_GENERATED_HASH" }, // SHA-512 hash generated on server
};
var content = new FormUrlEncodedContent(payload);
var response = await client.PostAsync(url, content);
var result = await response.Content.ReadAsStringAsync();
Console.WriteLine(result);
}
}const axios = require('axios');
const qs = require('querystring');
// PayU Hosted Checkout - enforce payment method customization
// PayU Hosted Checkout Collect Payment API endpoint (test environment)
const url = 'https://test.payu.in/_payment';
const headers = {
'accept': 'application/json',
'Content-Type': 'application/x-www-form-urlencoded'
};
const payload = {
'key': 'JP***g', // Merchant key provided by PayU
'txnid': 'ENFUPI001', // Unique transaction ID generated by merchant
'amount': '10.00', // Transaction amount
'firstname': 'PayU User', // Customer first name
'email': '[email protected]', // Customer email address
'phone': '9876543210', // Customer phone number
'productinfo': 'iPhone', // Product or order description
'surl': 'https://apiplayground-response.herokuapp.com/', // Success callback URL
'furl': 'https://apiplayground-response.herokuapp.com/', // Failure callback URL
'enforce_paymethod': 'upi', // Enforce payment method(s): upi
'hash': 'REPLACE_WITH_GENERATED_HASH' // SHA-512 hash generated on server
};
axios.post(url, qs.stringify(payload), { headers: headers })
.then(response => {
console.log(response.data);
})
.catch(error => {
console.error(error);
});import java.io.*;
import java.net.*;
import java.net.http.*;
public class PayUPayment {
public static void main(String[] args) throws IOException, InterruptedException {
// PayU Hosted Checkout - enforce payment method customization
HttpClient client = HttpClient.newHttpClient();
// Request body: key, txnid, amount, surl, furl, hash; enforce_paymethod=upi
String formData = "key=JP***g&txnid=ENFUPI001&amount=10.00&firstname=PayU%20User&[email protected]&phone=9876543210&productinfo=iPhone&surl=https://apiplayground-response.herokuapp.com/&furl=https://apiplayground-response.herokuapp.com/&enforce_paymethod=upi&hash=REPLACE_WITH_GENERATED_HASH";
HttpRequest request = HttpRequest.newBuilder()
.uri(URI.create("https://test.payu.in/_payment"))
.header("accept", "application/json")
.header("Content-Type", "application/x-www-form-urlencoded")
.POST(HttpRequest.BodyPublishers.ofString(formData))
.build();
HttpResponse<String> response = client.send(request,
HttpResponse.BodyHandlers.ofString());
System.out.println(response.body());
}
}<?php
// PayU Hosted Checkout - enforce payment method customization
$url = 'https://test.payu.in/_payment';
$headers = array(
'accept: application/json',
'Content-Type: application/x-www-form-urlencoded'
);
$payload = array(
'key' => 'JP***g', // Merchant key provided by PayU
'txnid' => 'ENFUPI001', // Unique transaction ID generated by merchant
'amount' => '10.00', // Transaction amount
'firstname' => 'PayU User', // Customer first name
'email' => '[email protected]', // Customer email address
'phone' => '9876543210', // Customer phone number
'productinfo' => 'iPhone', // Product or order description
'surl' => 'https://apiplayground-response.herokuapp.com/', // Success callback URL
'furl' => 'https://apiplayground-response.herokuapp.com/', // Failure callback URL
'enforce_paymethod' => 'upi', // Enforce payment method(s): upi
'hash' => 'REPLACE_WITH_GENERATED_HASH' // SHA-512 hash generated on server
);
$ch = curl_init();
curl_setopt($ch, CURLOPT_URL, $url);
curl_setopt($ch, CURLOPT_POST, 1);
curl_setopt($ch, CURLOPT_POSTFIELDS, http_build_query($payload));
curl_setopt($ch, CURLOPT_HTTPHEADER, $headers);
curl_setopt($ch, CURLOPT_RETURNTRANSFER, true);
$response = curl_exec($ch);
curl_close($ch);
echo $response;
?>use strict;
use warnings;
use LWP::UserAgent;
use HTTP::Request::Common;
# PayU Hosted Checkout - enforce payment method customization
my $url = 'https://test.payu.in/_payment';
my $ua = LWP::UserAgent->new;
my %payload = (
key => 'JP***g', # Merchant key provided by PayU
txnid => 'ENFUPI001', # Unique transaction ID generated by merchant
amount => '10.00', # Transaction amount
firstname => 'PayU User', # Customer first name
email => '[email protected]', # Customer email address
phone => '9876543210', # Customer phone number
productinfo => 'iPhone', # Product or order description
surl => 'https://apiplayground-response.herokuapp.com/', # Success callback URL
furl => 'https://apiplayground-response.herokuapp.com/', # Failure callback URL
enforce_paymethod => 'upi', # Enforce payment method(s): upi
hash => 'REPLACE_WITH_GENERATED_HASH' # SHA-512 hash generated on server
);
my $response = $ua->post(
$url,
'accept' => 'application/json',
'Content-Type' => 'application/x-www-form-urlencoded',
Content => \%payload
);
print $response->content;Wallet / Cash Card only (cashcard)
# PayU Hosted Checkout - enforce payment method customization
curl -X POST "https://test.payu.in/_payment" \
      -H "accept: application/json" \
      -H "Content-Type: application/x-www-form-urlencoded" \
      -d "key=JP***g&txnid=ENFCASH001&amount=10.00&firstname=PayU%20User&[email protected]&phone=9876543210&productinfo=iPhone&surl=https://apiplayground-response.herokuapp.com/&furl=https://apiplayground-response.herokuapp.com/&enforce_paymethod=cashcard&hash=REPLACE_WITH_GENERATED_HASH"
# Parameters include key, txnid, amount, surl, furl, hash; enforce_paymethod=cashcard
import requests
# PayU Hosted Checkout - enforce payment method customization
# PayU Hosted Checkout Collect Payment API endpoint (test environment)
url = "https://test.payu.in/_payment"
headers = {
"accept": "application/json",
"Content-Type": "application/x-www-form-urlencoded"
}
payload = {
'key': 'JP***g', # Merchant key provided by PayU
'txnid': 'ENFCASH001', # Unique transaction ID generated by merchant
'amount': '10.00', # Transaction amount
'firstname': 'PayU User', # Customer first name
'email': '[email protected]', # Customer email address
'phone': '9876543210', # Customer phone number
'productinfo': 'iPhone', # Product or order description
'surl': 'https://apiplayground-response.herokuapp.com/', # Success callback URL
'furl': 'https://apiplayground-response.herokuapp.com/', # Failure callback URL
'enforce_paymethod': 'cashcard', # Enforce payment method(s): cashcard
'hash': 'REPLACE_WITH_GENERATED_HASH', # SHA-512 hash generated on server
}
response = requests.post(url, headers=headers, data=payload)
print(response.text)using System;
using System.Net.Http;
using System.Collections.Generic;
using System.Threading.Tasks;
class Program
{
static async Task Main(string[] args)
{
// PayU Hosted Checkout - enforce payment method customization
using var client = new HttpClient();
var url = "https://test.payu.in/_payment";
client.DefaultRequestHeaders.Add("accept", "application/json");
var payload = new Dictionary<string, string>
{
{ "key", "JP***g" }, // Merchant key provided by PayU
{ "txnid", "ENFCASH001" }, // Unique transaction ID generated by merchant
{ "amount", "10.00" }, // Transaction amount
{ "firstname", "PayU User" }, // Customer first name
{ "email", "[email protected]" }, // Customer email address
{ "phone", "9876543210" }, // Customer phone number
{ "productinfo", "iPhone" }, // Product or order description
{ "surl", "https://apiplayground-response.herokuapp.com/" }, // Success callback URL
{ "furl", "https://apiplayground-response.herokuapp.com/" }, // Failure callback URL
{ "enforce_paymethod", "cashcard" }, // Enforce payment method(s): cashcard
{ "hash", "REPLACE_WITH_GENERATED_HASH" }, // SHA-512 hash generated on server
};
var content = new FormUrlEncodedContent(payload);
var response = await client.PostAsync(url, content);
var result = await response.Content.ReadAsStringAsync();
Console.WriteLine(result);
}
}const axios = require('axios');
const qs = require('querystring');
// PayU Hosted Checkout - enforce payment method customization
// PayU Hosted Checkout Collect Payment API endpoint (test environment)
const url = 'https://test.payu.in/_payment';
const headers = {
'accept': 'application/json',
'Content-Type': 'application/x-www-form-urlencoded'
};
const payload = {
'key': 'JP***g', // Merchant key provided by PayU
'txnid': 'ENFCASH001', // Unique transaction ID generated by merchant
'amount': '10.00', // Transaction amount
'firstname': 'PayU User', // Customer first name
'email': '[email protected]', // Customer email address
'phone': '9876543210', // Customer phone number
'productinfo': 'iPhone', // Product or order description
'surl': 'https://apiplayground-response.herokuapp.com/', // Success callback URL
'furl': 'https://apiplayground-response.herokuapp.com/', // Failure callback URL
'enforce_paymethod': 'cashcard', // Enforce payment method(s): cashcard
'hash': 'REPLACE_WITH_GENERATED_HASH' // SHA-512 hash generated on server
};
axios.post(url, qs.stringify(payload), { headers: headers })
.then(response => {
console.log(response.data);
})
.catch(error => {
console.error(error);
});import java.io.*;
import java.net.*;
import java.net.http.*;
public class PayUPayment {
public static void main(String[] args) throws IOException, InterruptedException {
// PayU Hosted Checkout - enforce payment method customization
HttpClient client = HttpClient.newHttpClient();
// Request body: key, txnid, amount, surl, furl, hash; enforce_paymethod=cashcard
String formData = "key=JP***g&txnid=ENFCASH001&amount=10.00&firstname=PayU%20User&[email protected]&phone=9876543210&productinfo=iPhone&surl=https://apiplayground-response.herokuapp.com/&furl=https://apiplayground-response.herokuapp.com/&enforce_paymethod=cashcard&hash=REPLACE_WITH_GENERATED_HASH";
HttpRequest request = HttpRequest.newBuilder()
.uri(URI.create("https://test.payu.in/_payment"))
.header("accept", "application/json")
.header("Content-Type", "application/x-www-form-urlencoded")
.POST(HttpRequest.BodyPublishers.ofString(formData))
.build();
HttpResponse<String> response = client.send(request,
HttpResponse.BodyHandlers.ofString());
System.out.println(response.body());
}
}<?php
// PayU Hosted Checkout - enforce payment method customization
$url = 'https://test.payu.in/_payment';
$headers = array(
'accept: application/json',
'Content-Type: application/x-www-form-urlencoded'
);
$payload = array(
'key' => 'JP***g', // Merchant key provided by PayU
'txnid' => 'ENFCASH001', // Unique transaction ID generated by merchant
'amount' => '10.00', // Transaction amount
'firstname' => 'PayU User', // Customer first name
'email' => '[email protected]', // Customer email address
'phone' => '9876543210', // Customer phone number
'productinfo' => 'iPhone', // Product or order description
'surl' => 'https://apiplayground-response.herokuapp.com/', // Success callback URL
'furl' => 'https://apiplayground-response.herokuapp.com/', // Failure callback URL
'enforce_paymethod' => 'cashcard', // Enforce payment method(s): cashcard
'hash' => 'REPLACE_WITH_GENERATED_HASH' // SHA-512 hash generated on server
);
$ch = curl_init();
curl_setopt($ch, CURLOPT_URL, $url);
curl_setopt($ch, CURLOPT_POST, 1);
curl_setopt($ch, CURLOPT_POSTFIELDS, http_build_query($payload));
curl_setopt($ch, CURLOPT_HTTPHEADER, $headers);
curl_setopt($ch, CURLOPT_RETURNTRANSFER, true);
$response = curl_exec($ch);
curl_close($ch);
echo $response;
?>use strict;
use warnings;
use LWP::UserAgent;
use HTTP::Request::Common;
# PayU Hosted Checkout - enforce payment method customization
my $url = 'https://test.payu.in/_payment';
my $ua = LWP::UserAgent->new;
my %payload = (
key => 'JP***g', # Merchant key provided by PayU
txnid => 'ENFCASH001', # Unique transaction ID generated by merchant
amount => '10.00', # Transaction amount
firstname => 'PayU User', # Customer first name
email => '[email protected]', # Customer email address
phone => '9876543210', # Customer phone number
productinfo => 'iPhone', # Product or order description
surl => 'https://apiplayground-response.herokuapp.com/', # Success callback URL
furl => 'https://apiplayground-response.herokuapp.com/', # Failure callback URL
enforce_paymethod => 'cashcard', # Enforce payment method(s): cashcard
hash => 'REPLACE_WITH_GENERATED_HASH' # SHA-512 hash generated on server
);
my $response = $ua->post(
$url,
'accept' => 'application/json',
'Content-Type' => 'application/x-www-form-urlencoded',
Content => \%payload
);
print $response->content;Sodexo only (SODEXO)
# PayU Hosted Checkout - enforce payment method customization
curl -X POST "https://test.payu.in/_payment" \
      -H "accept: application/json" \
      -H "Content-Type: application/x-www-form-urlencoded" \
      -d "key=JP***g&txnid=ENFSODEXO001&amount=10.00&firstname=PayU%20User&[email protected]&phone=9876543210&productinfo=iPhone&surl=https://apiplayground-response.herokuapp.com/&furl=https://apiplayground-response.herokuapp.com/&enforce_paymethod=SODEXO&hash=REPLACE_WITH_GENERATED_HASH"
# Parameters include key, txnid, amount, surl, furl, hash; enforce_paymethod=SODEXO
import requests
# PayU Hosted Checkout - enforce payment method customization
# PayU Hosted Checkout Collect Payment API endpoint (test environment)
url = "https://test.payu.in/_payment"
headers = {
"accept": "application/json",
"Content-Type": "application/x-www-form-urlencoded"
}
payload = {
'key': 'JP***g', # Merchant key provided by PayU
'txnid': 'ENFSODEXO001', # Unique transaction ID generated by merchant
'amount': '10.00', # Transaction amount
'firstname': 'PayU User', # Customer first name
'email': '[email protected]', # Customer email address
'phone': '9876543210', # Customer phone number
'productinfo': 'iPhone', # Product or order description
'surl': 'https://apiplayground-response.herokuapp.com/', # Success callback URL
'furl': 'https://apiplayground-response.herokuapp.com/', # Failure callback URL
'enforce_paymethod': 'SODEXO', # Enforce payment method(s): SODEXO
'hash': 'REPLACE_WITH_GENERATED_HASH', # SHA-512 hash generated on server
}
response = requests.post(url, headers=headers, data=payload)
print(response.text)using System;
using System.Net.Http;
using System.Collections.Generic;
using System.Threading.Tasks;
class Program
{
static async Task Main(string[] args)
{
// PayU Hosted Checkout - enforce payment method customization
using var client = new HttpClient();
var url = "https://test.payu.in/_payment";
client.DefaultRequestHeaders.Add("accept", "application/json");
var payload = new Dictionary<string, string>
{
{ "key", "JP***g" }, // Merchant key provided by PayU
{ "txnid", "ENFSODEXO001" }, // Unique transaction ID generated by merchant
{ "amount", "10.00" }, // Transaction amount
{ "firstname", "PayU User" }, // Customer first name
{ "email", "[email protected]" }, // Customer email address
{ "phone", "9876543210" }, // Customer phone number
{ "productinfo", "iPhone" }, // Product or order description
{ "surl", "https://apiplayground-response.herokuapp.com/" }, // Success callback URL
{ "furl", "https://apiplayground-response.herokuapp.com/" }, // Failure callback URL
{ "enforce_paymethod", "SODEXO" }, // Enforce payment method(s): SODEXO
{ "hash", "REPLACE_WITH_GENERATED_HASH" }, // SHA-512 hash generated on server
};
var content = new FormUrlEncodedContent(payload);
var response = await client.PostAsync(url, content);
var result = await response.Content.ReadAsStringAsync();
Console.WriteLine(result);
}
}const axios = require('axios');
const qs = require('querystring');
// PayU Hosted Checkout - enforce payment method customization
// PayU Hosted Checkout Collect Payment API endpoint (test environment)
const url = 'https://test.payu.in/_payment';
const headers = {
'accept': 'application/json',
'Content-Type': 'application/x-www-form-urlencoded'
};
const payload = {
'key': 'JP***g', // Merchant key provided by PayU
'txnid': 'ENFSODEXO001', // Unique transaction ID generated by merchant
'amount': '10.00', // Transaction amount
'firstname': 'PayU User', // Customer first name
'email': '[email protected]', // Customer email address
'phone': '9876543210', // Customer phone number
'productinfo': 'iPhone', // Product or order description
'surl': 'https://apiplayground-response.herokuapp.com/', // Success callback URL
'furl': 'https://apiplayground-response.herokuapp.com/', // Failure callback URL
'enforce_paymethod': 'SODEXO', // Enforce payment method(s): SODEXO
'hash': 'REPLACE_WITH_GENERATED_HASH' // SHA-512 hash generated on server
};
axios.post(url, qs.stringify(payload), { headers: headers })
.then(response => {
console.log(response.data);
})
.catch(error => {
console.error(error);
});import java.io.*;
import java.net.*;
import java.net.http.*;
public class PayUPayment {
public static void main(String[] args) throws IOException, InterruptedException {
// PayU Hosted Checkout - enforce payment method customization
HttpClient client = HttpClient.newHttpClient();
// Request body: key, txnid, amount, surl, furl, hash; enforce_paymethod=SODEXO
String formData = "key=JP***g&txnid=ENFSODEXO001&amount=10.00&firstname=PayU%20User&[email protected]&phone=9876543210&productinfo=iPhone&surl=https://apiplayground-response.herokuapp.com/&furl=https://apiplayground-response.herokuapp.com/&enforce_paymethod=SODEXO&hash=REPLACE_WITH_GENERATED_HASH";
HttpRequest request = HttpRequest.newBuilder()
.uri(URI.create("https://test.payu.in/_payment"))
.header("accept", "application/json")
.header("Content-Type", "application/x-www-form-urlencoded")
.POST(HttpRequest.BodyPublishers.ofString(formData))
.build();
HttpResponse<String> response = client.send(request,
HttpResponse.BodyHandlers.ofString());
System.out.println(response.body());
}
}<?php
// PayU Hosted Checkout - enforce payment method customization
$url = 'https://test.payu.in/_payment';
$headers = array(
'accept: application/json',
'Content-Type: application/x-www-form-urlencoded'
);
$payload = array(
'key' => 'JP***g', // Merchant key provided by PayU
'txnid' => 'ENFSODEXO001', // Unique transaction ID generated by merchant
'amount' => '10.00', // Transaction amount
'firstname' => 'PayU User', // Customer first name
'email' => '[email protected]', // Customer email address
'phone' => '9876543210', // Customer phone number
'productinfo' => 'iPhone', // Product or order description
'surl' => 'https://apiplayground-response.herokuapp.com/', // Success callback URL
'furl' => 'https://apiplayground-response.herokuapp.com/', // Failure callback URL
'enforce_paymethod' => 'SODEXO', // Enforce payment method(s): SODEXO
'hash' => 'REPLACE_WITH_GENERATED_HASH' // SHA-512 hash generated on server
);
$ch = curl_init();
curl_setopt($ch, CURLOPT_URL, $url);
curl_setopt($ch, CURLOPT_POST, 1);
curl_setopt($ch, CURLOPT_POSTFIELDS, http_build_query($payload));
curl_setopt($ch, CURLOPT_HTTPHEADER, $headers);
curl_setopt($ch, CURLOPT_RETURNTRANSFER, true);
$response = curl_exec($ch);
curl_close($ch);
echo $response;
?>use strict;
use warnings;
use LWP::UserAgent;
use HTTP::Request::Common;
# PayU Hosted Checkout - enforce payment method customization
my $url = 'https://test.payu.in/_payment';
my $ua = LWP::UserAgent->new;
my %payload = (
key => 'JP***g', # Merchant key provided by PayU
txnid => 'ENFSODEXO001', # Unique transaction ID generated by merchant
amount => '10.00', # Transaction amount
firstname => 'PayU User', # Customer first name
email => '[email protected]', # Customer email address
phone => '9876543210', # Customer phone number
productinfo => 'iPhone', # Product or order description
surl => 'https://apiplayground-response.herokuapp.com/', # Success callback URL
furl => 'https://apiplayground-response.herokuapp.com/', # Failure callback URL
enforce_paymethod => 'SODEXO', # Enforce payment method(s): SODEXO
hash => 'REPLACE_WITH_GENERATED_HASH' # SHA-512 hash generated on server
);
my $response = $ua->post(
$url,
'accept' => 'application/json',
'Content-Type' => 'application/x-www-form-urlencoded',
Content => \%payload
);
print $response->content;BNPL only (bnpl)
# PayU Hosted Checkout - enforce payment method customization
curl -X POST "https://test.payu.in/_payment" \
      -H "accept: application/json" \
      -H "Content-Type: application/x-www-form-urlencoded" \
      -d "key=JP***g&txnid=ENFBNPL001&amount=10.00&firstname=PayU%20User&[email protected]&phone=9876543210&productinfo=iPhone&surl=https://apiplayground-response.herokuapp.com/&furl=https://apiplayground-response.herokuapp.com/&enforce_paymethod=bnpl&hash=REPLACE_WITH_GENERATED_HASH"
# Parameters include key, txnid, amount, surl, furl, hash; enforce_paymethod=bnpl
import requests
# PayU Hosted Checkout - enforce payment method customization
# PayU Hosted Checkout Collect Payment API endpoint (test environment)
url = "https://test.payu.in/_payment"
headers = {
"accept": "application/json",
"Content-Type": "application/x-www-form-urlencoded"
}
payload = {
'key': 'JP***g', # Merchant key provided by PayU
'txnid': 'ENFBNPL001', # Unique transaction ID generated by merchant
'amount': '10.00', # Transaction amount
'firstname': 'PayU User', # Customer first name
'email': '[email protected]', # Customer email address
'phone': '9876543210', # Customer phone number
'productinfo': 'iPhone', # Product or order description
'surl': 'https://apiplayground-response.herokuapp.com/', # Success callback URL
'furl': 'https://apiplayground-response.herokuapp.com/', # Failure callback URL
'enforce_paymethod': 'bnpl', # Enforce payment method(s): bnpl
'hash': 'REPLACE_WITH_GENERATED_HASH', # SHA-512 hash generated on server
}
response = requests.post(url, headers=headers, data=payload)
print(response.text)using System;
using System.Net.Http;
using System.Collections.Generic;
using System.Threading.Tasks;
class Program
{
static async Task Main(string[] args)
{
// PayU Hosted Checkout - enforce payment method customization
using var client = new HttpClient();
var url = "https://test.payu.in/_payment";
client.DefaultRequestHeaders.Add("accept", "application/json");
var payload = new Dictionary<string, string>
{
{ "key", "JP***g" }, // Merchant key provided by PayU
{ "txnid", "ENFBNPL001" }, // Unique transaction ID generated by merchant
{ "amount", "10.00" }, // Transaction amount
{ "firstname", "PayU User" }, // Customer first name
{ "email", "[email protected]" }, // Customer email address
{ "phone", "9876543210" }, // Customer phone number
{ "productinfo", "iPhone" }, // Product or order description
{ "surl", "https://apiplayground-response.herokuapp.com/" }, // Success callback URL
{ "furl", "https://apiplayground-response.herokuapp.com/" }, // Failure callback URL
{ "enforce_paymethod", "bnpl" }, // Enforce payment method(s): bnpl
{ "hash", "REPLACE_WITH_GENERATED_HASH" }, // SHA-512 hash generated on server
};
var content = new FormUrlEncodedContent(payload);
var response = await client.PostAsync(url, content);
var result = await response.Content.ReadAsStringAsync();
Console.WriteLine(result);
}
}const axios = require('axios');
const qs = require('querystring');
// PayU Hosted Checkout - enforce payment method customization
// PayU Hosted Checkout Collect Payment API endpoint (test environment)
const url = 'https://test.payu.in/_payment';
const headers = {
'accept': 'application/json',
'Content-Type': 'application/x-www-form-urlencoded'
};
const payload = {
'key': 'JP***g', // Merchant key provided by PayU
'txnid': 'ENFBNPL001', // Unique transaction ID generated by merchant
'amount': '10.00', // Transaction amount
'firstname': 'PayU User', // Customer first name
'email': '[email protected]', // Customer email address
'phone': '9876543210', // Customer phone number
'productinfo': 'iPhone', // Product or order description
'surl': 'https://apiplayground-response.herokuapp.com/', // Success callback URL
'furl': 'https://apiplayground-response.herokuapp.com/', // Failure callback URL
'enforce_paymethod': 'bnpl', // Enforce payment method(s): bnpl
'hash': 'REPLACE_WITH_GENERATED_HASH' // SHA-512 hash generated on server
};
axios.post(url, qs.stringify(payload), { headers: headers })
.then(response => {
console.log(response.data);
})
.catch(error => {
console.error(error);
});import java.io.*;
import java.net.*;
import java.net.http.*;
public class PayUPayment {
public static void main(String[] args) throws IOException, InterruptedException {
// PayU Hosted Checkout - enforce payment method customization
HttpClient client = HttpClient.newHttpClient();
// Request body: key, txnid, amount, surl, furl, hash; enforce_paymethod=bnpl
String formData = "key=JP***g&txnid=ENFBNPL001&amount=10.00&firstname=PayU%20User&[email protected]&phone=9876543210&productinfo=iPhone&surl=https://apiplayground-response.herokuapp.com/&furl=https://apiplayground-response.herokuapp.com/&enforce_paymethod=bnpl&hash=REPLACE_WITH_GENERATED_HASH";
HttpRequest request = HttpRequest.newBuilder()
.uri(URI.create("https://test.payu.in/_payment"))
.header("accept", "application/json")
.header("Content-Type", "application/x-www-form-urlencoded")
.POST(HttpRequest.BodyPublishers.ofString(formData))
.build();
HttpResponse<String> response = client.send(request,
HttpResponse.BodyHandlers.ofString());
System.out.println(response.body());
}
}<?php
// PayU Hosted Checkout - enforce payment method customization
$url = 'https://test.payu.in/_payment';
$headers = array(
'accept: application/json',
'Content-Type: application/x-www-form-urlencoded'
);
$payload = array(
'key' => 'JP***g', // Merchant key provided by PayU
'txnid' => 'ENFBNPL001', // Unique transaction ID generated by merchant
'amount' => '10.00', // Transaction amount
'firstname' => 'PayU User', // Customer first name
'email' => '[email protected]', // Customer email address
'phone' => '9876543210', // Customer phone number
'productinfo' => 'iPhone', // Product or order description
'surl' => 'https://apiplayground-response.herokuapp.com/', // Success callback URL
'furl' => 'https://apiplayground-response.herokuapp.com/', // Failure callback URL
'enforce_paymethod' => 'bnpl', // Enforce payment method(s): bnpl
'hash' => 'REPLACE_WITH_GENERATED_HASH' // SHA-512 hash generated on server
);
$ch = curl_init();
curl_setopt($ch, CURLOPT_URL, $url);
curl_setopt($ch, CURLOPT_POST, 1);
curl_setopt($ch, CURLOPT_POSTFIELDS, http_build_query($payload));
curl_setopt($ch, CURLOPT_HTTPHEADER, $headers);
curl_setopt($ch, CURLOPT_RETURNTRANSFER, true);
$response = curl_exec($ch);
curl_close($ch);
echo $response;
?>use strict;
use warnings;
use LWP::UserAgent;
use HTTP::Request::Common;
# PayU Hosted Checkout - enforce payment method customization
my $url = 'https://test.payu.in/_payment';
my $ua = LWP::UserAgent->new;
my %payload = (
key => 'JP***g', # Merchant key provided by PayU
txnid => 'ENFBNPL001', # Unique transaction ID generated by merchant
amount => '10.00', # Transaction amount
firstname => 'PayU User', # Customer first name
email => '[email protected]', # Customer email address
phone => '9876543210', # Customer phone number
productinfo => 'iPhone', # Product or order description
surl => 'https://apiplayground-response.herokuapp.com/', # Success callback URL
furl => 'https://apiplayground-response.herokuapp.com/', # Failure callback URL
enforce_paymethod => 'bnpl', # Enforce payment method(s): bnpl
hash => 'REPLACE_WITH_GENERATED_HASH' # SHA-512 hash generated on server
);
my $response = $ua->post(
$url,
'accept' => 'application/json',
'Content-Type' => 'application/x-www-form-urlencoded',
Content => \%payload
);
print $response->content;QR only (qr)
# PayU Hosted Checkout - enforce payment method customization
curl -X POST "https://test.payu.in/_payment" \
      -H "accept: application/json" \
      -H "Content-Type: application/x-www-form-urlencoded" \
      -d "key=JP***g&txnid=ENFQR001&amount=10.00&firstname=PayU%20User&[email protected]&phone=9876543210&productinfo=iPhone&surl=https://apiplayground-response.herokuapp.com/&furl=https://apiplayground-response.herokuapp.com/&enforce_paymethod=qr&hash=REPLACE_WITH_GENERATED_HASH"
# Parameters include key, txnid, amount, surl, furl, hash; enforce_paymethod=qr
import requests
# PayU Hosted Checkout - enforce payment method customization
# PayU Hosted Checkout Collect Payment API endpoint (test environment)
url = "https://test.payu.in/_payment"
headers = {
"accept": "application/json",
"Content-Type": "application/x-www-form-urlencoded"
}
payload = {
'key': 'JP***g', # Merchant key provided by PayU
'txnid': 'ENFQR001', # Unique transaction ID generated by merchant
'amount': '10.00', # Transaction amount
'firstname': 'PayU User', # Customer first name
'email': '[email protected]', # Customer email address
'phone': '9876543210', # Customer phone number
'productinfo': 'iPhone', # Product or order description
'surl': 'https://apiplayground-response.herokuapp.com/', # Success callback URL
'furl': 'https://apiplayground-response.herokuapp.com/', # Failure callback URL
'enforce_paymethod': 'qr', # Enforce payment method(s): qr
'hash': 'REPLACE_WITH_GENERATED_HASH', # SHA-512 hash generated on server
}
response = requests.post(url, headers=headers, data=payload)
print(response.text)using System;
using System.Net.Http;
using System.Collections.Generic;
using System.Threading.Tasks;
class Program
{
static async Task Main(string[] args)
{
// PayU Hosted Checkout - enforce payment method customization
using var client = new HttpClient();
var url = "https://test.payu.in/_payment";
client.DefaultRequestHeaders.Add("accept", "application/json");
var payload = new Dictionary<string, string>
{
{ "key", "JP***g" }, // Merchant key provided by PayU
{ "txnid", "ENFQR001" }, // Unique transaction ID generated by merchant
{ "amount", "10.00" }, // Transaction amount
{ "firstname", "PayU User" }, // Customer first name
{ "email", "[email protected]" }, // Customer email address
{ "phone", "9876543210" }, // Customer phone number
{ "productinfo", "iPhone" }, // Product or order description
{ "surl", "https://apiplayground-response.herokuapp.com/" }, // Success callback URL
{ "furl", "https://apiplayground-response.herokuapp.com/" }, // Failure callback URL
{ "enforce_paymethod", "qr" }, // Enforce payment method(s): qr
{ "hash", "REPLACE_WITH_GENERATED_HASH" }, // SHA-512 hash generated on server
};
var content = new FormUrlEncodedContent(payload);
var response = await client.PostAsync(url, content);
var result = await response.Content.ReadAsStringAsync();
Console.WriteLine(result);
}
}const axios = require('axios');
const qs = require('querystring');
// PayU Hosted Checkout - enforce payment method customization
// PayU Hosted Checkout Collect Payment API endpoint (test environment)
const url = 'https://test.payu.in/_payment';
const headers = {
'accept': 'application/json',
'Content-Type': 'application/x-www-form-urlencoded'
};
const payload = {
'key': 'JP***g', // Merchant key provided by PayU
'txnid': 'ENFQR001', // Unique transaction ID generated by merchant
'amount': '10.00', // Transaction amount
'firstname': 'PayU User', // Customer first name
'email': '[email protected]', // Customer email address
'phone': '9876543210', // Customer phone number
'productinfo': 'iPhone', // Product or order description
'surl': 'https://apiplayground-response.herokuapp.com/', // Success callback URL
'furl': 'https://apiplayground-response.herokuapp.com/', // Failure callback URL
'enforce_paymethod': 'qr', // Enforce payment method(s): qr
'hash': 'REPLACE_WITH_GENERATED_HASH' // SHA-512 hash generated on server
};
axios.post(url, qs.stringify(payload), { headers: headers })
.then(response => {
console.log(response.data);
})
.catch(error => {
console.error(error);
});import java.io.*;
import java.net.*;
import java.net.http.*;
public class PayUPayment {
public static void main(String[] args) throws IOException, InterruptedException {
// PayU Hosted Checkout - enforce payment method customization
HttpClient client = HttpClient.newHttpClient();
// Request body: key, txnid, amount, surl, furl, hash; enforce_paymethod=qr
String formData = "key=JP***g&txnid=ENFQR001&amount=10.00&firstname=PayU%20User&[email protected]&phone=9876543210&productinfo=iPhone&surl=https://apiplayground-response.herokuapp.com/&furl=https://apiplayground-response.herokuapp.com/&enforce_paymethod=qr&hash=REPLACE_WITH_GENERATED_HASH";
HttpRequest request = HttpRequest.newBuilder()
.uri(URI.create("https://test.payu.in/_payment"))
.header("accept", "application/json")
.header("Content-Type", "application/x-www-form-urlencoded")
.POST(HttpRequest.BodyPublishers.ofString(formData))
.build();
HttpResponse<String> response = client.send(request,
HttpResponse.BodyHandlers.ofString());
System.out.println(response.body());
}
}<?php
// PayU Hosted Checkout - enforce payment method customization
$url = 'https://test.payu.in/_payment';
$headers = array(
'accept: application/json',
'Content-Type: application/x-www-form-urlencoded'
);
$payload = array(
'key' => 'JP***g', // Merchant key provided by PayU
'txnid' => 'ENFQR001', // Unique transaction ID generated by merchant
'amount' => '10.00', // Transaction amount
'firstname' => 'PayU User', // Customer first name
'email' => '[email protected]', // Customer email address
'phone' => '9876543210', // Customer phone number
'productinfo' => 'iPhone', // Product or order description
'surl' => 'https://apiplayground-response.herokuapp.com/', // Success callback URL
'furl' => 'https://apiplayground-response.herokuapp.com/', // Failure callback URL
'enforce_paymethod' => 'qr', // Enforce payment method(s): qr
'hash' => 'REPLACE_WITH_GENERATED_HASH' // SHA-512 hash generated on server
);
$ch = curl_init();
curl_setopt($ch, CURLOPT_URL, $url);
curl_setopt($ch, CURLOPT_POST, 1);
curl_setopt($ch, CURLOPT_POSTFIELDS, http_build_query($payload));
curl_setopt($ch, CURLOPT_HTTPHEADER, $headers);
curl_setopt($ch, CURLOPT_RETURNTRANSFER, true);
$response = curl_exec($ch);
curl_close($ch);
echo $response;
?>use strict;
use warnings;
use LWP::UserAgent;
use HTTP::Request::Common;
# PayU Hosted Checkout - enforce payment method customization
my $url = 'https://test.payu.in/_payment';
my $ua = LWP::UserAgent->new;
my %payload = (
key => 'JP***g', # Merchant key provided by PayU
txnid => 'ENFQR001', # Unique transaction ID generated by merchant
amount => '10.00', # Transaction amount
firstname => 'PayU User', # Customer first name
email => '[email protected]', # Customer email address
phone => '9876543210', # Customer phone number
productinfo => 'iPhone', # Product or order description
surl => 'https://apiplayground-response.herokuapp.com/', # Success callback URL
furl => 'https://apiplayground-response.herokuapp.com/', # Failure callback URL
enforce_paymethod => 'qr', # Enforce payment method(s): qr
hash => 'REPLACE_WITH_GENERATED_HASH' # SHA-512 hash generated on server
);
my $response = $ua->post(
$url,
'accept' => 'application/json',
'Content-Type' => 'application/x-www-form-urlencoded',
Content => \%payload
);
print $response->content;creditcard|netbanking|cashcard
All the credit card, Net Banking, and cash card options are displayed (as the whole category is enforced for these).
Note: Ensure you use this parameter only after testing properly as an incorrect string will lead to undesirable payment options being displayed.
For an example procedure on how to enforce payment with a credit card, refer to Enforce Payment with Credit Card.
Sample request with multiple categories
Credit Card and Debit Card (creditcard|debitcard)
# PayU Hosted Checkout - enforce payment method customization
curl -X POST "https://test.payu.in/_payment" \
      -H "accept: application/json" \
      -H "Content-Type: application/x-www-form-urlencoded" \
      -d "key=JP***g&txnid=ENFCCDC001&amount=10.00&firstname=PayU%20User&[email protected]&phone=9876543210&productinfo=iPhone&surl=https://apiplayground-response.herokuapp.com/&furl=https://apiplayground-response.herokuapp.com/&enforce_paymethod=creditcard|debitcard&hash=REPLACE_WITH_GENERATED_HASH"
# Parameters include key, txnid, amount, surl, furl, hash; enforce_paymethod=creditcard|debitcard
import requests
# PayU Hosted Checkout - enforce payment method customization
# PayU Hosted Checkout Collect Payment API endpoint (test environment)
url = "https://test.payu.in/_payment"
headers = {
"accept": "application/json",
"Content-Type": "application/x-www-form-urlencoded"
}
payload = {
'key': 'JP***g', # Merchant key provided by PayU
'txnid': 'ENFCCDC001', # Unique transaction ID generated by merchant
'amount': '10.00', # Transaction amount
'firstname': 'PayU User', # Customer first name
'email': '[email protected]', # Customer email address
'phone': '9876543210', # Customer phone number
'productinfo': 'iPhone', # Product or order description
'surl': 'https://apiplayground-response.herokuapp.com/', # Success callback URL
'furl': 'https://apiplayground-response.herokuapp.com/', # Failure callback URL
'enforce_paymethod': 'creditcard|debitcard', # Enforce payment method(s): creditcard|debitcard
'hash': 'REPLACE_WITH_GENERATED_HASH', # SHA-512 hash generated on server
}
response = requests.post(url, headers=headers, data=payload)
print(response.text)using System;
using System.Net.Http;
using System.Collections.Generic;
using System.Threading.Tasks;
class Program
{
static async Task Main(string[] args)
{
// PayU Hosted Checkout - enforce payment method customization
using var client = new HttpClient();
var url = "https://test.payu.in/_payment";
client.DefaultRequestHeaders.Add("accept", "application/json");
var payload = new Dictionary<string, string>
{
{ "key", "JP***g" }, // Merchant key provided by PayU
{ "txnid", "ENFCCDC001" }, // Unique transaction ID generated by merchant
{ "amount", "10.00" }, // Transaction amount
{ "firstname", "PayU User" }, // Customer first name
{ "email", "[email protected]" }, // Customer email address
{ "phone", "9876543210" }, // Customer phone number
{ "productinfo", "iPhone" }, // Product or order description
{ "surl", "https://apiplayground-response.herokuapp.com/" }, // Success callback URL
{ "furl", "https://apiplayground-response.herokuapp.com/" }, // Failure callback URL
{ "enforce_paymethod", "creditcard|debitcard" }, // Enforce payment method(s): creditcard|debitcard
{ "hash", "REPLACE_WITH_GENERATED_HASH" }, // SHA-512 hash generated on server
};
var content = new FormUrlEncodedContent(payload);
var response = await client.PostAsync(url, content);
var result = await response.Content.ReadAsStringAsync();
Console.WriteLine(result);
}
}const axios = require('axios');
const qs = require('querystring');
// PayU Hosted Checkout - enforce payment method customization
// PayU Hosted Checkout Collect Payment API endpoint (test environment)
const url = 'https://test.payu.in/_payment';
const headers = {
'accept': 'application/json',
'Content-Type': 'application/x-www-form-urlencoded'
};
const payload = {
'key': 'JP***g', // Merchant key provided by PayU
'txnid': 'ENFCCDC001', // Unique transaction ID generated by merchant
'amount': '10.00', // Transaction amount
'firstname': 'PayU User', // Customer first name
'email': '[email protected]', // Customer email address
'phone': '9876543210', // Customer phone number
'productinfo': 'iPhone', // Product or order description
'surl': 'https://apiplayground-response.herokuapp.com/', // Success callback URL
'furl': 'https://apiplayground-response.herokuapp.com/', // Failure callback URL
'enforce_paymethod': 'creditcard|debitcard', // Enforce payment method(s): creditcard|debitcard
'hash': 'REPLACE_WITH_GENERATED_HASH' // SHA-512 hash generated on server
};
axios.post(url, qs.stringify(payload), { headers: headers })
.then(response => {
console.log(response.data);
})
.catch(error => {
console.error(error);
});import java.io.*;
import java.net.*;
import java.net.http.*;
public class PayUPayment {
public static void main(String[] args) throws IOException, InterruptedException {
// PayU Hosted Checkout - enforce payment method customization
HttpClient client = HttpClient.newHttpClient();
// Request body: key, txnid, amount, surl, furl, hash; enforce_paymethod=creditcard|debitcard
String formData = "key=JP***g&txnid=ENFCCDC001&amount=10.00&firstname=PayU%20User&[email protected]&phone=9876543210&productinfo=iPhone&surl=https://apiplayground-response.herokuapp.com/&furl=https://apiplayground-response.herokuapp.com/&enforce_paymethod=creditcard|debitcard&hash=REPLACE_WITH_GENERATED_HASH";
HttpRequest request = HttpRequest.newBuilder()
.uri(URI.create("https://test.payu.in/_payment"))
.header("accept", "application/json")
.header("Content-Type", "application/x-www-form-urlencoded")
.POST(HttpRequest.BodyPublishers.ofString(formData))
.build();
HttpResponse<String> response = client.send(request,
HttpResponse.BodyHandlers.ofString());
System.out.println(response.body());
}
}<?php
// PayU Hosted Checkout - enforce payment method customization
$url = 'https://test.payu.in/_payment';
$headers = array(
'accept: application/json',
'Content-Type: application/x-www-form-urlencoded'
);
$payload = array(
'key' => 'JP***g', // Merchant key provided by PayU
'txnid' => 'ENFCCDC001', // Unique transaction ID generated by merchant
'amount' => '10.00', // Transaction amount
'firstname' => 'PayU User', // Customer first name
'email' => '[email protected]', // Customer email address
'phone' => '9876543210', // Customer phone number
'productinfo' => 'iPhone', // Product or order description
'surl' => 'https://apiplayground-response.herokuapp.com/', // Success callback URL
'furl' => 'https://apiplayground-response.herokuapp.com/', // Failure callback URL
'enforce_paymethod' => 'creditcard|debitcard', // Enforce payment method(s): creditcard|debitcard
'hash' => 'REPLACE_WITH_GENERATED_HASH' // SHA-512 hash generated on server
);
$ch = curl_init();
curl_setopt($ch, CURLOPT_URL, $url);
curl_setopt($ch, CURLOPT_POST, 1);
curl_setopt($ch, CURLOPT_POSTFIELDS, http_build_query($payload));
curl_setopt($ch, CURLOPT_HTTPHEADER, $headers);
curl_setopt($ch, CURLOPT_RETURNTRANSFER, true);
$response = curl_exec($ch);
curl_close($ch);
echo $response;
?>use strict;
use warnings;
use LWP::UserAgent;
use HTTP::Request::Common;
# PayU Hosted Checkout - enforce payment method customization
my $url = 'https://test.payu.in/_payment';
my $ua = LWP::UserAgent->new;
my %payload = (
key => 'JP***g', # Merchant key provided by PayU
txnid => 'ENFCCDC001', # Unique transaction ID generated by merchant
amount => '10.00', # Transaction amount
firstname => 'PayU User', # Customer first name
email => '[email protected]', # Customer email address
phone => '9876543210', # Customer phone number
productinfo => 'iPhone', # Product or order description
surl => 'https://apiplayground-response.herokuapp.com/', # Success callback URL
furl => 'https://apiplayground-response.herokuapp.com/', # Failure callback URL
enforce_paymethod => 'creditcard|debitcard', # Enforce payment method(s): creditcard|debitcard
hash => 'REPLACE_WITH_GENERATED_HASH' # SHA-512 hash generated on server
);
my $response = $ua->post(
$url,
'accept' => 'application/json',
'Content-Type' => 'application/x-www-form-urlencoded',
Content => \%payload
);
print $response->content;Credit Card, Net Banking, and Wallet (creditcard|netbanking|cashcard)
# PayU Hosted Checkout - enforce payment method customization
curl -X POST "https://test.payu.in/_payment" \
      -H "accept: application/json" \
      -H "Content-Type: application/x-www-form-urlencoded" \
      -d "key=JP***g&txnid=ENFMIX001&amount=10.00&firstname=PayU%20User&[email protected]&phone=9876543210&productinfo=iPhone&surl=https://apiplayground-response.herokuapp.com/&furl=https://apiplayground-response.herokuapp.com/&enforce_paymethod=creditcard|netbanking|cashcard&hash=REPLACE_WITH_GENERATED_HASH"
# Parameters include key, txnid, amount, surl, furl, hash; enforce_paymethod=creditcard|netbanking|cashcard
import requests
# PayU Hosted Checkout - enforce payment method customization
# PayU Hosted Checkout Collect Payment API endpoint (test environment)
url = "https://test.payu.in/_payment"
headers = {
"accept": "application/json",
"Content-Type": "application/x-www-form-urlencoded"
}
payload = {
'key': 'JP***g', # Merchant key provided by PayU
'txnid': 'ENFMIX001', # Unique transaction ID generated by merchant
'amount': '10.00', # Transaction amount
'firstname': 'PayU User', # Customer first name
'email': '[email protected]', # Customer email address
'phone': '9876543210', # Customer phone number
'productinfo': 'iPhone', # Product or order description
'surl': 'https://apiplayground-response.herokuapp.com/', # Success callback URL
'furl': 'https://apiplayground-response.herokuapp.com/', # Failure callback URL
'enforce_paymethod': 'creditcard|netbanking|cashcard', # Enforce payment method(s): creditcard|netbanking|cashcard
'hash': 'REPLACE_WITH_GENERATED_HASH', # SHA-512 hash generated on server
}
response = requests.post(url, headers=headers, data=payload)
print(response.text)using System;
using System.Net.Http;
using System.Collections.Generic;
using System.Threading.Tasks;
class Program
{
static async Task Main(string[] args)
{
// PayU Hosted Checkout - enforce payment method customization
using var client = new HttpClient();
var url = "https://test.payu.in/_payment";
client.DefaultRequestHeaders.Add("accept", "application/json");
var payload = new Dictionary<string, string>
{
{ "key", "JP***g" }, // Merchant key provided by PayU
{ "txnid", "ENFMIX001" }, // Unique transaction ID generated by merchant
{ "amount", "10.00" }, // Transaction amount
{ "firstname", "PayU User" }, // Customer first name
{ "email", "[email protected]" }, // Customer email address
{ "phone", "9876543210" }, // Customer phone number
{ "productinfo", "iPhone" }, // Product or order description
{ "surl", "https://apiplayground-response.herokuapp.com/" }, // Success callback URL
{ "furl", "https://apiplayground-response.herokuapp.com/" }, // Failure callback URL
{ "enforce_paymethod", "creditcard|netbanking|cashcard" }, // Enforce payment method(s): creditcard|netbanking|cashcard
{ "hash", "REPLACE_WITH_GENERATED_HASH" }, // SHA-512 hash generated on server
};
var content = new FormUrlEncodedContent(payload);
var response = await client.PostAsync(url, content);
var result = await response.Content.ReadAsStringAsync();
Console.WriteLine(result);
}
}const axios = require('axios');
const qs = require('querystring');
// PayU Hosted Checkout - enforce payment method customization
// PayU Hosted Checkout Collect Payment API endpoint (test environment)
const url = 'https://test.payu.in/_payment';
const headers = {
'accept': 'application/json',
'Content-Type': 'application/x-www-form-urlencoded'
};
const payload = {
'key': 'JP***g', // Merchant key provided by PayU
'txnid': 'ENFMIX001', // Unique transaction ID generated by merchant
'amount': '10.00', // Transaction amount
'firstname': 'PayU User', // Customer first name
'email': '[email protected]', // Customer email address
'phone': '9876543210', // Customer phone number
'productinfo': 'iPhone', // Product or order description
'surl': 'https://apiplayground-response.herokuapp.com/', // Success callback URL
'furl': 'https://apiplayground-response.herokuapp.com/', // Failure callback URL
'enforce_paymethod': 'creditcard|netbanking|cashcard', // Enforce payment method(s): creditcard|netbanking|cashcard
'hash': 'REPLACE_WITH_GENERATED_HASH' // SHA-512 hash generated on server
};
axios.post(url, qs.stringify(payload), { headers: headers })
.then(response => {
console.log(response.data);
})
.catch(error => {
console.error(error);
});import java.io.*;
import java.net.*;
import java.net.http.*;
public class PayUPayment {
public static void main(String[] args) throws IOException, InterruptedException {
// PayU Hosted Checkout - enforce payment method customization
HttpClient client = HttpClient.newHttpClient();
// Request body: key, txnid, amount, surl, furl, hash; enforce_paymethod=creditcard|netbanking|cashcard
String formData = "key=JP***g&txnid=ENFMIX001&amount=10.00&firstname=PayU%20User&[email protected]&phone=9876543210&productinfo=iPhone&surl=https://apiplayground-response.herokuapp.com/&furl=https://apiplayground-response.herokuapp.com/&enforce_paymethod=creditcard|netbanking|cashcard&hash=REPLACE_WITH_GENERATED_HASH";
HttpRequest request = HttpRequest.newBuilder()
.uri(URI.create("https://test.payu.in/_payment"))
.header("accept", "application/json")
.header("Content-Type", "application/x-www-form-urlencoded")
.POST(HttpRequest.BodyPublishers.ofString(formData))
.build();
HttpResponse<String> response = client.send(request,
HttpResponse.BodyHandlers.ofString());
System.out.println(response.body());
}
}<?php
// PayU Hosted Checkout - enforce payment method customization
$url = 'https://test.payu.in/_payment';
$headers = array(
'accept: application/json',
'Content-Type: application/x-www-form-urlencoded'
);
$payload = array(
'key' => 'JP***g', // Merchant key provided by PayU
'txnid' => 'ENFMIX001', // Unique transaction ID generated by merchant
'amount' => '10.00', // Transaction amount
'firstname' => 'PayU User', // Customer first name
'email' => '[email protected]', // Customer email address
'phone' => '9876543210', // Customer phone number
'productinfo' => 'iPhone', // Product or order description
'surl' => 'https://apiplayground-response.herokuapp.com/', // Success callback URL
'furl' => 'https://apiplayground-response.herokuapp.com/', // Failure callback URL
'enforce_paymethod' => 'creditcard|netbanking|cashcard', // Enforce payment method(s): creditcard|netbanking|cashcard
'hash' => 'REPLACE_WITH_GENERATED_HASH' // SHA-512 hash generated on server
);
$ch = curl_init();
curl_setopt($ch, CURLOPT_URL, $url);
curl_setopt($ch, CURLOPT_POST, 1);
curl_setopt($ch, CURLOPT_POSTFIELDS, http_build_query($payload));
curl_setopt($ch, CURLOPT_HTTPHEADER, $headers);
curl_setopt($ch, CURLOPT_RETURNTRANSFER, true);
$response = curl_exec($ch);
curl_close($ch);
echo $response;
?>use strict;
use warnings;
use LWP::UserAgent;
use HTTP::Request::Common;
# PayU Hosted Checkout - enforce payment method customization
my $url = 'https://test.payu.in/_payment';
my $ua = LWP::UserAgent->new;
my %payload = (
key => 'JP***g', # Merchant key provided by PayU
txnid => 'ENFMIX001', # Unique transaction ID generated by merchant
amount => '10.00', # Transaction amount
firstname => 'PayU User', # Customer first name
email => '[email protected]', # Customer email address
phone => '9876543210', # Customer phone number
productinfo => 'iPhone', # Product or order description
surl => 'https://apiplayground-response.herokuapp.com/', # Success callback URL
furl => 'https://apiplayground-response.herokuapp.com/', # Failure callback URL
enforce_paymethod => 'creditcard|netbanking|cashcard', # Enforce payment method(s): creditcard|netbanking|cashcard
hash => 'REPLACE_WITH_GENERATED_HASH' # SHA-512 hash generated on server
);
my $response = $ua->post(
$url,
'accept' => 'application/json',
'Content-Type' => 'application/x-www-form-urlencoded',
Content => \%payload
);
print $response->content;Hide Specific Payment Modes
The drop_category parameter can be used if you want to hide one or multiple payment options. For example, if you consider the payment options such as credit card, debit card, and net banking, you can hide the credit card mode of payment.
If 30 Net Banking options are available and you want to drop two of those net banking options (that is, do not display those two options on the PayU page), the drop_category parameter can be used effectively.
To drop the whole category, use the following values:
| Category | Category Value |
|---|---|
| Credit Card | CC |
| Debit Card | DC |
| Net Banking | NB |
| NEFT/RTGS | NEFTRTGS |
| EMI | EMI |
| Wallet | CASH |
| BNPL | BNPL |
| Sodexo | SODEXO |
To drop sub-categories mentioned in the above table, use the respective bank codes for them. For the list bankcodes, refer to Bank and Card Codes for Integration.
Checkout customization examples
drop_category – DC|VISA|MAST
In this example:
- For the debit card category, only Visa and Master Card options will be dropped, so they are not displayed on the PayU page.
- All other active payment options are displayed.
In this example:
- For the credit card category, only the AMEX option is dropped and not displayed on the PayU page.
- In the debit card category, only the VISA option would be dropped.
- In the EMI category, only HDFC 6 months EMI option (bank code – EMI6) will be dropped.
- All the other active payment options will be displayed on the PayU page.
Note: Use this parameter only after proper testing as an incorrect string will display undesirable payment modes.
Sample request with a single payment method removed or dropped
```curl
# PayU Hosted Checkout - drop payment category customization
curl -X POST "https://test.payu.in/_payment" \
-H "accept: application/json" \
-H "Content-Type: application/x-www-form-urlencoded" \
-d "key=JP***g&txnid=DROPCC001&amount=10.00&firstname=PayU%20User&[email protected]&phone=9876543210&productinfo=iPhone&surl=https://apiplayground-response.herokuapp.com/&furl=https://apiplayground-response.herokuapp.com/&drop_category=CC&hash=REPLACE_WITH_GENERATED_HASH"
# Parameters include key, txnid, amount, surl, furl, hash; drop_category=CC
```
```python
import requests
# PayU Hosted Checkout - drop payment category customization
# PayU Hosted Checkout Collect Payment API endpoint (test environment)
url = "https://test.payu.in/_payment"
headers = {
"accept": "application/json",
"Content-Type": "application/x-www-form-urlencoded"
}
payload = {
'key': 'JP***g', # Merchant key provided by PayU
'txnid': 'DROPCC001', # Unique transaction ID generated by merchant
'amount': '10.00', # Transaction amount
'firstname': 'PayU User', # Customer first name
'email': '[email protected]', # Customer email address
'phone': '9876543210', # Customer phone number
'productinfo': 'iPhone', # Product or order description
'surl': 'https://apiplayground-response.herokuapp.com/', # Success callback URL
'furl': 'https://apiplayground-response.herokuapp.com/', # Failure callback URL
'drop_category': 'CC', # Hide payment category or sub-category: CC
'hash': 'REPLACE_WITH_GENERATED_HASH', # SHA-512 hash generated on server
}
response = requests.post(url, headers=headers, data=payload)
print(response.text)
```
```csharp
using System;
using System.Net.Http;
using System.Collections.Generic;
using System.Threading.Tasks;
class Program
{
static async Task Main(string[] args)
{
// PayU Hosted Checkout - drop payment category customization
using var client = new HttpClient();
var url = "https://test.payu.in/_payment";
client.DefaultRequestHeaders.Add("accept", "application/json");
var payload = new Dictionary<string, string>
{
{ "key", "JP***g" }, // Merchant key provided by PayU
{ "txnid", "DROPCC001" }, // Unique transaction ID generated by merchant
{ "amount", "10.00" }, // Transaction amount
{ "firstname", "PayU User" }, // Customer first name
{ "email", "[email protected]" }, // Customer email address
{ "phone", "9876543210" }, // Customer phone number
{ "productinfo", "iPhone" }, // Product or order description
{ "surl", "https://apiplayground-response.herokuapp.com/" }, // Success callback URL
{ "furl", "https://apiplayground-response.herokuapp.com/" }, // Failure callback URL
{ "drop_category", "CC" }, // Hide payment category or sub-category: CC
{ "hash", "REPLACE_WITH_GENERATED_HASH" }, // SHA-512 hash generated on server
};
var content = new FormUrlEncodedContent(payload);
var response = await client.PostAsync(url, content);
var result = await response.Content.ReadAsStringAsync();
Console.WriteLine(result);
}
}
```
```javascript
const axios = require('axios');
const qs = require('querystring');
// PayU Hosted Checkout - drop payment category customization
// PayU Hosted Checkout Collect Payment API endpoint (test environment)
const url = 'https://test.payu.in/_payment';
const headers = {
'accept': 'application/json',
'Content-Type': 'application/x-www-form-urlencoded'
};
const payload = {
'key': 'JP***g', // Merchant key provided by PayU
'txnid': 'DROPCC001', // Unique transaction ID generated by merchant
'amount': '10.00', // Transaction amount
'firstname': 'PayU User', // Customer first name
'email': '[email protected]', // Customer email address
'phone': '9876543210', // Customer phone number
'productinfo': 'iPhone', // Product or order description
'surl': 'https://apiplayground-response.herokuapp.com/', // Success callback URL
'furl': 'https://apiplayground-response.herokuapp.com/', // Failure callback URL
'drop_category': 'CC', // Hide payment category or sub-category: CC
'hash': 'REPLACE_WITH_GENERATED_HASH' // SHA-512 hash generated on server
};
axios.post(url, qs.stringify(payload), { headers: headers })
.then(response => {
console.log(response.data);
})
.catch(error => {
console.error(error);
});
```
```java
import java.io.*;
import java.net.*;
import java.net.http.*;
public class PayUPayment {
public static void main(String[] args) throws IOException, InterruptedException {
// PayU Hosted Checkout - drop payment category customization
HttpClient client = HttpClient.newHttpClient();
// Request body: key, txnid, amount, surl, furl, hash; drop_category=CC
String formData = "key=JP***g&txnid=DROPCC001&amount=10.00&firstname=PayU%20User&[email protected]&phone=9876543210&productinfo=iPhone&surl=https://apiplayground-response.herokuapp.com/&furl=https://apiplayground-response.herokuapp.com/&drop_category=CC&hash=REPLACE_WITH_GENERATED_HASH";
HttpRequest request = HttpRequest.newBuilder()
.uri(URI.create("https://test.payu.in/_payment"))
.header("accept", "application/json")
.header("Content-Type", "application/x-www-form-urlencoded")
.POST(HttpRequest.BodyPublishers.ofString(formData))
.build();
HttpResponse<String> response = client.send(request,
HttpResponse.BodyHandlers.ofString());
System.out.println(response.body());
}
}
```
```php
<?php
// PayU Hosted Checkout - drop payment category customization
$url = 'https://test.payu.in/_payment';
$headers = array(
'accept: application/json',
'Content-Type: application/x-www-form-urlencoded'
);
$payload = array(
'key' => 'JP***g', // Merchant key provided by PayU
'txnid' => 'DROPCC001', // Unique transaction ID generated by merchant
'amount' => '10.00', // Transaction amount
'firstname' => 'PayU User', // Customer first name
'email' => '[email protected]', // Customer email address
'phone' => '9876543210', // Customer phone number
'productinfo' => 'iPhone', // Product or order description
'surl' => 'https://apiplayground-response.herokuapp.com/', // Success callback URL
'furl' => 'https://apiplayground-response.herokuapp.com/', // Failure callback URL
'drop_category' => 'CC', // Hide payment category or sub-category: CC
'hash' => 'REPLACE_WITH_GENERATED_HASH' // SHA-512 hash generated on server
);
$ch = curl_init();
curl_setopt($ch, CURLOPT_URL, $url);
curl_setopt($ch, CURLOPT_POST, 1);
curl_setopt($ch, CURLOPT_POSTFIELDS, http_build_query($payload));
curl_setopt($ch, CURLOPT_HTTPHEADER, $headers);
curl_setopt($ch, CURLOPT_RETURNTRANSFER, true);
$response = curl_exec($ch);
curl_close($ch);
echo $response;
?>
```
```perl
use strict;
use warnings;
use LWP::UserAgent;
use HTTP::Request::Common;
# PayU Hosted Checkout - drop payment category customization
my $url = 'https://test.payu.in/_payment';
my $ua = LWP::UserAgent->new;
my %payload = (
key => 'JP***g', # Merchant key provided by PayU
txnid => 'DROPCC001', # Unique transaction ID generated by merchant
amount => '10.00', # Transaction amount
firstname => 'PayU User', # Customer first name
email => '[email protected]', # Customer email address
phone => '9876543210', # Customer phone number
productinfo => 'iPhone', # Product or order description
surl => 'https://apiplayground-response.herokuapp.com/', # Success callback URL
furl => 'https://apiplayground-response.herokuapp.com/', # Failure callback URL
drop_category => 'CC', # Hide payment category or sub-category: CC
hash => 'REPLACE_WITH_GENERATED_HASH' # SHA-512 hash generated on server
);
my $response = $ua->post(
$url,
'accept' => 'application/json',
'Content-Type' => 'application/x-www-form-urlencoded',
Content => \%payload
);
print $response->content;
```
**Hide Debit Card (`DC`)**
```curl
# PayU Hosted Checkout - drop payment category customization
curl -X POST "https://test.payu.in/_payment" \
-H "accept: application/json" \
-H "Content-Type: application/x-www-form-urlencoded" \
-d "key=JP***g&txnid=DROPD001&amount=10.00&firstname=PayU%20User&[email protected]&phone=9876543210&productinfo=iPhone&surl=https://apiplayground-response.herokuapp.com/&furl=https://apiplayground-response.herokuapp.com/&drop_category=DC&hash=REPLACE_WITH_GENERATED_HASH"
# Parameters include key, txnid, amount, surl, furl, hash; drop_category=DC
```
```python
import requests
# PayU Hosted Checkout - drop payment category customization
# PayU Hosted Checkout Collect Payment API endpoint (test environment)
url = "https://test.payu.in/_payment"
headers = {
"accept": "application/json",
"Content-Type": "application/x-www-form-urlencoded"
}
payload = {
'key': 'JP***g', # Merchant key provided by PayU
'txnid': 'DROPD001', # Unique transaction ID generated by merchant
'amount': '10.00', # Transaction amount
'firstname': 'PayU User', # Customer first name
'email': '[email protected]', # Customer email address
'phone': '9876543210', # Customer phone number
'productinfo': 'iPhone', # Product or order description
'surl': 'https://apiplayground-response.herokuapp.com/', # Success callback URL
'furl': 'https://apiplayground-response.herokuapp.com/', # Failure callback URL
'drop_category': 'DC', # Hide payment category or sub-category: DC
'hash': 'REPLACE_WITH_GENERATED_HASH', # SHA-512 hash generated on server
}
response = requests.post(url, headers=headers, data=payload)
print(response.text)
```
```csharp
using System;
using System.Net.Http;
using System.Collections.Generic;
using System.Threading.Tasks;
class Program
{
static async Task Main(string[] args)
{
// PayU Hosted Checkout - drop payment category customization
using var client = new HttpClient();
var url = "https://test.payu.in/_payment";
client.DefaultRequestHeaders.Add("accept", "application/json");
var payload = new Dictionary<string, string>
{
{ "key", "JP***g" }, // Merchant key provided by PayU
{ "txnid", "DROPD001" }, // Unique transaction ID generated by merchant
{ "amount", "10.00" }, // Transaction amount
{ "firstname", "PayU User" }, // Customer first name
{ "email", "[email protected]" }, // Customer email address
{ "phone", "9876543210" }, // Customer phone number
{ "productinfo", "iPhone" }, // Product or order description
{ "surl", "https://apiplayground-response.herokuapp.com/" }, // Success callback URL
{ "furl", "https://apiplayground-response.herokuapp.com/" }, // Failure callback URL
{ "drop_category", "DC" }, // Hide payment category or sub-category: DC
{ "hash", "REPLACE_WITH_GENERATED_HASH" }, // SHA-512 hash generated on server
};
var content = new FormUrlEncodedContent(payload);
var response = await client.PostAsync(url, content);
var result = await response.Content.ReadAsStringAsync();
Console.WriteLine(result);
}
}
```
```javascript
const axios = require('axios');
const qs = require('querystring');
// PayU Hosted Checkout - drop payment category customization
// PayU Hosted Checkout Collect Payment API endpoint (test environment)
const url = 'https://test.payu.in/_payment';
const headers = {
'accept': 'application/json',
'Content-Type': 'application/x-www-form-urlencoded'
};
const payload = {
'key': 'JP***g', // Merchant key provided by PayU
'txnid': 'DROPD001', // Unique transaction ID generated by merchant
'amount': '10.00', // Transaction amount
'firstname': 'PayU User', // Customer first name
'email': '[email protected]', // Customer email address
'phone': '9876543210', // Customer phone number
'productinfo': 'iPhone', // Product or order description
'surl': 'https://apiplayground-response.herokuapp.com/', // Success callback URL
'furl': 'https://apiplayground-response.herokuapp.com/', // Failure callback URL
'drop_category': 'DC', // Hide payment category or sub-category: DC
'hash': 'REPLACE_WITH_GENERATED_HASH' // SHA-512 hash generated on server
};
axios.post(url, qs.stringify(payload), { headers: headers })
.then(response => {
console.log(response.data);
})
.catch(error => {
console.error(error);
});
```
```java
import java.io.*;
import java.net.*;
import java.net.http.*;
public class PayUPayment {
public static void main(String[] args) throws IOException, InterruptedException {
// PayU Hosted Checkout - drop payment category customization
HttpClient client = HttpClient.newHttpClient();
// Request body: key, txnid, amount, surl, furl, hash; drop_category=DC
String formData = "key=JP***g&txnid=DROPD001&amount=10.00&firstname=PayU%20User&[email protected]&phone=9876543210&productinfo=iPhone&surl=https://apiplayground-response.herokuapp.com/&furl=https://apiplayground-response.herokuapp.com/&drop_category=DC&hash=REPLACE_WITH_GENERATED_HASH";
HttpRequest request = HttpRequest.newBuilder()
.uri(URI.create("https://test.payu.in/_payment"))
.header("accept", "application/json")
.header("Content-Type", "application/x-www-form-urlencoded")
.POST(HttpRequest.BodyPublishers.ofString(formData))
.build();
HttpResponse<String> response = client.send(request,
HttpResponse.BodyHandlers.ofString());
System.out.println(response.body());
}
}
```
```php
<?php
// PayU Hosted Checkout - drop payment category customization
$url = 'https://test.payu.in/_payment';
$headers = array(
'accept: application/json',
'Content-Type: application/x-www-form-urlencoded'
);
$payload = array(
'key' => 'JP***g', // Merchant key provided by PayU
'txnid' => 'DROPD001', // Unique transaction ID generated by merchant
'amount' => '10.00', // Transaction amount
'firstname' => 'PayU User', // Customer first name
'email' => '[email protected]', // Customer email address
'phone' => '9876543210', // Customer phone number
'productinfo' => 'iPhone', // Product or order description
'surl' => 'https://apiplayground-response.herokuapp.com/', // Success callback URL
'furl' => 'https://apiplayground-response.herokuapp.com/', // Failure callback URL
'drop_category' => 'DC', // Hide payment category or sub-category: DC
'hash' => 'REPLACE_WITH_GENERATED_HASH' // SHA-512 hash generated on server
);
$ch = curl_init();
curl_setopt($ch, CURLOPT_URL, $url);
curl_setopt($ch, CURLOPT_POST, 1);
curl_setopt($ch, CURLOPT_POSTFIELDS, http_build_query($payload));
curl_setopt($ch, CURLOPT_HTTPHEADER, $headers);
curl_setopt($ch, CURLOPT_RETURNTRANSFER, true);
$response = curl_exec($ch);
curl_close($ch);
echo $response;
?>
```
```perl
use strict;
use warnings;
use LWP::UserAgent;
use HTTP::Request::Common;
# PayU Hosted Checkout - drop payment category customization
my $url = 'https://test.payu.in/_payment';
my $ua = LWP::UserAgent->new;
my %payload = (
key => 'JP***g', # Merchant key provided by PayU
txnid => 'DROPD001', # Unique transaction ID generated by merchant
amount => '10.00', # Transaction amount
firstname => 'PayU User', # Customer first name
email => '[email protected]', # Customer email address
phone => '9876543210', # Customer phone number
productinfo => 'iPhone', # Product or order description
surl => 'https://apiplayground-response.herokuapp.com/', # Success callback URL
furl => 'https://apiplayground-response.herokuapp.com/', # Failure callback URL
drop_category => 'DC', # Hide payment category or sub-category: DC
hash => 'REPLACE_WITH_GENERATED_HASH' # SHA-512 hash generated on server
);
my $response = $ua->post(
$url,
'accept' => 'application/json',
'Content-Type' => 'application/x-www-form-urlencoded',
Content => \%payload
);
print $response->content;
```
**Hide Net Banking (`NB`)**
```curl
# PayU Hosted Checkout - drop payment category customization
curl -X POST "https://test.payu.in/_payment" \
-H "accept: application/json" \
-H "Content-Type: application/x-www-form-urlencoded" \
-d "key=JP***g&txnid=DROPB001&amount=10.00&firstname=PayU%20User&[email protected]&phone=9876543210&productinfo=iPhone&surl=https://apiplayground-response.herokuapp.com/&furl=https://apiplayground-response.herokuapp.com/&drop_category=NB&hash=REPLACE_WITH_GENERATED_HASH"
# Parameters include key, txnid, amount, surl, furl, hash; drop_category=NB
```
```python
import requests
# PayU Hosted Checkout - drop payment category customization
# PayU Hosted Checkout Collect Payment API endpoint (test environment)
url = "https://test.payu.in/_payment"
headers = {
"accept": "application/json",
"Content-Type": "application/x-www-form-urlencoded"
}
payload = {
'key': 'JP***g', # Merchant key provided by PayU
'txnid': 'DROPB001', # Unique transaction ID generated by merchant
'amount': '10.00', # Transaction amount
'firstname': 'PayU User', # Customer first name
'email': '[email protected]', # Customer email address
'phone': '9876543210', # Customer phone number
'productinfo': 'iPhone', # Product or order description
'surl': 'https://apiplayground-response.herokuapp.com/', # Success callback URL
'furl': 'https://apiplayground-response.herokuapp.com/', # Failure callback URL
'drop_category': 'NB', # Hide payment category or sub-category: NB
'hash': 'REPLACE_WITH_GENERATED_HASH', # SHA-512 hash generated on server
}
response = requests.post(url, headers=headers, data=payload)
print(response.text)
```
```csharp
using System;
using System.Net.Http;
using System.Collections.Generic;
using System.Threading.Tasks;
class Program
{
static async Task Main(string[] args)
{
// PayU Hosted Checkout - drop payment category customization
using var client = new HttpClient();
var url = "https://test.payu.in/_payment";
client.DefaultRequestHeaders.Add("accept", "application/json");
var payload = new Dictionary<string, string>
{
{ "key", "JP***g" }, // Merchant key provided by PayU
{ "txnid", "DROPB001" }, // Unique transaction ID generated by merchant
{ "amount", "10.00" }, // Transaction amount
{ "firstname", "PayU User" }, // Customer first name
{ "email", "[email protected]" }, // Customer email address
{ "phone", "9876543210" }, // Customer phone number
{ "productinfo", "iPhone" }, // Product or order description
{ "surl", "https://apiplayground-response.herokuapp.com/" }, // Success callback URL
{ "furl", "https://apiplayground-response.herokuapp.com/" }, // Failure callback URL
{ "drop_category", "NB" }, // Hide payment category or sub-category: NB
{ "hash", "REPLACE_WITH_GENERATED_HASH" }, // SHA-512 hash generated on server
};
var content = new FormUrlEncodedContent(payload);
var response = await client.PostAsync(url, content);
var result = await response.Content.ReadAsStringAsync();
Console.WriteLine(result);
}
}
```
```javascript
const axios = require('axios');
const qs = require('querystring');
// PayU Hosted Checkout - drop payment category customization
// PayU Hosted Checkout Collect Payment API endpoint (test environment)
const url = 'https://test.payu.in/_payment';
const headers = {
'accept': 'application/json',
'Content-Type': 'application/x-www-form-urlencoded'
};
const payload = {
'key': 'JP***g', // Merchant key provided by PayU
'txnid': 'DROPB001', // Unique transaction ID generated by merchant
'amount': '10.00', // Transaction amount
'firstname': 'PayU User', // Customer first name
'email': '[email protected]', // Customer email address
'phone': '9876543210', // Customer phone number
'productinfo': 'iPhone', // Product or order description
'surl': 'https://apiplayground-response.herokuapp.com/', // Success callback URL
'furl': 'https://apiplayground-response.herokuapp.com/', // Failure callback URL
'drop_category': 'NB', // Hide payment category or sub-category: NB
'hash': 'REPLACE_WITH_GENERATED_HASH' // SHA-512 hash generated on server
};
axios.post(url, qs.stringify(payload), { headers: headers })
.then(response => {
console.log(response.data);
})
.catch(error => {
console.error(error);
});
```
```java
import java.io.*;
import java.net.*;
import java.net.http.*;
public class PayUPayment {
public static void main(String[] args) throws IOException, InterruptedException {
// PayU Hosted Checkout - drop payment category customization
HttpClient client = HttpClient.newHttpClient();
// Request body: key, txnid, amount, surl, furl, hash; drop_category=NB
String formData = "key=JP***g&txnid=DROPB001&amount=10.00&firstname=PayU%20User&[email protected]&phone=9876543210&productinfo=iPhone&surl=https://apiplayground-response.herokuapp.com/&furl=https://apiplayground-response.herokuapp.com/&drop_category=NB&hash=REPLACE_WITH_GENERATED_HASH";
HttpRequest request = HttpRequest.newBuilder()
.uri(URI.create("https://test.payu.in/_payment"))
.header("accept", "application/json")
.header("Content-Type", "application/x-www-form-urlencoded")
.POST(HttpRequest.BodyPublishers.ofString(formData))
.build();
HttpResponse<String> response = client.send(request,
HttpResponse.BodyHandlers.ofString());
System.out.println(response.body());
}
}
```
```php
<?php
// PayU Hosted Checkout - drop payment category customization
$url = 'https://test.payu.in/_payment';
$headers = array(
'accept: application/json',
'Content-Type: application/x-www-form-urlencoded'
);
$payload = array(
'key' => 'JP***g', // Merchant key provided by PayU
'txnid' => 'DROPB001', // Unique transaction ID generated by merchant
'amount' => '10.00', // Transaction amount
'firstname' => 'PayU User', // Customer first name
'email' => '[email protected]', // Customer email address
'phone' => '9876543210', // Customer phone number
'productinfo' => 'iPhone', // Product or order description
'surl' => 'https://apiplayground-response.herokuapp.com/', // Success callback URL
'furl' => 'https://apiplayground-response.herokuapp.com/', // Failure callback URL
'drop_category' => 'NB', // Hide payment category or sub-category: NB
'hash' => 'REPLACE_WITH_GENERATED_HASH' // SHA-512 hash generated on server
);
$ch = curl_init();
curl_setopt($ch, CURLOPT_URL, $url);
curl_setopt($ch, CURLOPT_POST, 1);
curl_setopt($ch, CURLOPT_POSTFIELDS, http_build_query($payload));
curl_setopt($ch, CURLOPT_HTTPHEADER, $headers);
curl_setopt($ch, CURLOPT_RETURNTRANSFER, true);
$response = curl_exec($ch);
curl_close($ch);
echo $response;
?>
```
```perl
use strict;
use warnings;
use LWP::UserAgent;
use HTTP::Request::Common;
# PayU Hosted Checkout - drop payment category customization
my $url = 'https://test.payu.in/_payment';
my $ua = LWP::UserAgent->new;
my %payload = (
key => 'JP***g', # Merchant key provided by PayU
txnid => 'DROPB001', # Unique transaction ID generated by merchant
amount => '10.00', # Transaction amount
firstname => 'PayU User', # Customer first name
email => '[email protected]', # Customer email address
phone => '9876543210', # Customer phone number
productinfo => 'iPhone', # Product or order description
surl => 'https://apiplayground-response.herokuapp.com/', # Success callback URL
furl => 'https://apiplayground-response.herokuapp.com/', # Failure callback URL
drop_category => 'NB', # Hide payment category or sub-category: NB
hash => 'REPLACE_WITH_GENERATED_HASH' # SHA-512 hash generated on server
);
my $response = $ua->post(
$url,
'accept' => 'application/json',
'Content-Type' => 'application/x-www-form-urlencoded',
Content => \%payload
);
print $response->content;
```
**Hide NEFT/RTGS (`NEFTRTGS`)**
```curl
# PayU Hosted Checkout - drop payment category customization
curl -X POST "https://test.payu.in/_payment" \
-H "accept: application/json" \
-H "Content-Type: application/x-www-form-urlencoded" \
-d "key=JP***g&txnid=DROPNE001&amount=10.00&firstname=PayU%20User&[email protected]&phone=9876543210&productinfo=iPhone&surl=https://apiplayground-response.herokuapp.com/&furl=https://apiplayground-response.herokuapp.com/&drop_category=NEFTRTGS&hash=REPLACE_WITH_GENERATED_HASH"
# Parameters include key, txnid, amount, surl, furl, hash; drop_category=NEFTRTGS
```
```python
import requests
# PayU Hosted Checkout - drop payment category customization
# PayU Hosted Checkout Collect Payment API endpoint (test environment)
url = "https://test.payu.in/_payment"
headers = {
"accept": "application/json",
"Content-Type": "application/x-www-form-urlencoded"
}
payload = {
'key': 'JP***g', # Merchant key provided by PayU
'txnid': 'DROPNE001', # Unique transaction ID generated by merchant
'amount': '10.00', # Transaction amount
'firstname': 'PayU User', # Customer first name
'email': '[email protected]', # Customer email address
'phone': '9876543210', # Customer phone number
'productinfo': 'iPhone', # Product or order description
'surl': 'https://apiplayground-response.herokuapp.com/', # Success callback URL
'furl': 'https://apiplayground-response.herokuapp.com/', # Failure callback URL
'drop_category': 'NEFTRTGS', # Hide payment category or sub-category: NEFTRTGS
'hash': 'REPLACE_WITH_GENERATED_HASH', # SHA-512 hash generated on server
}
response = requests.post(url, headers=headers, data=payload)
print(response.text)
```
```csharp
using System;
using System.Net.Http;
using System.Collections.Generic;
using System.Threading.Tasks;
class Program
{
static async Task Main(string[] args)
{
// PayU Hosted Checkout - drop payment category customization
using var client = new HttpClient();
var url = "https://test.payu.in/_payment";
client.DefaultRequestHeaders.Add("accept", "application/json");
var payload = new Dictionary<string, string>
{
{ "key", "JP***g" }, // Merchant key provided by PayU
{ "txnid", "DROPNE001" }, // Unique transaction ID generated by merchant
{ "amount", "10.00" }, // Transaction amount
{ "firstname", "PayU User" }, // Customer first name
{ "email", "[email protected]" }, // Customer email address
{ "phone", "9876543210" }, // Customer phone number
{ "productinfo", "iPhone" }, // Product or order description
{ "surl", "https://apiplayground-response.herokuapp.com/" }, // Success callback URL
{ "furl", "https://apiplayground-response.herokuapp.com/" }, // Failure callback URL
{ "drop_category", "NEFTRTGS" }, // Hide payment category or sub-category: NEFTRTGS
{ "hash", "REPLACE_WITH_GENERATED_HASH" }, // SHA-512 hash generated on server
};
var content = new FormUrlEncodedContent(payload);
var response = await client.PostAsync(url, content);
var result = await response.Content.ReadAsStringAsync();
Console.WriteLine(result);
}
}
```
```javascript
const axios = require('axios');
const qs = require('querystring');
// PayU Hosted Checkout - drop payment category customization
// PayU Hosted Checkout Collect Payment API endpoint (test environment)
const url = 'https://test.payu.in/_payment';
const headers = {
'accept': 'application/json',
'Content-Type': 'application/x-www-form-urlencoded'
};
const payload = {
'key': 'JP***g', // Merchant key provided by PayU
'txnid': 'DROPNE001', // Unique transaction ID generated by merchant
'amount': '10.00', // Transaction amount
'firstname': 'PayU User', // Customer first name
'email': '[email protected]', // Customer email address
'phone': '9876543210', // Customer phone number
'productinfo': 'iPhone', // Product or order description
'surl': 'https://apiplayground-response.herokuapp.com/', // Success callback URL
'furl': 'https://apiplayground-response.herokuapp.com/', // Failure callback URL
'drop_category': 'NEFTRTGS', // Hide payment category or sub-category: NEFTRTGS
'hash': 'REPLACE_WITH_GENERATED_HASH' // SHA-512 hash generated on server
};
axios.post(url, qs.stringify(payload), { headers: headers })
.then(response => {
console.log(response.data);
})
.catch(error => {
console.error(error);
});
```
```java
import java.io.*;
import java.net.*;
import java.net.http.*;
public class PayUPayment {
public static void main(String[] args) throws IOException, InterruptedException {
// PayU Hosted Checkout - drop payment category customization
HttpClient client = HttpClient.newHttpClient();
// Request body: key, txnid, amount, surl, furl, hash; drop_category=NEFTRTGS
String formData = "key=JP***g&txnid=DROPNE001&amount=10.00&firstname=PayU%20User&[email protected]&phone=9876543210&productinfo=iPhone&surl=https://apiplayground-response.herokuapp.com/&furl=https://apiplayground-response.herokuapp.com/&drop_category=NEFTRTGS&hash=REPLACE_WITH_GENERATED_HASH";
HttpRequest request = HttpRequest.newBuilder()
.uri(URI.create("https://test.payu.in/_payment"))
.header("accept", "application/json")
.header("Content-Type", "application/x-www-form-urlencoded")
.POST(HttpRequest.BodyPublishers.ofString(formData))
.build();
HttpResponse<String> response = client.send(request,
HttpResponse.BodyHandlers.ofString());
System.out.println(response.body());
}
}
```
```php
<?php
// PayU Hosted Checkout - drop payment category customization
$url = 'https://test.payu.in/_payment';
$headers = array(
'accept: application/json',
'Content-Type: application/x-www-form-urlencoded'
);
$payload = array(
'key' => 'JP***g', // Merchant key provided by PayU
'txnid' => 'DROPNE001', // Unique transaction ID generated by merchant
'amount' => '10.00', // Transaction amount
'firstname' => 'PayU User', // Customer first name
'email' => '[email protected]', // Customer email address
'phone' => '9876543210', // Customer phone number
'productinfo' => 'iPhone', // Product or order description
'surl' => 'https://apiplayground-response.herokuapp.com/', // Success callback URL
'furl' => 'https://apiplayground-response.herokuapp.com/', // Failure callback URL
'drop_category' => 'NEFTRTGS', // Hide payment category or sub-category: NEFTRTGS
'hash' => 'REPLACE_WITH_GENERATED_HASH' // SHA-512 hash generated on server
);
$ch = curl_init();
curl_setopt($ch, CURLOPT_URL, $url);
curl_setopt($ch, CURLOPT_POST, 1);
curl_setopt($ch, CURLOPT_POSTFIELDS, http_build_query($payload));
curl_setopt($ch, CURLOPT_HTTPHEADER, $headers);
curl_setopt($ch, CURLOPT_RETURNTRANSFER, true);
$response = curl_exec($ch);
curl_close($ch);
echo $response;
?>
```
```perl
use strict;
use warnings;
use LWP::UserAgent;
use HTTP::Request::Common;
# PayU Hosted Checkout - drop payment category customization
my $url = 'https://test.payu.in/_payment';
my $ua = LWP::UserAgent->new;
my %payload = (
key => 'JP***g', # Merchant key provided by PayU
txnid => 'DROPNE001', # Unique transaction ID generated by merchant
amount => '10.00', # Transaction amount
firstname => 'PayU User', # Customer first name
email => '[email protected]', # Customer email address
phone => '9876543210', # Customer phone number
productinfo => 'iPhone', # Product or order description
surl => 'https://apiplayground-response.herokuapp.com/', # Success callback URL
furl => 'https://apiplayground-response.herokuapp.com/', # Failure callback URL
drop_category => 'NEFTRTGS', # Hide payment category or sub-category: NEFTRTGS
hash => 'REPLACE_WITH_GENERATED_HASH' # SHA-512 hash generated on server
);
my $response = $ua->post(
$url,
'accept' => 'application/json',
'Content-Type' => 'application/x-www-form-urlencoded',
Content => \%payload
);
print $response->content;
```
**Hide EMI (`EMI`)**
```curl
# PayU Hosted Checkout - drop payment category customization
curl -X POST "https://test.payu.in/_payment" \
-H "accept: application/json" \
-H "Content-Type: application/x-www-form-urlencoded" \
-d "key=JP***g&txnid=DROPEMI001&amount=10.00&firstname=PayU%20User&[email protected]&phone=9876543210&productinfo=iPhone&surl=https://apiplayground-response.herokuapp.com/&furl=https://apiplayground-response.herokuapp.com/&drop_category=EMI&hash=REPLACE_WITH_GENERATED_HASH"
# Parameters include key, txnid, amount, surl, furl, hash; drop_category=EMI
```
```python
import requests
# PayU Hosted Checkout - drop payment category customization
# PayU Hosted Checkout Collect Payment API endpoint (test environment)
url = "https://test.payu.in/_payment"
headers = {
"accept": "application/json",
"Content-Type": "application/x-www-form-urlencoded"
}
payload = {
'key': 'JP***g', # Merchant key provided by PayU
'txnid': 'DROPEMI001', # Unique transaction ID generated by merchant
'amount': '10.00', # Transaction amount
'firstname': 'PayU User', # Customer first name
'email': '[email protected]', # Customer email address
'phone': '9876543210', # Customer phone number
'productinfo': 'iPhone', # Product or order description
'surl': 'https://apiplayground-response.herokuapp.com/', # Success callback URL
'furl': 'https://apiplayground-response.herokuapp.com/', # Failure callback URL
'drop_category': 'EMI', # Hide payment category or sub-category: EMI
'hash': 'REPLACE_WITH_GENERATED_HASH', # SHA-512 hash generated on server
}
response = requests.post(url, headers=headers, data=payload)
print(response.text)
```
```csharp
using System;
using System.Net.Http;
using System.Collections.Generic;
using System.Threading.Tasks;
class Program
{
static async Task Main(string[] args)
{
// PayU Hosted Checkout - drop payment category customization
using var client = new HttpClient();
var url = "https://test.payu.in/_payment";
client.DefaultRequestHeaders.Add("accept", "application/json");
var payload = new Dictionary<string, string>
{
{ "key", "JP***g" }, // Merchant key provided by PayU
{ "txnid", "DROPEMI001" }, // Unique transaction ID generated by merchant
{ "amount", "10.00" }, // Transaction amount
{ "firstname", "PayU User" }, // Customer first name
{ "email", "[email protected]" }, // Customer email address
{ "phone", "9876543210" }, // Customer phone number
{ "productinfo", "iPhone" }, // Product or order description
{ "surl", "https://apiplayground-response.herokuapp.com/" }, // Success callback URL
{ "furl", "https://apiplayground-response.herokuapp.com/" }, // Failure callback URL
{ "drop_category", "EMI" }, // Hide payment category or sub-category: EMI
{ "hash", "REPLACE_WITH_GENERATED_HASH" }, // SHA-512 hash generated on server
};
var content = new FormUrlEncodedContent(payload);
var response = await client.PostAsync(url, content);
var result = await response.Content.ReadAsStringAsync();
Console.WriteLine(result);
}
}
```
```javascript
const axios = require('axios');
const qs = require('querystring');
// PayU Hosted Checkout - drop payment category customization
// PayU Hosted Checkout Collect Payment API endpoint (test environment)
const url = 'https://test.payu.in/_payment';
const headers = {
'accept': 'application/json',
'Content-Type': 'application/x-www-form-urlencoded'
};
const payload = {
'key': 'JP***g', // Merchant key provided by PayU
'txnid': 'DROPEMI001', // Unique transaction ID generated by merchant
'amount': '10.00', // Transaction amount
'firstname': 'PayU User', // Customer first name
'email': '[email protected]', // Customer email address
'phone': '9876543210', // Customer phone number
'productinfo': 'iPhone', // Product or order description
'surl': 'https://apiplayground-response.herokuapp.com/', // Success callback URL
'furl': 'https://apiplayground-response.herokuapp.com/', // Failure callback URL
'drop_category': 'EMI', // Hide payment category or sub-category: EMI
'hash': 'REPLACE_WITH_GENERATED_HASH' // SHA-512 hash generated on server
};
axios.post(url, qs.stringify(payload), { headers: headers })
.then(response => {
console.log(response.data);
})
.catch(error => {
console.error(error);
});
```
```java
import java.io.*;
import java.net.*;
import java.net.http.*;
public class PayUPayment {
public static void main(String[] args) throws IOException, InterruptedException {
// PayU Hosted Checkout - drop payment category customization
HttpClient client = HttpClient.newHttpClient();
// Request body: key, txnid, amount, surl, furl, hash; drop_category=EMI
String formData = "key=JP***g&txnid=DROPEMI001&amount=10.00&firstname=PayU%20User&[email protected]&phone=9876543210&productinfo=iPhone&surl=https://apiplayground-response.herokuapp.com/&furl=https://apiplayground-response.herokuapp.com/&drop_category=EMI&hash=REPLACE_WITH_GENERATED_HASH";
HttpRequest request = HttpRequest.newBuilder()
.uri(URI.create("https://test.payu.in/_payment"))
.header("accept", "application/json")
.header("Content-Type", "application/x-www-form-urlencoded")
.POST(HttpRequest.BodyPublishers.ofString(formData))
.build();
HttpResponse<String> response = client.send(request,
HttpResponse.BodyHandlers.ofString());
System.out.println(response.body());
}
}
```
```php
<?php
// PayU Hosted Checkout - drop payment category customization
$url = 'https://test.payu.in/_payment';
$headers = array(
'accept: application/json',
'Content-Type: application/x-www-form-urlencoded'
);
$payload = array(
'key' => 'JP***g', // Merchant key provided by PayU
'txnid' => 'DROPEMI001', // Unique transaction ID generated by merchant
'amount' => '10.00', // Transaction amount
'firstname' => 'PayU User', // Customer first name
'email' => '[email protected]', // Customer email address
'phone' => '9876543210', // Customer phone number
'productinfo' => 'iPhone', // Product or order description
'surl' => 'https://apiplayground-response.herokuapp.com/', // Success callback URL
'furl' => 'https://apiplayground-response.herokuapp.com/', // Failure callback URL
'drop_category' => 'EMI', // Hide payment category or sub-category: EMI
'hash' => 'REPLACE_WITH_GENERATED_HASH' // SHA-512 hash generated on server
);
$ch = curl_init();
curl_setopt($ch, CURLOPT_URL, $url);
curl_setopt($ch, CURLOPT_POST, 1);
curl_setopt($ch, CURLOPT_POSTFIELDS, http_build_query($payload));
curl_setopt($ch, CURLOPT_HTTPHEADER, $headers);
curl_setopt($ch, CURLOPT_RETURNTRANSFER, true);
$response = curl_exec($ch);
curl_close($ch);
echo $response;
?>
```
```perl
use strict;
use warnings;
use LWP::UserAgent;
use HTTP::Request::Common;
# PayU Hosted Checkout - drop payment category customization
my $url = 'https://test.payu.in/_payment';
my $ua = LWP::UserAgent->new;
my %payload = (
key => 'JP***g', # Merchant key provided by PayU
txnid => 'DROPEMI001', # Unique transaction ID generated by merchant
amount => '10.00', # Transaction amount
firstname => 'PayU User', # Customer first name
email => '[email protected]', # Customer email address
phone => '9876543210', # Customer phone number
productinfo => 'iPhone', # Product or order description
surl => 'https://apiplayground-response.herokuapp.com/', # Success callback URL
furl => 'https://apiplayground-response.herokuapp.com/', # Failure callback URL
drop_category => 'EMI', # Hide payment category or sub-category: EMI
hash => 'REPLACE_WITH_GENERATED_HASH' # SHA-512 hash generated on server
);
my $response = $ua->post(
$url,
'accept' => 'application/json',
'Content-Type' => 'application/x-www-form-urlencoded',
Content => \%payload
);
print $response->content;
```
**Hide Wallet (`CASH`)**
```curl
# PayU Hosted Checkout - drop payment category customization
curl -X POST "https://test.payu.in/_payment" \
-H "accept: application/json" \
-H "Content-Type: application/x-www-form-urlencoded" \
-d "key=JP***g&txnid=DROPCASH001&amount=10.00&firstname=PayU%20User&[email protected]&phone=9876543210&productinfo=iPhone&surl=https://apiplayground-response.herokuapp.com/&furl=https://apiplayground-response.herokuapp.com/&drop_category=CASH&hash=REPLACE_WITH_GENERATED_HASH"
# Parameters include key, txnid, amount, surl, furl, hash; drop_category=CASH
```
```python
import requests
# PayU Hosted Checkout - drop payment category customization
# PayU Hosted Checkout Collect Payment API endpoint (test environment)
url = "https://test.payu.in/_payment"
headers = {
"accept": "application/json",
"Content-Type": "application/x-www-form-urlencoded"
}
payload = {
'key': 'JP***g', # Merchant key provided by PayU
'txnid': 'DROPCASH001', # Unique transaction ID generated by merchant
'amount': '10.00', # Transaction amount
'firstname': 'PayU User', # Customer first name
'email': '[email protected]', # Customer email address
'phone': '9876543210', # Customer phone number
'productinfo': 'iPhone', # Product or order description
'surl': 'https://apiplayground-response.herokuapp.com/', # Success callback URL
'furl': 'https://apiplayground-response.herokuapp.com/', # Failure callback URL
'drop_category': 'CASH', # Hide payment category or sub-category: CASH
'hash': 'REPLACE_WITH_GENERATED_HASH', # SHA-512 hash generated on server
}
response = requests.post(url, headers=headers, data=payload)
print(response.text)
```
```csharp
using System;
using System.Net.Http;
using System.Collections.Generic;
using System.Threading.Tasks;
class Program
{
static async Task Main(string[] args)
{
// PayU Hosted Checkout - drop payment category customization
using var client = new HttpClient();
var url = "https://test.payu.in/_payment";
client.DefaultRequestHeaders.Add("accept", "application/json");
var payload = new Dictionary<string, string>
{
{ "key", "JP***g" }, // Merchant key provided by PayU
{ "txnid", "DROPCASH001" }, // Unique transaction ID generated by merchant
{ "amount", "10.00" }, // Transaction amount
{ "firstname", "PayU User" }, // Customer first name
{ "email", "[email protected]" }, // Customer email address
{ "phone", "9876543210" }, // Customer phone number
{ "productinfo", "iPhone" }, // Product or order description
{ "surl", "https://apiplayground-response.herokuapp.com/" }, // Success callback URL
{ "furl", "https://apiplayground-response.herokuapp.com/" }, // Failure callback URL
{ "drop_category", "CASH" }, // Hide payment category or sub-category: CASH
{ "hash", "REPLACE_WITH_GENERATED_HASH" }, // SHA-512 hash generated on server
};
var content = new FormUrlEncodedContent(payload);
var response = await client.PostAsync(url, content);
var result = await response.Content.ReadAsStringAsync();
Console.WriteLine(result);
}
}
```
```javascript
const axios = require('axios');
const qs = require('querystring');
// PayU Hosted Checkout - drop payment category customization
// PayU Hosted Checkout Collect Payment API endpoint (test environment)
const url = 'https://test.payu.in/_payment';
const headers = {
'accept': 'application/json',
'Content-Type': 'application/x-www-form-urlencoded'
};
const payload = {
'key': 'JP***g', // Merchant key provided by PayU
'txnid': 'DROPCASH001', // Unique transaction ID generated by merchant
'amount': '10.00', // Transaction amount
'firstname': 'PayU User', // Customer first name
'email': '[email protected]', // Customer email address
'phone': '9876543210', // Customer phone number
'productinfo': 'iPhone', // Product or order description
'surl': 'https://apiplayground-response.herokuapp.com/', // Success callback URL
'furl': 'https://apiplayground-response.herokuapp.com/', // Failure callback URL
'drop_category': 'CASH', // Hide payment category or sub-category: CASH
'hash': 'REPLACE_WITH_GENERATED_HASH' // SHA-512 hash generated on server
};
axios.post(url, qs.stringify(payload), { headers: headers })
.then(response => {
console.log(response.data);
})
.catch(error => {
console.error(error);
});
```
```java
import java.io.*;
import java.net.*;
import java.net.http.*;
public class PayUPayment {
public static void main(String[] args) throws IOException, InterruptedException {
// PayU Hosted Checkout - drop payment category customization
HttpClient client = HttpClient.newHttpClient();
// Request body: key, txnid, amount, surl, furl, hash; drop_category=CASH
String formData = "key=JP***g&txnid=DROPCASH001&amount=10.00&firstname=PayU%20User&[email protected]&phone=9876543210&productinfo=iPhone&surl=https://apiplayground-response.herokuapp.com/&furl=https://apiplayground-response.herokuapp.com/&drop_category=CASH&hash=REPLACE_WITH_GENERATED_HASH";
HttpRequest request = HttpRequest.newBuilder()
.uri(URI.create("https://test.payu.in/_payment"))
.header("accept", "application/json")
.header("Content-Type", "application/x-www-form-urlencoded")
.POST(HttpRequest.BodyPublishers.ofString(formData))
.build();
HttpResponse<String> response = client.send(request,
HttpResponse.BodyHandlers.ofString());
System.out.println(response.body());
}
}
```
```php
<?php
// PayU Hosted Checkout - drop payment category customization
$url = 'https://test.payu.in/_payment';
$headers = array(
'accept: application/json',
'Content-Type: application/x-www-form-urlencoded'
);
$payload = array(
'key' => 'JP***g', // Merchant key provided by PayU
'txnid' => 'DROPCASH001', // Unique transaction ID generated by merchant
'amount' => '10.00', // Transaction amount
'firstname' => 'PayU User', // Customer first name
'email' => '[email protected]', // Customer email address
'phone' => '9876543210', // Customer phone number
'productinfo' => 'iPhone', // Product or order description
'surl' => 'https://apiplayground-response.herokuapp.com/', // Success callback URL
'furl' => 'https://apiplayground-response.herokuapp.com/', // Failure callback URL
'drop_category' => 'CASH', // Hide payment category or sub-category: CASH
'hash' => 'REPLACE_WITH_GENERATED_HASH' // SHA-512 hash generated on server
);
$ch = curl_init();
curl_setopt($ch, CURLOPT_URL, $url);
curl_setopt($ch, CURLOPT_POST, 1);
curl_setopt($ch, CURLOPT_POSTFIELDS, http_build_query($payload));
curl_setopt($ch, CURLOPT_HTTPHEADER, $headers);
curl_setopt($ch, CURLOPT_RETURNTRANSFER, true);
$response = curl_exec($ch);
curl_close($ch);
echo $response;
?>
```
```perl
use strict;
use warnings;
use LWP::UserAgent;
use HTTP::Request::Common;
# PayU Hosted Checkout - drop payment category customization
my $url = 'https://test.payu.in/_payment';
my $ua = LWP::UserAgent->new;
my %payload = (
key => 'JP***g', # Merchant key provided by PayU
txnid => 'DROPCASH001', # Unique transaction ID generated by merchant
amount => '10.00', # Transaction amount
firstname => 'PayU User', # Customer first name
email => '[email protected]', # Customer email address
phone => '9876543210', # Customer phone number
productinfo => 'iPhone', # Product or order description
surl => 'https://apiplayground-response.herokuapp.com/', # Success callback URL
furl => 'https://apiplayground-response.herokuapp.com/', # Failure callback URL
drop_category => 'CASH', # Hide payment category or sub-category: CASH
hash => 'REPLACE_WITH_GENERATED_HASH' # SHA-512 hash generated on server
);
my $response = $ua->post(
$url,
'accept' => 'application/json',
'Content-Type' => 'application/x-www-form-urlencoded',
Content => \%payload
);
print $response->content;
```
**Hide BNPL (`BNPL`)**
````curl
curl -X POST "https://test.payu.in/_payment" \
-H "accept: application/json" \
-H "Content-Type: application/x-www-form-urlencoded" \
-d "key=JP***g&txnid=DROPBNPL001&amount=10.00&firstname=PayU%20User&[email protected]&phone=9876543210&productinfo=iPhone&surl=https://apiplayground-response.herokuapp.com/&furl=https://apiplayground-response.herokuapp.com/&drop_category=BNPL&hash=REPLACE_WITH_GENERATED_HASH"
```
```python
import requests
# PayU Hosted Checkout - drop payment category customization
# PayU Hosted Checkout Collect Payment API endpoint (test environment)
url = "https://test.payu.in/_payment"
headers = {
"accept": "application/json",
"Content-Type": "application/x-www-form-urlencoded"
}
payload = {
'key': 'JP***g', # Merchant key provided by PayU
'txnid': 'DROPBNPL001', # Unique transaction ID generated by merchant
'amount': '10.00', # Transaction amount
'firstname': 'PayU User', # Customer first name
'email': '[email protected]', # Customer email address
'phone': '9876543210', # Customer phone number
'productinfo': 'iPhone', # Product or order description
'surl': 'https://apiplayground-response.herokuapp.com/', # Success callback URL
'furl': 'https://apiplayground-response.herokuapp.com/', # Failure callback URL
'drop_category': 'BNPL', # Hide payment category or sub-category: BNPL
'hash': 'REPLACE_WITH_GENERATED_HASH', # SHA-512 hash generated on server
}
response = requests.post(url, headers=headers, data=payload)
print(response.text)
```
```javascript
const axios = require('axios');
const qs = require('querystring');
// PayU Hosted Checkout - drop payment category customization
// PayU Hosted Checkout Collect Payment API endpoint (test environment)
const url = 'https://test.payu.in/_payment';
const headers = {
'accept': 'application/json',
'Content-Type': 'application/x-www-form-urlencoded'
};
const payload = {
'key': 'JP***g', // Merchant key provided by PayU
'txnid': 'DROPBNPL001', // Unique transaction ID generated by merchant
'amount': '10.00', // Transaction amount
'firstname': 'PayU User', // Customer first name
'email': '[email protected]', // Customer email address
'phone': '9876543210', // Customer phone number
'productinfo': 'iPhone', // Product or order description
'surl': 'https://apiplayground-response.herokuapp.com/', // Success callback URL
'furl': 'https://apiplayground-response.herokuapp.com/', // Failure callback URL
'drop_category': 'BNPL', // Hide payment category or sub-category: BNPL
'hash': 'REPLACE_WITH_GENERATED_HASH' // SHA-512 hash generated on server
};
axios.post(url, qs.stringify(payload), { headers: headers })
.then(response => {
console.log(response.data);
})
.catch(error => {
console.error(error);
});
```
```java
import java.io.*;
import java.net.*;
import java.net.http.*;
public class PayUPayment {
public static void main(String[] args) throws IOException, InterruptedException {
// PayU Hosted Checkout - drop payment category customization
HttpClient client = HttpClient.newHttpClient();
// Request body: key, txnid, amount, surl, furl, hash; drop_category=BNPL
String formData = "key=JP***g&txnid=DROPBNPL001&amount=10.00&firstname=PayU%20User&[email protected]&phone=9876543210&productinfo=iPhone&surl=https://apiplayground-response.herokuapp.com/&furl=https://apiplayground-response.herokuapp.com/&drop_category=BNPL&hash=REPLACE_WITH_GENERATED_HASH";
HttpRequest request = HttpRequest.newBuilder()
.uri(URI.create("https://test.payu.in/_payment"))
.header("accept", "application/json")
.header("Content-Type", "application/x-www-form-urlencoded")
.POST(HttpRequest.BodyPublishers.ofString(formData))
.build();
HttpResponse<String> response = client.send(request,
HttpResponse.BodyHandlers.ofString());
System.out.println(response.body());
}
}
```
```php
<?php
// PayU Hosted Checkout - drop payment category customization
$url = 'https://test.payu.in/_payment';
$headers = array(
'accept: application/json',
'Content-Type: application/x-www-form-urlencoded'
);
$payload = array(
'key' => 'JP***g', // Merchant key provided by PayU
'txnid' => 'DROPBNPL001', // Unique transaction ID generated by merchant
'amount' => '10.00', // Transaction amount
'firstname' => 'PayU User', // Customer first name
'email' => '[email protected]', // Customer email address
'phone' => '9876543210', // Customer phone number
'productinfo' => 'iPhone', // Product or order description
'surl' => 'https://apiplayground-response.herokuapp.com/', // Success callback URL
'furl' => 'https://apiplayground-response.herokuapp.com/', // Failure callback URL
'drop_category' => 'BNPL', // Hide payment category or sub-category: BNPL
'hash' => 'REPLACE_WITH_GENERATED_HASH' // SHA-512 hash generated on server
);
$ch = curl_init();
curl_setopt($ch, CURLOPT_URL, $url);
curl_setopt($ch, CURLOPT_POST, 1);
curl_setopt($ch, CURLOPT_POSTFIELDS, http_build_query($payload));
curl_setopt($ch, CURLOPT_HTTPHEADER, $headers);
curl_setopt($ch, CURLOPT_RETURNTRANSFER, true);
$response = curl_exec($ch);
curl_close($ch);
echo $response;
?>
```
```perl
use strict;
use warnings;
use LWP::UserAgent;
use HTTP::Request::Common;
# PayU Hosted Checkout - drop payment category customization
my $url = 'https://test.payu.in/_payment';
my $ua = LWP::UserAgent->new;
my %payload = (
key => 'JP***g', # Merchant key provided by PayU
txnid => 'DROPBNPL001', # Unique transaction ID generated by merchant
amount => '10.00', # Transaction amount
firstname => 'PayU User', # Customer first name
email => '[email protected]', # Customer email address
phone => '9876543210', # Customer phone number
productinfo => 'iPhone', # Product or order description
surl => 'https://apiplayground-response.herokuapp.com/', # Success callback URL
furl => 'https://apiplayground-response.herokuapp.com/', # Failure callback URL
drop_category => 'BNPL', # Hide payment category or sub-category: BNPL
hash => 'REPLACE_WITH_GENERATED_HASH' # SHA-512 hash generated on server
);
my $response = $ua->post(
$url,
'accept' => 'application/json',
'Content-Type' => 'application/x-www-form-urlencoded',
Content => \%payload
);
print $response->content;
```
**Hide Sodexo (`SODEXO`)**
```curl
# PayU Hosted Checkout - drop payment category customization
curl -X POST "https://test.payu.in/_payment" \
-H "accept: application/json" \
-H "Content-Type: application/x-www-form-urlencoded" \
-d "key=JP***g&txnid=DROPSODEXO001&amount=10.00&firstname=PayU%20User&[email protected]&phone=9876543210&productinfo=iPhone&surl=https://apiplayground-response.herokuapp.com/&furl=https://apiplayground-response.herokuapp.com/&drop_category=SODEXO&hash=REPLACE_WITH_GENERATED_HASH"
# Parameters include key, txnid, amount, surl, furl, hash; drop_category=SODEXO
```
```python
import requests
# PayU Hosted Checkout - drop payment category customization
# PayU Hosted Checkout Collect Payment API endpoint (test environment)
url = "https://test.payu.in/_payment"
headers = {
"accept": "application/json",
"Content-Type": "application/x-www-form-urlencoded"
}
payload = {
'key': 'JP***g', # Merchant key provided by PayU
'txnid': 'DROPSODEXO001', # Unique transaction ID generated by merchant
'amount': '10.00', # Transaction amount
'firstname': 'PayU User', # Customer first name
'email': '[email protected]', # Customer email address
'phone': '9876543210', # Customer phone number
'productinfo': 'iPhone', # Product or order description
'surl': 'https://apiplayground-response.herokuapp.com/', # Success callback URL
'furl': 'https://apiplayground-response.herokuapp.com/', # Failure callback URL
'drop_category': 'SODEXO', # Hide payment category or sub-category: SODEXO
'hash': 'REPLACE_WITH_GENERATED_HASH', # SHA-512 hash generated on server
}
response = requests.post(url, headers=headers, data=payload)
print(response.text)
```
```csharp
using System;
using System.Net.Http;
using System.Collections.Generic;
using System.Threading.Tasks;
class Program
{
static async Task Main(string[] args)
{
// PayU Hosted Checkout - drop payment category customization
using var client = new HttpClient();
var url = "https://test.payu.in/_payment";
client.DefaultRequestHeaders.Add("accept", "application/json");
var payload = new Dictionary<string, string>
{
{ "key", "JP***g" }, // Merchant key provided by PayU
{ "txnid", "DROPSODEXO001" }, // Unique transaction ID generated by merchant
{ "amount", "10.00" }, // Transaction amount
{ "firstname", "PayU User" }, // Customer first name
{ "email", "[email protected]" }, // Customer email address
{ "phone", "9876543210" }, // Customer phone number
{ "productinfo", "iPhone" }, // Product or order description
{ "surl", "https://apiplayground-response.herokuapp.com/" }, // Success callback URL
{ "furl", "https://apiplayground-response.herokuapp.com/" }, // Failure callback URL
{ "drop_category", "SODEXO" }, // Hide payment category or sub-category: SODEXO
{ "hash", "REPLACE_WITH_GENERATED_HASH" }, // SHA-512 hash generated on server
};
var content = new FormUrlEncodedContent(payload);
var response = await client.PostAsync(url, content);
var result = await response.Content.ReadAsStringAsync();
Console.WriteLine(result);
}
}
```
```javascript
const axios = require('axios');
const qs = require('querystring');
// PayU Hosted Checkout - drop payment category customization
// PayU Hosted Checkout Collect Payment API endpoint (test environment)
const url = 'https://test.payu.in/_payment';
const headers = {
'accept': 'application/json',
'Content-Type': 'application/x-www-form-urlencoded'
};
const payload = {
'key': 'JP***g', // Merchant key provided by PayU
'txnid': 'DROPSODEXO001', // Unique transaction ID generated by merchant
'amount': '10.00', // Transaction amount
'firstname': 'PayU User', // Customer first name
'email': '[email protected]', // Customer email address
'phone': '9876543210', // Customer phone number
'productinfo': 'iPhone', // Product or order description
'surl': 'https://apiplayground-response.herokuapp.com/', // Success callback URL
'furl': 'https://apiplayground-response.herokuapp.com/', // Failure callback URL
'drop_category': 'SODEXO', // Hide payment category or sub-category: SODEXO
'hash': 'REPLACE_WITH_GENERATED_HASH' // SHA-512 hash generated on server
};
axios.post(url, qs.stringify(payload), { headers: headers })
.then(response => {
console.log(response.data);
})
.catch(error => {
console.error(error);
});
```
```java
import java.io.*;
import java.net.*;
import java.net.http.*;
public class PayUPayment {
public static void main(String[] args) throws IOException, InterruptedException {
// PayU Hosted Checkout - drop payment category customization
HttpClient client = HttpClient.newHttpClient();
// Request body: key, txnid, amount, surl, furl, hash; drop_category=SODEXO
String formData = "key=JP***g&txnid=DROPSODEXO001&amount=10.00&firstname=PayU%20User&[email protected]&phone=9876543210&productinfo=iPhone&surl=https://apiplayground-response.herokuapp.com/&furl=https://apiplayground-response.herokuapp.com/&drop_category=SODEXO&hash=REPLACE_WITH_GENERATED_HASH";
HttpRequest request = HttpRequest.newBuilder()
.uri(URI.create("https://test.payu.in/_payment"))
.header("accept", "application/json")
.header("Content-Type", "application/x-www-form-urlencoded")
.POST(HttpRequest.BodyPublishers.ofString(formData))
.build();
HttpResponse<String> response = client.send(request,
HttpResponse.BodyHandlers.ofString());
System.out.println(response.body());
}
}
```
```php
<?php
// PayU Hosted Checkout - drop payment category customization
$url = 'https://test.payu.in/_payment';
$headers = array(
'accept: application/json',
'Content-Type: application/x-www-form-urlencoded'
);
$payload = array(
'key' => 'JP***g', // Merchant key provided by PayU
'txnid' => 'DROPSODEXO001', // Unique transaction ID generated by merchant
'amount' => '10.00', // Transaction amount
'firstname' => 'PayU User', // Customer first name
'email' => '[email protected]', // Customer email address
'phone' => '9876543210', // Customer phone number
'productinfo' => 'iPhone', // Product or order description
'surl' => 'https://apiplayground-response.herokuapp.com/', // Success callback URL
'furl' => 'https://apiplayground-response.herokuapp.com/', // Failure callback URL
'drop_category' => 'SODEXO', // Hide payment category or sub-category: SODEXO
'hash' => 'REPLACE_WITH_GENERATED_HASH' // SHA-512 hash generated on server
);
$ch = curl_init();
curl_setopt($ch, CURLOPT_URL, $url);
curl_setopt($ch, CURLOPT_POST, 1);
curl_setopt($ch, CURLOPT_POSTFIELDS, http_build_query($payload));
curl_setopt($ch, CURLOPT_HTTPHEADER, $headers);
curl_setopt($ch, CURLOPT_RETURNTRANSFER, true);
$response = curl_exec($ch);
curl_close($ch);
echo $response;
?>
```
```perl
use strict;
use warnings;
use LWP::UserAgent;
use HTTP::Request::Common;
# PayU Hosted Checkout - drop payment category customization
my $url = 'https://test.payu.in/_payment';
my $ua = LWP::UserAgent->new;
my %payload = (
key => 'JP***g', # Merchant key provided by PayU
txnid => 'DROPSODEXO001', # Unique transaction ID generated by merchant
amount => '10.00', # Transaction amount
firstname => 'PayU User', # Customer first name
email => '[email protected]', # Customer email address
phone => '9876543210', # Customer phone number
productinfo => 'iPhone', # Product or order description
surl => 'https://apiplayground-response.herokuapp.com/', # Success callback URL
furl => 'https://apiplayground-response.herokuapp.com/', # Failure callback URL
drop_category => 'SODEXO', # Hide payment category or sub-category: SODEXO
hash => 'REPLACE_WITH_GENERATED_HASH' # SHA-512 hash generated on server
);
my $response = $ua->post(
$url,
'accept' => 'application/json',
'Content-Type' => 'application/x-www-form-urlencoded',
Content => \%payload
);
print $response->content;
```Sample request with multiple payment method removed or dropped
Hide Credit Card and Net Banking (CC|NB)
# PayU Hosted Checkout - drop payment category customization
curl -X POST "https://test.payu.in/_payment" \
      -H "accept: application/json" \
      -H "Content-Type: application/x-www-form-urlencoded" \
      -d "key=JP***g&txnid=DROP2CAT001&amount=10.00&firstname=PayU%20User&[email protected]&phone=9876543210&productinfo=iPhone&surl=https://apiplayground-response.herokuapp.com/&furl=https://apiplayground-response.herokuapp.com/&drop_category=CC|NB&hash=REPLACE_WITH_GENERATED_HASH"
# Parameters include key, txnid, amount, surl, furl, hash; drop_category=CC|NB
import requests
# PayU Hosted Checkout - drop payment category customization
# PayU Hosted Checkout Collect Payment API endpoint (test environment)
url = "https://test.payu.in/_payment"
headers = {
"accept": "application/json",
"Content-Type": "application/x-www-form-urlencoded"
}
payload = {
'key': 'JP***g', # Merchant key provided by PayU
'txnid': 'DROP2CAT001', # Unique transaction ID generated by merchant
'amount': '10.00', # Transaction amount
'firstname': 'PayU User', # Customer first name
'email': '[email protected]', # Customer email address
'phone': '9876543210', # Customer phone number
'productinfo': 'iPhone', # Product or order description
'surl': 'https://apiplayground-response.herokuapp.com/', # Success callback URL
'furl': 'https://apiplayground-response.herokuapp.com/', # Failure callback URL
'drop_category': 'CC|NB', # Hide payment category or sub-category: CC|NB
'hash': 'REPLACE_WITH_GENERATED_HASH', # SHA-512 hash generated on server
}
response = requests.post(url, headers=headers, data=payload)
print(response.text)using System;
using System.Net.Http;
using System.Collections.Generic;
using System.Threading.Tasks;
class Program
{
static async Task Main(string[] args)
{
// PayU Hosted Checkout - drop payment category customization
using var client = new HttpClient();
var url = "https://test.payu.in/_payment";
client.DefaultRequestHeaders.Add("accept", "application/json");
var payload = new Dictionary<string, string>
{
{ "key", "JP***g" }, // Merchant key provided by PayU
{ "txnid", "DROP2CAT001" }, // Unique transaction ID generated by merchant
{ "amount", "10.00" }, // Transaction amount
{ "firstname", "PayU User" }, // Customer first name
{ "email", "[email protected]" }, // Customer email address
{ "phone", "9876543210" }, // Customer phone number
{ "productinfo", "iPhone" }, // Product or order description
{ "surl", "https://apiplayground-response.herokuapp.com/" }, // Success callback URL
{ "furl", "https://apiplayground-response.herokuapp.com/" }, // Failure callback URL
{ "drop_category", "CC|NB" }, // Hide payment category or sub-category: CC|NB
{ "hash", "REPLACE_WITH_GENERATED_HASH" }, // SHA-512 hash generated on server
};
var content = new FormUrlEncodedContent(payload);
var response = await client.PostAsync(url, content);
var result = await response.Content.ReadAsStringAsync();
Console.WriteLine(result);
}
}const axios = require('axios');
const qs = require('querystring');
// PayU Hosted Checkout - drop payment category customization
// PayU Hosted Checkout Collect Payment API endpoint (test environment)
const url = 'https://test.payu.in/_payment';
const headers = {
'accept': 'application/json',
'Content-Type': 'application/x-www-form-urlencoded'
};
const payload = {
'key': 'JP***g', // Merchant key provided by PayU
'txnid': 'DROP2CAT001', // Unique transaction ID generated by merchant
'amount': '10.00', // Transaction amount
'firstname': 'PayU User', // Customer first name
'email': '[email protected]', // Customer email address
'phone': '9876543210', // Customer phone number
'productinfo': 'iPhone', // Product or order description
'surl': 'https://apiplayground-response.herokuapp.com/', // Success callback URL
'furl': 'https://apiplayground-response.herokuapp.com/', // Failure callback URL
'drop_category': 'CC|NB', // Hide payment category or sub-category: CC|NB
'hash': 'REPLACE_WITH_GENERATED_HASH' // SHA-512 hash generated on server
};
axios.post(url, qs.stringify(payload), { headers: headers })
.then(response => {
console.log(response.data);
})
.catch(error => {
console.error(error);
});import java.io.*;
import java.net.*;
import java.net.http.*;
public class PayUPayment {
public static void main(String[] args) throws IOException, InterruptedException {
// PayU Hosted Checkout - drop payment category customization
HttpClient client = HttpClient.newHttpClient();
// Request body: key, txnid, amount, surl, furl, hash; drop_category=CC|NB
String formData = "key=JP***g&txnid=DROP2CAT001&amount=10.00&firstname=PayU%20User&[email protected]&phone=9876543210&productinfo=iPhone&surl=https://apiplayground-response.herokuapp.com/&furl=https://apiplayground-response.herokuapp.com/&drop_category=CC|NB&hash=REPLACE_WITH_GENERATED_HASH";
HttpRequest request = HttpRequest.newBuilder()
.uri(URI.create("https://test.payu.in/_payment"))
.header("accept", "application/json")
.header("Content-Type", "application/x-www-form-urlencoded")
.POST(HttpRequest.BodyPublishers.ofString(formData))
.build();
HttpResponse<String> response = client.send(request,
HttpResponse.BodyHandlers.ofString());
System.out.println(response.body());
}
}<?php
// PayU Hosted Checkout - drop payment category customization
$url = 'https://test.payu.in/_payment';
$headers = array(
'accept: application/json',
'Content-Type: application/x-www-form-urlencoded'
);
$payload = array(
'key' => 'JP***g', // Merchant key provided by PayU
'txnid' => 'DROP2CAT001', // Unique transaction ID generated by merchant
'amount' => '10.00', // Transaction amount
'firstname' => 'PayU User', // Customer first name
'email' => '[email protected]', // Customer email address
'phone' => '9876543210', // Customer phone number
'productinfo' => 'iPhone', // Product or order description
'surl' => 'https://apiplayground-response.herokuapp.com/', // Success callback URL
'furl' => 'https://apiplayground-response.herokuapp.com/', // Failure callback URL
'drop_category' => 'CC|NB', // Hide payment category or sub-category: CC|NB
'hash' => 'REPLACE_WITH_GENERATED_HASH' // SHA-512 hash generated on server
);
$ch = curl_init();
curl_setopt($ch, CURLOPT_URL, $url);
curl_setopt($ch, CURLOPT_POST, 1);
curl_setopt($ch, CURLOPT_POSTFIELDS, http_build_query($payload));
curl_setopt($ch, CURLOPT_HTTPHEADER, $headers);
curl_setopt($ch, CURLOPT_RETURNTRANSFER, true);
$response = curl_exec($ch);
curl_close($ch);
echo $response;
?>use strict;
use warnings;
use LWP::UserAgent;
use HTTP::Request::Common;
# PayU Hosted Checkout - drop payment category customization
my $url = 'https://test.payu.in/_payment';
my $ua = LWP::UserAgent->new;
my %payload = (
key => 'JP***g', # Merchant key provided by PayU
txnid => 'DROP2CAT001', # Unique transaction ID generated by merchant
amount => '10.00', # Transaction amount
firstname => 'PayU User', # Customer first name
email => '[email protected]', # Customer email address
phone => '9876543210', # Customer phone number
productinfo => 'iPhone', # Product or order description
surl => 'https://apiplayground-response.herokuapp.com/', # Success callback URL
furl => 'https://apiplayground-response.herokuapp.com/', # Failure callback URL
drop_category => 'CC|NB', # Hide payment category or sub-category: CC|NB
hash => 'REPLACE_WITH_GENERATED_HASH' # SHA-512 hash generated on server
);
my $response = $ua->post(
$url,
'accept' => 'application/json',
'Content-Type' => 'application/x-www-form-urlencoded',
Content => \%payload
);
print $response->content;drop_category — hide sub-options (bank / scheme codes)
drop_category — hide sub-options (bank / scheme codes)Use the bank and scheme codes from Bank and Card Codes for Integration (illustrative codes below match the earlier examples in this page).
Debit Card: drop Visa and Mastercard only (DC|VISA|MAST)
# PayU Hosted Checkout - drop payment category customization
curl -X POST "https://test.payu.in/_payment" \
      -H "accept: application/json" \
      -H "Content-Type: application/x-www-form-urlencoded" \
      -d "key=JP***g&txnid=DROPSUB001&amount=10.00&firstname=PayU%20User&[email protected]&phone=9876543210&productinfo=iPhone&surl=https://apiplayground-response.herokuapp.com/&furl=https://apiplayground-response.herokuapp.com/&drop_category=DC|VISA|MAST&hash=REPLACE_WITH_GENERATED_HASH"
# Parameters include key, txnid, amount, surl, furl, hash; drop_category=DC|VISA|MAST
import requests
# PayU Hosted Checkout - drop payment category customization
# PayU Hosted Checkout Collect Payment API endpoint (test environment)
url = "https://test.payu.in/_payment"
headers = {
"accept": "application/json",
"Content-Type": "application/x-www-form-urlencoded"
}
payload = {
'key': 'JP***g', # Merchant key provided by PayU
'txnid': 'DROPSUB001', # Unique transaction ID generated by merchant
'amount': '10.00', # Transaction amount
'firstname': 'PayU User', # Customer first name
'email': '[email protected]', # Customer email address
'phone': '9876543210', # Customer phone number
'productinfo': 'iPhone', # Product or order description
'surl': 'https://apiplayground-response.herokuapp.com/', # Success callback URL
'furl': 'https://apiplayground-response.herokuapp.com/', # Failure callback URL
'drop_category': 'DC|VISA|MAST', # Hide payment category or sub-category: DC|VISA|MAST
'hash': 'REPLACE_WITH_GENERATED_HASH', # SHA-512 hash generated on server
}
response = requests.post(url, headers=headers, data=payload)
print(response.text)using System;
using System.Net.Http;
using System.Collections.Generic;
using System.Threading.Tasks;
class Program
{
static async Task Main(string[] args)
{
// PayU Hosted Checkout - drop payment category customization
using var client = new HttpClient();
var url = "https://test.payu.in/_payment";
client.DefaultRequestHeaders.Add("accept", "application/json");
var payload = new Dictionary<string, string>
{
{ "key", "JP***g" }, // Merchant key provided by PayU
{ "txnid", "DROPSUB001" }, // Unique transaction ID generated by merchant
{ "amount", "10.00" }, // Transaction amount
{ "firstname", "PayU User" }, // Customer first name
{ "email", "[email protected]" }, // Customer email address
{ "phone", "9876543210" }, // Customer phone number
{ "productinfo", "iPhone" }, // Product or order description
{ "surl", "https://apiplayground-response.herokuapp.com/" }, // Success callback URL
{ "furl", "https://apiplayground-response.herokuapp.com/" }, // Failure callback URL
{ "drop_category", "DC|VISA|MAST" }, // Hide payment category or sub-category: DC|VISA|MAST
{ "hash", "REPLACE_WITH_GENERATED_HASH" }, // SHA-512 hash generated on server
};
var content = new FormUrlEncodedContent(payload);
var response = await client.PostAsync(url, content);
var result = await response.Content.ReadAsStringAsync();
Console.WriteLine(result);
}
}const axios = require('axios');
const qs = require('querystring');
// PayU Hosted Checkout - drop payment category customization
// PayU Hosted Checkout Collect Payment API endpoint (test environment)
const url = 'https://test.payu.in/_payment';
const headers = {
'accept': 'application/json',
'Content-Type': 'application/x-www-form-urlencoded'
};
const payload = {
'key': 'JP***g', // Merchant key provided by PayU
'txnid': 'DROPSUB001', // Unique transaction ID generated by merchant
'amount': '10.00', // Transaction amount
'firstname': 'PayU User', // Customer first name
'email': '[email protected]', // Customer email address
'phone': '9876543210', // Customer phone number
'productinfo': 'iPhone', // Product or order description
'surl': 'https://apiplayground-response.herokuapp.com/', // Success callback URL
'furl': 'https://apiplayground-response.herokuapp.com/', // Failure callback URL
'drop_category': 'DC|VISA|MAST', // Hide payment category or sub-category: DC|VISA|MAST
'hash': 'REPLACE_WITH_GENERATED_HASH' // SHA-512 hash generated on server
};
axios.post(url, qs.stringify(payload), { headers: headers })
.then(response => {
console.log(response.data);
})
.catch(error => {
console.error(error);
});import java.io.*;
import java.net.*;
import java.net.http.*;
public class PayUPayment {
public static void main(String[] args) throws IOException, InterruptedException {
// PayU Hosted Checkout - drop payment category customization
HttpClient client = HttpClient.newHttpClient();
// Request body: key, txnid, amount, surl, furl, hash; drop_category=DC|VISA|MAST
String formData = "key=JP***g&txnid=DROPSUB001&amount=10.00&firstname=PayU%20User&[email protected]&phone=9876543210&productinfo=iPhone&surl=https://apiplayground-response.herokuapp.com/&furl=https://apiplayground-response.herokuapp.com/&drop_category=DC|VISA|MAST&hash=REPLACE_WITH_GENERATED_HASH";
HttpRequest request = HttpRequest.newBuilder()
.uri(URI.create("https://test.payu.in/_payment"))
.header("accept", "application/json")
.header("Content-Type", "application/x-www-form-urlencoded")
.POST(HttpRequest.BodyPublishers.ofString(formData))
.build();
HttpResponse<String> response = client.send(request,
HttpResponse.BodyHandlers.ofString());
System.out.println(response.body());
}
}<?php
// PayU Hosted Checkout - drop payment category customization
$url = 'https://test.payu.in/_payment';
$headers = array(
'accept: application/json',
'Content-Type: application/x-www-form-urlencoded'
);
$payload = array(
'key' => 'JP***g', // Merchant key provided by PayU
'txnid' => 'DROPSUB001', // Unique transaction ID generated by merchant
'amount' => '10.00', // Transaction amount
'firstname' => 'PayU User', // Customer first name
'email' => '[email protected]', // Customer email address
'phone' => '9876543210', // Customer phone number
'productinfo' => 'iPhone', // Product or order description
'surl' => 'https://apiplayground-response.herokuapp.com/', // Success callback URL
'furl' => 'https://apiplayground-response.herokuapp.com/', // Failure callback URL
'drop_category' => 'DC|VISA|MAST', // Hide payment category or sub-category: DC|VISA|MAST
'hash' => 'REPLACE_WITH_GENERATED_HASH' // SHA-512 hash generated on server
);
$ch = curl_init();
curl_setopt($ch, CURLOPT_URL, $url);
curl_setopt($ch, CURLOPT_POST, 1);
curl_setopt($ch, CURLOPT_POSTFIELDS, http_build_query($payload));
curl_setopt($ch, CURLOPT_HTTPHEADER, $headers);
curl_setopt($ch, CURLOPT_RETURNTRANSFER, true);
$response = curl_exec($ch);
curl_close($ch);
echo $response;
?>use strict;
use warnings;
use LWP::UserAgent;
use HTTP::Request::Common;
# PayU Hosted Checkout - drop payment category customization
my $url = 'https://test.payu.in/_payment';
my $ua = LWP::UserAgent->new;
my %payload = (
key => 'JP***g', # Merchant key provided by PayU
txnid => 'DROPSUB001', # Unique transaction ID generated by merchant
amount => '10.00', # Transaction amount
firstname => 'PayU User', # Customer first name
email => '[email protected]', # Customer email address
phone => '9876543210', # Customer phone number
productinfo => 'iPhone', # Product or order description
surl => 'https://apiplayground-response.herokuapp.com/', # Success callback URL
furl => 'https://apiplayground-response.herokuapp.com/', # Failure callback URL
drop_category => 'DC|VISA|MAST', # Hide payment category or sub-category: DC|VISA|MAST
hash => 'REPLACE_WITH_GENERATED_HASH' # SHA-512 hash generated on server
);
my $response = $ua->post(
$url,
'accept' => 'application/json',
'Content-Type' => 'application/x-www-form-urlencoded',
Content => \%payload
);
print $response->content;Mixed sub-category drops (CC|AMEX, DC|VISA, EMI|EMI6)
# PayU Hosted Checkout - drop payment category customization
curl -X POST "https://test.payu.in/_payment" \
      -H "accept: application/json" \
      -H "Content-Type: application/x-www-form-urlencoded" \
      -d "key=JP***g&txnid=DROPSUB002&amount=10.00&firstname=PayU%20User&[email protected]&phone=9876543210&productinfo=iPhone&surl=https://apiplayground-response.herokuapp.com/&furl=https://apiplayground-response.herokuapp.com/&drop_category=CC|AMEX, DC|VISA, EMI|EMI6&hash=REPLACE_WITH_GENERATED_HASH"
# Parameters include key, txnid, amount, surl, furl, hash; drop_category=CC|AMEX, DC|VISA, EMI|EMI6
import requests
# PayU Hosted Checkout - drop payment category customization
# PayU Hosted Checkout Collect Payment API endpoint (test environment)
url = "https://test.payu.in/_payment"
headers = {
"accept": "application/json",
"Content-Type": "application/x-www-form-urlencoded"
}
payload = {
'key': 'JP***g', # Merchant key provided by PayU
'txnid': 'DROPSUB002', # Unique transaction ID generated by merchant
'amount': '10.00', # Transaction amount
'firstname': 'PayU User', # Customer first name
'email': '[email protected]', # Customer email address
'phone': '9876543210', # Customer phone number
'productinfo': 'iPhone', # Product or order description
'surl': 'https://apiplayground-response.herokuapp.com/', # Success callback URL
'furl': 'https://apiplayground-response.herokuapp.com/', # Failure callback URL
'drop_category': 'CC|AMEX, DC|VISA, EMI|EMI6', # Hide payment category or sub-category: CC|AMEX, DC|VISA, EMI|EMI6
'hash': 'REPLACE_WITH_GENERATED_HASH', # SHA-512 hash generated on server
}
response = requests.post(url, headers=headers, data=payload)
print(response.text)using System;
using System.Net.Http;
using System.Collections.Generic;
using System.Threading.Tasks;
class Program
{
static async Task Main(string[] args)
{
// PayU Hosted Checkout - drop payment category customization
using var client = new HttpClient();
var url = "https://test.payu.in/_payment";
client.DefaultRequestHeaders.Add("accept", "application/json");
var payload = new Dictionary<string, string>
{
{ "key", "JP***g" }, // Merchant key provided by PayU
{ "txnid", "DROPSUB002" }, // Unique transaction ID generated by merchant
{ "amount", "10.00" }, // Transaction amount
{ "firstname", "PayU User" }, // Customer first name
{ "email", "[email protected]" }, // Customer email address
{ "phone", "9876543210" }, // Customer phone number
{ "productinfo", "iPhone" }, // Product or order description
{ "surl", "https://apiplayground-response.herokuapp.com/" }, // Success callback URL
{ "furl", "https://apiplayground-response.herokuapp.com/" }, // Failure callback URL
{ "drop_category", "CC|AMEX, DC|VISA, EMI|EMI6" }, // Hide payment category or sub-category: CC|AMEX, DC|VISA, EMI|EMI6
{ "hash", "REPLACE_WITH_GENERATED_HASH" }, // SHA-512 hash generated on server
};
var content = new FormUrlEncodedContent(payload);
var response = await client.PostAsync(url, content);
var result = await response.Content.ReadAsStringAsync();
Console.WriteLine(result);
}
}const axios = require('axios');
const qs = require('querystring');
// PayU Hosted Checkout - drop payment category customization
// PayU Hosted Checkout Collect Payment API endpoint (test environment)
const url = 'https://test.payu.in/_payment';
const headers = {
'accept': 'application/json',
'Content-Type': 'application/x-www-form-urlencoded'
};
const payload = {
'key': 'JP***g', // Merchant key provided by PayU
'txnid': 'DROPSUB002', // Unique transaction ID generated by merchant
'amount': '10.00', // Transaction amount
'firstname': 'PayU User', // Customer first name
'email': '[email protected]', // Customer email address
'phone': '9876543210', // Customer phone number
'productinfo': 'iPhone', // Product or order description
'surl': 'https://apiplayground-response.herokuapp.com/', // Success callback URL
'furl': 'https://apiplayground-response.herokuapp.com/', // Failure callback URL
'drop_category': 'CC|AMEX, DC|VISA, EMI|EMI6', // Hide payment category or sub-category: CC|AMEX, DC|VISA, EMI|EMI6
'hash': 'REPLACE_WITH_GENERATED_HASH' // SHA-512 hash generated on server
};
axios.post(url, qs.stringify(payload), { headers: headers })
.then(response => {
console.log(response.data);
})
.catch(error => {
console.error(error);
});import java.io.*;
import java.net.*;
import java.net.http.*;
public class PayUPayment {
public static void main(String[] args) throws IOException, InterruptedException {
// PayU Hosted Checkout - drop payment category customization
HttpClient client = HttpClient.newHttpClient();
// Request body: key, txnid, amount, surl, furl, hash; drop_category=CC|AMEX, DC|VISA, EMI|EMI6
String formData = "key=JP***g&txnid=DROPSUB002&amount=10.00&firstname=PayU%20User&[email protected]&phone=9876543210&productinfo=iPhone&surl=https://apiplayground-response.herokuapp.com/&furl=https://apiplayground-response.herokuapp.com/&drop_category=CC|AMEX, DC|VISA, EMI|EMI6&hash=REPLACE_WITH_GENERATED_HASH";
HttpRequest request = HttpRequest.newBuilder()
.uri(URI.create("https://test.payu.in/_payment"))
.header("accept", "application/json")
.header("Content-Type", "application/x-www-form-urlencoded")
.POST(HttpRequest.BodyPublishers.ofString(formData))
.build();
HttpResponse<String> response = client.send(request,
HttpResponse.BodyHandlers.ofString());
System.out.println(response.body());
}
}<?php
// PayU Hosted Checkout - drop payment category customization
$url = 'https://test.payu.in/_payment';
$headers = array(
'accept: application/json',
'Content-Type: application/x-www-form-urlencoded'
);
$payload = array(
'key' => 'JP***g', // Merchant key provided by PayU
'txnid' => 'DROPSUB002', // Unique transaction ID generated by merchant
'amount' => '10.00', // Transaction amount
'firstname' => 'PayU User', // Customer first name
'email' => '[email protected]', // Customer email address
'phone' => '9876543210', // Customer phone number
'productinfo' => 'iPhone', // Product or order description
'surl' => 'https://apiplayground-response.herokuapp.com/', // Success callback URL
'furl' => 'https://apiplayground-response.herokuapp.com/', // Failure callback URL
'drop_category' => 'CC|AMEX, DC|VISA, EMI|EMI6', // Hide payment category or sub-category: CC|AMEX, DC|VISA, EMI|EMI6
'hash' => 'REPLACE_WITH_GENERATED_HASH' // SHA-512 hash generated on server
);
$ch = curl_init();
curl_setopt($ch, CURLOPT_URL, $url);
curl_setopt($ch, CURLOPT_POST, 1);
curl_setopt($ch, CURLOPT_POSTFIELDS, http_build_query($payload));
curl_setopt($ch, CURLOPT_HTTPHEADER, $headers);
curl_setopt($ch, CURLOPT_RETURNTRANSFER, true);
$response = curl_exec($ch);
curl_close($ch);
echo $response;
?>use strict;
use warnings;
use LWP::UserAgent;
use HTTP::Request::Common;
# PayU Hosted Checkout - drop payment category customization
my $url = 'https://test.payu.in/_payment';
my $ua = LWP::UserAgent->new;
my %payload = (
key => 'JP***g', # Merchant key provided by PayU
txnid => 'DROPSUB002', # Unique transaction ID generated by merchant
amount => '10.00', # Transaction amount
firstname => 'PayU User', # Customer first name
email => '[email protected]', # Customer email address
phone => '9876543210', # Customer phone number
productinfo => 'iPhone', # Product or order description
surl => 'https://apiplayground-response.herokuapp.com/', # Success callback URL
furl => 'https://apiplayground-response.herokuapp.com/', # Failure callback URL
drop_category => 'CC|AMEX, DC|VISA, EMI|EMI6', # Hide payment category or sub-category: CC|AMEX, DC|VISA, EMI|EMI6
hash => 'REPLACE_WITH_GENERATED_HASH' # SHA-512 hash generated on server
);
my $response = $ua->post(
$url,
'accept' => 'application/json',
'Content-Type' => 'application/x-www-form-urlencoded',
Content => \%payload
);
print $response->content;Change the Language
To change the display language in PayU Hosted Checkout, add the language parameter to the payment request API call. The following video shows how vernacular support can improve your business:
The display_lang parameter should be set to one of the following values (same as corresponding language spelling):
English Hindi
Tamil Telugu
Kannada Gujarati
* Marathi
Here is an example payment request API call with the display_lang parameter set to Hindi:
# PayU Hosted Checkout - set checkout display language
curl -X POST "https://test.payu.in/_payment" \
      -H "accept: application/json" \
      -H "Content-Type: application/x-www-form-urlencoded" \
      -d "key=JP***g&txnid=PQI6MqpYrjEefU&amount=10.00&firstname=PayU User&[email protected]&phone=9876543210&productinfo=iPhone&surl=https://apiplayground-response.herokuapp.com/&furl=https://apiplayground-response.herokuapp.com/&display_lang=Hindi&hash=05a397501918ec5c36ae52daa3b3e49b43e986b86940e109d060076e467c3ea7536617df7420e0e6863dced8c5b45f9fff15c13bdf0335512c05f0210b31b072"
# Parameters include key, txnid, amount, surl, furl, hash; display_lang=Hindi
import requests
# PayU Hosted Checkout - set checkout display language
# PayU Hosted Checkout Collect Payment API endpoint (test environment)
url = "https://test.payu.in/_payment"
headers = {
"accept": "application/json",
"Content-Type": "application/x-www-form-urlencoded"
}
payload = {
'key': 'JP***g', # Merchant key provided by PayU
'txnid': 'PQI6MqpYrjEefU', # Unique transaction ID generated by merchant
'amount': '10.00', # Transaction amount
'firstname': 'PayU User', # Customer first name
'email': '[email protected]', # Customer email address
'phone': '9876543210', # Customer phone number
'productinfo': 'iPhone', # Product or order description
'surl': 'https://apiplayground-response.herokuapp.com/', # Success callback URL
'furl': 'https://apiplayground-response.herokuapp.com/', # Failure callback URL
'display_lang': 'Hindi', # Display checkout page in Hindi
'hash': '05a397501918ec5c36ae52daa3b3e49b43e986b86940e109d060076e467c3ea7536617df7420e0e6863dced8c5b45f9fff15c13bdf0335512c05f0210b31b072', # SHA-512 hash generated on server
}
response = requests.post(url, headers=headers, data=payload)
print(response.text)using System;
using System.Net.Http;
using System.Collections.Generic;
using System.Threading.Tasks;
class Program
{
static async Task Main(string[] args)
{
// PayU Hosted Checkout - set checkout display language
using var client = new HttpClient();
var url = "https://test.payu.in/_payment";
client.DefaultRequestHeaders.Add("accept", "application/json");
var payload = new Dictionary<string, string>
{
{ "key", "JP***g" }, // Merchant key provided by PayU
{ "txnid", "PQI6MqpYrjEefU" }, // Unique transaction ID generated by merchant
{ "amount", "10.00" }, // Transaction amount
{ "firstname", "PayU User" }, // Customer first name
{ "email", "[email protected]" }, // Customer email address
{ "phone", "9876543210" }, // Customer phone number
{ "productinfo", "iPhone" }, // Product or order description
{ "surl", "https://apiplayground-response.herokuapp.com/" }, // Success callback URL
{ "furl", "https://apiplayground-response.herokuapp.com/" }, // Failure callback URL
{ "display_lang", "Hindi" }, // Display checkout page in Hindi
{ "hash", "05a397501918ec5c36ae52daa3b3e49b43e986b86940e109d060076e467c3ea7536617df7420e0e6863dced8c5b45f9fff15c13bdf0335512c05f0210b31b072" }, // SHA-512 hash generated on server
};
var content = new FormUrlEncodedContent(payload);
var response = await client.PostAsync(url, content);
var result = await response.Content.ReadAsStringAsync();
Console.WriteLine(result);
}
}const axios = require('axios');
const qs = require('querystring');
// PayU Hosted Checkout - set checkout display language
// PayU Hosted Checkout Collect Payment API endpoint (test environment)
const url = 'https://test.payu.in/_payment';
const headers = {
'accept': 'application/json',
'Content-Type': 'application/x-www-form-urlencoded'
};
const payload = {
'key': 'JP***g', // Merchant key provided by PayU
'txnid': 'PQI6MqpYrjEefU', // Unique transaction ID generated by merchant
'amount': '10.00', // Transaction amount
'firstname': 'PayU User', // Customer first name
'email': '[email protected]', // Customer email address
'phone': '9876543210', // Customer phone number
'productinfo': 'iPhone', // Product or order description
'surl': 'https://apiplayground-response.herokuapp.com/', // Success callback URL
'furl': 'https://apiplayground-response.herokuapp.com/', // Failure callback URL
'display_lang': 'Hindi', // Display checkout page in Hindi
'hash': '05a397501918ec5c36ae52daa3b3e49b43e986b86940e109d060076e467c3ea7536617df7420e0e6863dced8c5b45f9fff15c13bdf0335512c05f0210b31b072' // SHA-512 hash generated on server
};
axios.post(url, qs.stringify(payload), { headers: headers })
.then(response => {
console.log(response.data);
})
.catch(error => {
console.error(error);
});import java.io.*;
import java.net.*;
import java.net.http.*;
public class PayUPayment {
public static void main(String[] args) throws IOException, InterruptedException {
// PayU Hosted Checkout - set checkout display language
HttpClient client = HttpClient.newHttpClient();
// Request body: key, txnid, amount, surl, furl, hash; display_lang=Hindi
String formData = "key=JP***g&txnid=PQI6MqpYrjEefU&amount=10.00&firstname=PayU User&[email protected]&phone=9876543210&productinfo=iPhone&surl=https://apiplayground-response.herokuapp.com/&furl=https://apiplayground-response.herokuapp.com/&display_lang=Hindi&hash=05a397501918ec5c36ae52daa3b3e49b43e986b86940e109d060076e467c3ea7536617df7420e0e6863dced8c5b45f9fff15c13bdf0335512c05f0210b31b072";
HttpRequest request = HttpRequest.newBuilder()
.uri(URI.create("https://test.payu.in/_payment"))
.header("accept", "application/json")
.header("Content-Type", "application/x-www-form-urlencoded")
.POST(HttpRequest.BodyPublishers.ofString(formData))
.build();
HttpResponse<String> response = client.send(request,
HttpResponse.BodyHandlers.ofString());
System.out.println(response.body());
}
}<?php
// PayU Hosted Checkout - set checkout display language
$url = 'https://test.payu.in/_payment';
$headers = array(
'accept: application/json',
'Content-Type: application/x-www-form-urlencoded'
);
$payload = array(
'key' => 'JP***g', // Merchant key provided by PayU
'txnid' => 'PQI6MqpYrjEefU', // Unique transaction ID generated by merchant
'amount' => '10.00', // Transaction amount
'firstname' => 'PayU User', // Customer first name
'email' => '[email protected]', // Customer email address
'phone' => '9876543210', // Customer phone number
'productinfo' => 'iPhone', // Product or order description
'surl' => 'https://apiplayground-response.herokuapp.com/', // Success callback URL
'furl' => 'https://apiplayground-response.herokuapp.com/', // Failure callback URL
'display_lang' => 'Hindi', // Display checkout page in Hindi
'hash' => '05a397501918ec5c36ae52daa3b3e49b43e986b86940e109d060076e467c3ea7536617df7420e0e6863dced8c5b45f9fff15c13bdf0335512c05f0210b31b072' // SHA-512 hash generated on server
);
$ch = curl_init();
curl_setopt($ch, CURLOPT_URL, $url);
curl_setopt($ch, CURLOPT_POST, 1);
curl_setopt($ch, CURLOPT_POSTFIELDS, http_build_query($payload));
curl_setopt($ch, CURLOPT_HTTPHEADER, $headers);
curl_setopt($ch, CURLOPT_RETURNTRANSFER, true);
$response = curl_exec($ch);
curl_close($ch);
echo $response;
?>use strict;
use warnings;
use LWP::UserAgent;
use HTTP::Request::Common;
# PayU Hosted Checkout - set checkout display language
my $url = 'https://test.payu.in/_payment';
my $ua = LWP::UserAgent->new;
my %payload = (
key => 'JP***g', # Merchant key provided by PayU
txnid => 'PQI6MqpYrjEefU', # Unique transaction ID generated by merchant
amount => '10.00', # Transaction amount
firstname => 'PayU User', # Customer first name
email => '[email protected]', # Customer email address
phone => '9876543210', # Customer phone number
productinfo => 'iPhone', # Product or order description
surl => 'https://apiplayground-response.herokuapp.com/', # Success callback URL
furl => 'https://apiplayground-response.herokuapp.com/', # Failure callback URL
display_lang => 'Hindi', # Display checkout page in Hindi
hash => '05a397501918ec5c36ae52daa3b3e49b43e986b86940e109d060076e467c3ea7536617df7420e0e6863dced8c5b45f9fff15c13bdf0335512c05f0210b31b072' # SHA-512 hash generated on server
);
my $response = $ua->post(
$url,
'accept' => 'application/json',
'Content-Type' => 'application/x-www-form-urlencoded',
Content => \%payload
);
print $response->content;The PayU payment page is displayed with the display language as "Hindi" similar to the following screenshot:

Configure Checkout Payment Methods and Settings
By default, the following payment methods are enabled for merchants on PayU Payment page (with PayU Hosted Checkout integration):
NetBanking Debit Card
Credit Card UPI
* Wallet
You can enable the following modes if you are eligible using Dashboard:
BNPL EMI
* International Payments
Note: You can enable or activate any of the above payment modes only if your are eligible or you have signed an agreement with PayU. If you are unable to raise request using Dashboard, contact your PayU Key Account Manager.
The following procedures describes how to enable payment mode or a feature.
Enable a payment method
To configure the Dashboard to enable payment method:
-
Navigate to Dashboard > Settings > Payment Methods.
The Manage Payment Methods page is displayed with Debit Card tab selected by default.
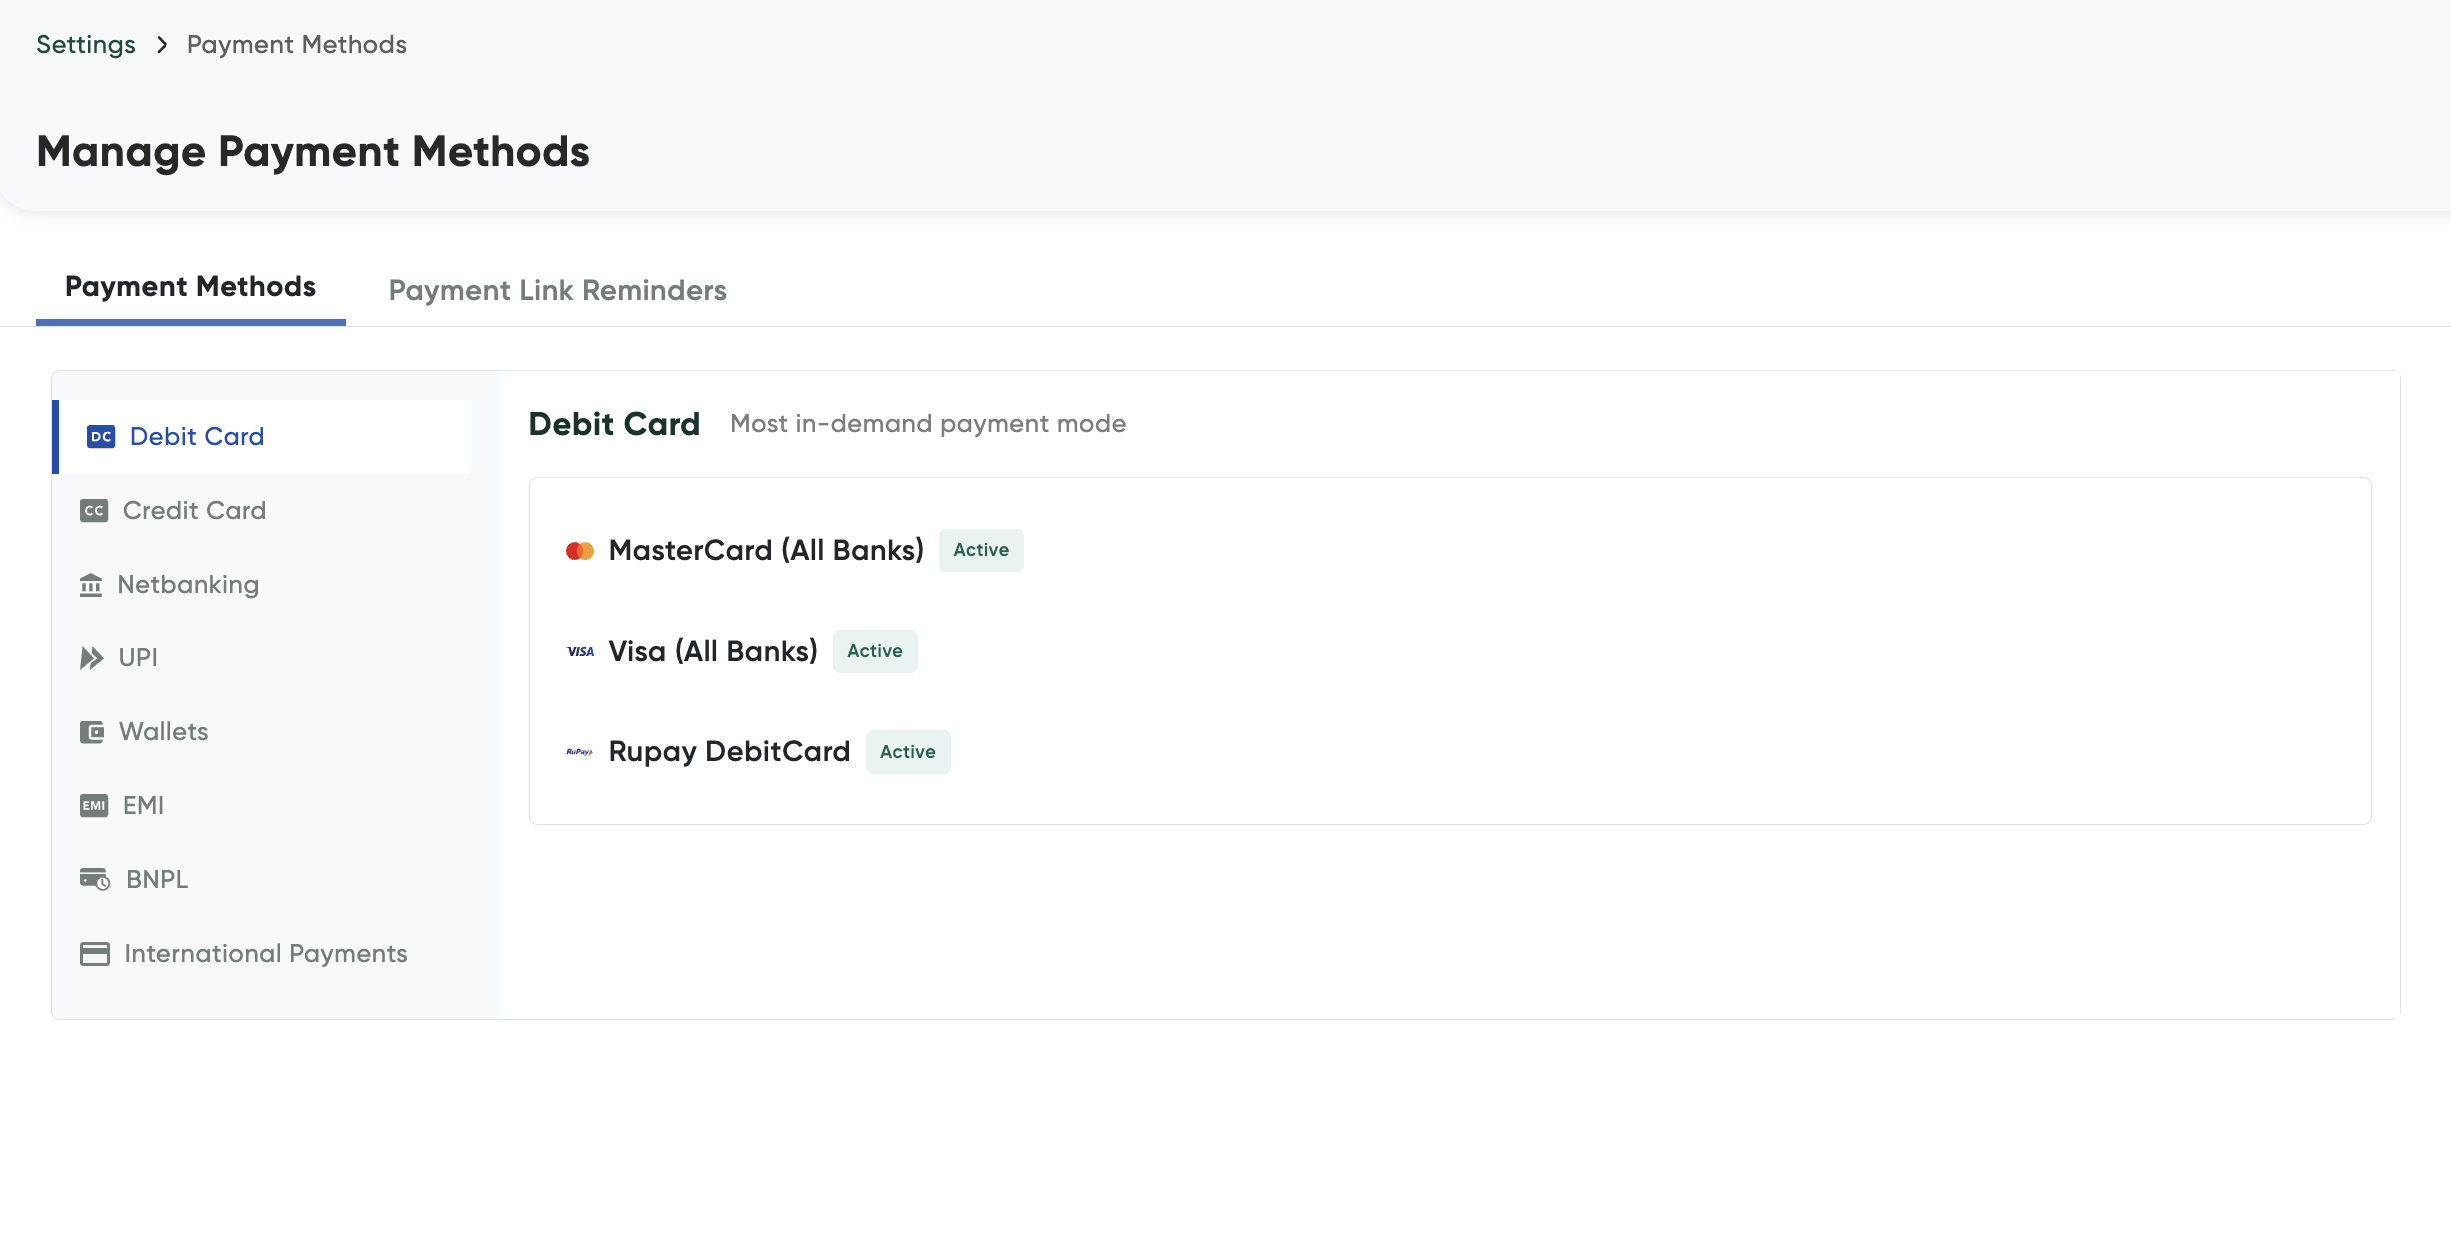
-
Select any of the payment method tab that you wish to configure.
If you are eligible for the payment method, the Activate Now button is displayed. For example, the Activate Now button is enabled in the International Payments tab.
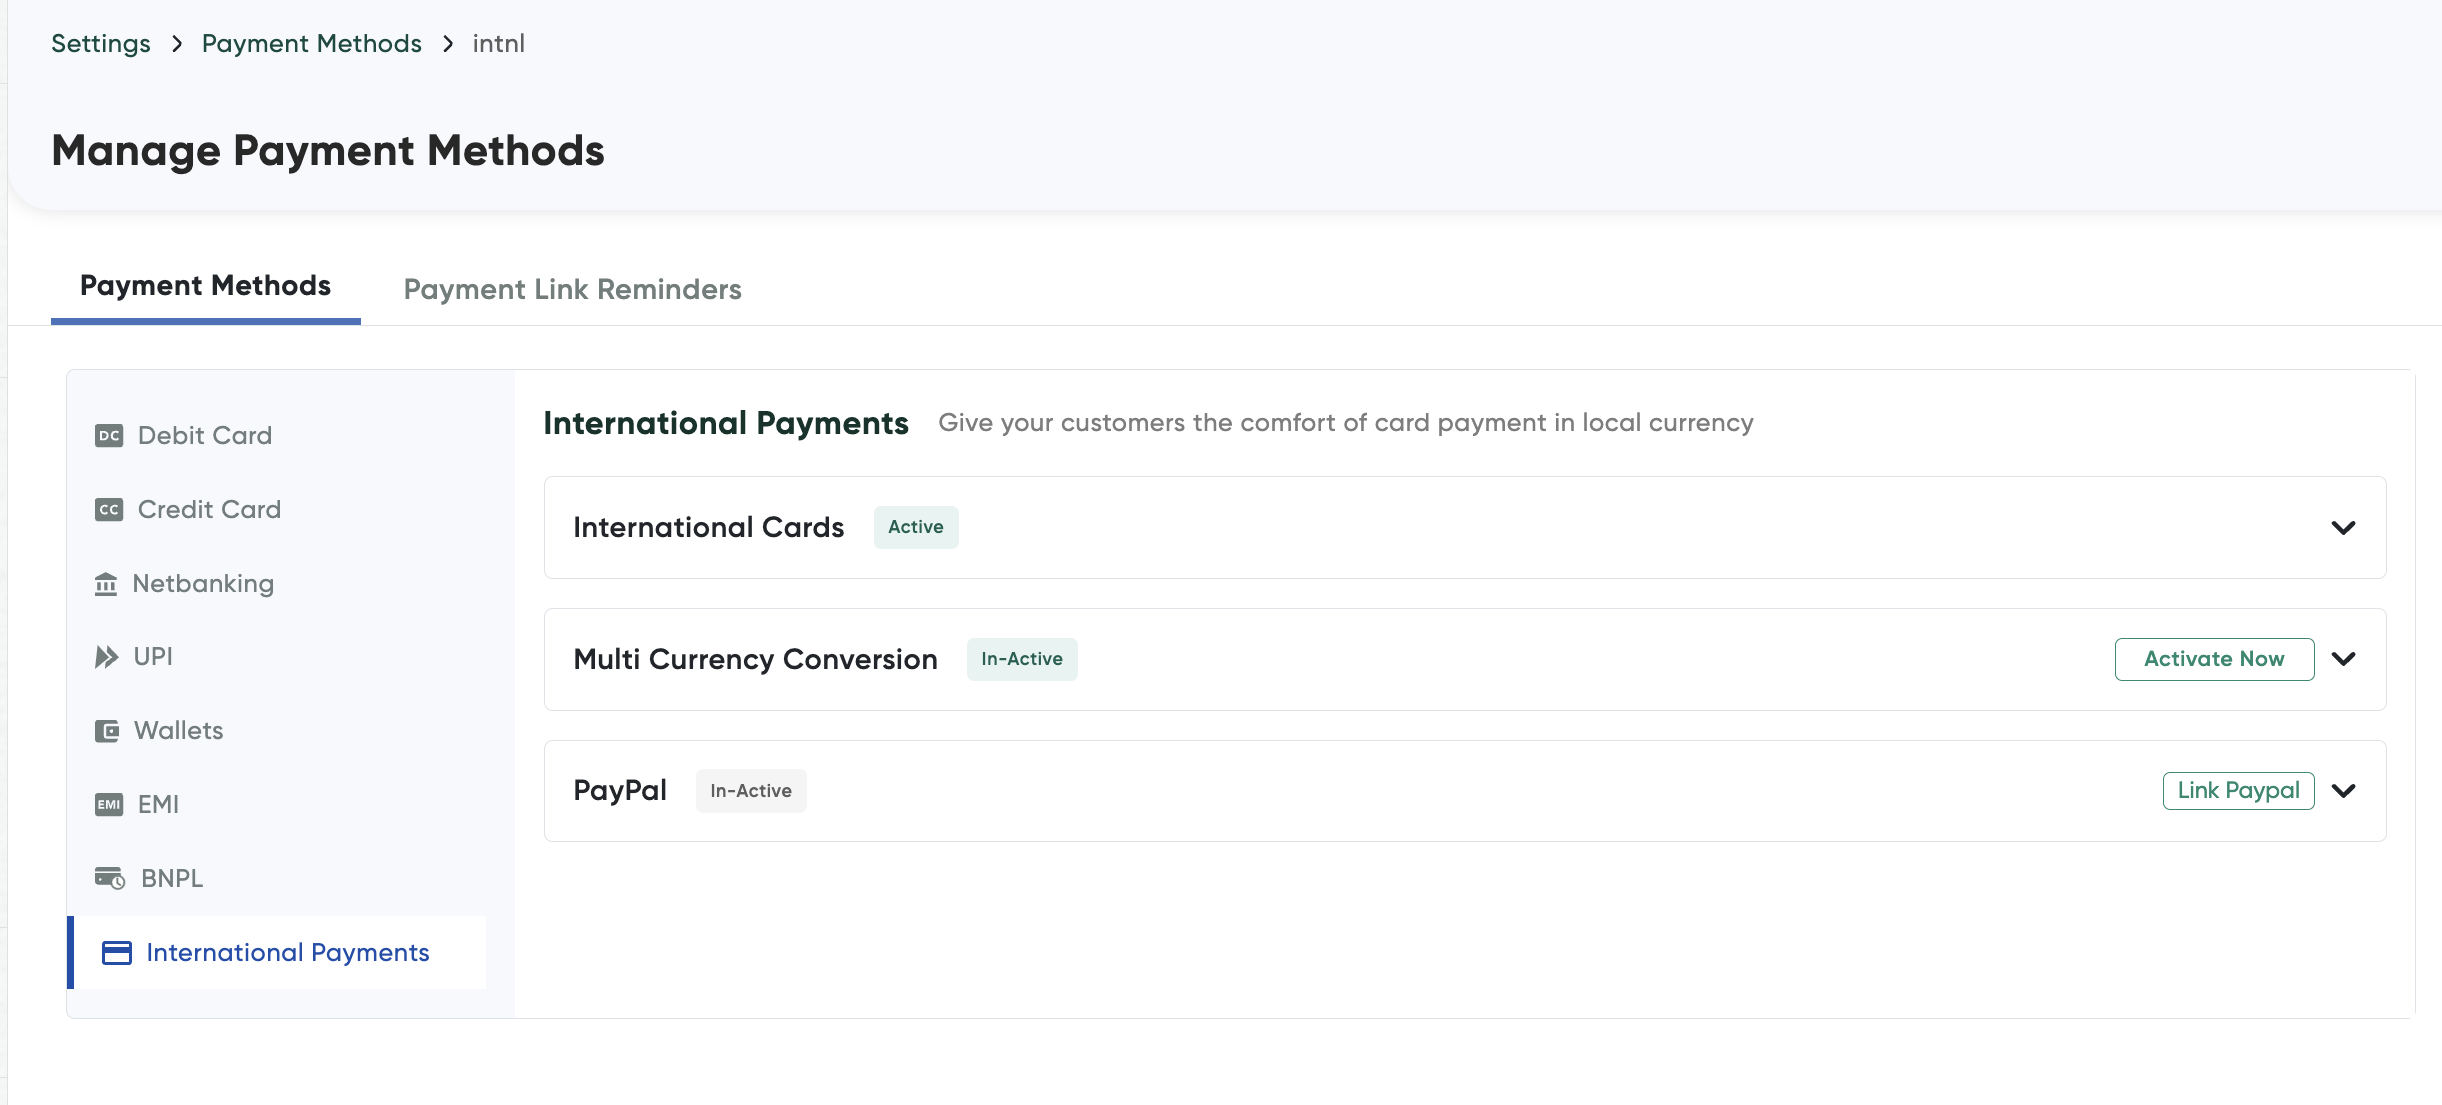
-
Click Activate Now.
A pop-up dialog box is displayed similar to the following screenshot and this will vary according to the payment method:
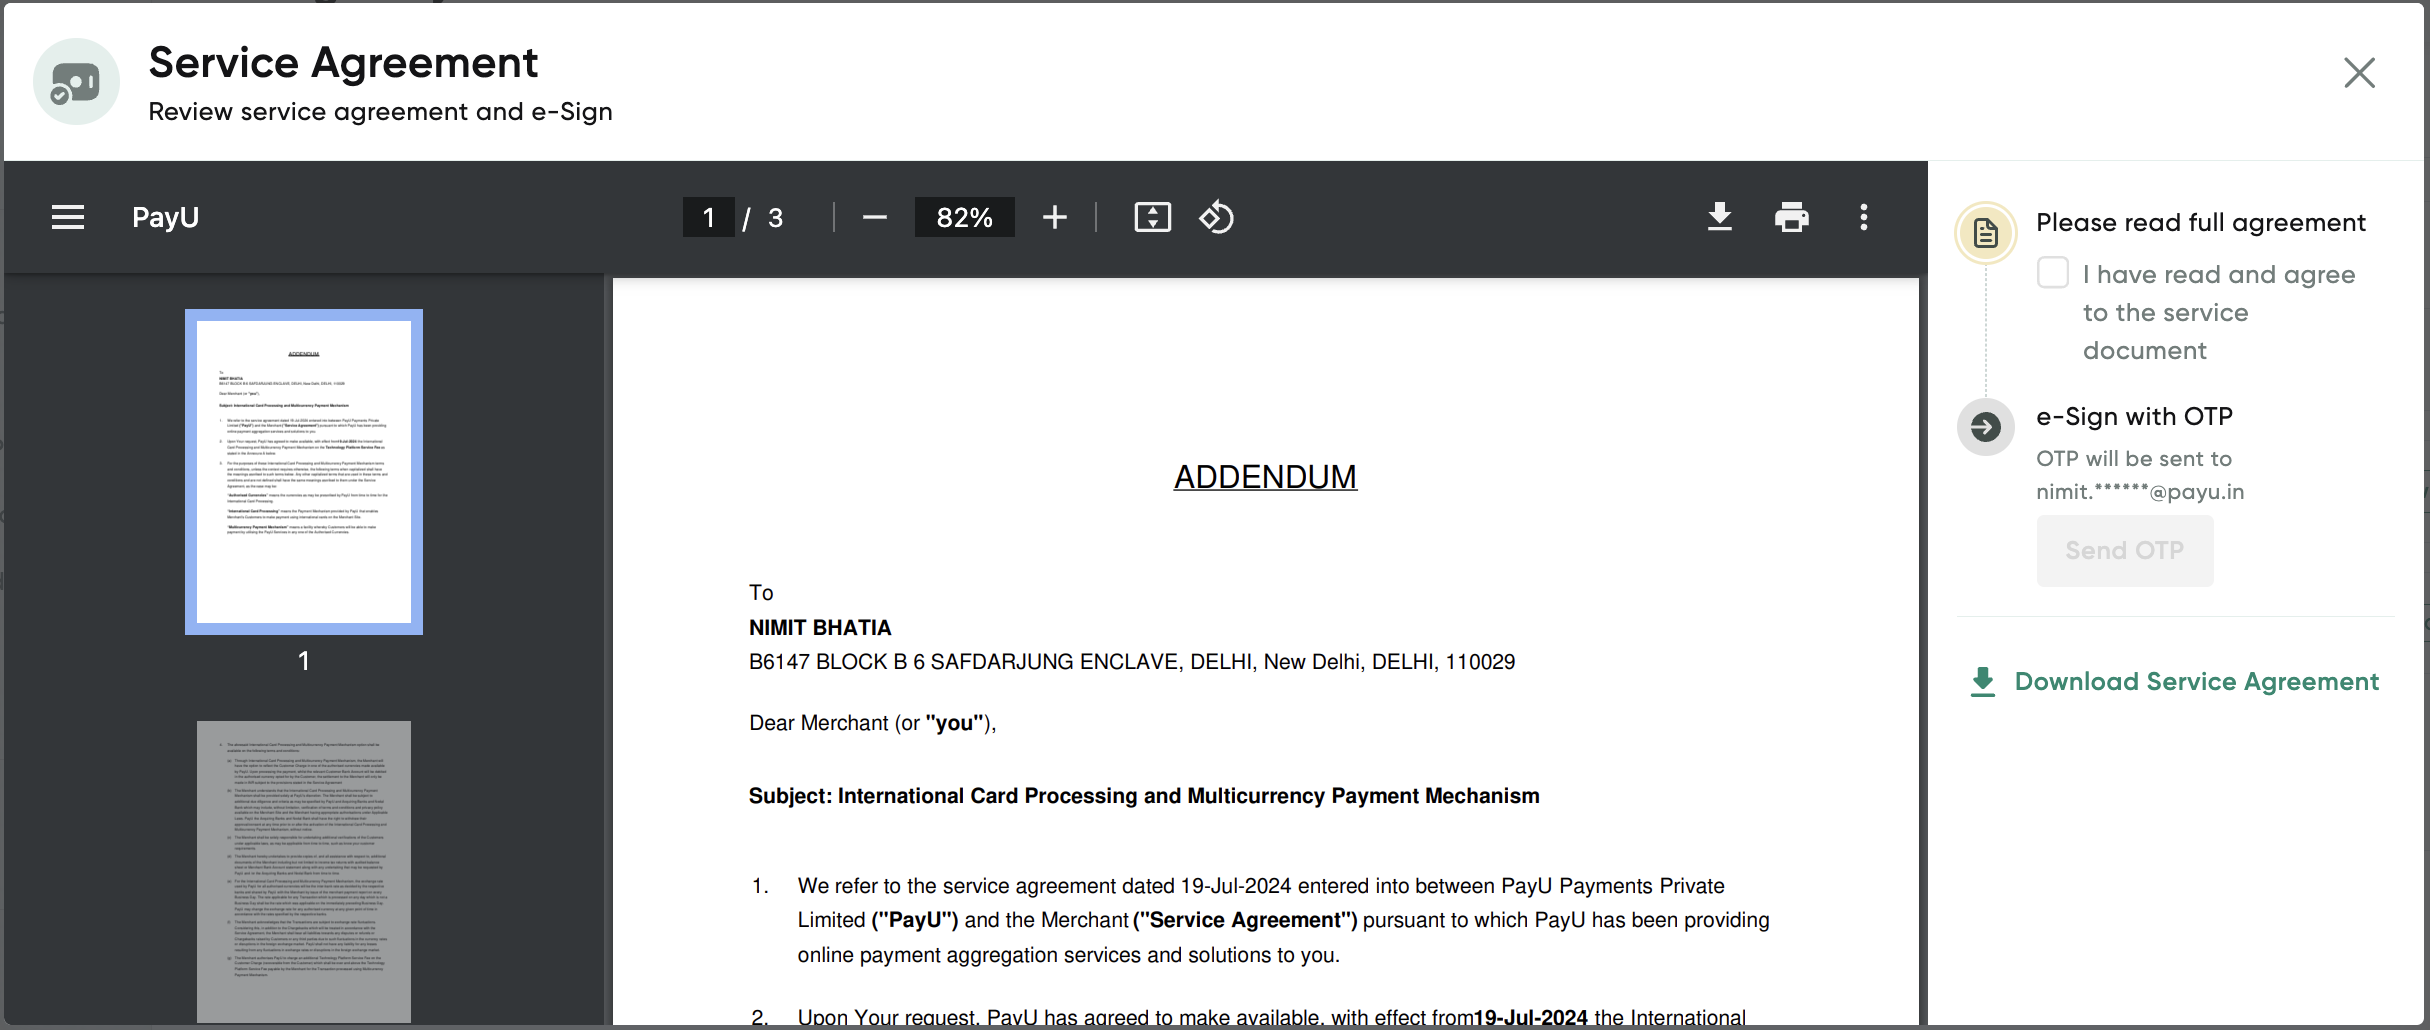
-
Click Proceed to activate.
A confirmation message is displayed.
Activate PayPal wallet
To activate PayPal wallet and start collecting payments with PayPal:
- Follow the steps as in Enable a payment method.
- Click Link PayPal account.
You are redirected to the PayPal page similar to the following screenshot.
- Enter your email address that you want to use in future with PayPal.
- Select your country as India.
- Click Next.
- Enter the password to create the account.
- Select your nature of your business and PAN details, name to displayed on statement and website URL as required and click Next.
- Enter your name, date of birth and contact details.
- Scroll down and enter the business contact phone number and primary
- Click Next.
Note: Contact your PayU Key Account Manager to remove a payment mode from the Checkout page.
Configure Checkout Settings
The Checkout Customisation page on PayU Dashboard lets you tailor your checkout page to match your brand identity and prioritise the payment methods that are most relevant to your customers.
You can perform the following tasks from this page:
Add your brand logo and apply your brand colours. Set a default language for the checkout page.
Add an owner signature that appears on invoices and customer-facing pages. Choose the order in which payment methods appear at checkout, or let PayU recommend the order automatically.
A live preview on the right-hand side of the page shows how your checkout page will appear on Desktop and Mobile devices as you make changes.
>
Reference: For more information on PayU hosted Checkout integration, refer to
PayU Hosted Checkout.
Configure Brandings
To update your brand settings:
-
Navigate to Dashboard > Settings > Checkout Settings.
The Set up your brand page is displayed.
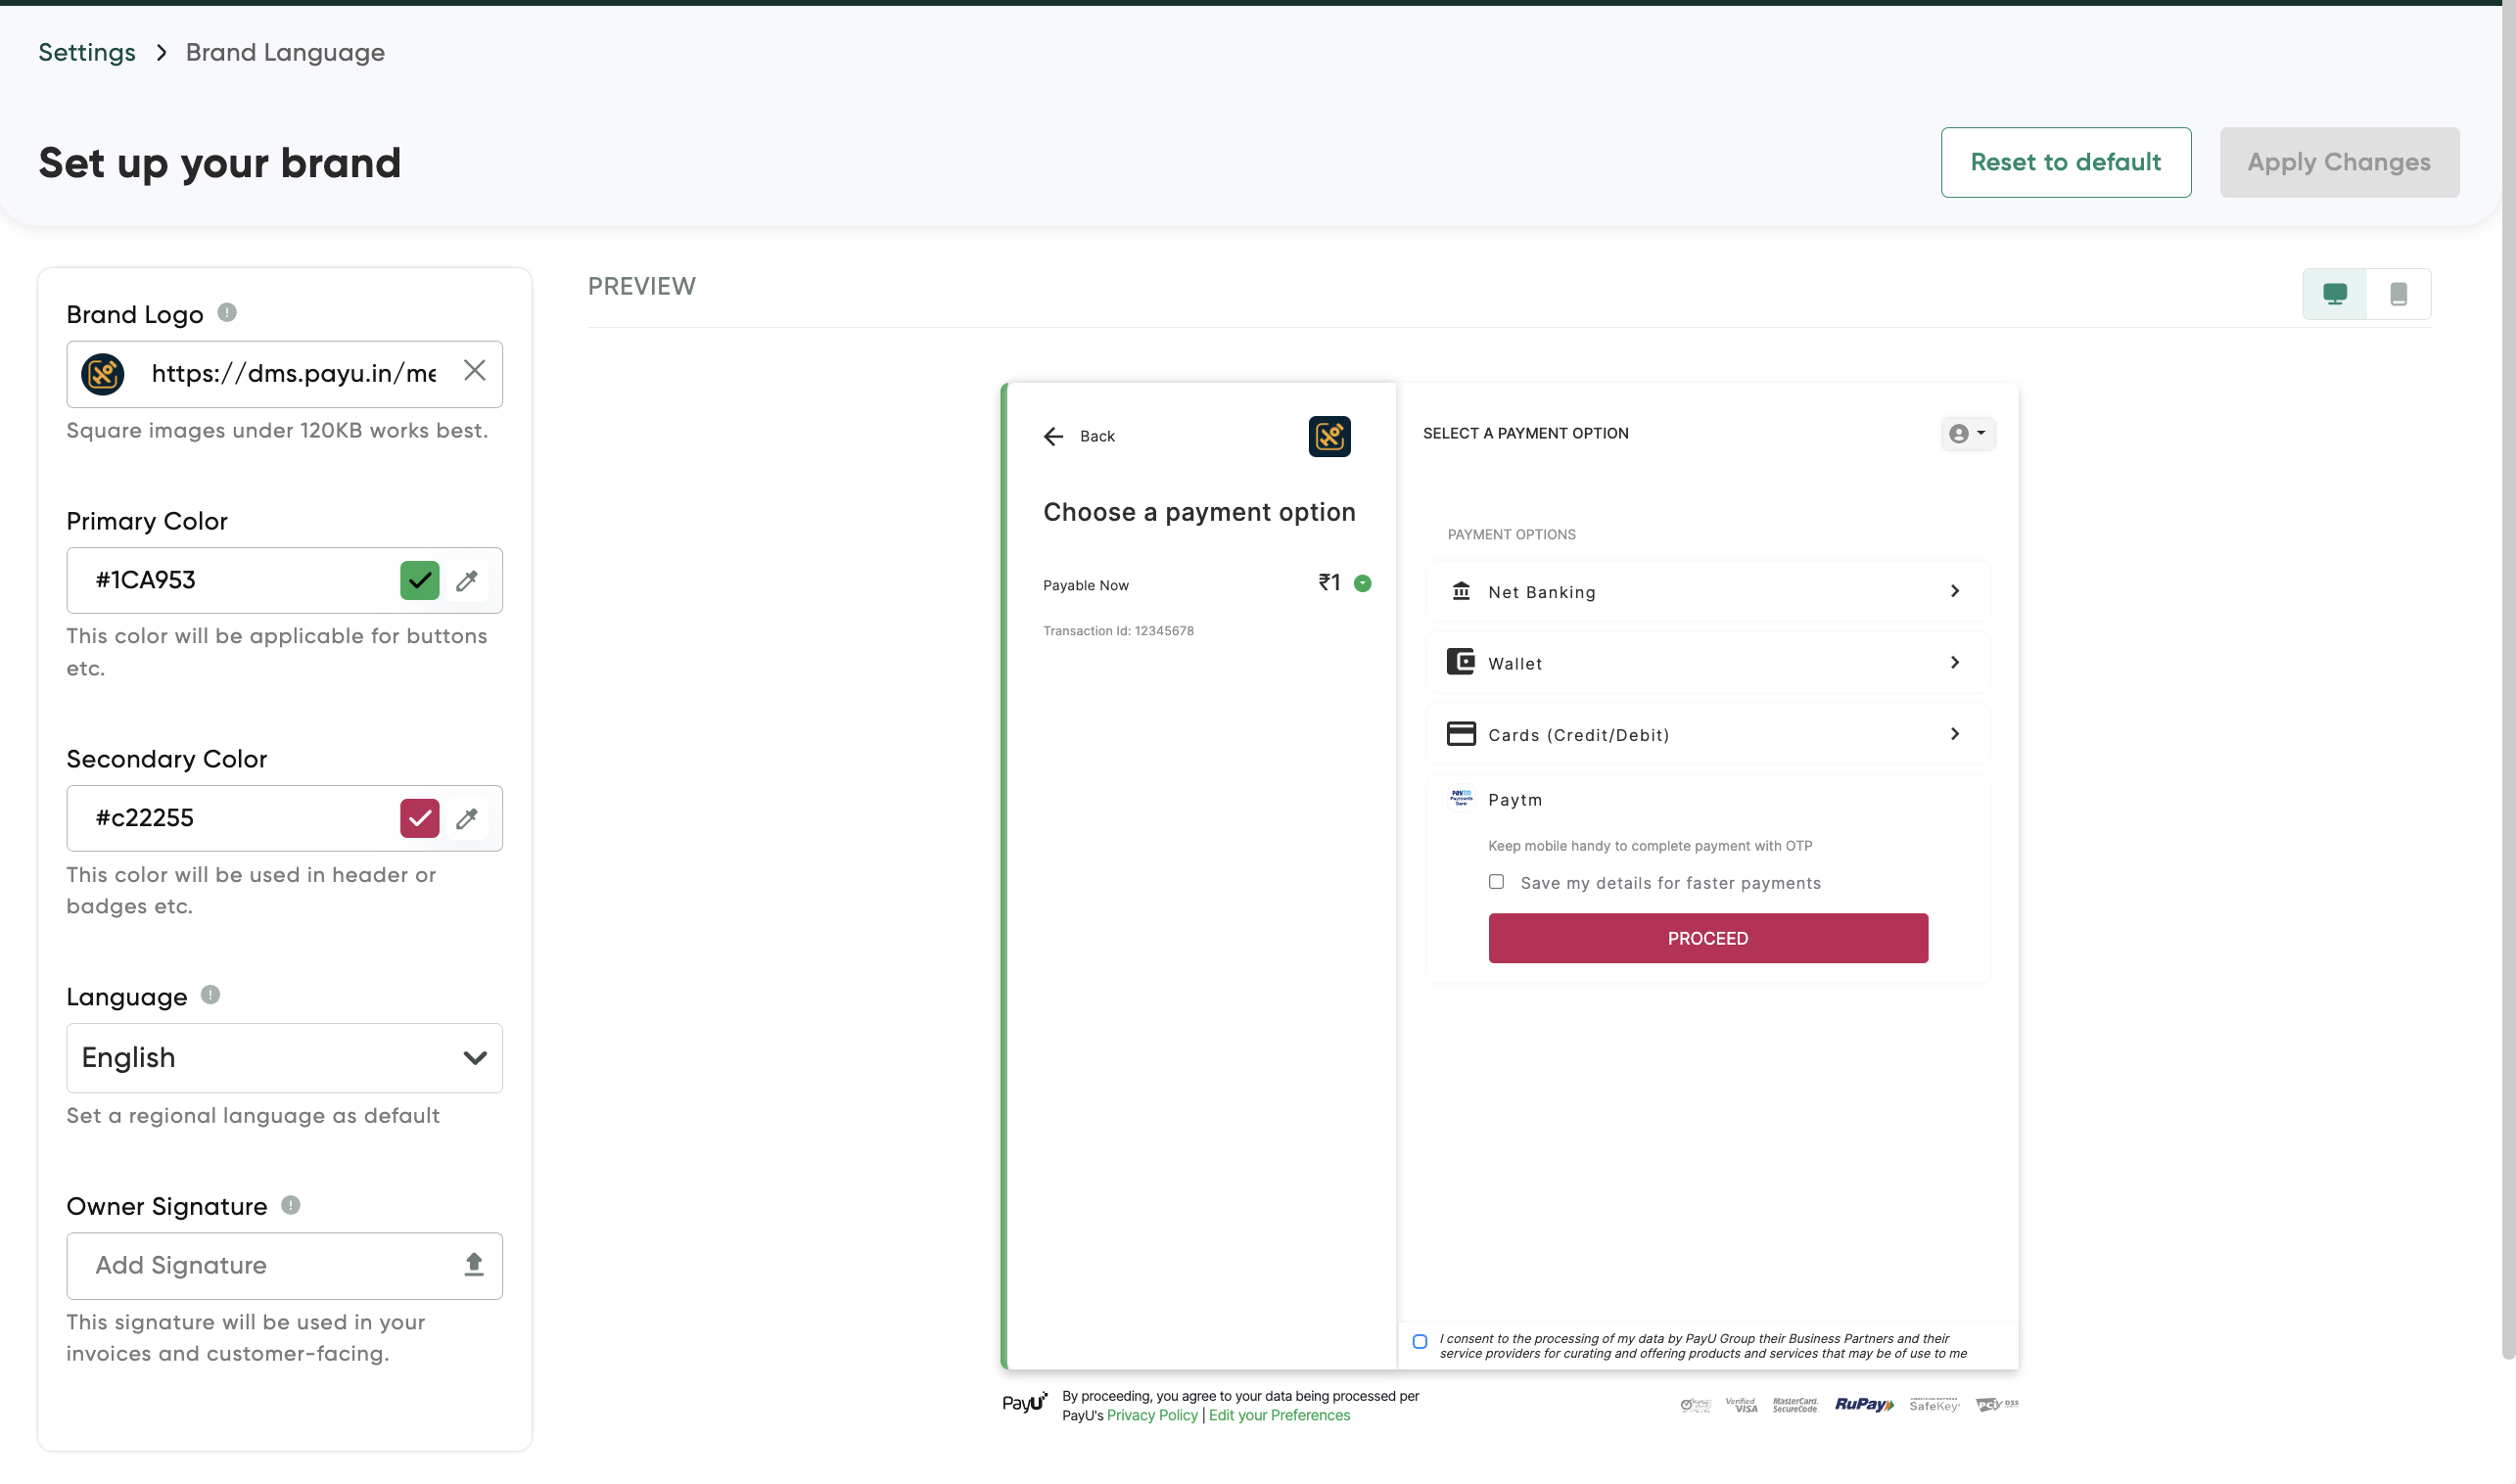
- Select or enter the details as described in the following table:
| Field | Description |
|---|---|
| Brand Logo | Enter the location or URL of the brand logo. Note: You need to that the size of the logo image is 90×90 and format of the logo image is PNG |
| Secondary Color | Click the color chooser to choose the color theme for the checkout page. |
| Language | Select the language from the Language drop-down list that has to be displayed on the Checkout page. |
| Owner Signature | Click Select the file from your library to select the signature file and click Upload to complete the action. |
Note: While you configure each field above on the , you can see the preview in the right pane. For example, if you add or update the brand logo URL, it will be updated in the right pane preview.
Customize the Payment Order
You can choose either configure the custom payment method order or PayU recommended order as described in the following:
Configure the Custom Payment Method Order
Set a custom order if you want to control exactly which payment method appears first, second, and so on at checkout.
To set a custom payment method order:
-
Select Manage Checkout > Checkout Customisation from the menu on left pane.
-
Select the Features for Website platform tab.
The Features for Website platform tab is displayed. -
Under Payment Methods Order, click Set Order.
The Payment Method Order pop-up page is displayed with the list of your integrated payment methods.
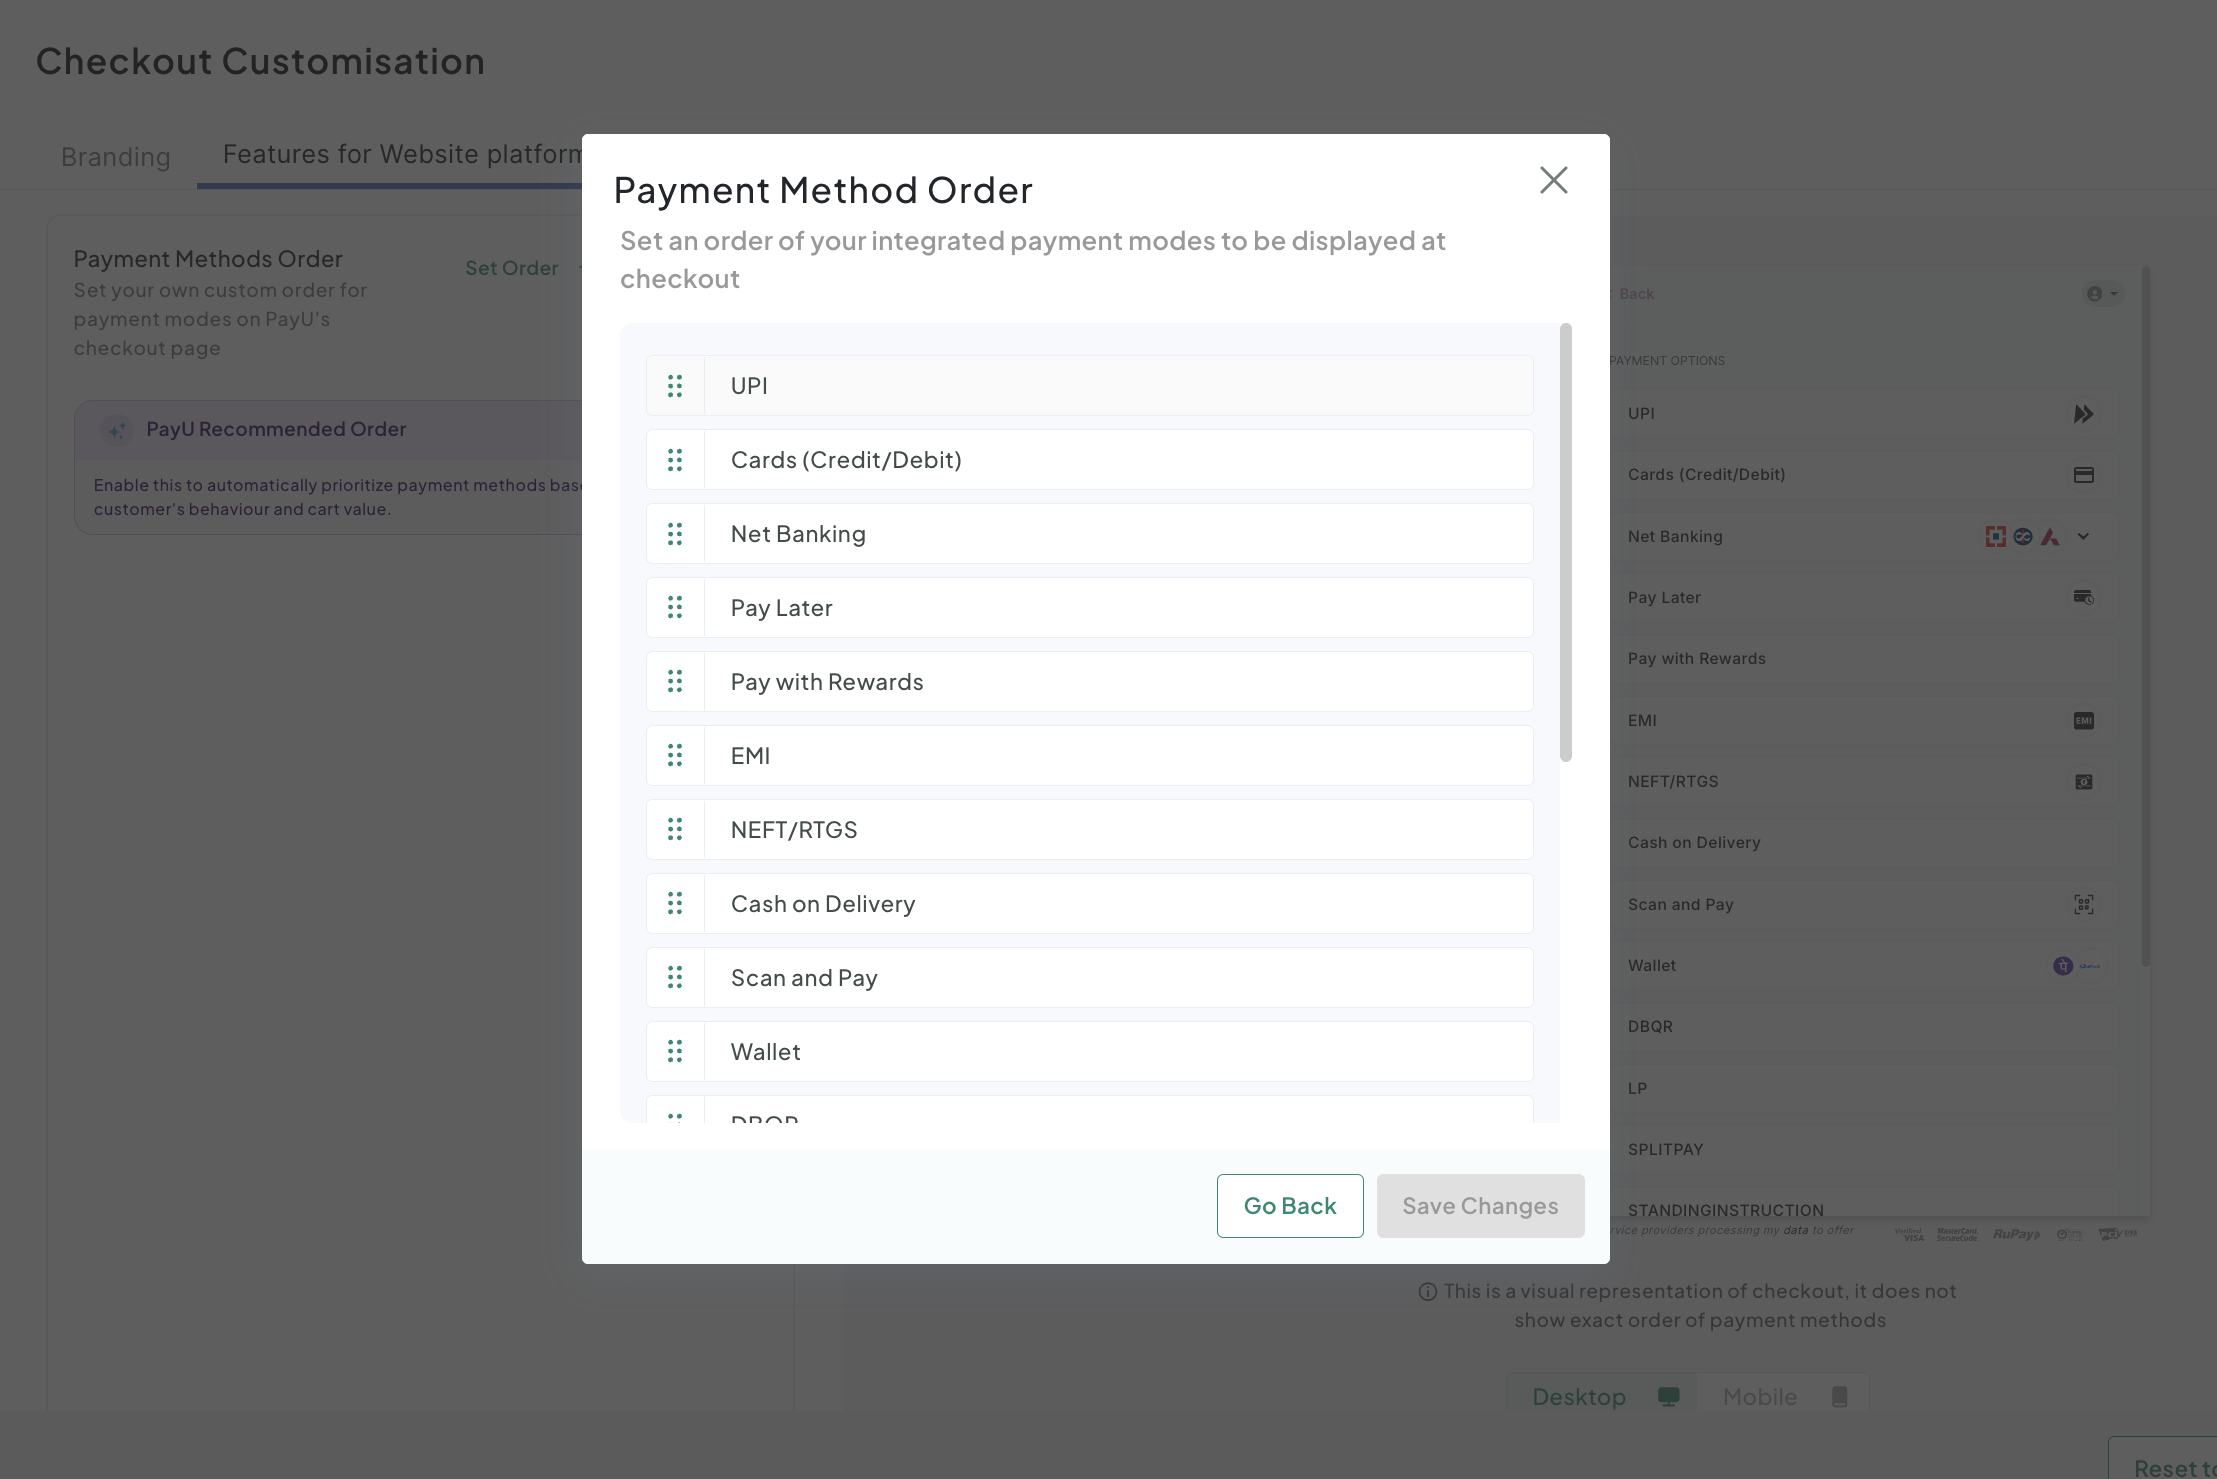
-
To reorder the list, drag a payment method by the handle on the left and drop it in the position where you want it to appear.
For example, to show UPI at the top of the checkout page, drag it above Cards (Credit/Debit).
-
Repeat the previous step until the payment methods appear in the order you want.
-
Select Save Changes to apply the new order.
The custom order is reflected immediately in the preview pane.
Enable PayU Recommended Order
Enable PayU Recommended Order if you want PayU to automatically prioritise payment methods based on real-time signals such as customer behaviour and cart value. This option helps to improve conversion without requiring you to manage the order manually.
To enable PayU Recommended Order:
- Select Manage Checkout > Checkout Customisation from the menu on left pane.
- Select the Features for Website platform tab.
The Features for Website platform tab is displayed.
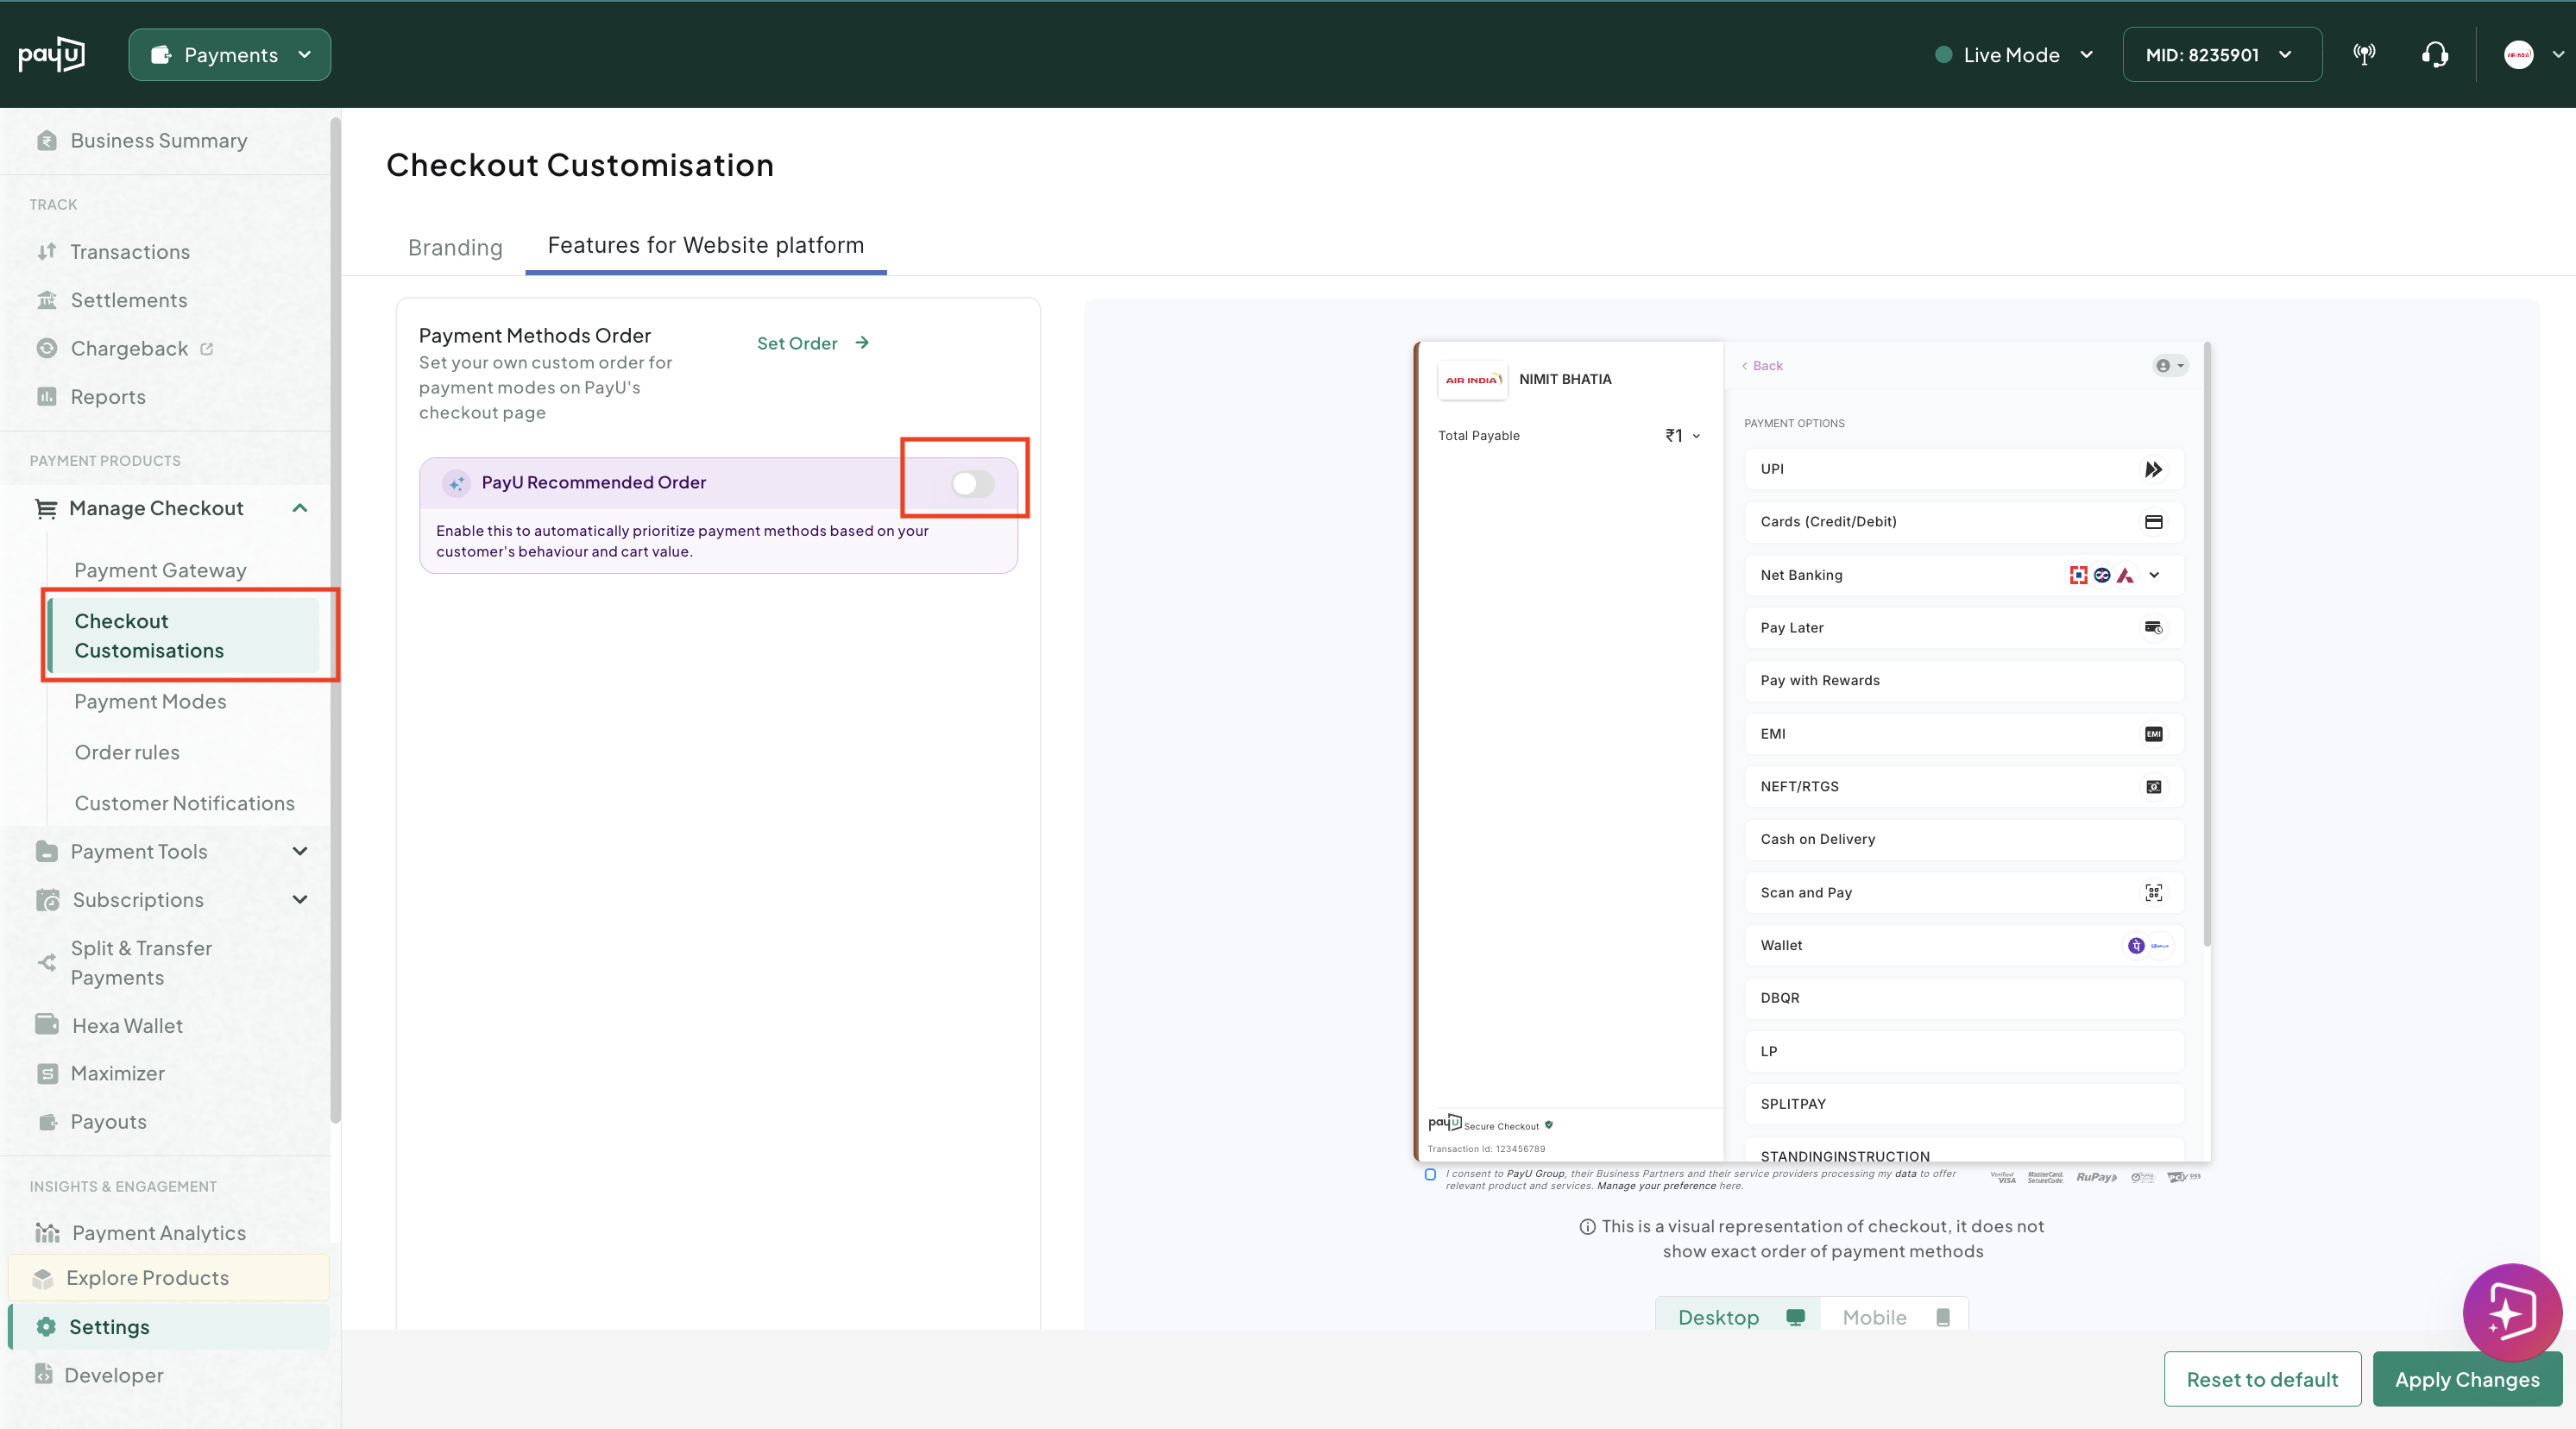
-
Under Payment Methods Order, turn on the PayU Recommended Order toggle.
When this toggle is turned on, PayU automatically determines the order of payment methods at checkout, and the Set Order option is disabled.
-
Select Apply Changes to save your settings.
Note: To switch back to a custom order, turn off the PayU Recommended Order toggle, and then follow the steps in Set a Custom Payment Method Order.
Updated about 2 months ago