Affordability Widget Integration for Shopify
PayU Affordability Widget can be introduced into themes in Liquid template files, sections, blocks, and snippets.
To configure the Affordability Widget for Shopify:
Note: If you are using themes created in 2020 or before, where product.json is not present, Step 1 must be followed.
Step 1: Duplicate the Existing Theme
Duplicate the Existing Theme
To duplicate the existing theme:
Note: If you are using themes created in 2020 or before, where product.json is not present, step in this section can be skipped and proceed to Step 2: Add Snippet for PayU.
- Log in to Shopify Admin portal.
- Select Themes under Online Stores on the left navigation pane.
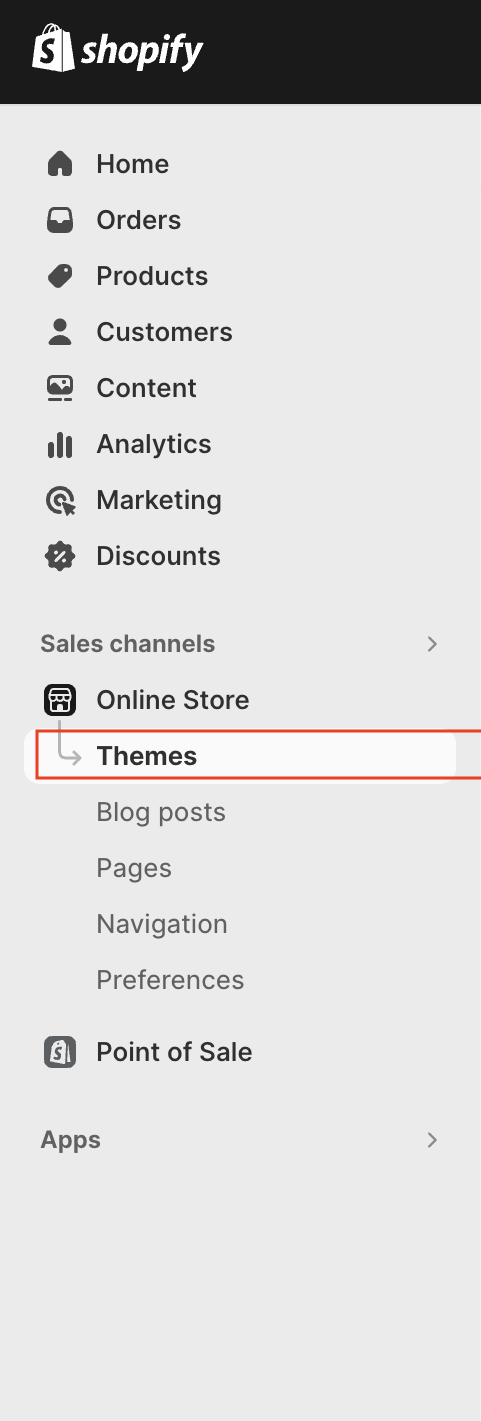
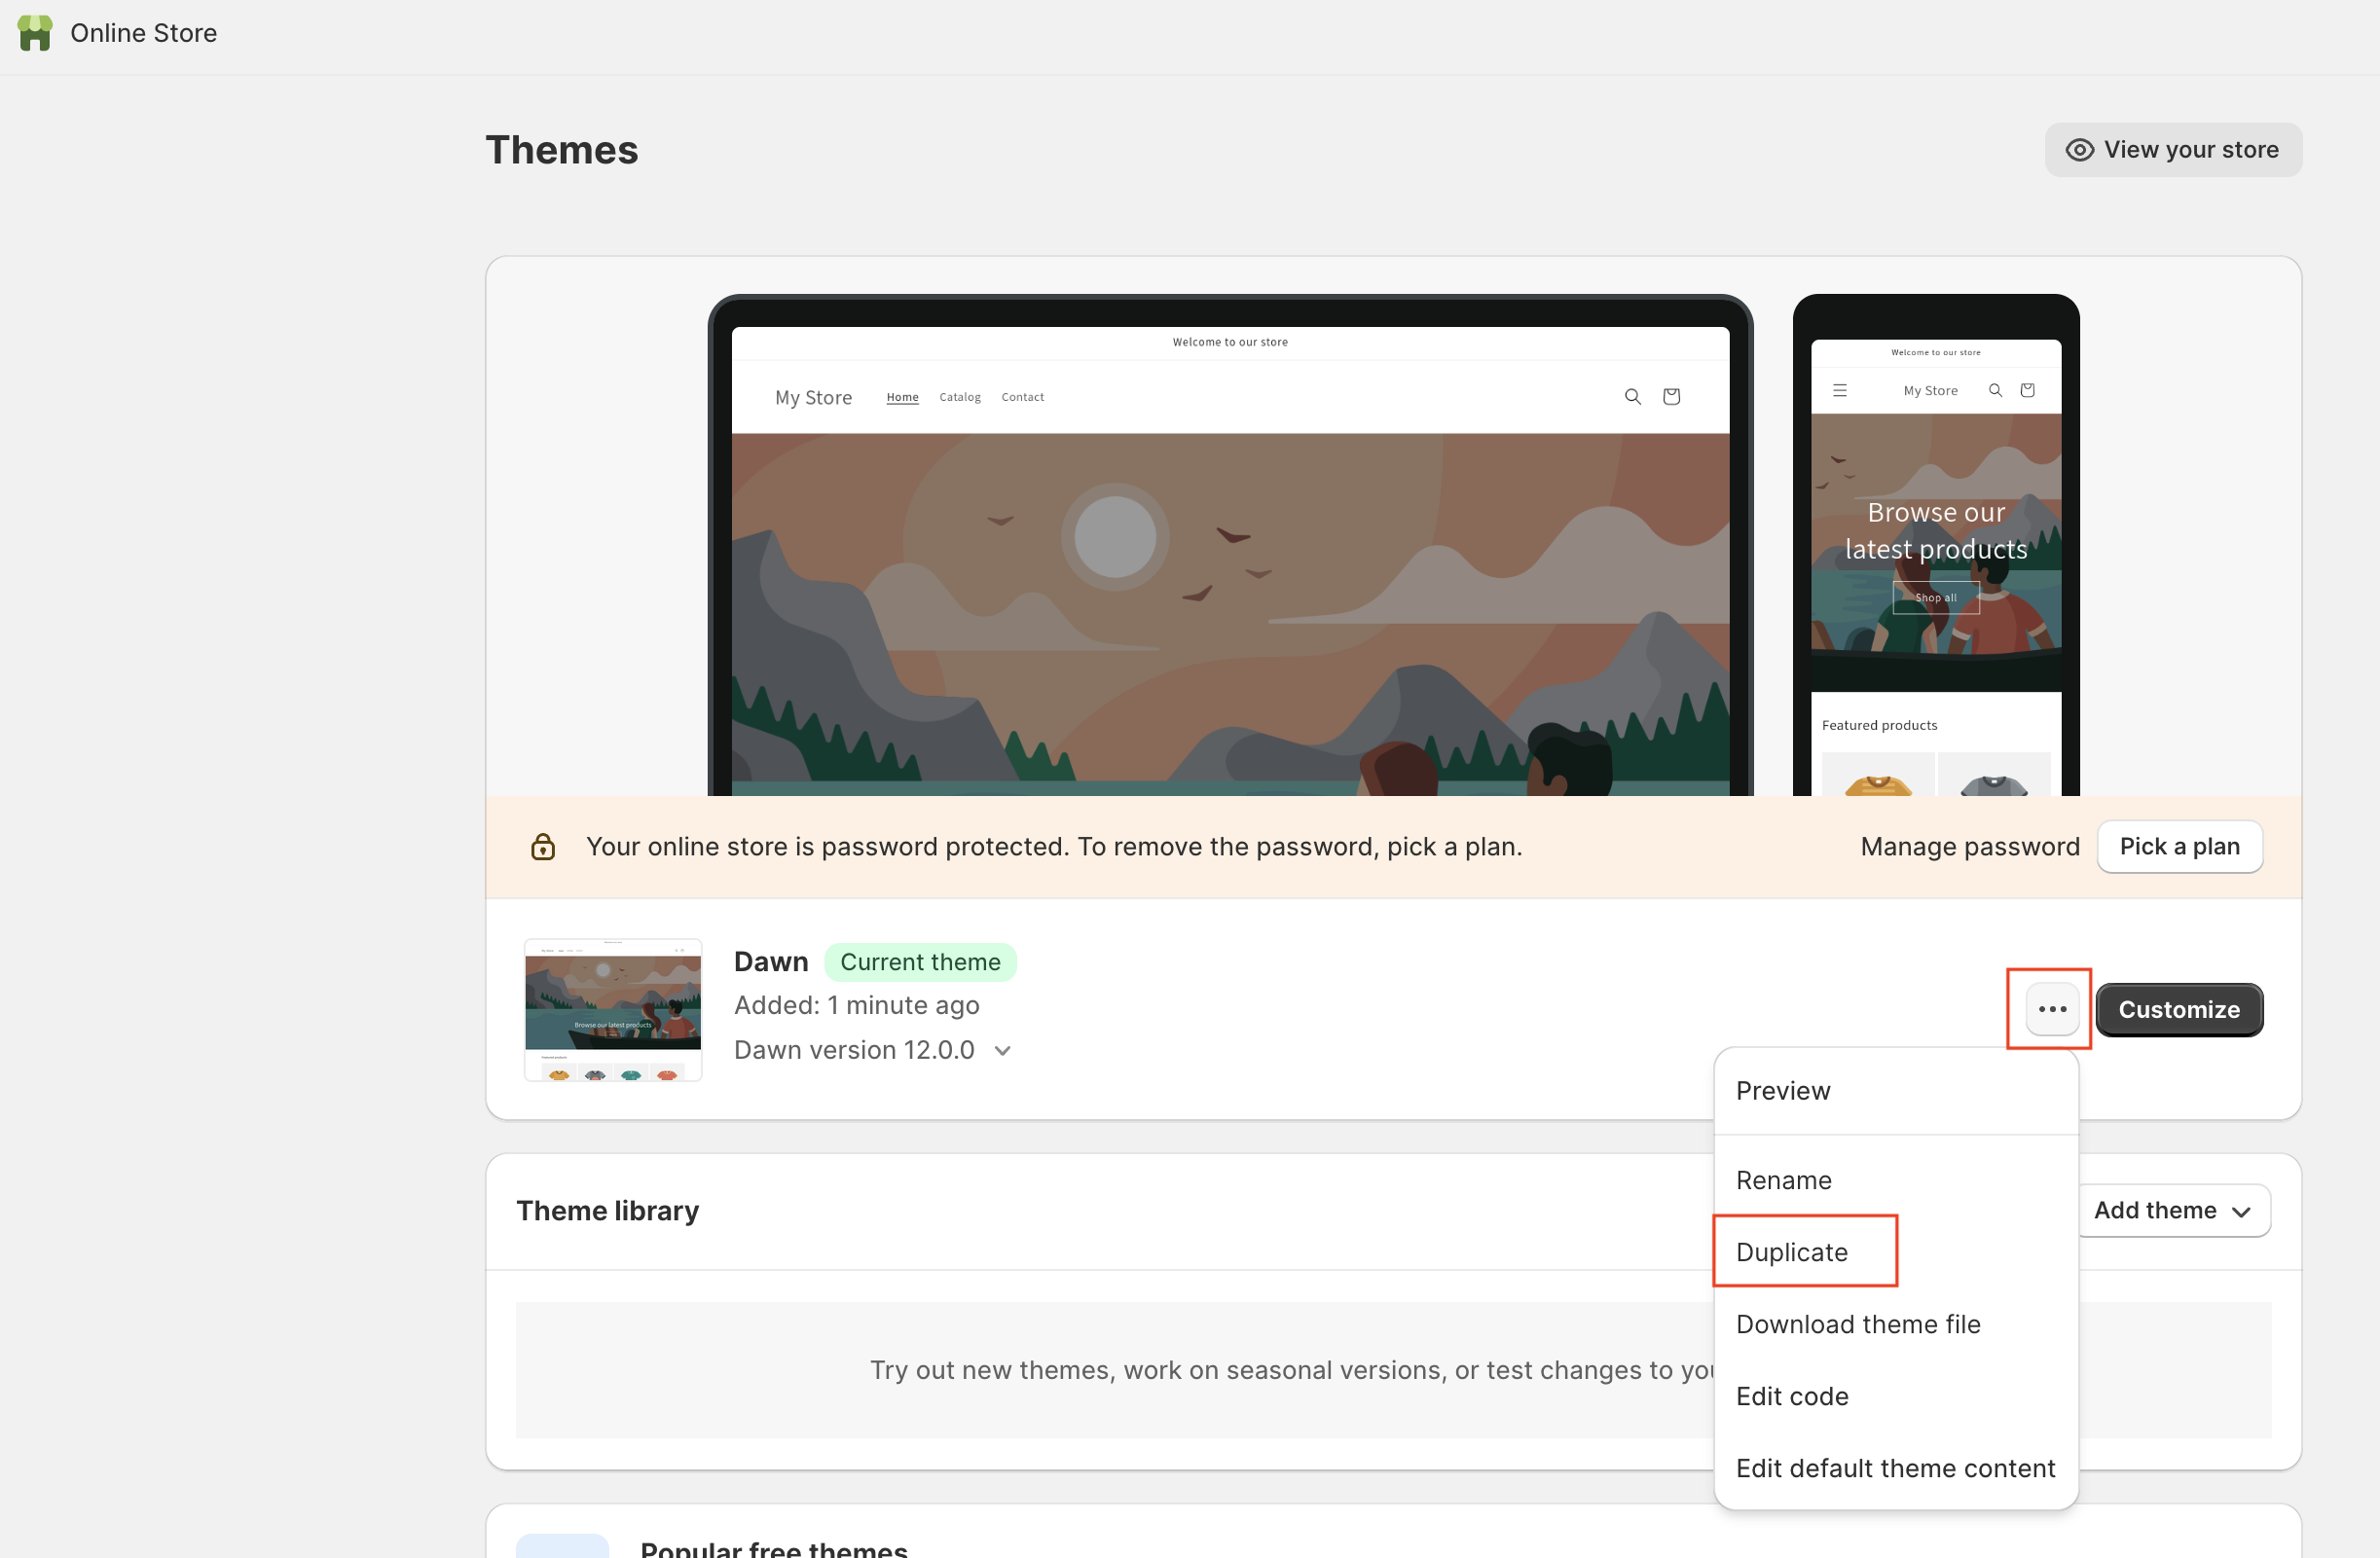
- Select the hamburger menu for which you wish configure the widget and select Duplicate Theme.
-
Select the hamburger menu for which you wish to configure the widget and select Edit Code to open the Code page for the current theme.
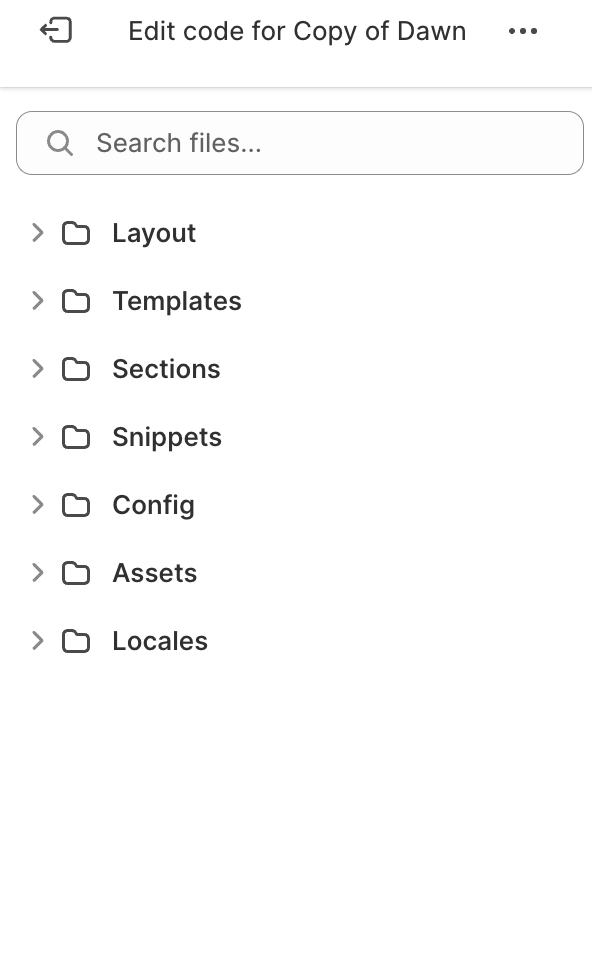
The following folders are displayed on Code page of the current theme.
- Navigate to Layout > theme.liquid file.
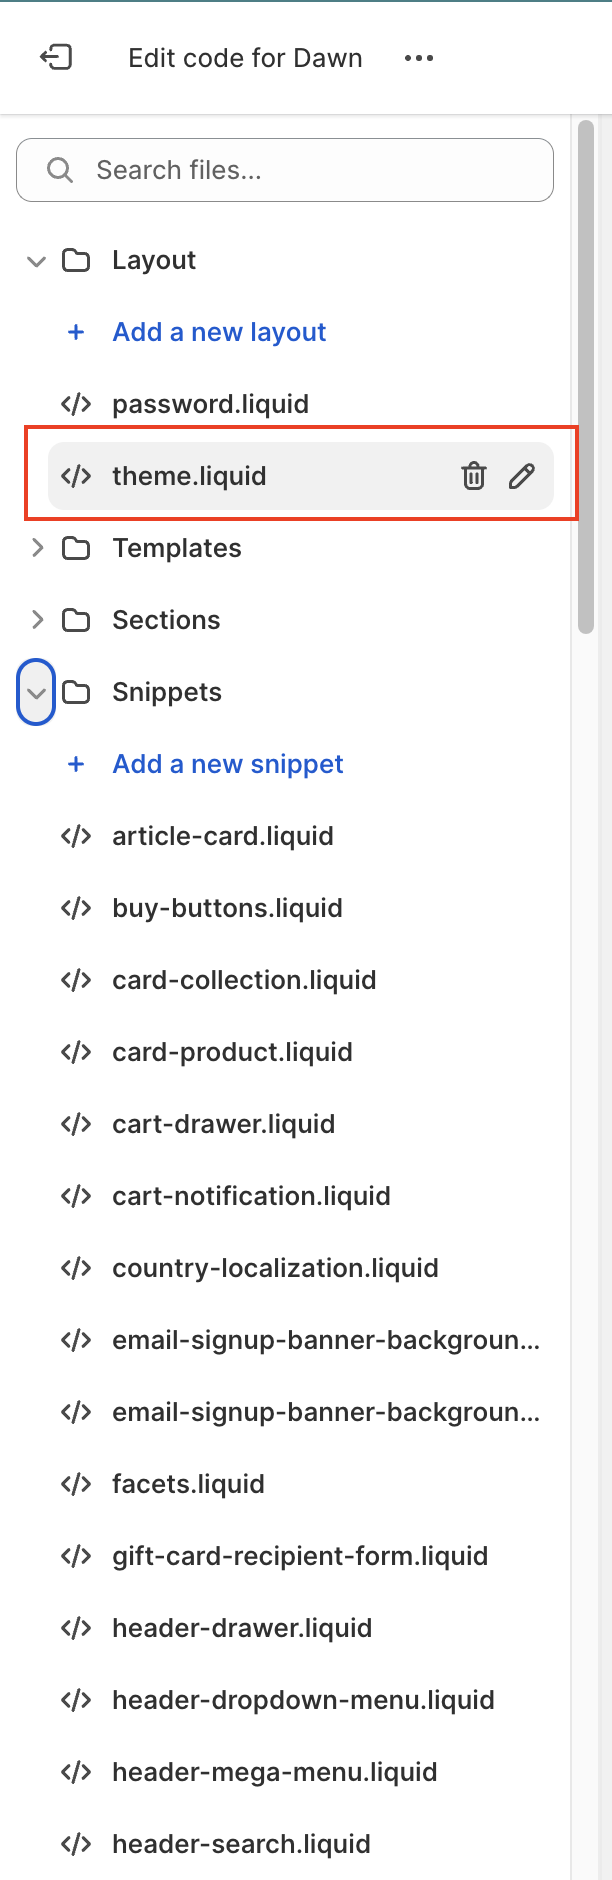
- Add the below script before completing the head tag:
<script defer src="https://jssdk.payu.in/widget/affordability-widget.min.js"></script>Step 2: Add an affordability snippet on your website
Non SKU-based offer
To add a snippet to your website for a non SKU-based offer:
Note:Add a non-SKU based offer on PayU Dashboard before performing this procedure. For more information, refer to Create an Instant Discount or Cashback Offer.
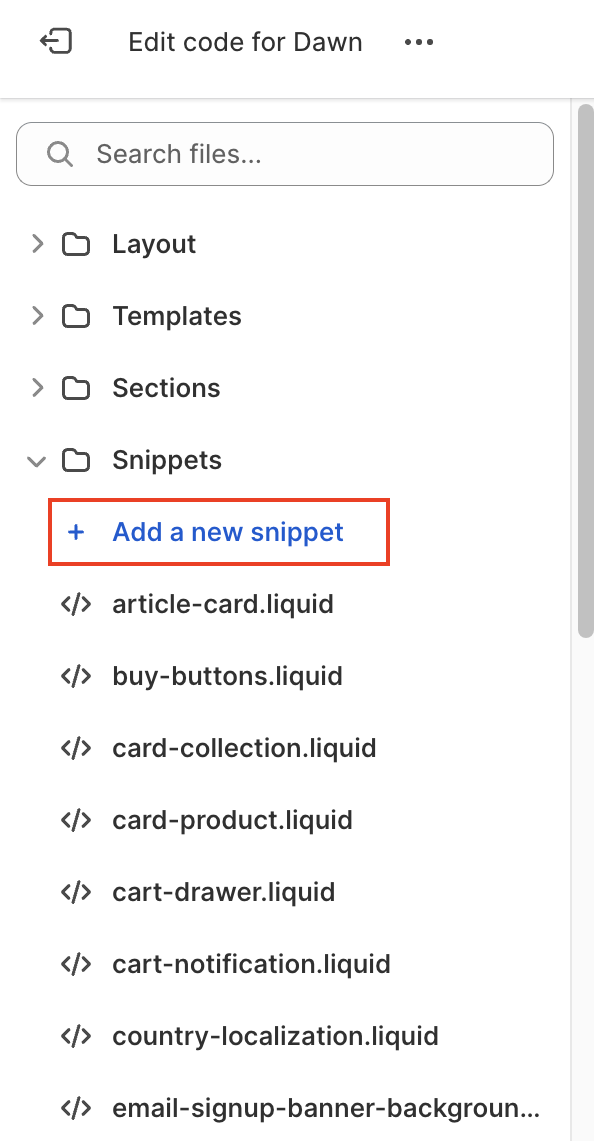
- Select Add a new Snippet under the Snippet folder on the left pane.
-
Create and add a new snippet with the name “payu-block” as filename under the Snippets folder.
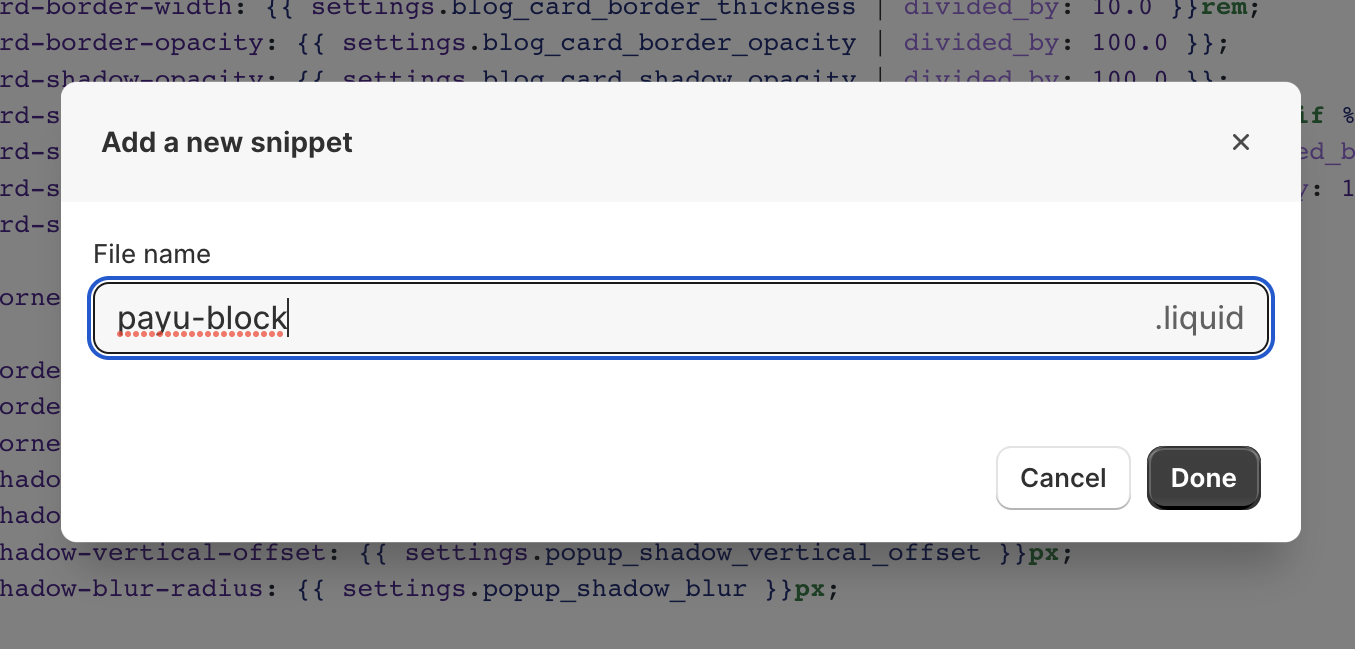
The _Add a new snippet _dialog box is displayed.
-
Enter the name of the snippet as payu-block and then click Done.
- Add the following snippet inside the payu-block file:
<script>
    window.addEventListener("load", (event) => {
        var widgetConfig = {
            "key": "MERCHANT_KEY",
            "amount": {{ payu_amount | divided_by: 100.00 }},
        };
        payuAffordability.init(widgetConfig);
    });
</script>
<div id="payuWidget"></div>
This is to view UI on the webpage, key is the merchant key.
SKU-based offer
To add a snippet to your website for a SKU-based offer:
Note:Add a SKU based offer on PayU Dashboard before performing this procedure. For more information, refer to Create a SKU-Based Offer.
- Select Add a new Snippet under the Snippet folder on the left pane.
-
Create and add a new snippet with the name “payu-block” as filename under the Snippets folder.
The _Add a new snippet _dialog box is displayed.
-
Enter the name of the snippet as payu-block and then click Done.
- Add the following snippet inside the payu-block file:
<script>
     window.onload = function() {
        // Initialize an empty array for SKU details
        var skusDetail = [];
        var payuAmount;

        // Check if the product object exists
        {% if product %}
          // Set payu_amount to the product price in rupees
          payuAmount = {{ product.selected_or_first_available_variant.price | divided_by: 100.00 }};


          {% if product.selected_or_first_available_variant.sku != blank %}  // Check if the variant SKU exists
            skusDetail.push({
              skuId: "{{ product.selected_or_first_available_variant.sku }}",              // Get the variant SKU ID
              skuAmount: {{ product.selected_or_first_available_variant.price | divided_by: 100.00 }},  // Convert price to rupees
              quantity: 1
            });
          {% endif %}

          console.log("SKU Details from Product Variants:", skusDetail);
        {% else %}
          // If product does not exist, set payu_amount to the cart amount
          payuAmount = {{ cart.total_price | divided_by: 100.00 }};


          // If product does not exist, create skusDetail from line items of the cart
          {% for line_item in cart.items %}
            {% if line_item.sku != blank %}  // Check if the line item SKU exists
              skusDetail.push({
                skuId: "{{ line_item.sku }}",              // Get the line item SKU ID
                skuAmount: {{ line_item.price | divided_by: 100.00 }},  // Convert line item price to rupees
                quantity: {{ line_item.quantity }}  // Get the line item quantity
              });
            {% else %}
              console.log('One or more items does not have SKU info')
              skusDetail = []
              {% break %}
            {% endif %}
          {% endfor %}

          console.log("SKU Details from Cart Line Items:", skusDetail);
        {% endif %}

       const widgetConfig = {
          "key": "smsplus",
          "amount": payuAmount,
          "skusDetail": skusDetail
        };
     payuAffordability.init(widgetConfig);
   }
</script>
<div id="payuWidget"></div>
This is to view UI on the webpage, key is the merchant key.
Step 3: Update the Templates
Update the Templates
To update the templates:
- Check the following files under the Templates folder:
- Product.json
- Cart.json
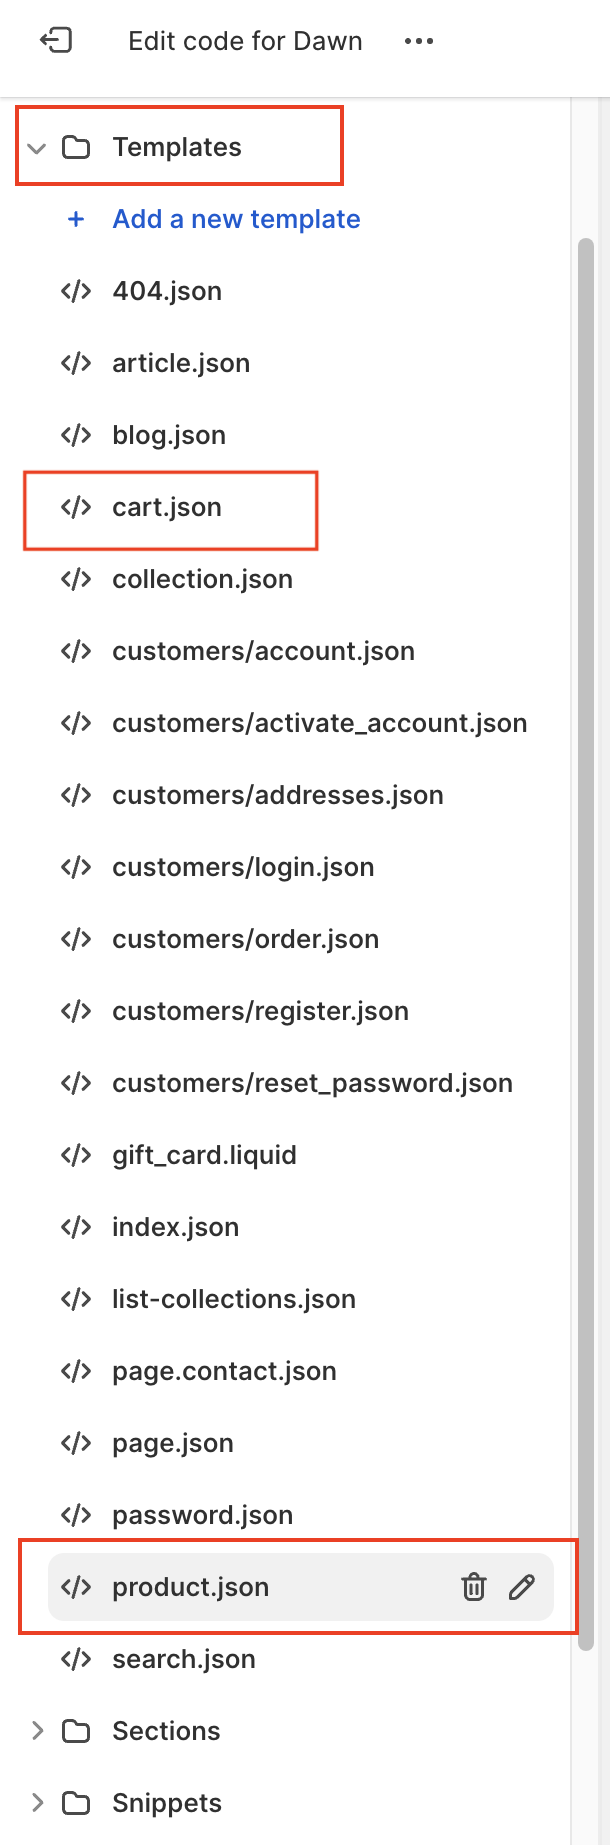
- Edit the Product.json file.
- Search the main section and observe the type defined.
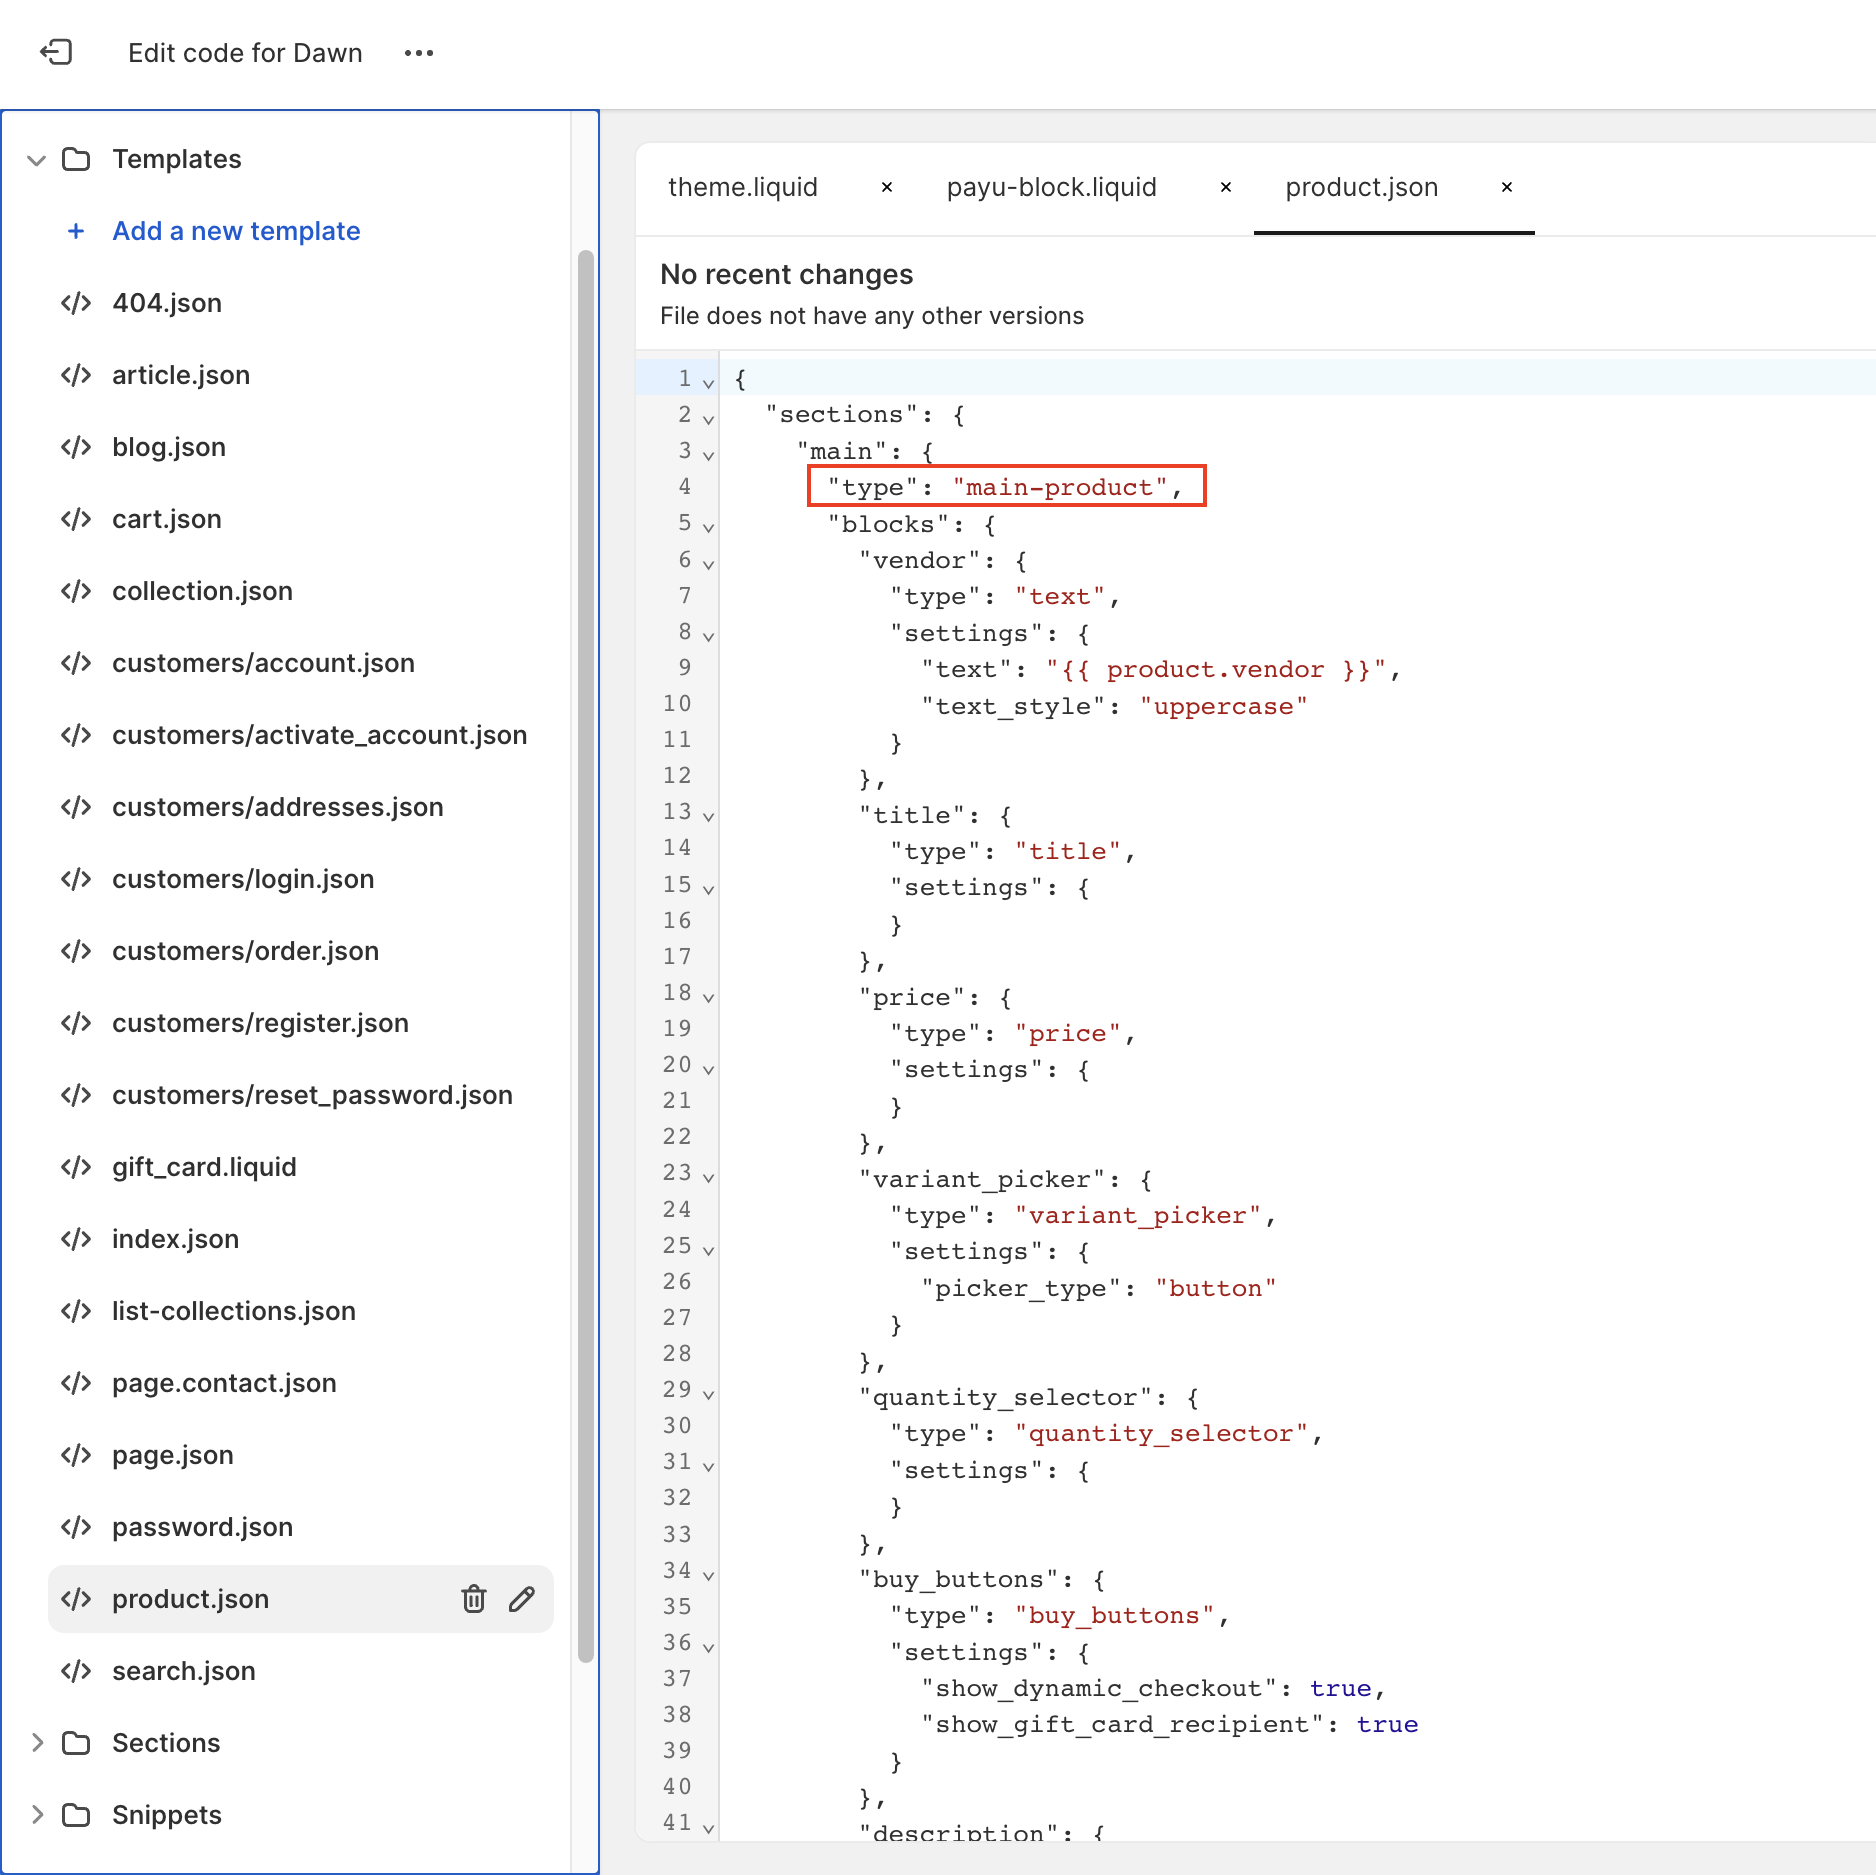
- Open the corresponding liquid file mentioned in step 3, that is, under Sections folder, navigate to the main-product.liquid file. This file is used is to render Widget on the webpage.
- Search for the following code:
{%- for block in section.blocks -%}
{%- case block.type -%}- Add the following code after the code specified in step 5.
{%- when 'payu_widget' -%}
{% render 'payu-block',payu_amount: product.price %}- Search for word schema and add the following code under blocks.
{

“type":"payu_widget”, ”name”:”payu_widget”

},- Repeat the step 5 to step 7 for the main-cart.footer.liquid if you want to show widget on your Add to Cart page.
- Open the Product.json file under the Templates folder.
- Add in the blocks of main section in the Product.json file
"payu_block": {
"type": "payu_widget",

"settings": { }

},- Add “payu_block” in order of main section to define order and placeholder of the PayU Widget. Save the changes.
"payu_block": {
        "type": "payu_widget",
        "settings": {}
}- Repeat the above step 9 to step 11 for the Cart.json file.
Step 4: Update Theme
Update Theme
To update the theme:
- Navigate to Shopify theme editor,
- Click Add block in the Product information section,
- Select the PayU Widget to drag and place where you want to place the widget.
Note:Search for Product.liquid or product-info.liquid file and add the following line of code anywhere or before
endif. This code is to render the page._{% render 'payu-block',payu\_amount: product.price %}_
- Click Done.
- Repeat step 2 to step 4 for cart.json in case you want to show widget on Add to cart page. Main-cart.footer
Updated 7 months ago