
Create a Payment Link
Create a payment link in the PayU Dashboard and share it with your customer in under 5 minutes. No code required.
Create a Payment Link from the PayU Dashboard and share it with your customer in under 5 minutes without the help of a developer or code.
What All I Need?
Set up your account if you have not already.
Log in to the PayU Dashboard to check whether you have access to the PayU dashboard before you start.
How Do I Create a Payment Link?
To create and send a payment link
1. Open Payment Links on the Dashboard
- Log in to the PayU dashboard.
- Expand Payment Tools and click Payment Links displayed in the left navigation.
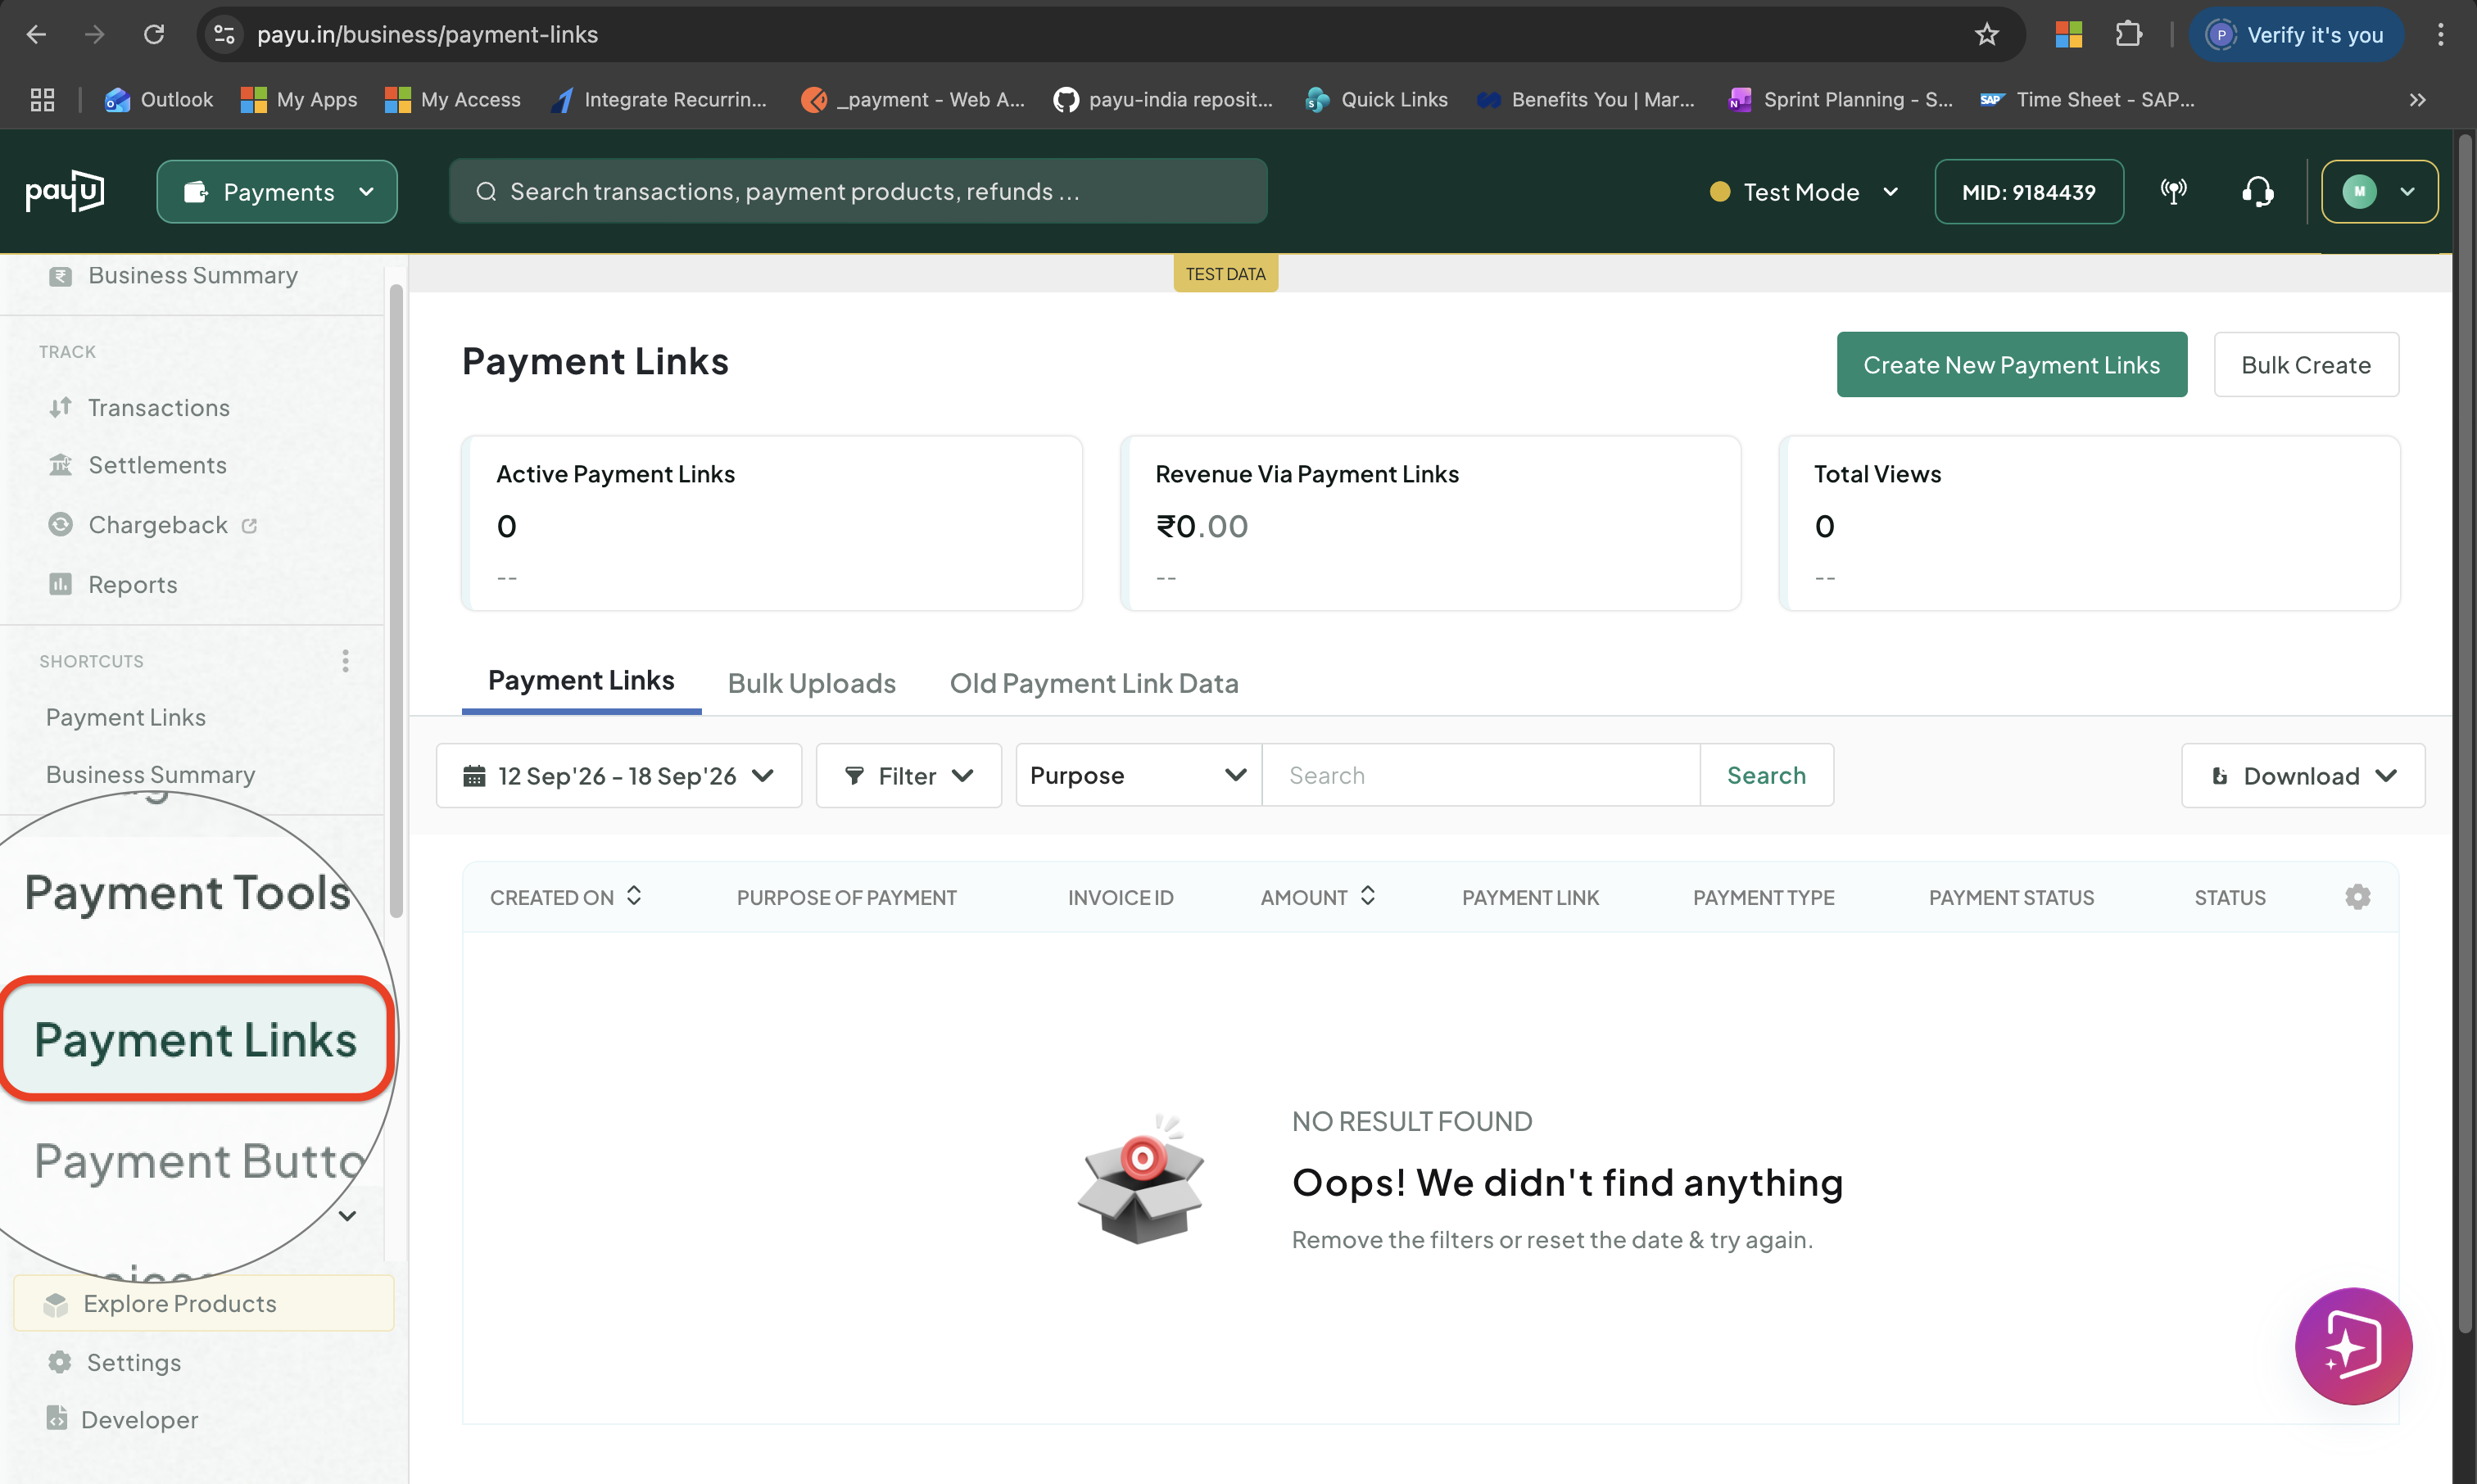
Go to Payment Links
2. Create a new link
- Click Create New Payment Links displayed in the top-right corner of the Payment Links page.
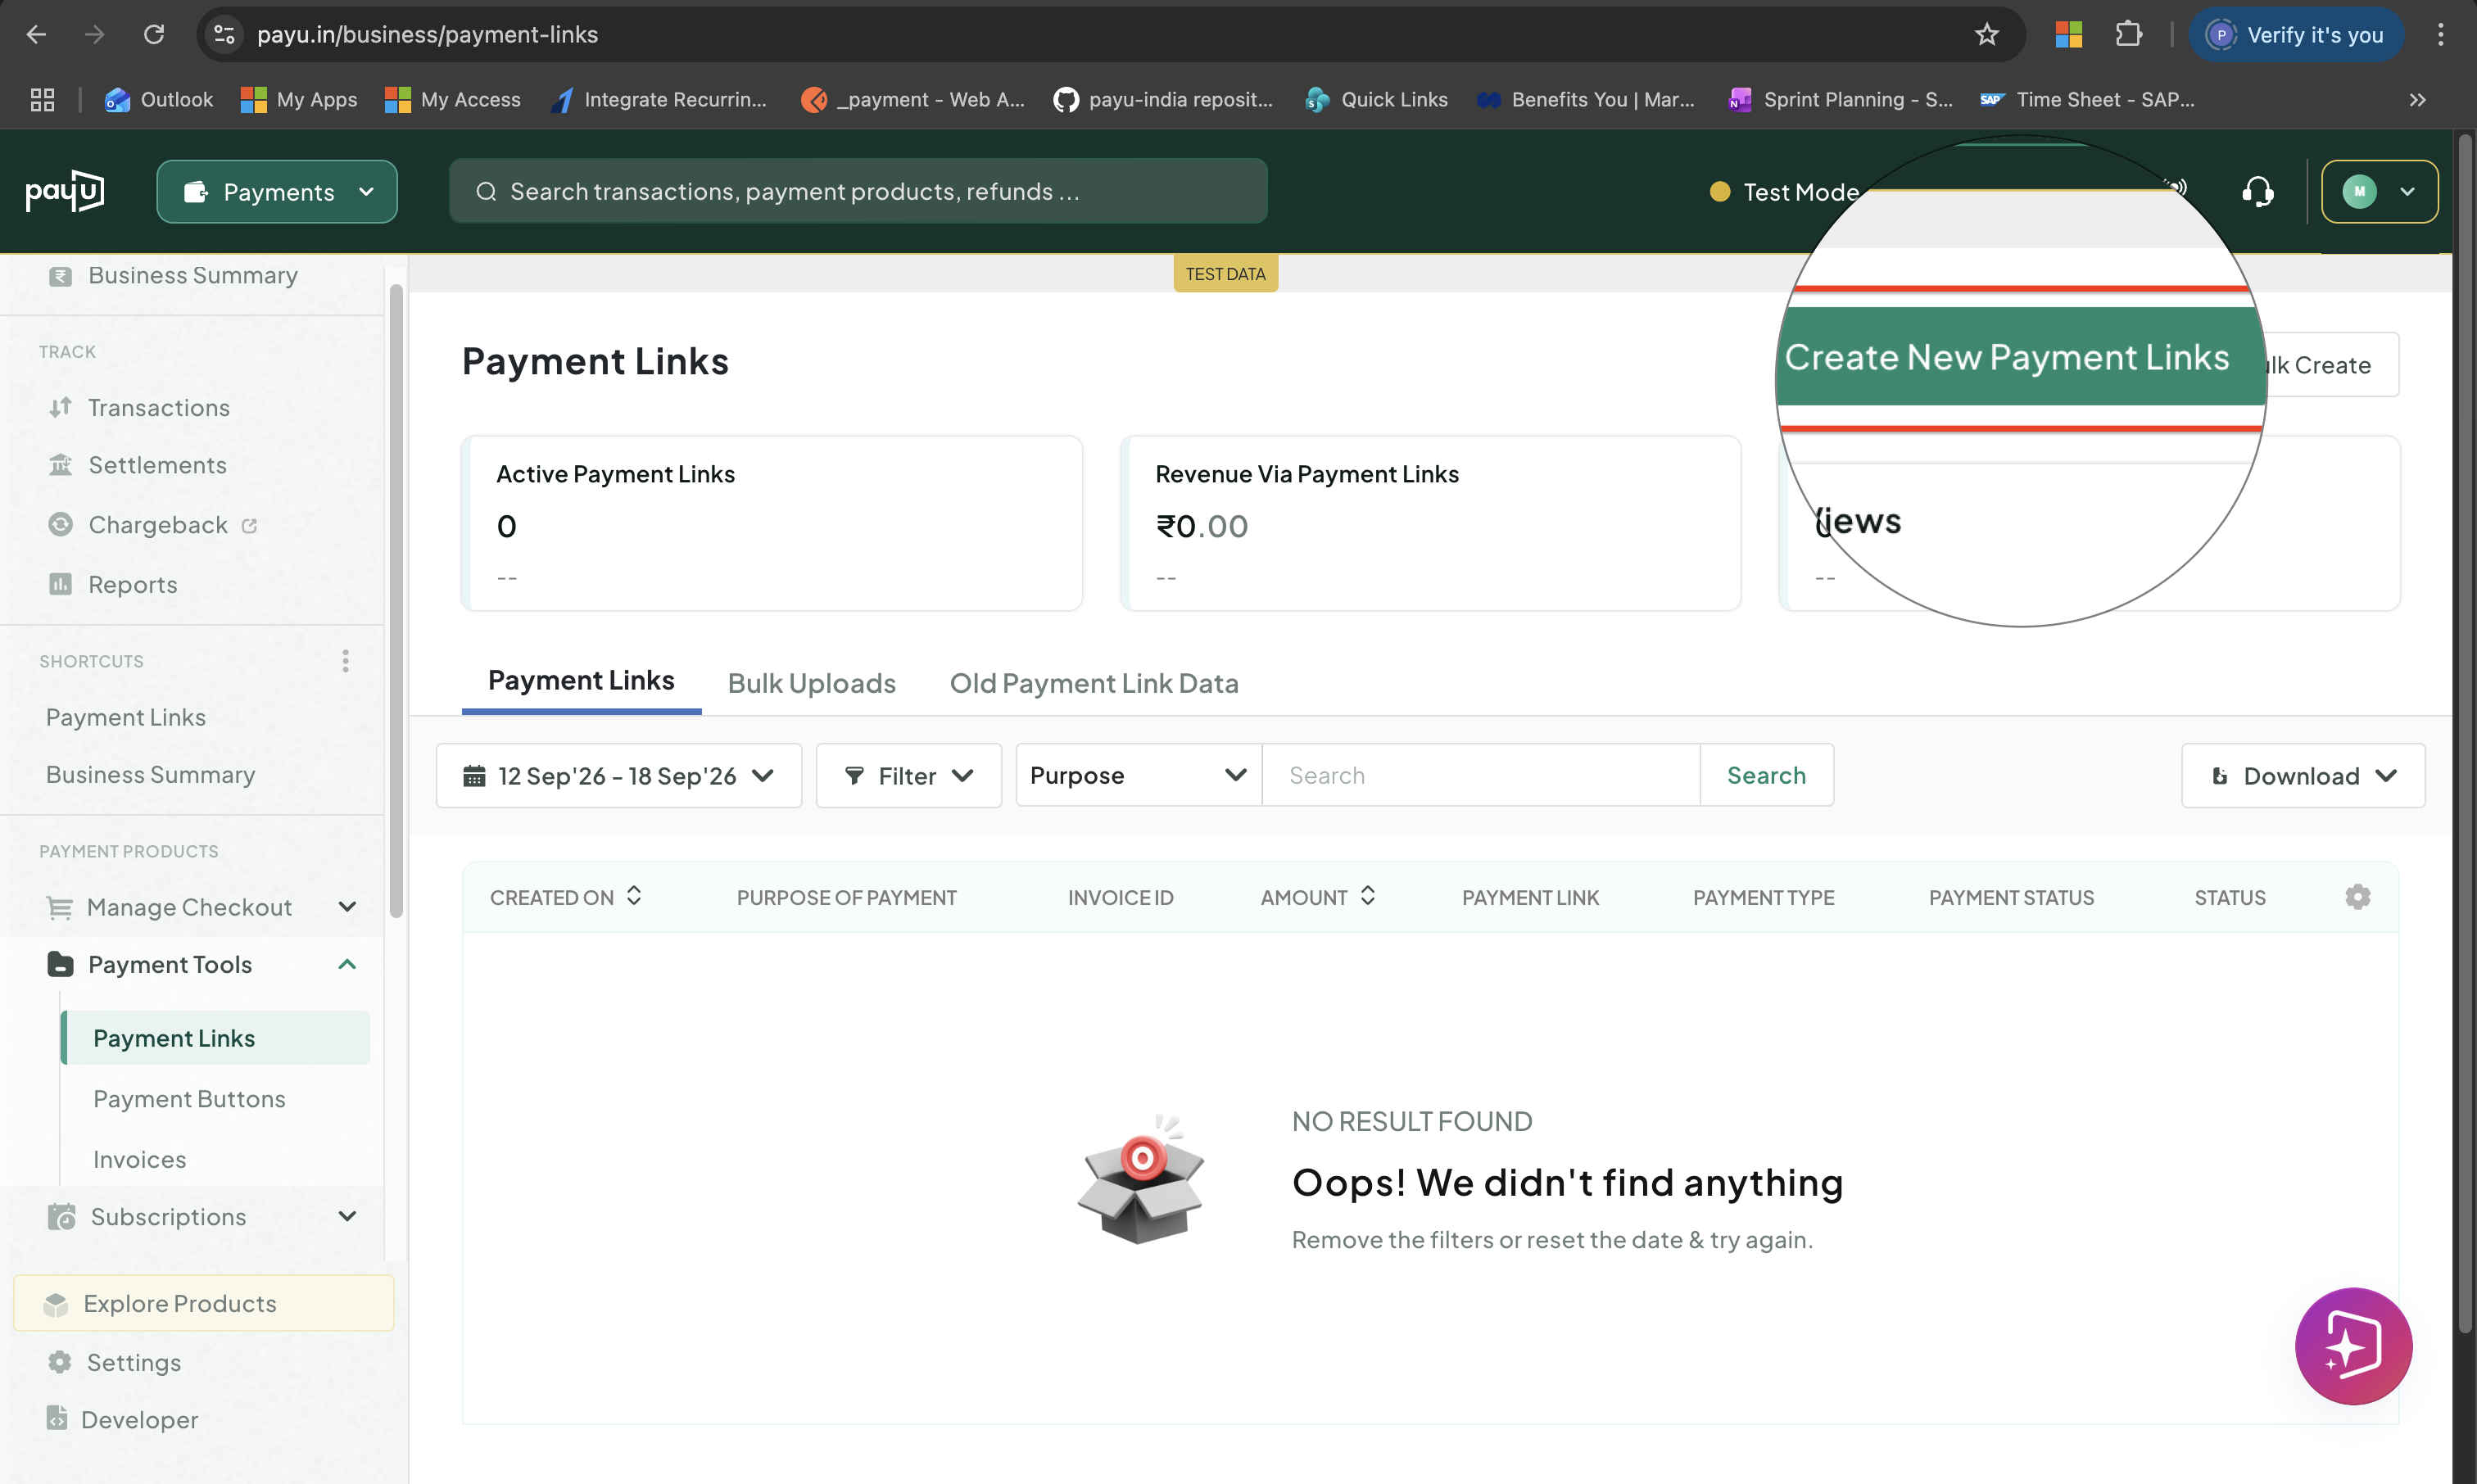
Create New Payment Link panel
Provide these details in the Payment Link Details section:
Parameters/Fields marked with * are mandatory.
Required Fields
| Information | Description |
|---|---|
| Item Description* | A short description about the link you are creating. |
| **Total Amount** | The total amount you want to collect. You can choose to leave this field for the open payments. Add an amount if you wan to allow partial payments. |
| **Limit Link Access To** | Use this filed to limit the payment link to number of customers or transactions. |
| **Set Payment Due Date (Link Expiry)** | Use this field if you want to set the expiry of the link. Post this date and time the link stops working and customers cannot make the payment using this link. |
| **Enable Partial Payment** | Enable this to accept partial payments. |
| **Min. Initial Payment** (only if you enable partial payment) | Enter the minimum part payment accepted. |
| **Number of Instalments** | Enter the number of instalments you want to allow on the payment link. |
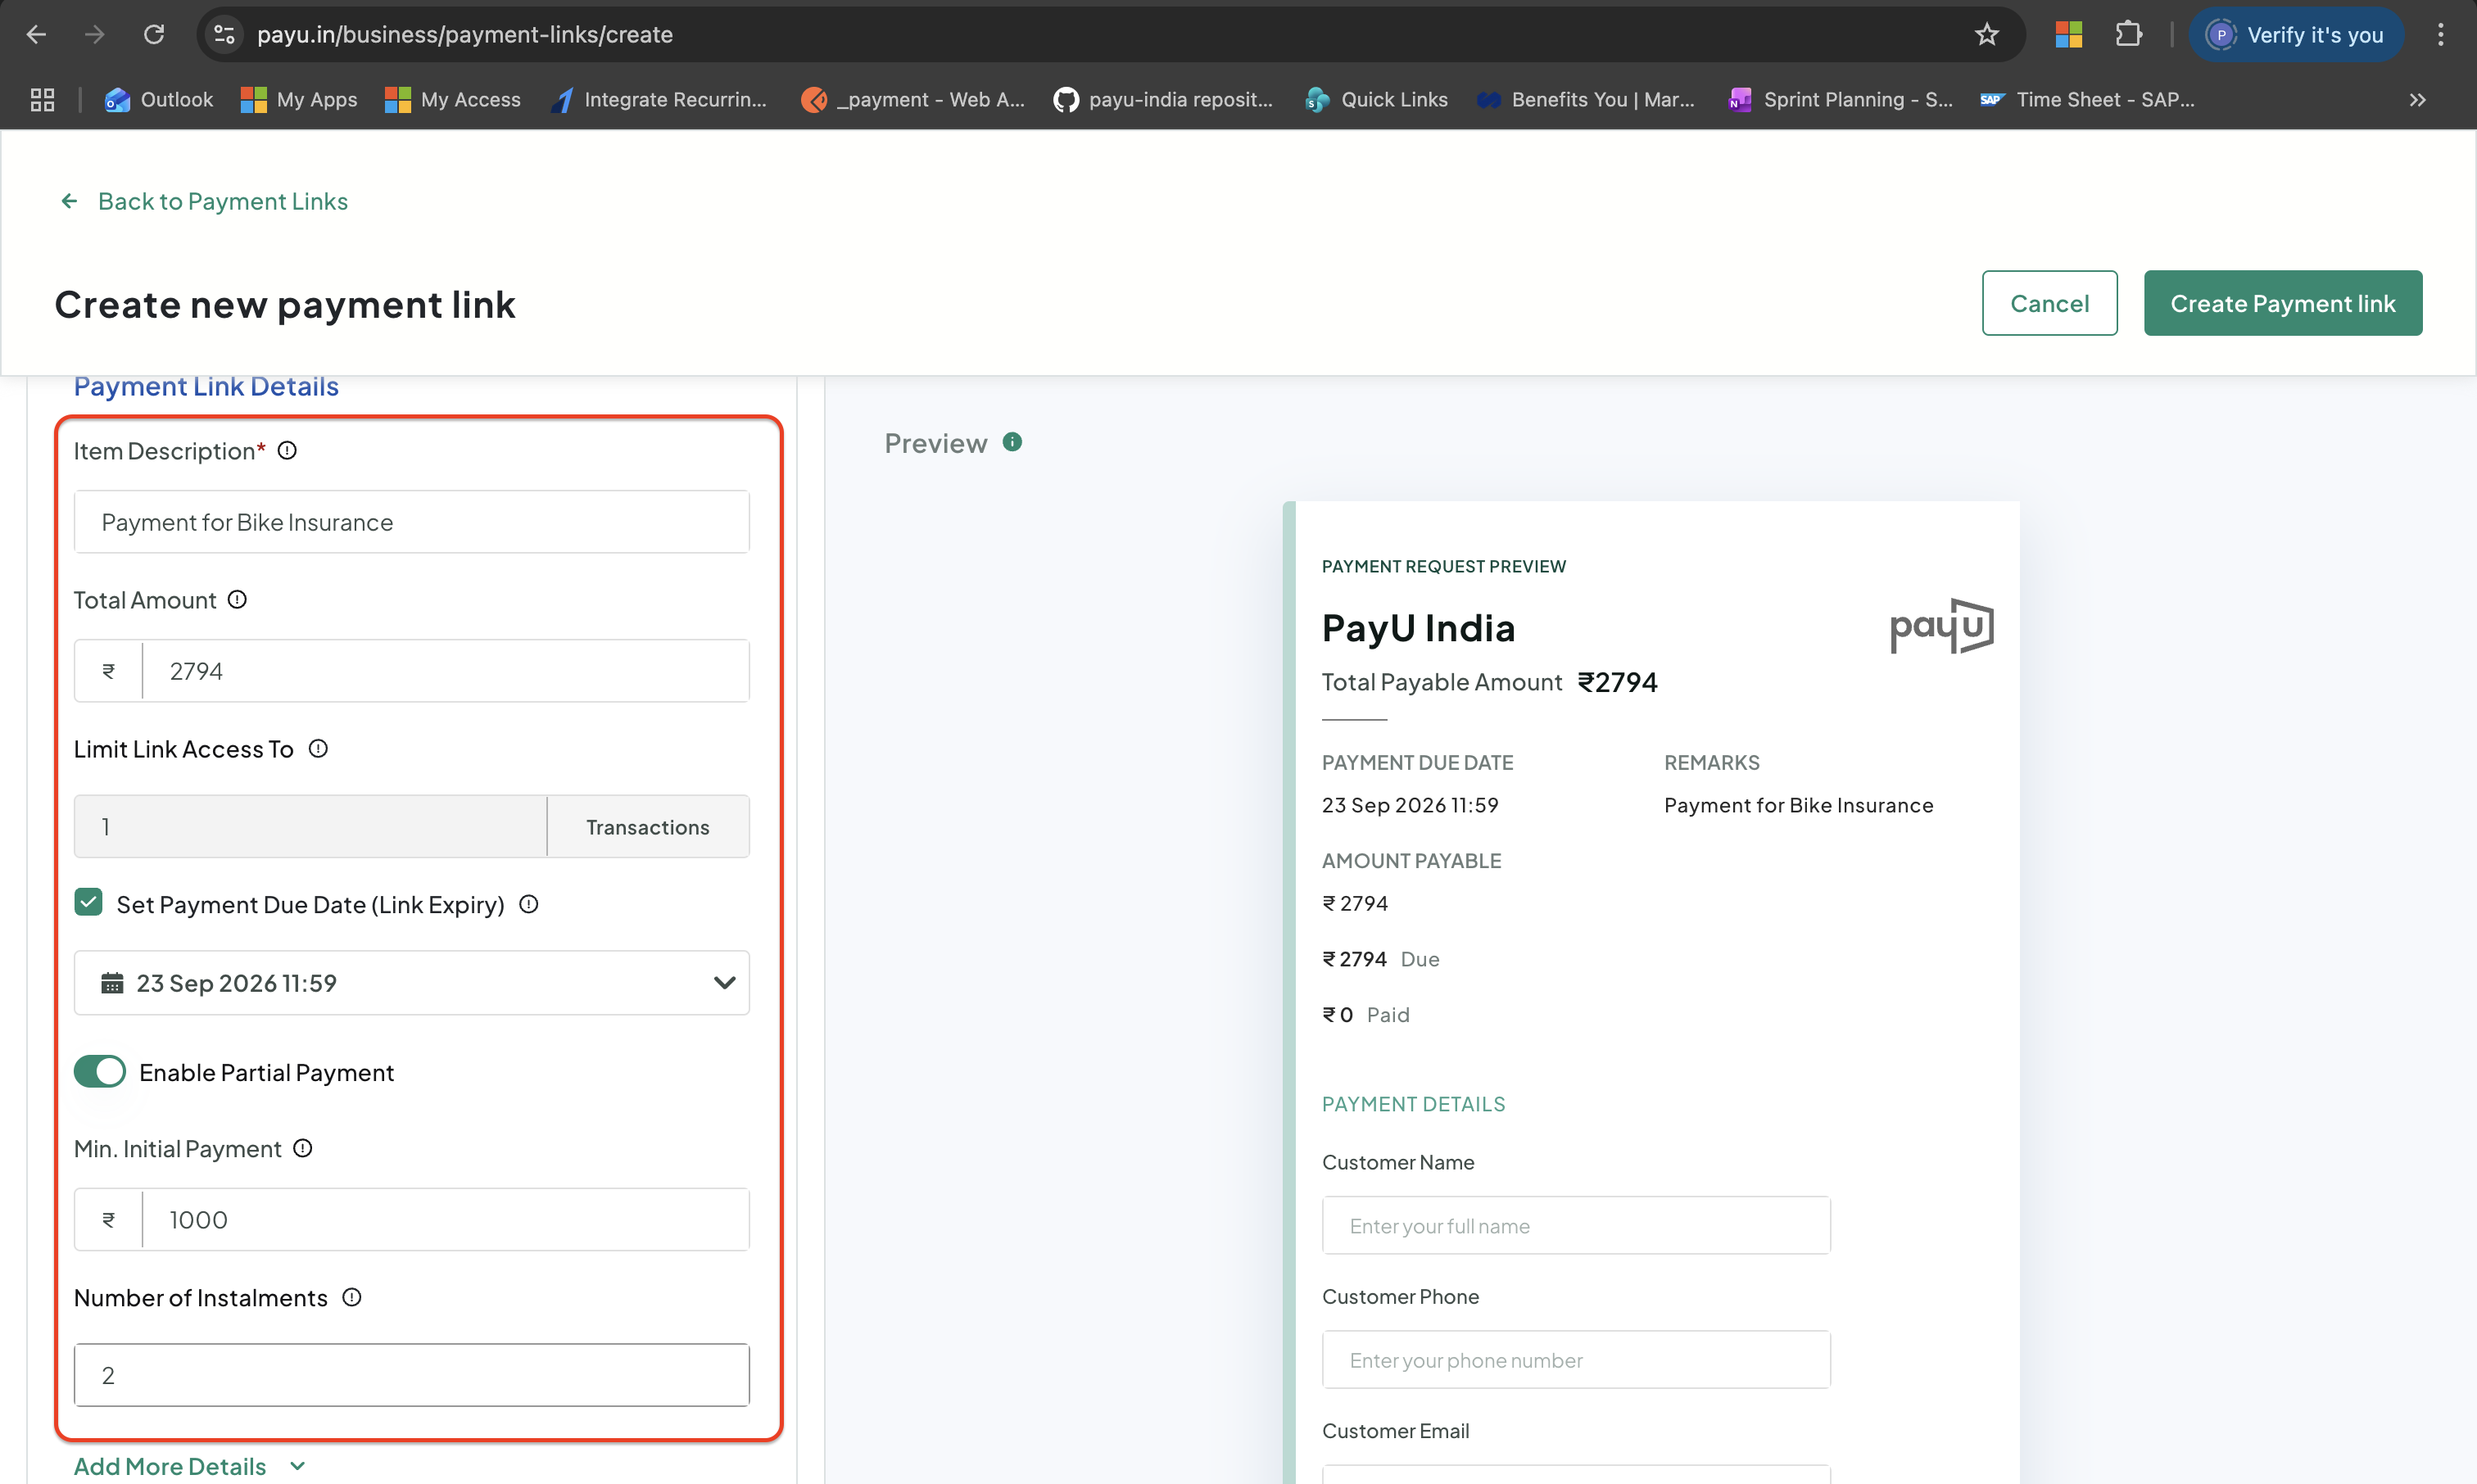
Provide Payment Link Details
Payment Links PreviewAs you fill in the form, a live preview of the pre-payment page updates in real time — so you can see exactly what your customer will see before the link goes live.
3. Add More Details (optional)
- Click Add More Details to include these additional configuration fields:
| Field | Description |
|---|---|
| Add Invoice Number | Tie the link to your internal invoice ID |
| Add Tax | Add a tax line to the payment record |
| Add Shipping | Add a shipping charge |
| Add Address Details | Collect delivery address from the customer |
| Add UDF Details | Custom key-value fields for your own records |
| Add Merchant Reference ID | Your internal order or booking reference |
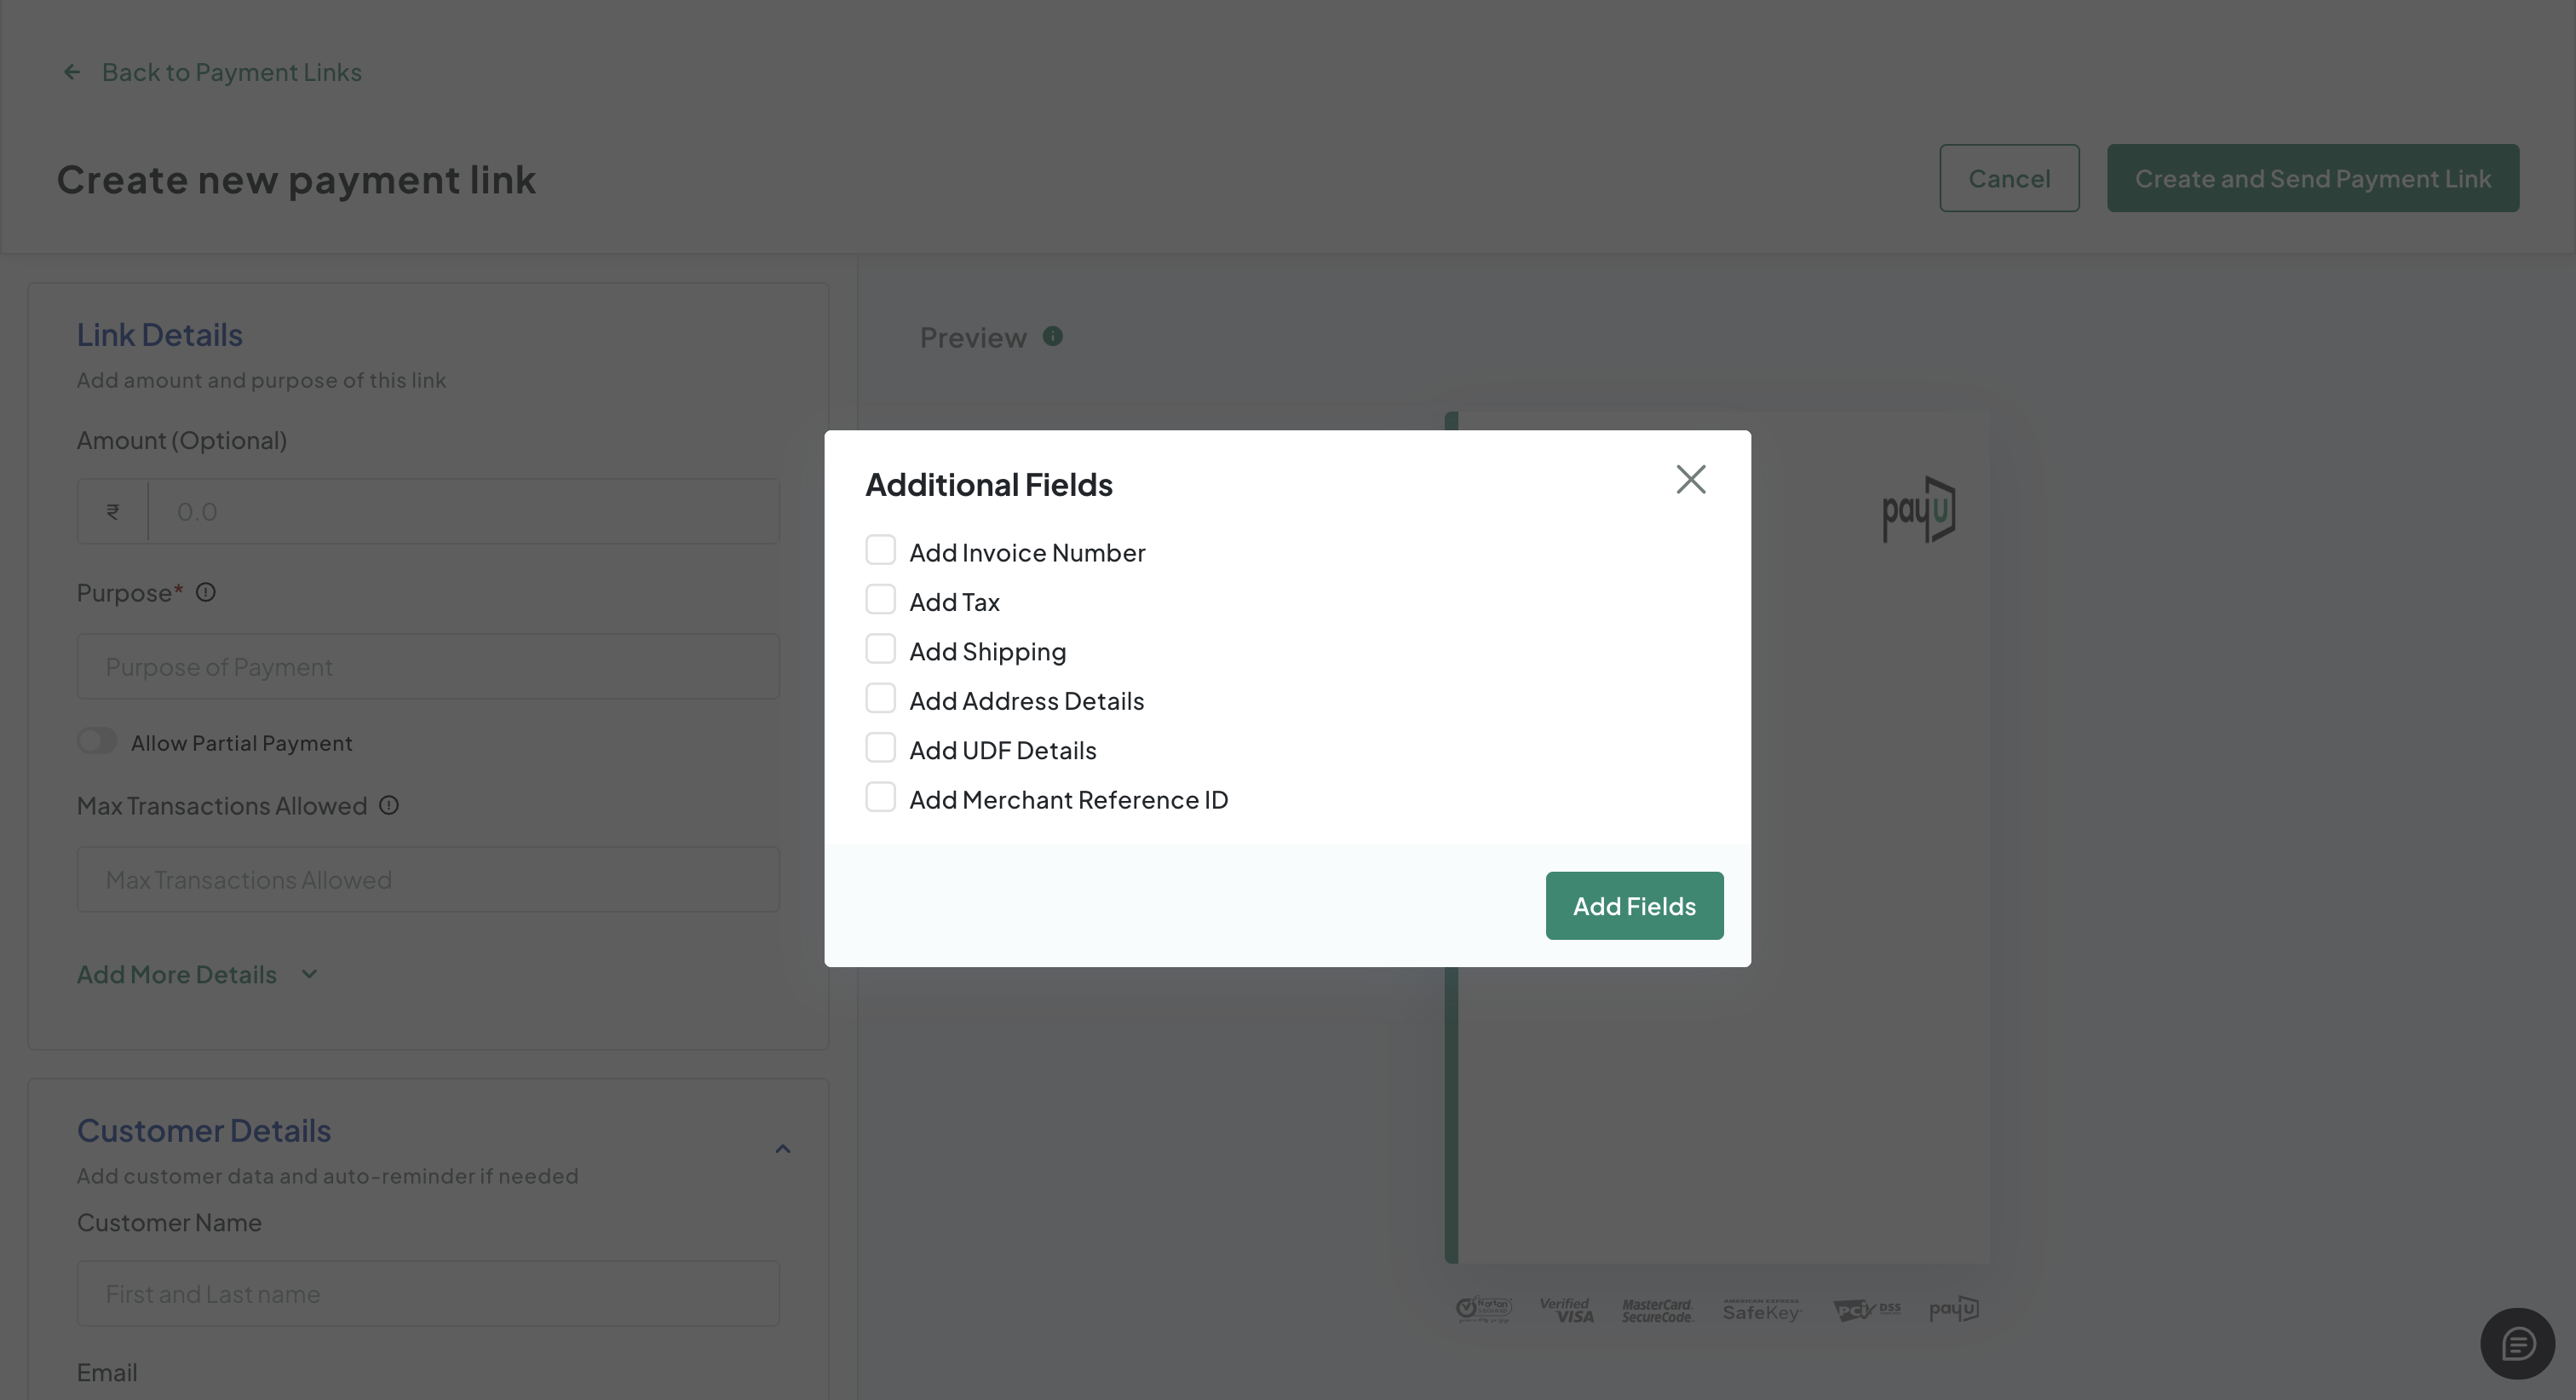
- Click Add Fields to apply your selection and return to the main panel.
4. Customer Targeting
Add these details under the Customer Targeting section:
| Fields | Description |
|---|---|
| Phone number | The customer phone number. |
| Send via SMS | Select for PayU to send the link automatically via SMS. |
| Name | The customer name. |
| The customer email ID. | |
| Send Email | Select for PayU to send the link automatically via email. |
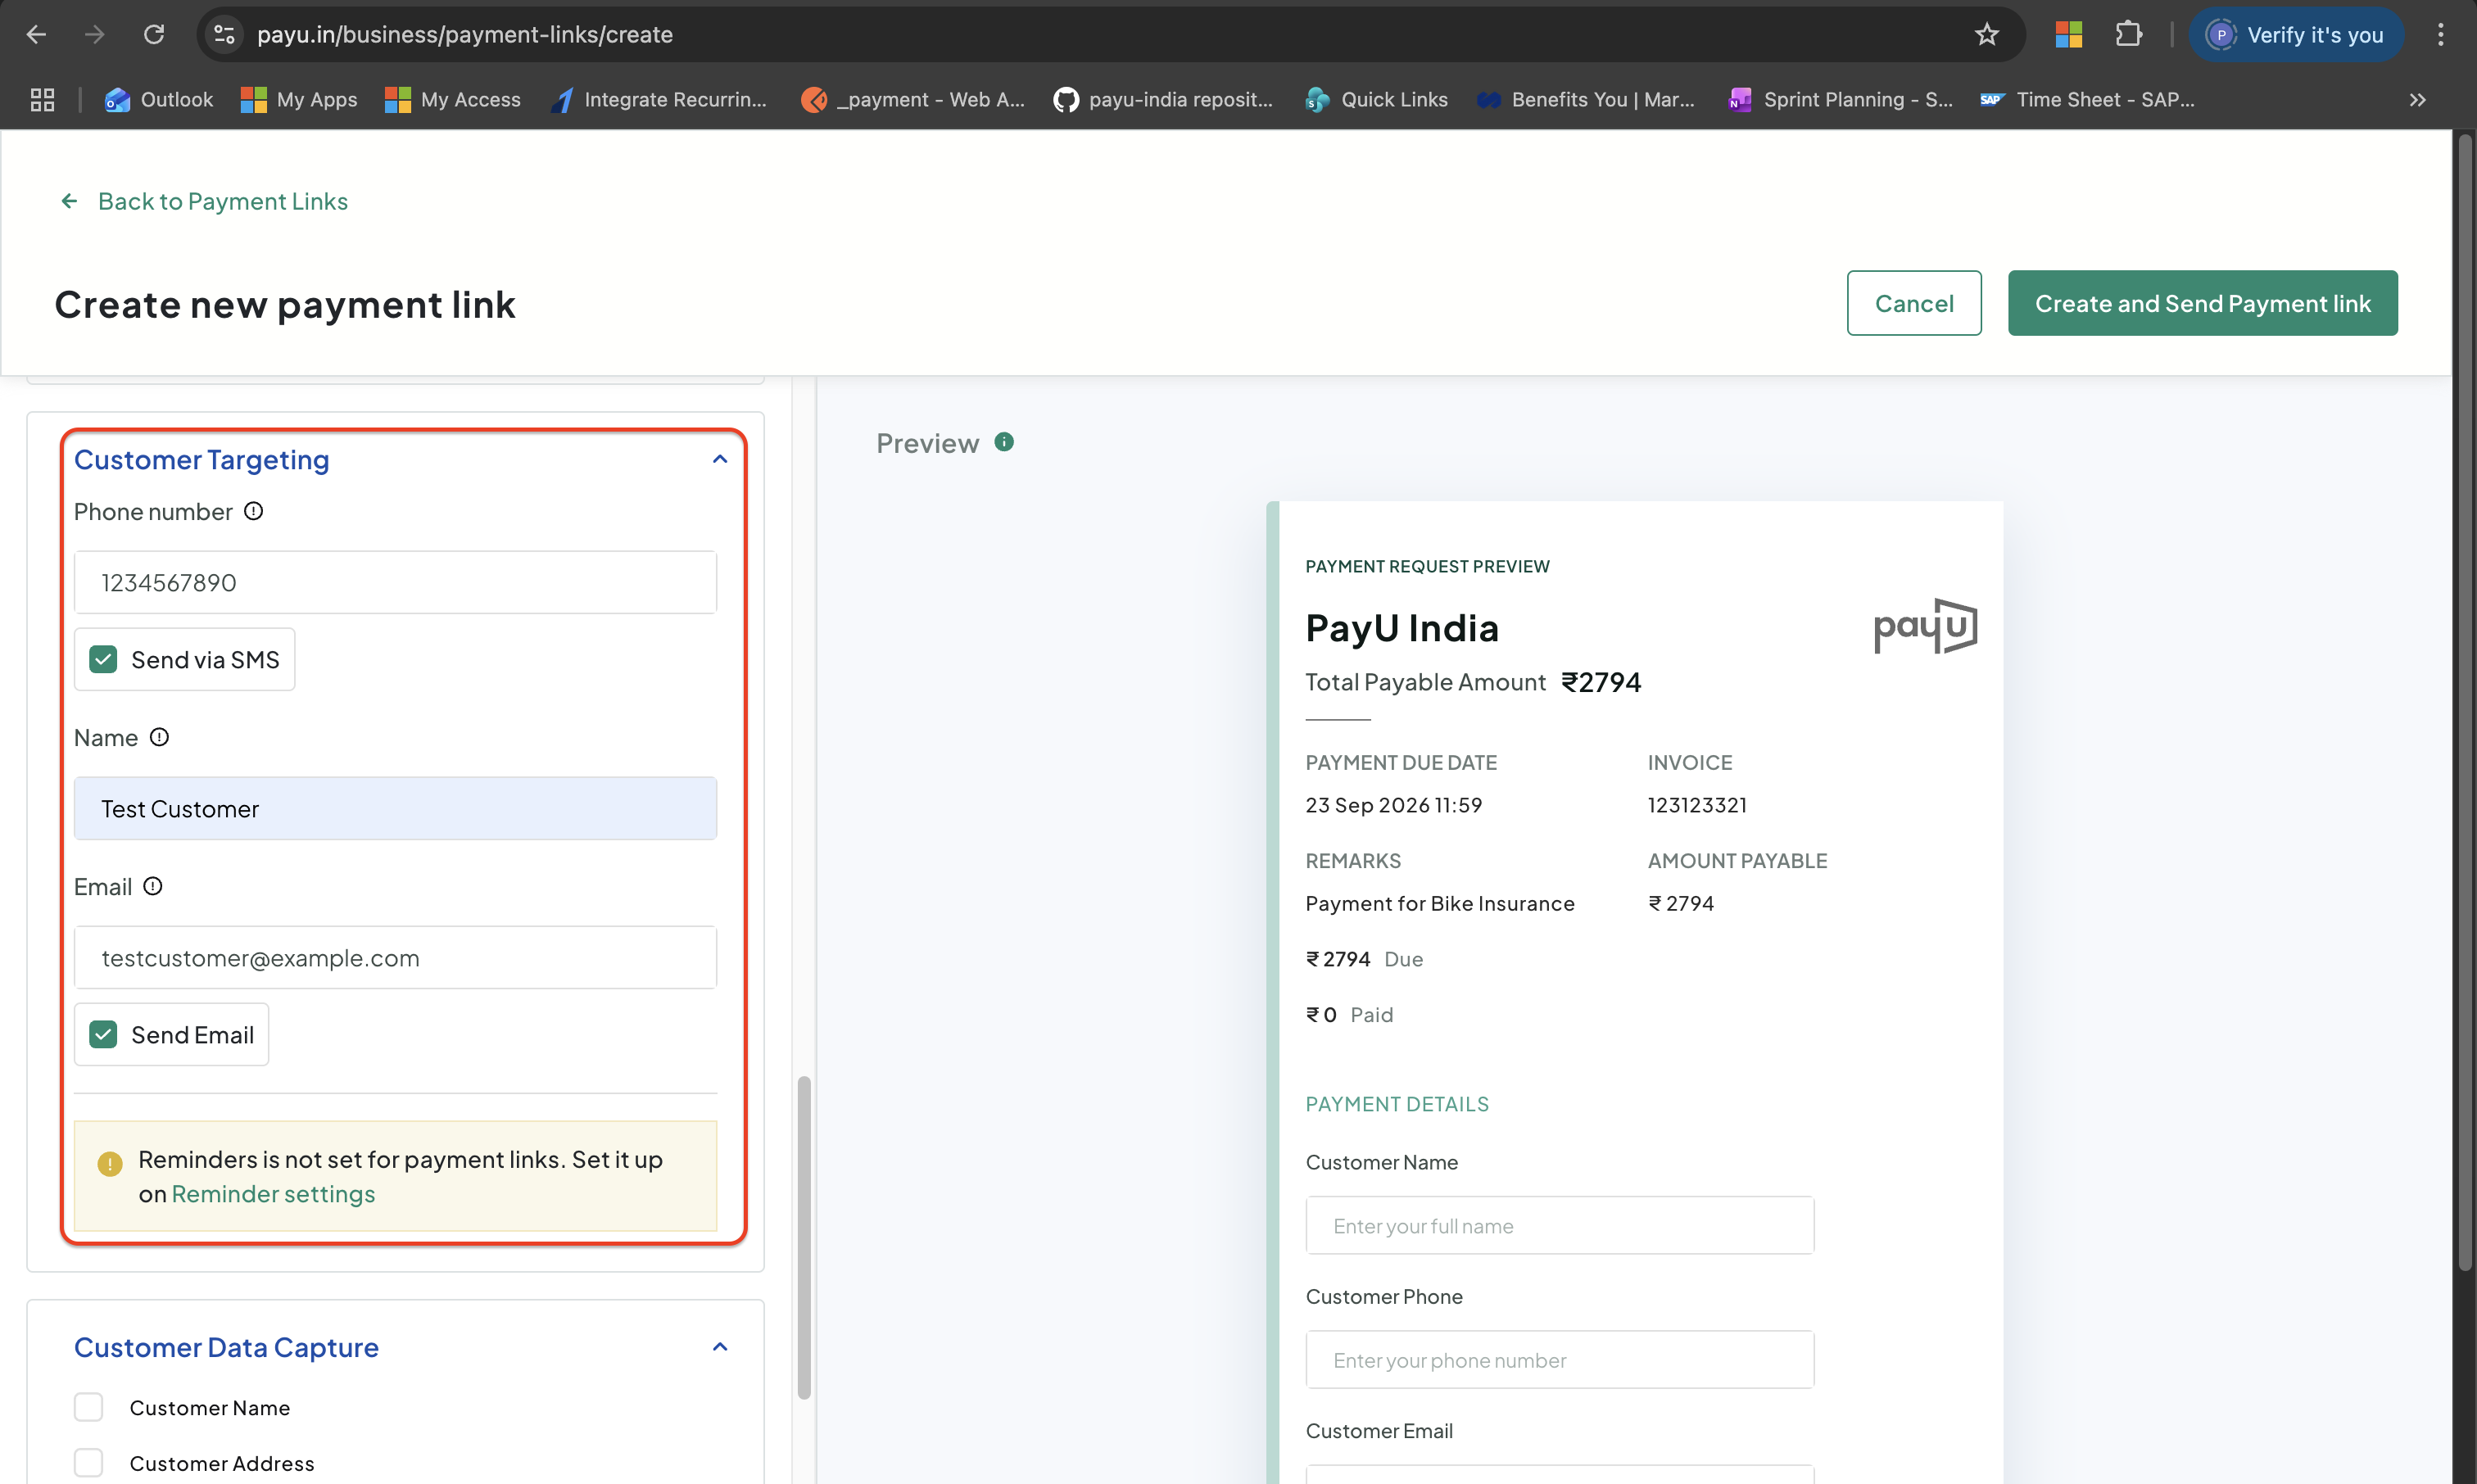
Enter Customer Details
Note:If you enter the customer's phone or email and toggle notifications on, PayU sends the link the moment you click Create — no manual copying or sharing needed.
5. Customer Data Capture (optional)
Specify what PayU collects from your customer at checkout under the Customer Data Capture section:
- Standard fields: Customer Email and Phone
- Custom fields: click Add new Fields+ and configure:
- Field Type: Alphanumeric, Calendar, or Dropdown
- Field Name: the label the customer sees
- Mark as Mandatory: Select to require the field before payment can proceed
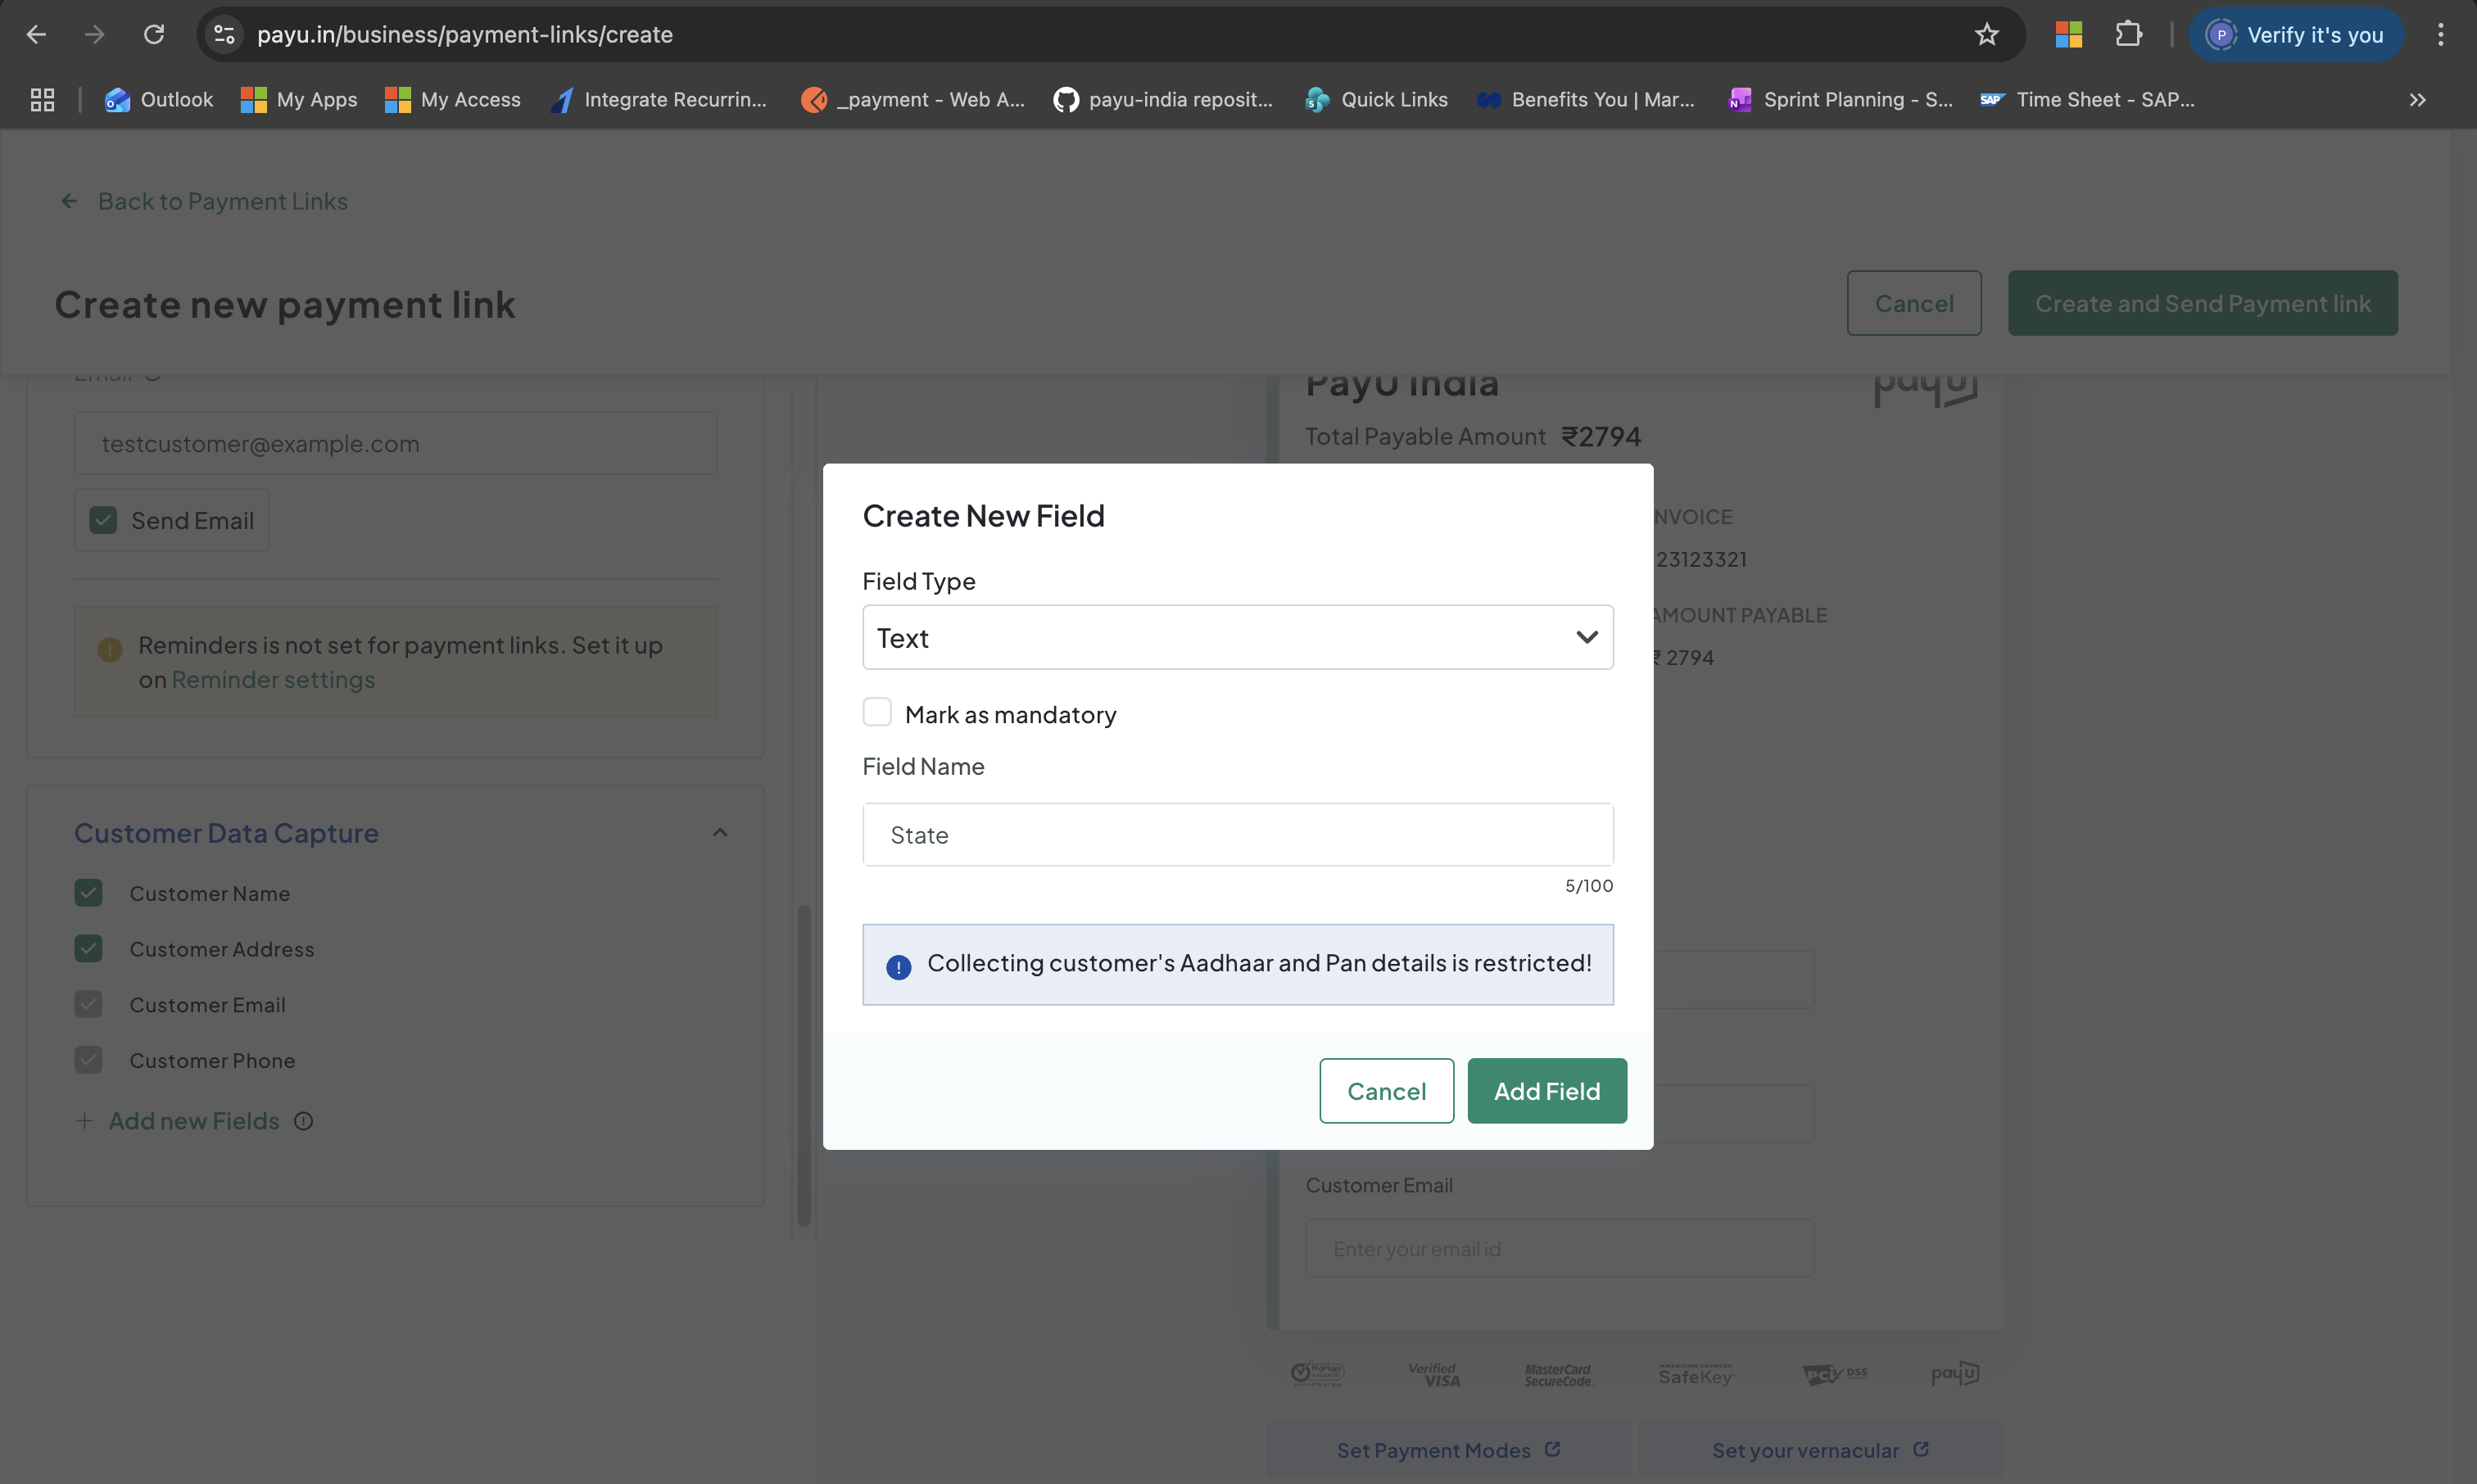
Capture Customer Data
6. Create and send
Click Create and Send Payment link in the top-right corner.
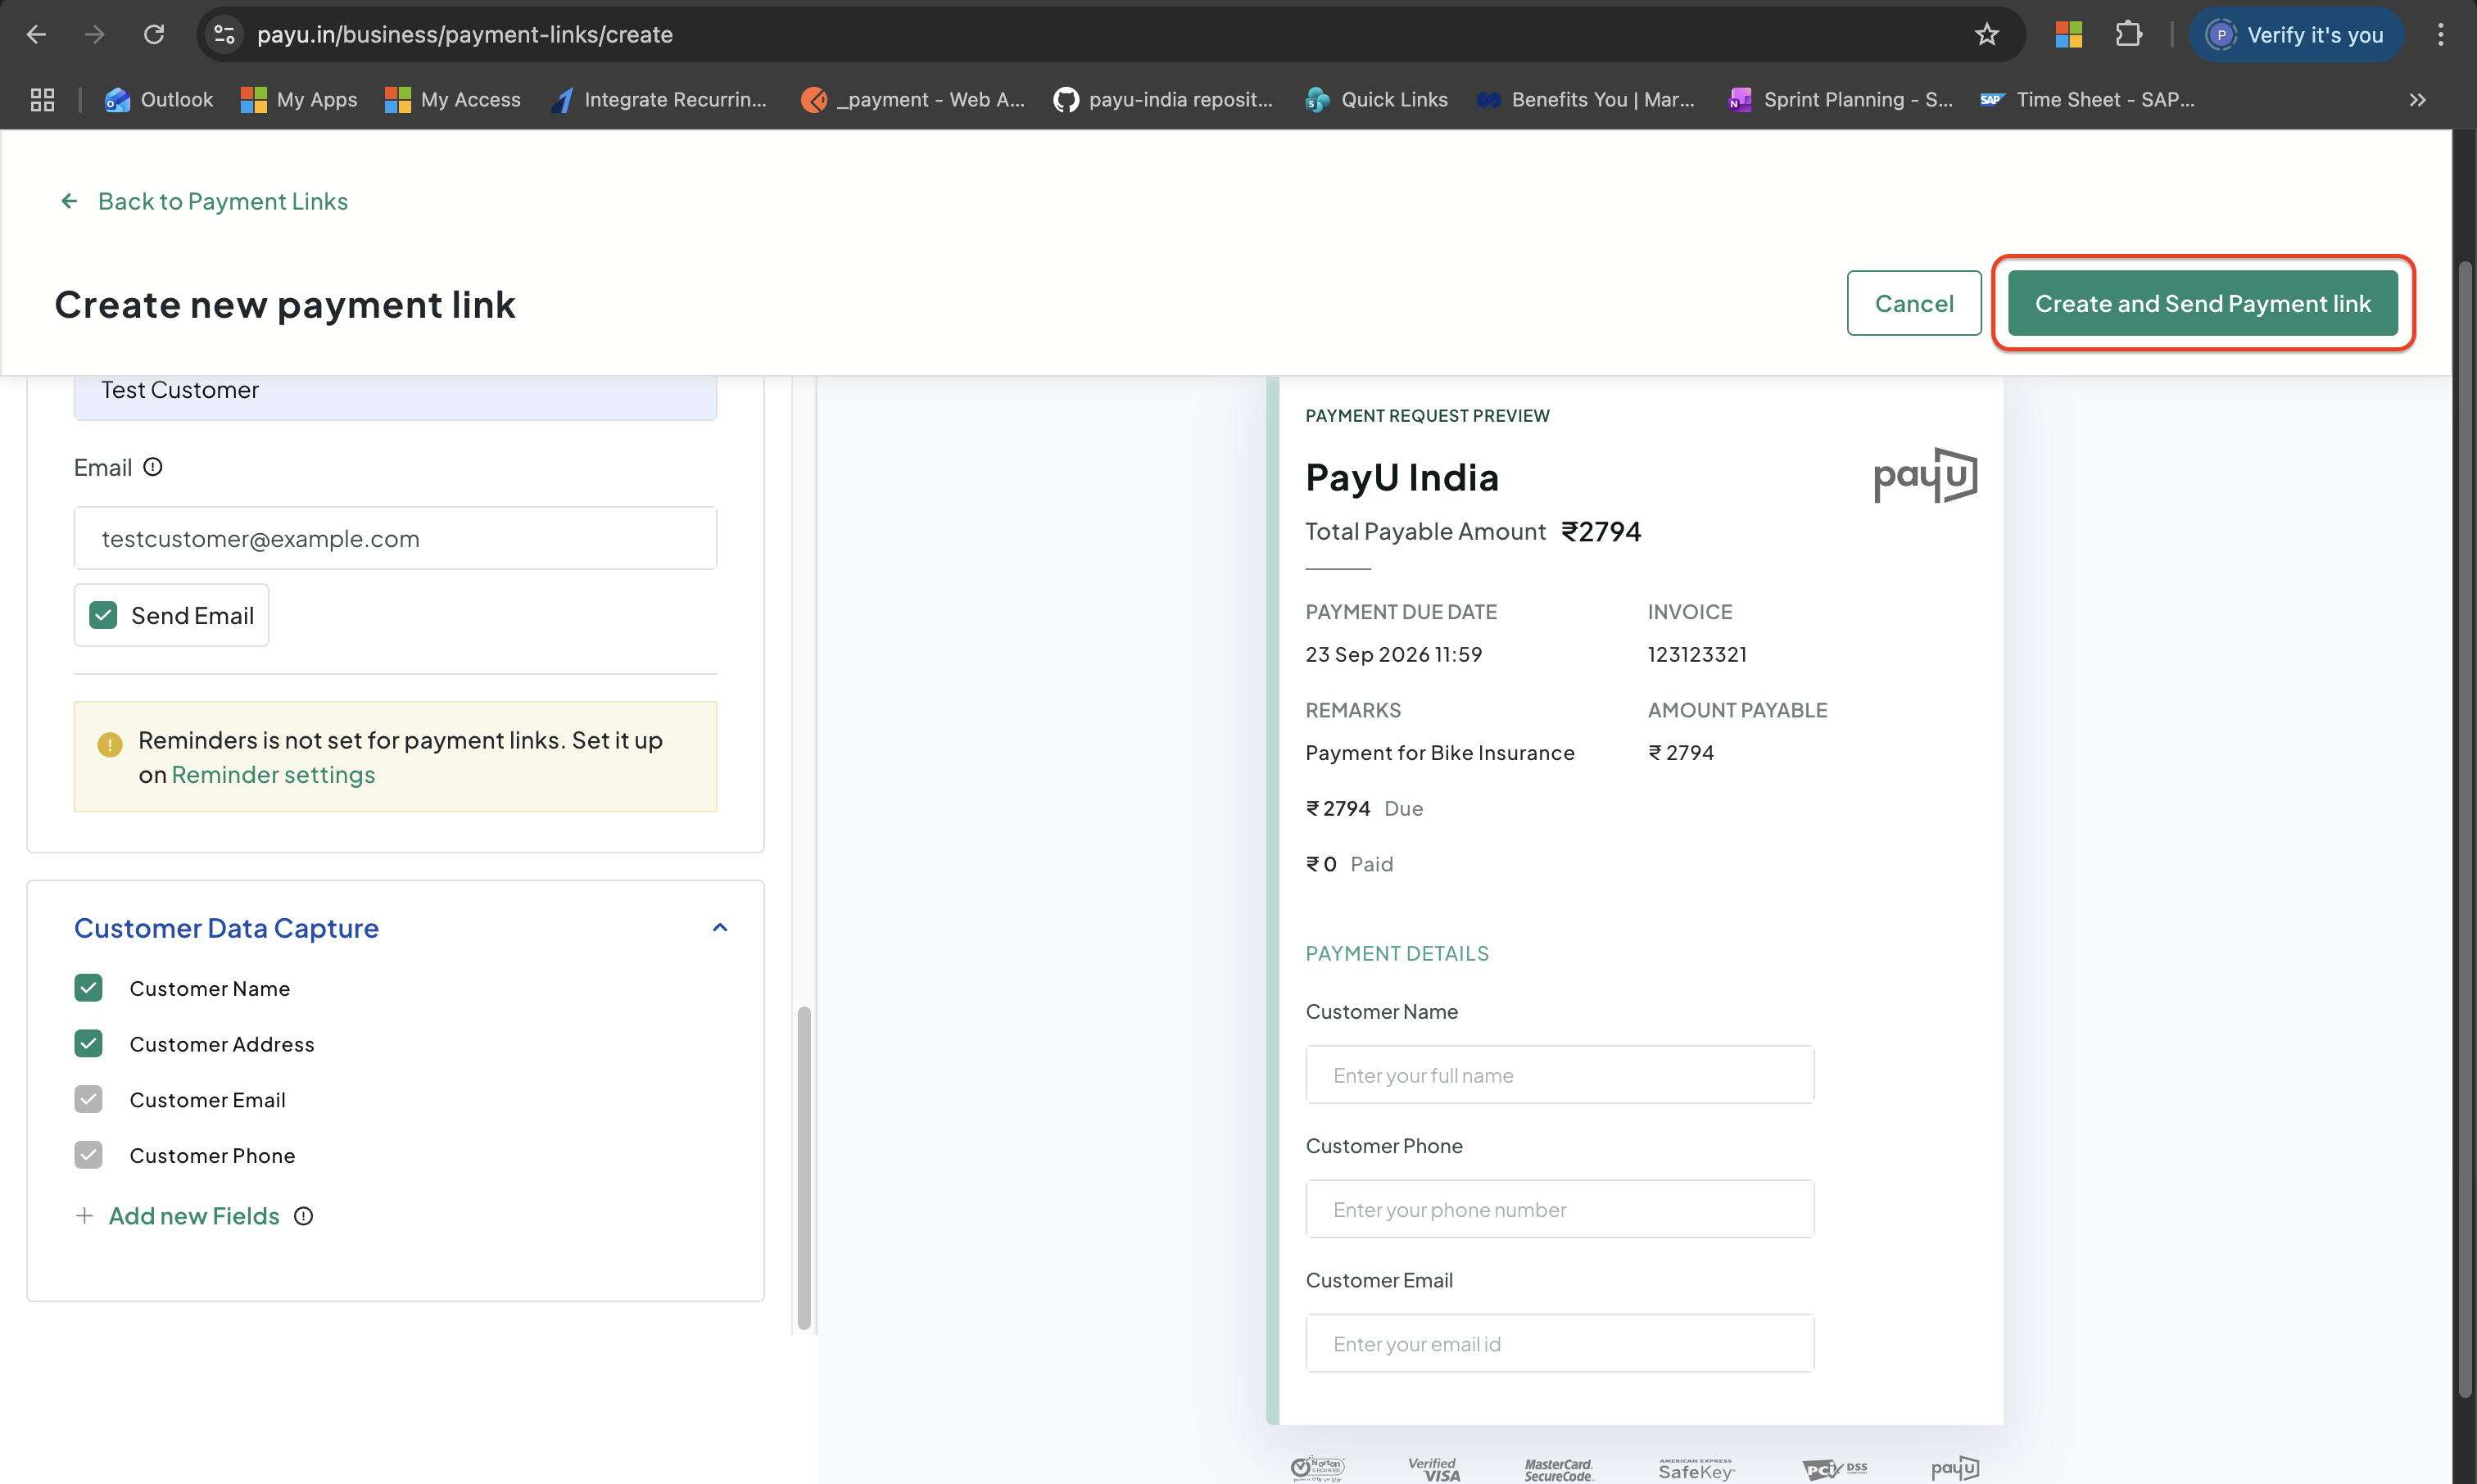
Create and Send a Payment Link
What happens next:
- If notifications are on → PayU sends the link to the customer immediately via SMS/email.
- If not → the link appears in your Payment Links Dashboard. Copy the URL from the Payment Link column and share it over WhatsApp, email, or any channel.
How Do I Create Many Links at Once?
Use bulk upload to create hundreds of payment links in one go. Each row in the CSV becomes a separate link. Maximum file size allowed is 20 MB.
1. Open Bulk Uploads
-
Log in to the PayU Dashboard.
-
Expand Payment Tools and click Payment Links displayed in the left navigation.
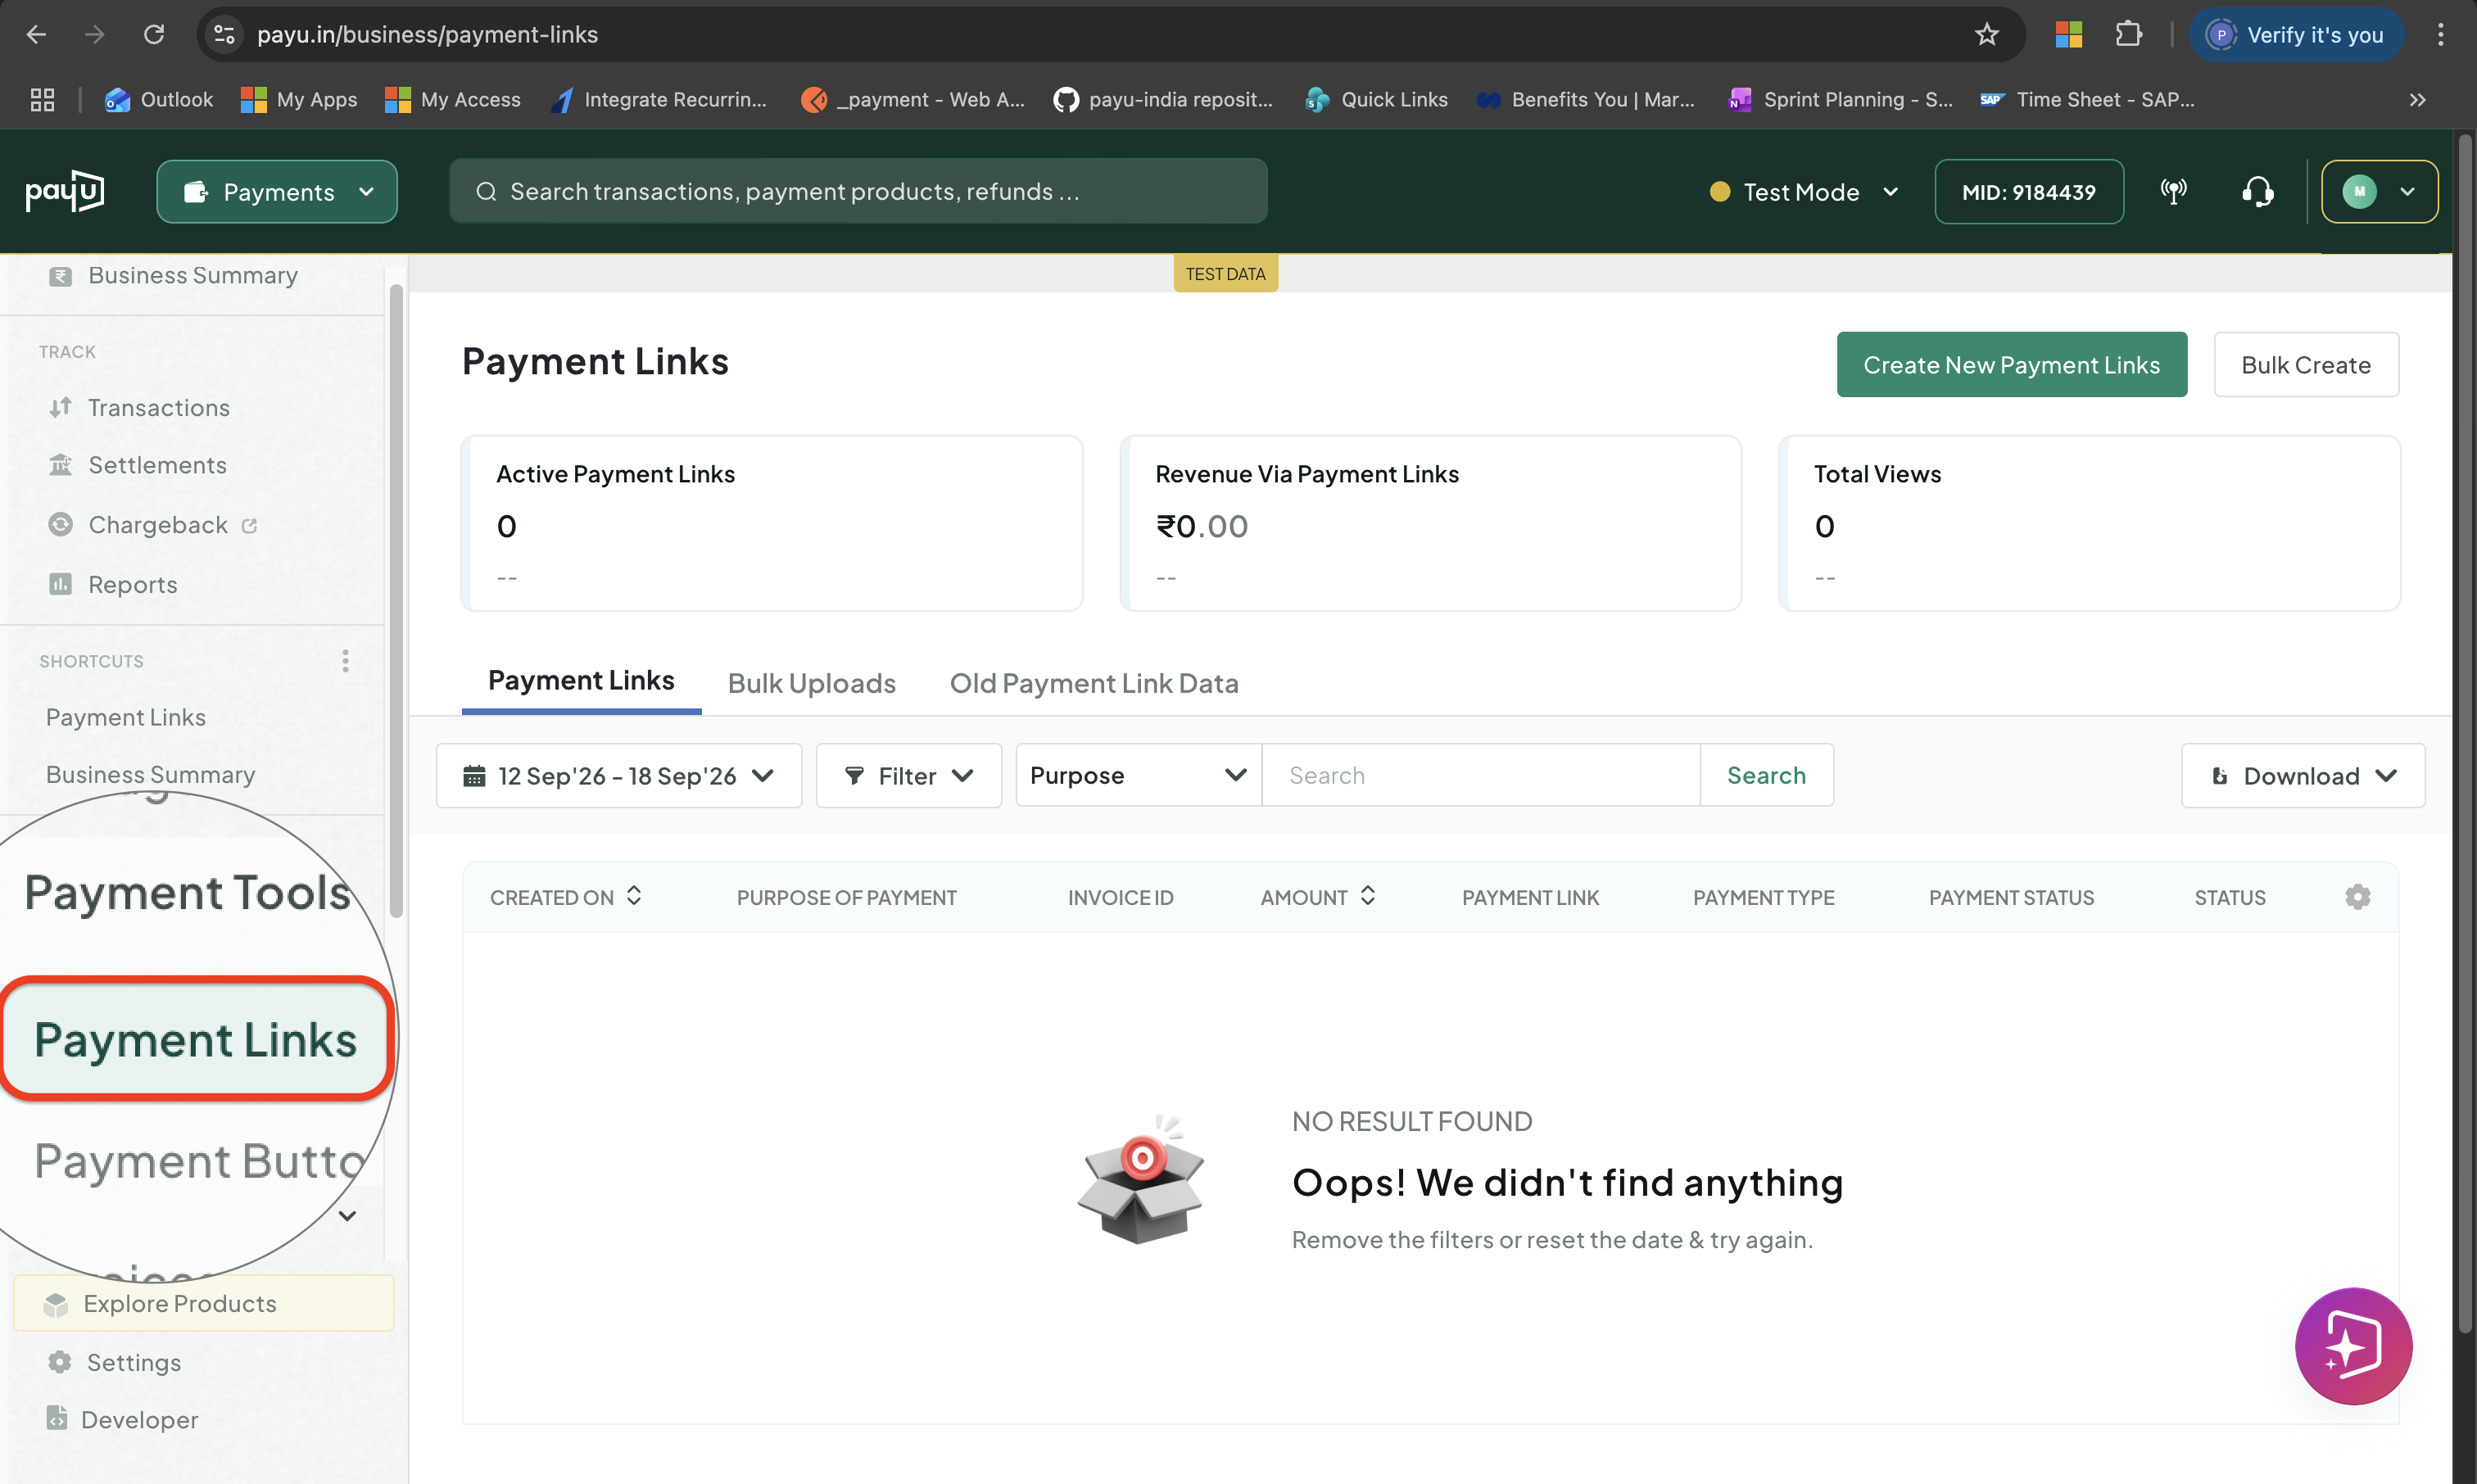
Go to Payment Links
-
Click Bulk Create displayed at the top-right.
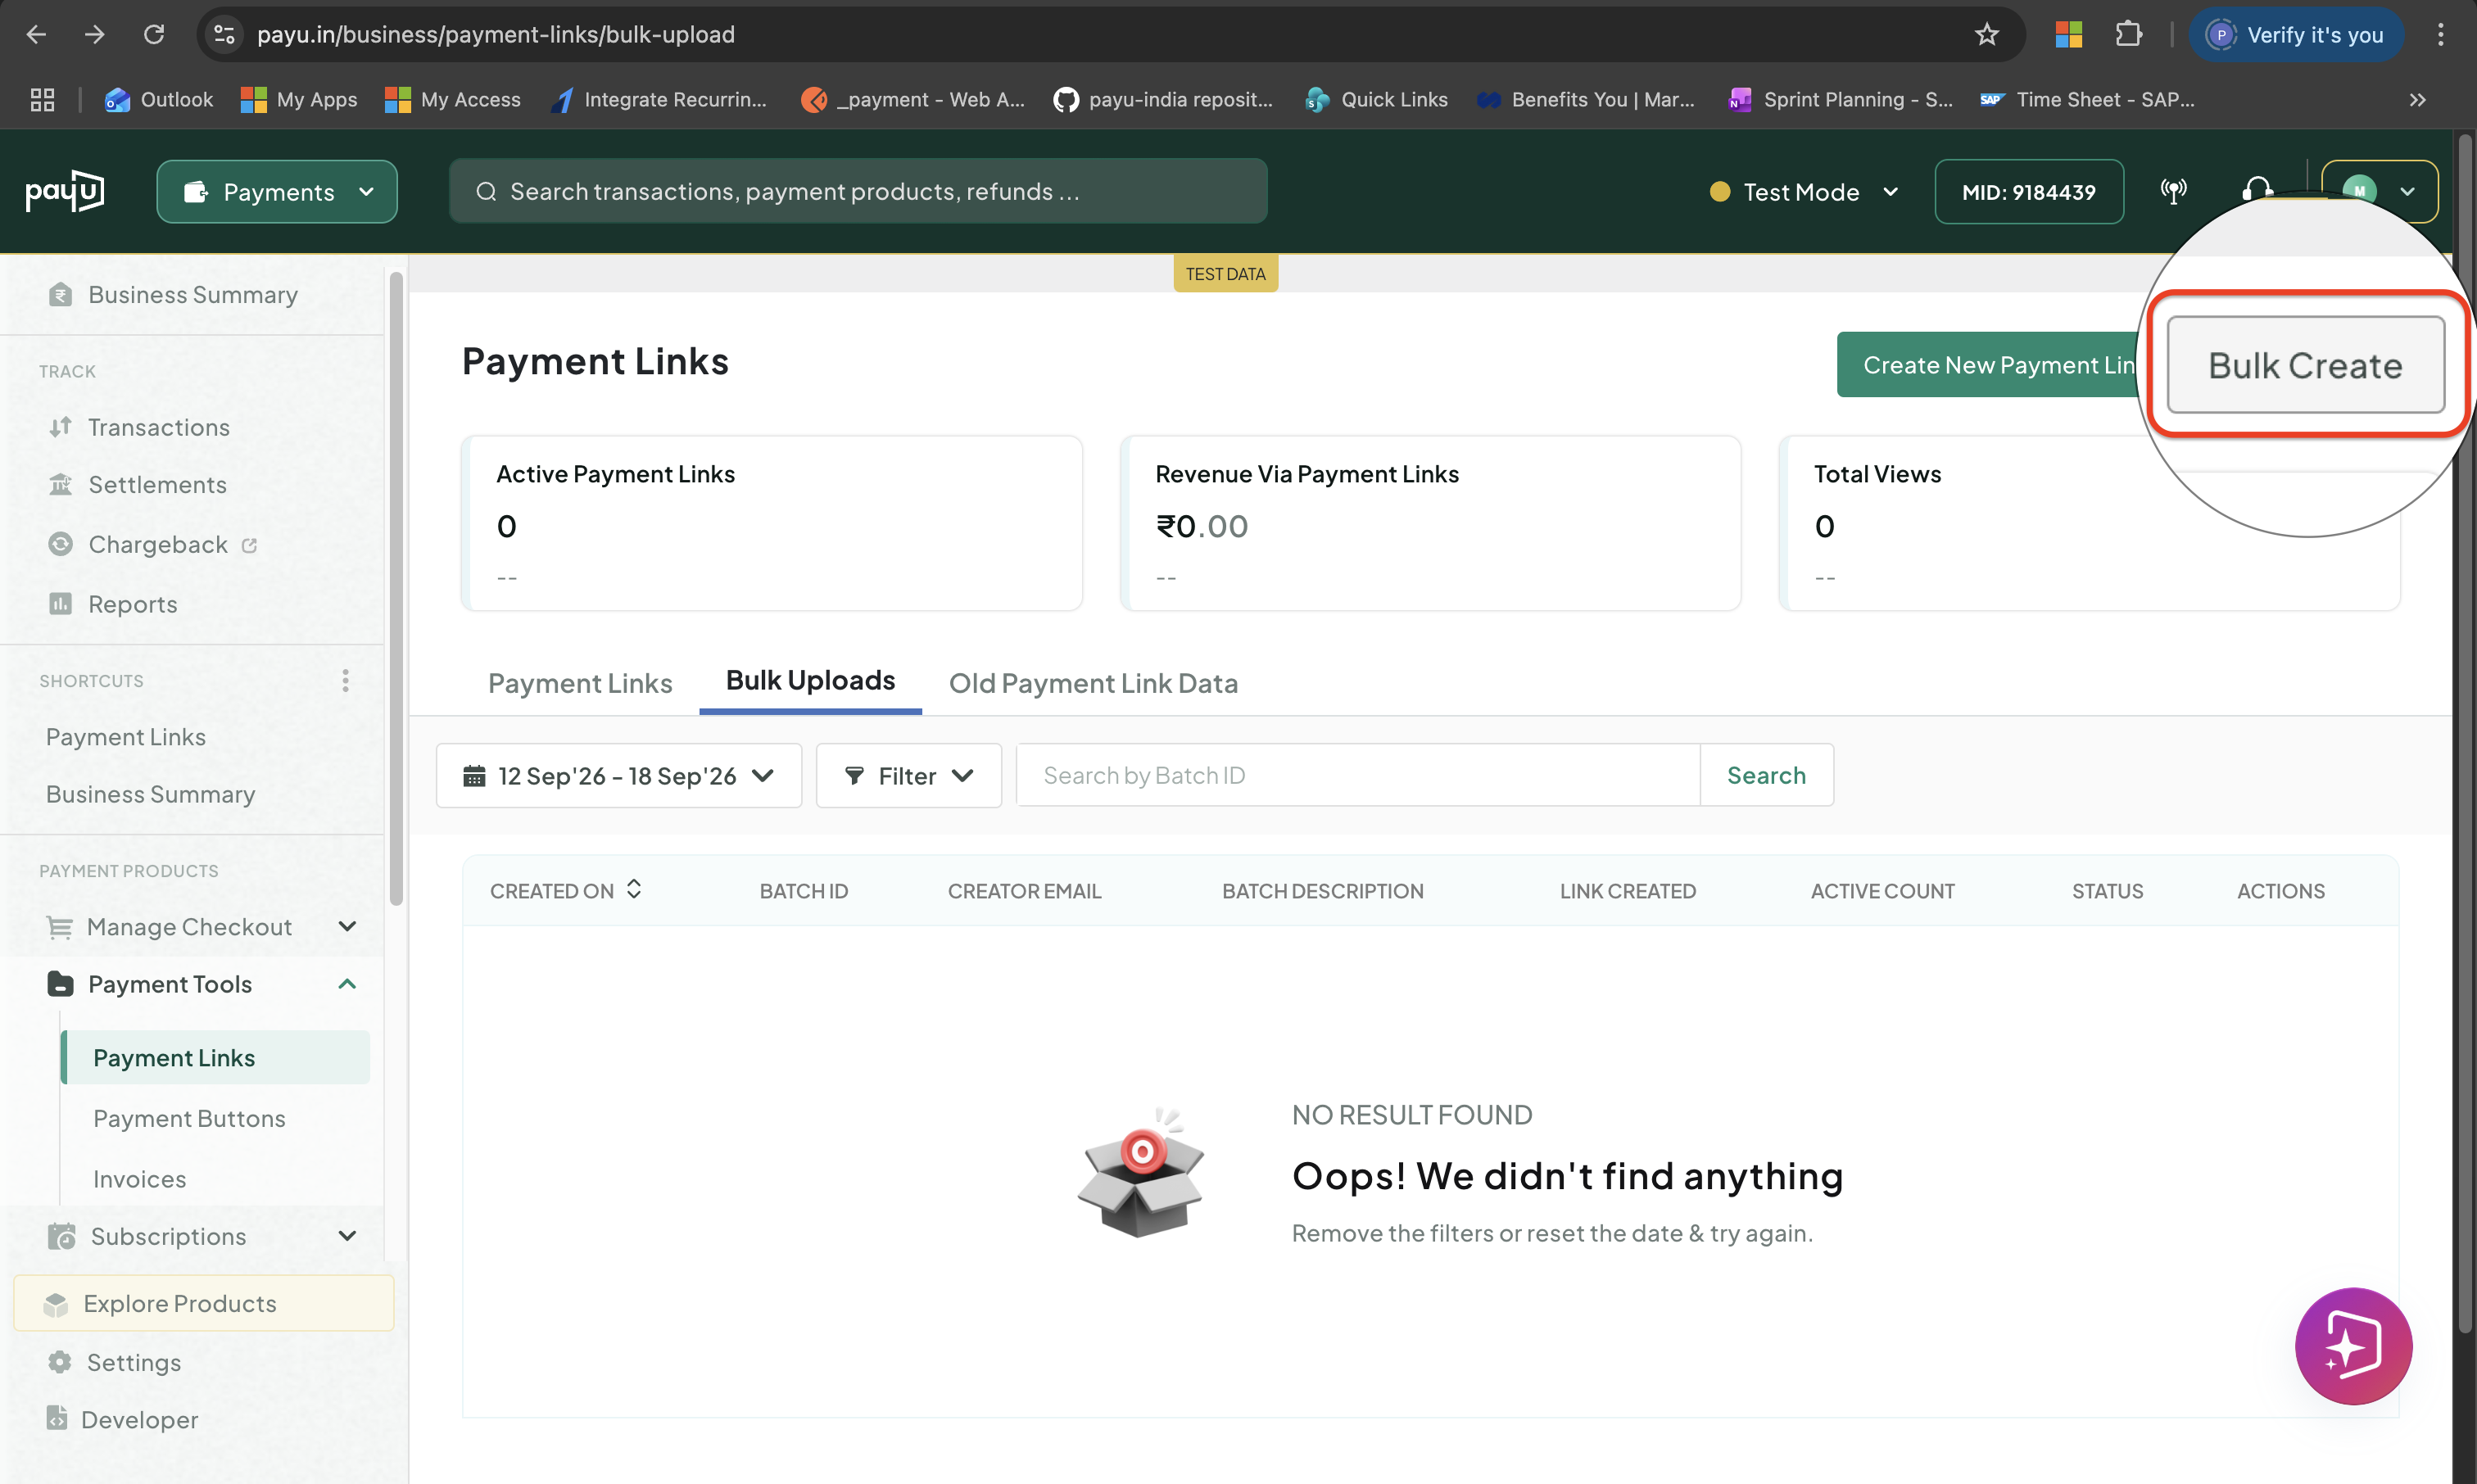
Go to Bulk Create
2. Download the sample file and review column definitions
-
On the Generate Bulk Payment links page, click Download Sample File to get the CSV template with the correct column structure.
The CSV accepts the following columns:
| Column | Required | Description |
|---|---|---|
| Amount | Mandatory | Payment amount — must be ≥ 1 |
| Product Description | Mandatory | Purpose of the payment shown on checkout |
| Invoice ID | Optional | Your unique reference to identify this link |
| Merchant Reference ID | Optional | Unique ID per transaction — if entered, only one payment is allowed on the link |
| Customer Name | Optional | Pre-fills customer name at checkout |
| Customer Email | Optional | Customer's email address |
| Customer Mobile | Optional | Customer's mobile number (10 digits) |
| Validation Period | Optional | Number of units the link is valid for (default: 365). Max: 1000 days from creation |
| Time Unit | Optional | Unit for Validation Period — D = days · H = hours · M = minutes |
| Send SMS | Optional | 1 = send SMS · 0 or blank = do not send |
| Is Partial Payment Allowed | Optional | 1 = allow partial payment · 0 or blank = full amount required |
| Max Payments Allowed | Optional | Maximum number of payments on this link — blank means unlimited until expiry |
Note:Amount and Product Description are the only mandatory columns. All other columns are optional. You can leave them blank if not required.
3. Fill in your CSV
Open the downloaded sample file and fill in one row per payment link.
Error-free Upload Tips
Do not change column headers — PayU maps fields by column name.
Ensure every row has a value for Amount and Product Description.
If using Invoice ID, each value must be unique across your merchant account.
If using Validation Period + Time Unit together — both fields must be filled.
Leave Merchant Reference ID blank if you want the link to be usable more than once.
Save the file as
.csv(not.xlsx) before uploading.
4. Upload your File and Set Batch Details
Back on the Generate Bulk Payment links page:
-
Click Select file from your library and choose your completed CSV. Maximum file size allowed is 20 MB.
-
Enter a Batch ID (Optional): Your internal reference for this upload batch.
-
Enter a Batch description (optional): A label to help you identify this batch later.
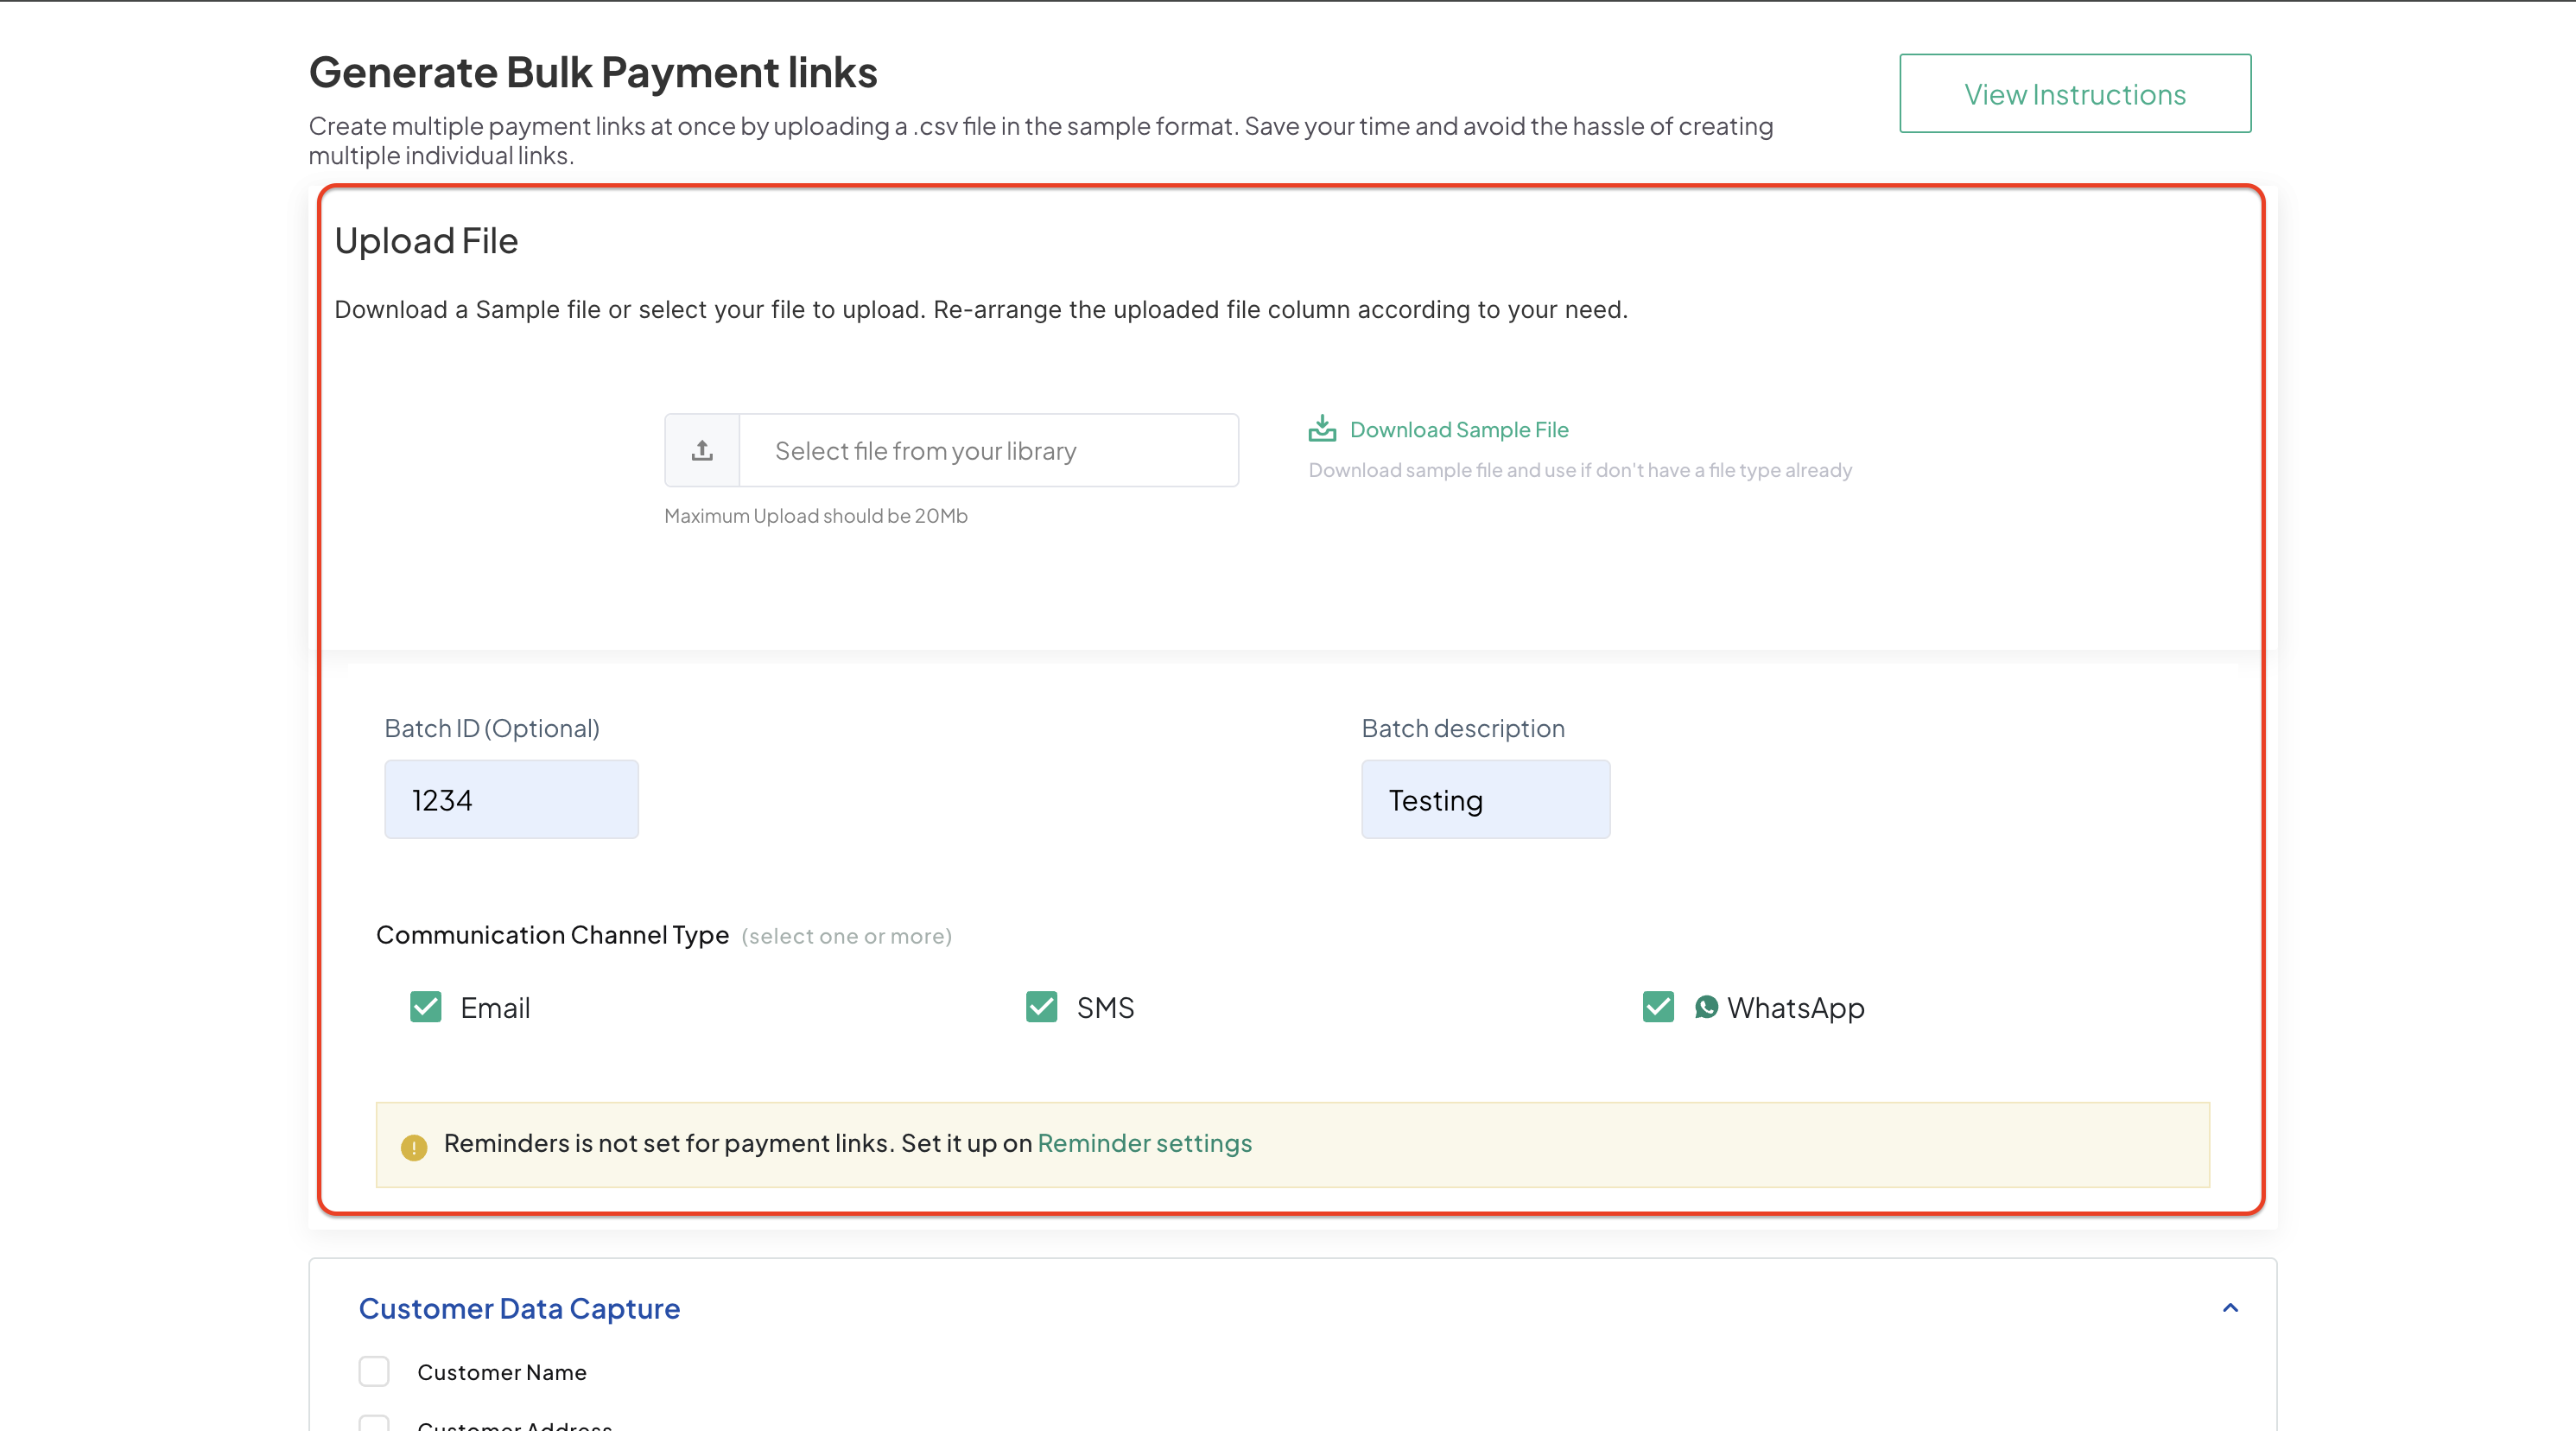
Upload and Set Batch Detials
5. Choose Communication Channel Type
Under Communication Channel Type, select how PayU should notify customers when their link is created. You can select all, one, or neither. If neither is selected, links are created but not sent. You can share them manually from the Payment Links Dashboard.
- Email: Sends the link to the customer's email address (if provided in the CSV)
- SMS: Sends the link to the customer's mobile number (if provided in the CSV)
- WhatsApp: Sends the link to the customer's WhatsApp (if provided in the CSV)
Note:Payment link reminders are not enabled by default. To set them up, go to Reminder settings in the Dashboard before uploading.
6. Configure Customer Data Capture
-
Under Customer Data Capture, select which information should PayU collect from customers on the checkout page. Below are the available options:
- Customer Name
- Customer Address
- Customer Email (checked by default)
- Customer Phone (checked by default)
-
To add custom fields beyond these, click + Add New Fields and configure the field type, label, and whether it is mandatory.
-
Once done, click Generate Payment Links (or the upload/submit button) to process your batch.
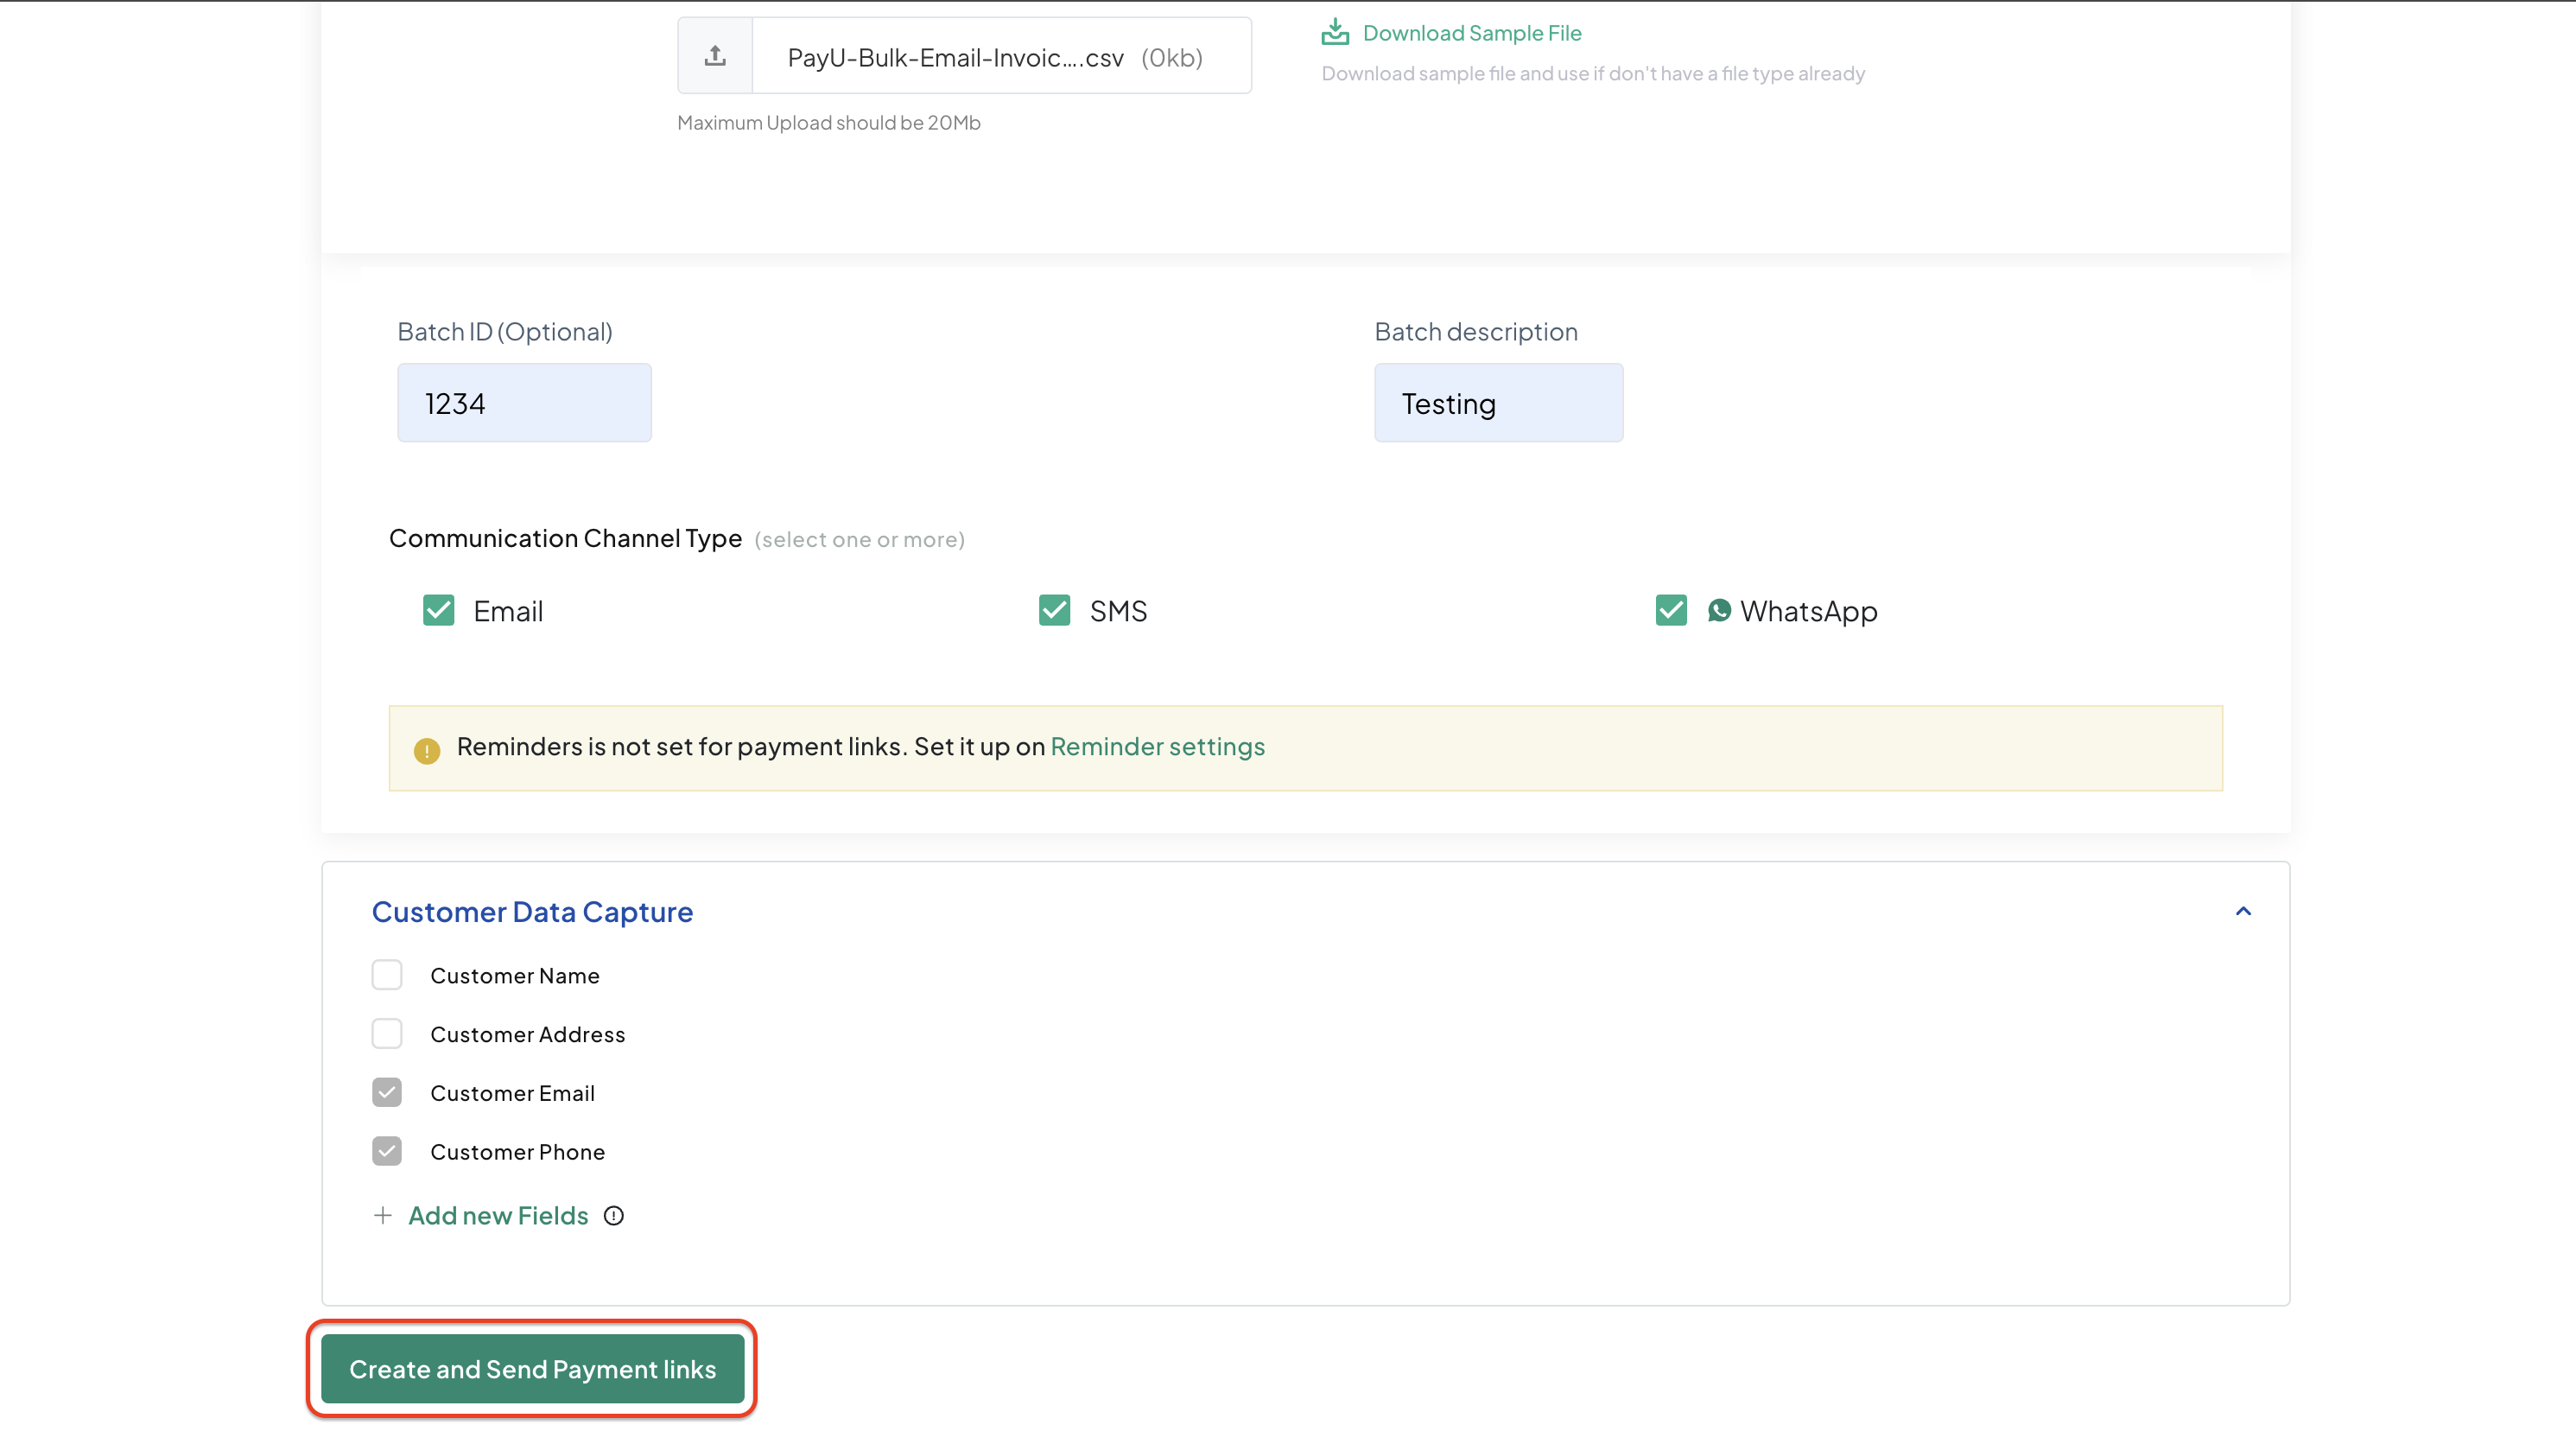
Create and Send Payment Links
7. Review Upload Results
After upload, PayU processes each row and creates the links. To check results:
- Go to the Bulk Uploads tab in the Payment Links Dashboard.
- Find your batch in the history list. Each batch shows the total links created and any errors.
- Click into a batch to see per-row results. Rows with errors are flagged with the specific issue.
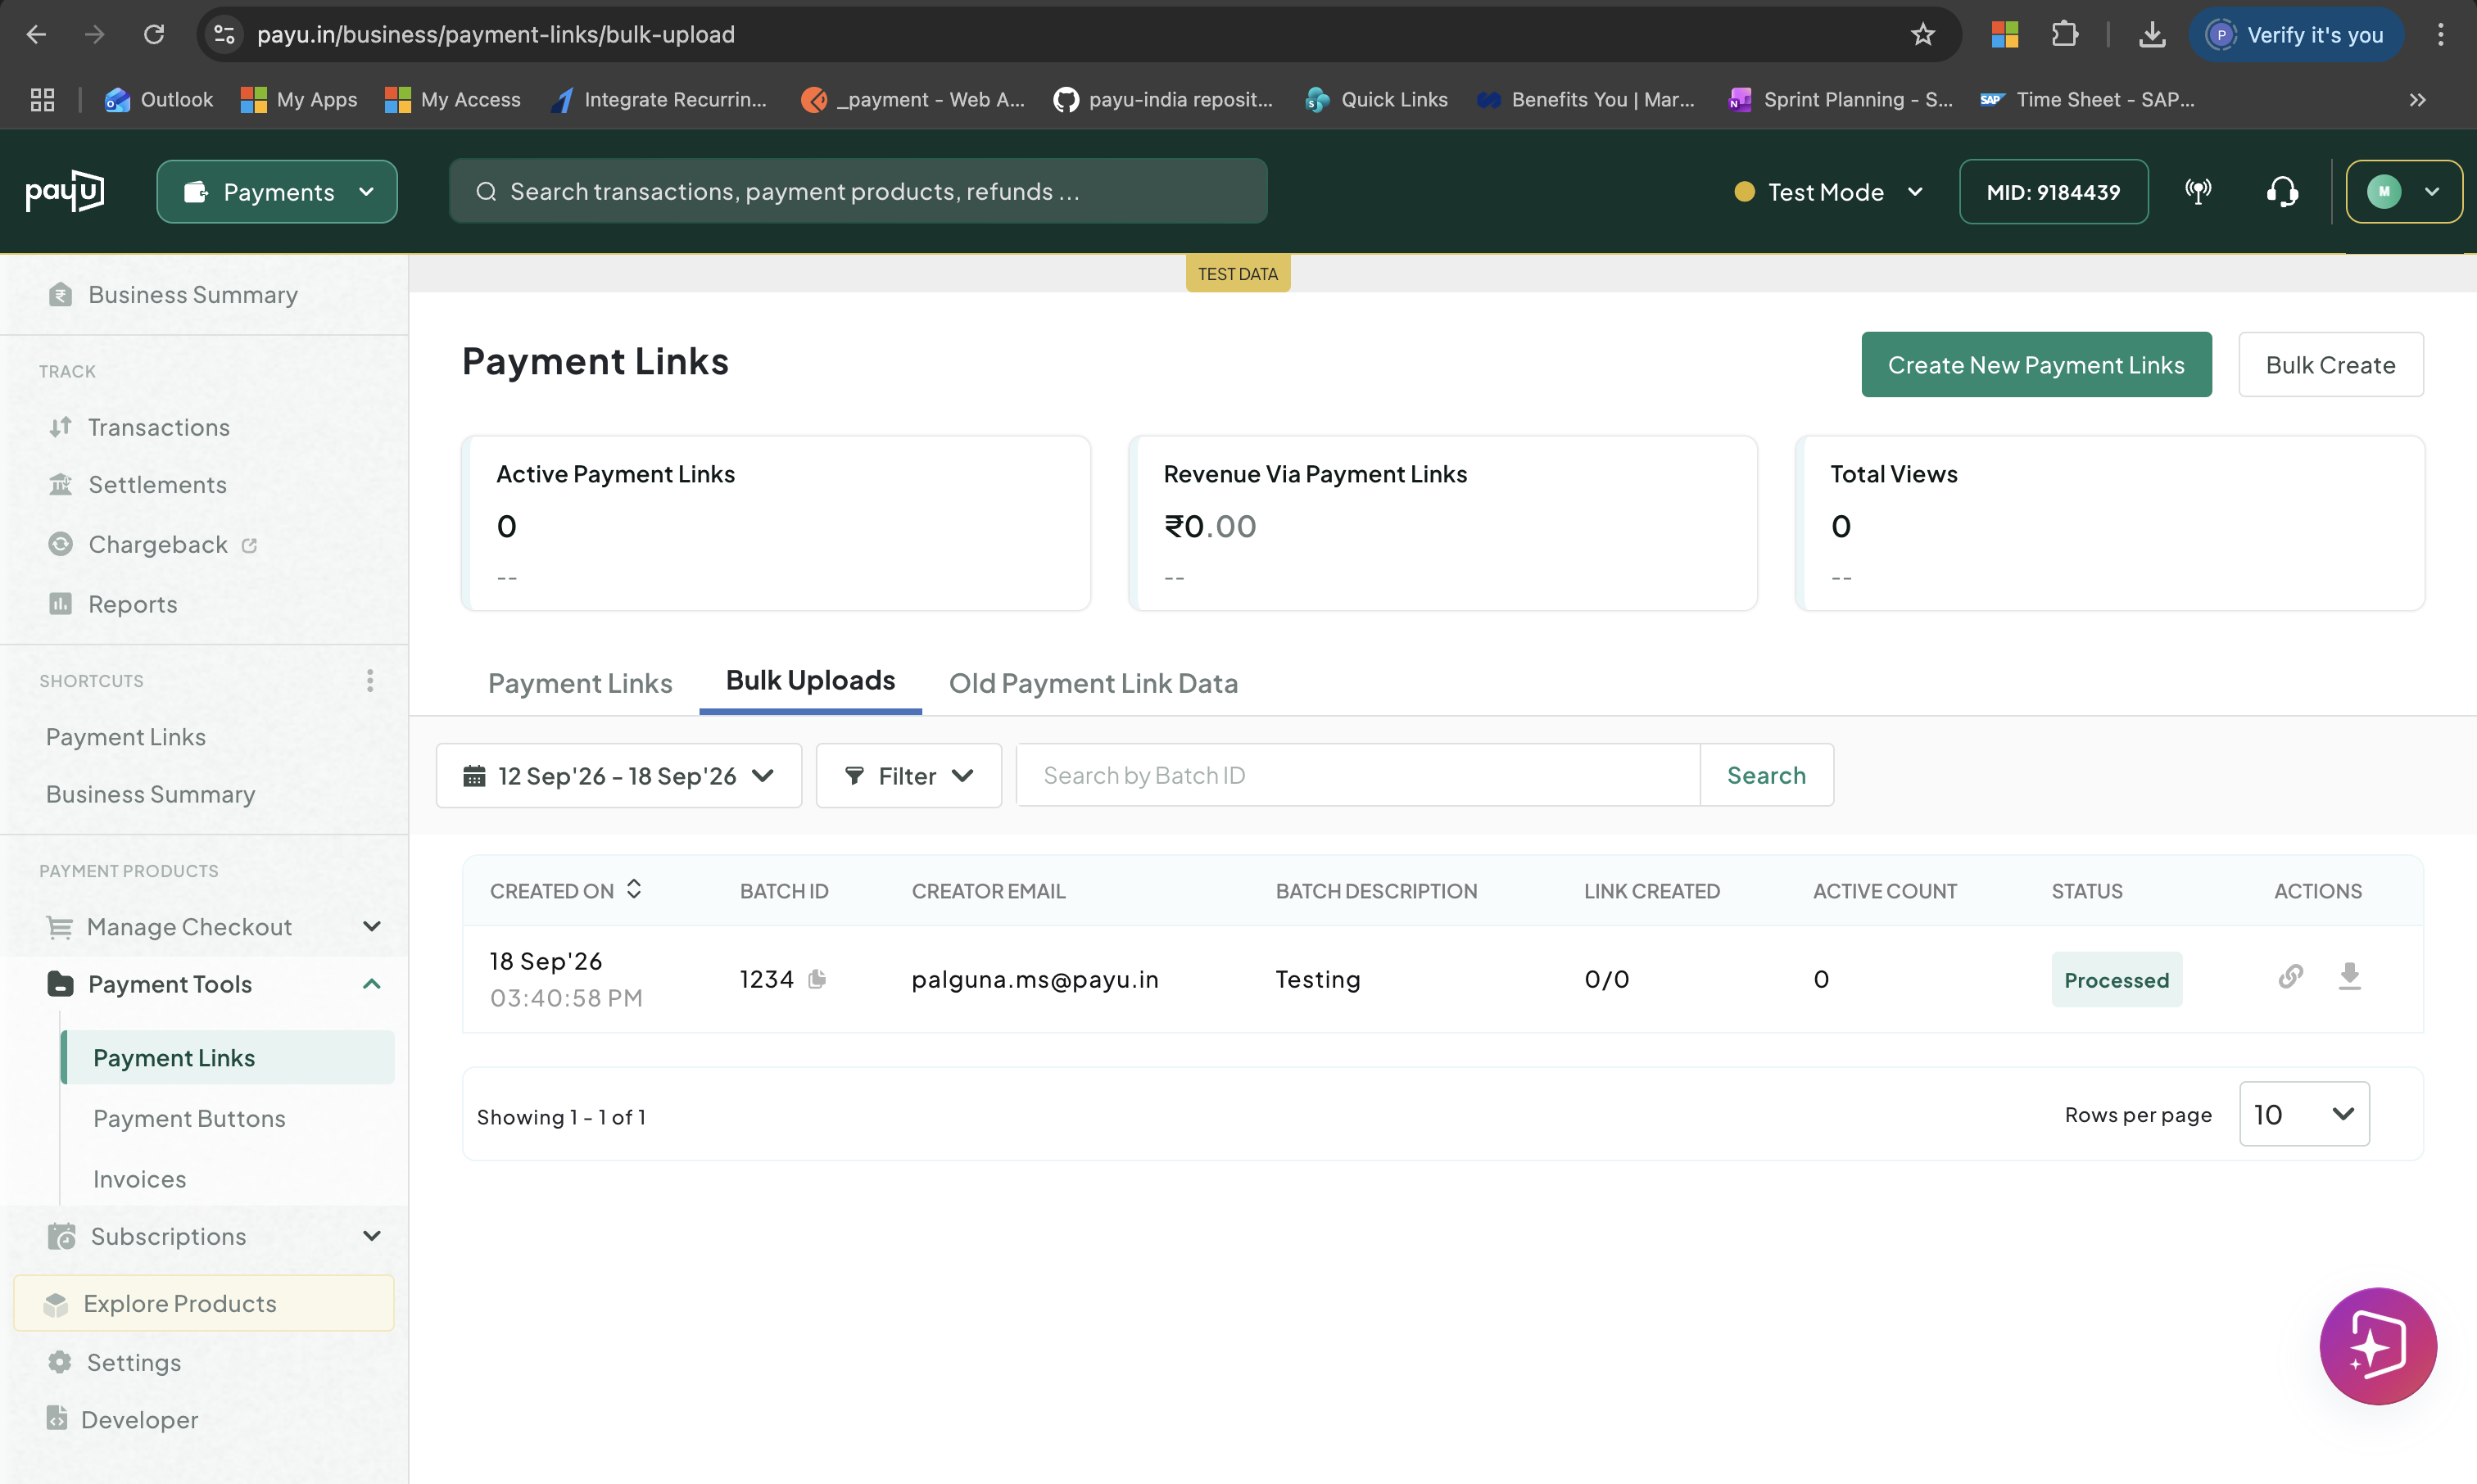
Check Bulk Upload Status
Common Errors: File and Format Issues
These errors stop the entire upload before any rows are processed.
| Error | Cause | Fix |
|---|---|---|
| File not accepted / upload fails | File is .xlsx, not .csv | Open in Excel or Google Sheets → Save as CSV (comma-separated) |
| File too large | File exceeds 20 MB | Split into smaller files and upload in batches |
| Fields mapped incorrectly / column not recognised | Column headers were renamed or reordered | Re-download the sample file and keep its headers exactly as-is |
| Batch created but 0 links generated | File has a header row but no data rows | Make sure at least one data row is filled below the header |
Common Errors: Row Data Issues
These errors are reported per row — the rest of the batch may still succeed.
| Error | Cause | Fix |
|---|---|---|
| "Amount is mandatory" | Amount column is empty | Fill in Amount for every row |
| "Amount must be at least 1" | Amount is 0 or below | Enter a value of 1 or more |
| "Invalid Amount" | Amount has commas, symbols, or letters — e.g. ₹1,000 | Use plain numbers only — 1000, not ₹1,000 |
| "Product Description is mandatory" | Description column is empty | Fill in Product Description for every row |
| "Invoice ID already exists" | Invoice ID was used in a previous link | Use a unique Invoice ID per row, or leave it blank |
| "Invalid Time Unit" | Time Unit is not D, H, or M | Use uppercase D (days), H (hours), or M (minutes) |
| "Validation Period and Time Unit must both be filled" | One is filled, the other is blank | Fill both together, or leave both blank |
| "Validation Period exceeds maximum" | Equivalent days exceed 1000 from today | Reduce the period or switch to a shorter Time Unit |
| "Invalid mobile number" | Not 10 digits, or includes spaces, dashes, 0, or +91 | Enter 10 digits only — 9876543210, not +919876543210 |
| "Invalid email" | Missing @, has spaces, or is malformed | Check format — [email protected] |
| "Send SMS requires a mobile number" | Send SMS is 1 but Customer Mobile is blank | Add the mobile number, or set Send SMS to 0 |
| "Invalid value for partial payment" | Is Partial Payment Allowed is not 0 or 1 | Use 1 to allow partial payments, 0 or blank for full amount only |
What Are the Different Statuses of a Payment Link?
| Status | What it Means | Dashboard Actions | API Actions |
|---|---|---|---|
| Active | Live — accepting payments | Share, Duplicate, Edit, Deactivate | Share, Duplicate, Edit, Deactivate |
| Paid | Payment received (or max transactions reached) | Share, Duplicate, Edit, Deactivate | Share, Duplicate, Edit, Deactivate |
| Expired | Expiry date passed | Share, Duplicate, and Activate | Share, Duplicate, and Activate |
| Deactivated | Manually stopped | Share, Duplicate, and Activate | Share, Duplicate, and Activate |
Need to create or manage payment links from your own system — CRM, ERP, or billing tool? Use Payment Links APIs to create, share, fetch, and deactivate links programmatically with OAuth2 authentication.
→ Generate an Access Token · Create a Payment Link · Fetch and manage links via API
What Happens After My Customer Pays?
After your customer makes the payment:
- PayU updates the link status to Paid in your Dashboard.
- The transaction appears in the Transactions tab in your Dashboard.
- If you have webhooks configured, PayU sends a
payment.successevent to your server.
WebhooksWebhooks are optional. Your Dashboard always reflects the current payment status without any webhook setup.
What Do I Do If Something Goes Wrong?
| Problem | Fix |
|---|---|
| Customer says the link isn't opening | Check the link status in your Dashboard — it may be expired or deactivated. |
| Customer didn't receive the SMS or email | Confirm phone/email were entered and the notification toggle was on before creation. Reshare from Actions > Share in your Dashboard. |
| Customer paid but Dashboard still shows Pending | Wait 5–10 minutes and refresh. See Errors and Troubleshooting for more details. |
| Wrong amount or details on the link | Deactivate it and create a new one — links cannot be edited after creation. Duplicate the link to reuse the settings. |
What If My Customer Wants the Money Back?
It depends on
- Whether you want to return the money yourself. Use PayU refunds to initiate.
- You are waiting for the amount to reach your account. PayU settlements can help you find out when the amount will be settled.
- Your customer has raised a complaint with their bank.
Next Steps
Updated 6 days ago
