
Set Up Your Account
Create your PayU merchant account, complete KYC, and get your integration credentials.
Before you can integrate with PayU, you need these three:
- A merchant account
- A completed KYC
- Merchant secrets
- API credentials.
How long does this take?
- Create an account: 5 minutes
- Complete KYC: 15–30 minutes (Keep your business documents ready)
- Test credentials: Available immediately after account creation
- Production credentials: Available after PayU verifies your website (up to 2 business days)
Step 1: Create a PayU Account
To create a PayU account:
-
Log in to the PayU dashboard in your browser.
-
Provide the following details on the Create your PayU account page:
Field Details Email Your email address. This will be your login username and receives PayU communications Password Your password should contain: - At least 8 characters,
- At least 1 uppercase
- At least 1 lowercase
- At least 1 number
- At least 1 special character
Mobile Your 10-digit mobile number Do you want to collect payments for your website? (optional) Select Yes and enter your website URL if applicable -
Click Send OTP & Create Account. An OTP is sent to your mobile number.
-
Enter the OTP and click VERIFY OTP on the OTP Verification page.
You can continue to complete your KYC or choose to complete it later. Click Go to Dashboard to access your test credentials.
What Happens Next:
- Your Test Key and Salt are available immediately. You can start building and testing right away.
- Your Production Key and Salt become available after PayU verifies your website. This takes up to 2 business days.
- You must complete KYC (Step 2 below) before you can accept real payments.
Step 2: Complete KYC and Activate Your Account
PayU requires all merchants to complete KYC (Know Your Customer) to comply with regulatory guidelines. Your account cannot accept live payments until you complete the KYC.
Before you start, keep these documents ready:
- Business PAN Card Number: Business PAN card details to verify your business identity.
- Proof of identity (Aadhaar card, passport, or PAN card)
- Proof of address (Aadhaar card, passport, or utility bill)
- Business proof (GST registration certificate or business license)
For the full list of required documents based on your business type, refer to the Documents checklist below.
Follow steps in every section to complete your KYC:
1. Resume Onboarding
Log in to the PayU dashboard and click Resume Onboarding at the top of the page (or under Onboarding Progress)
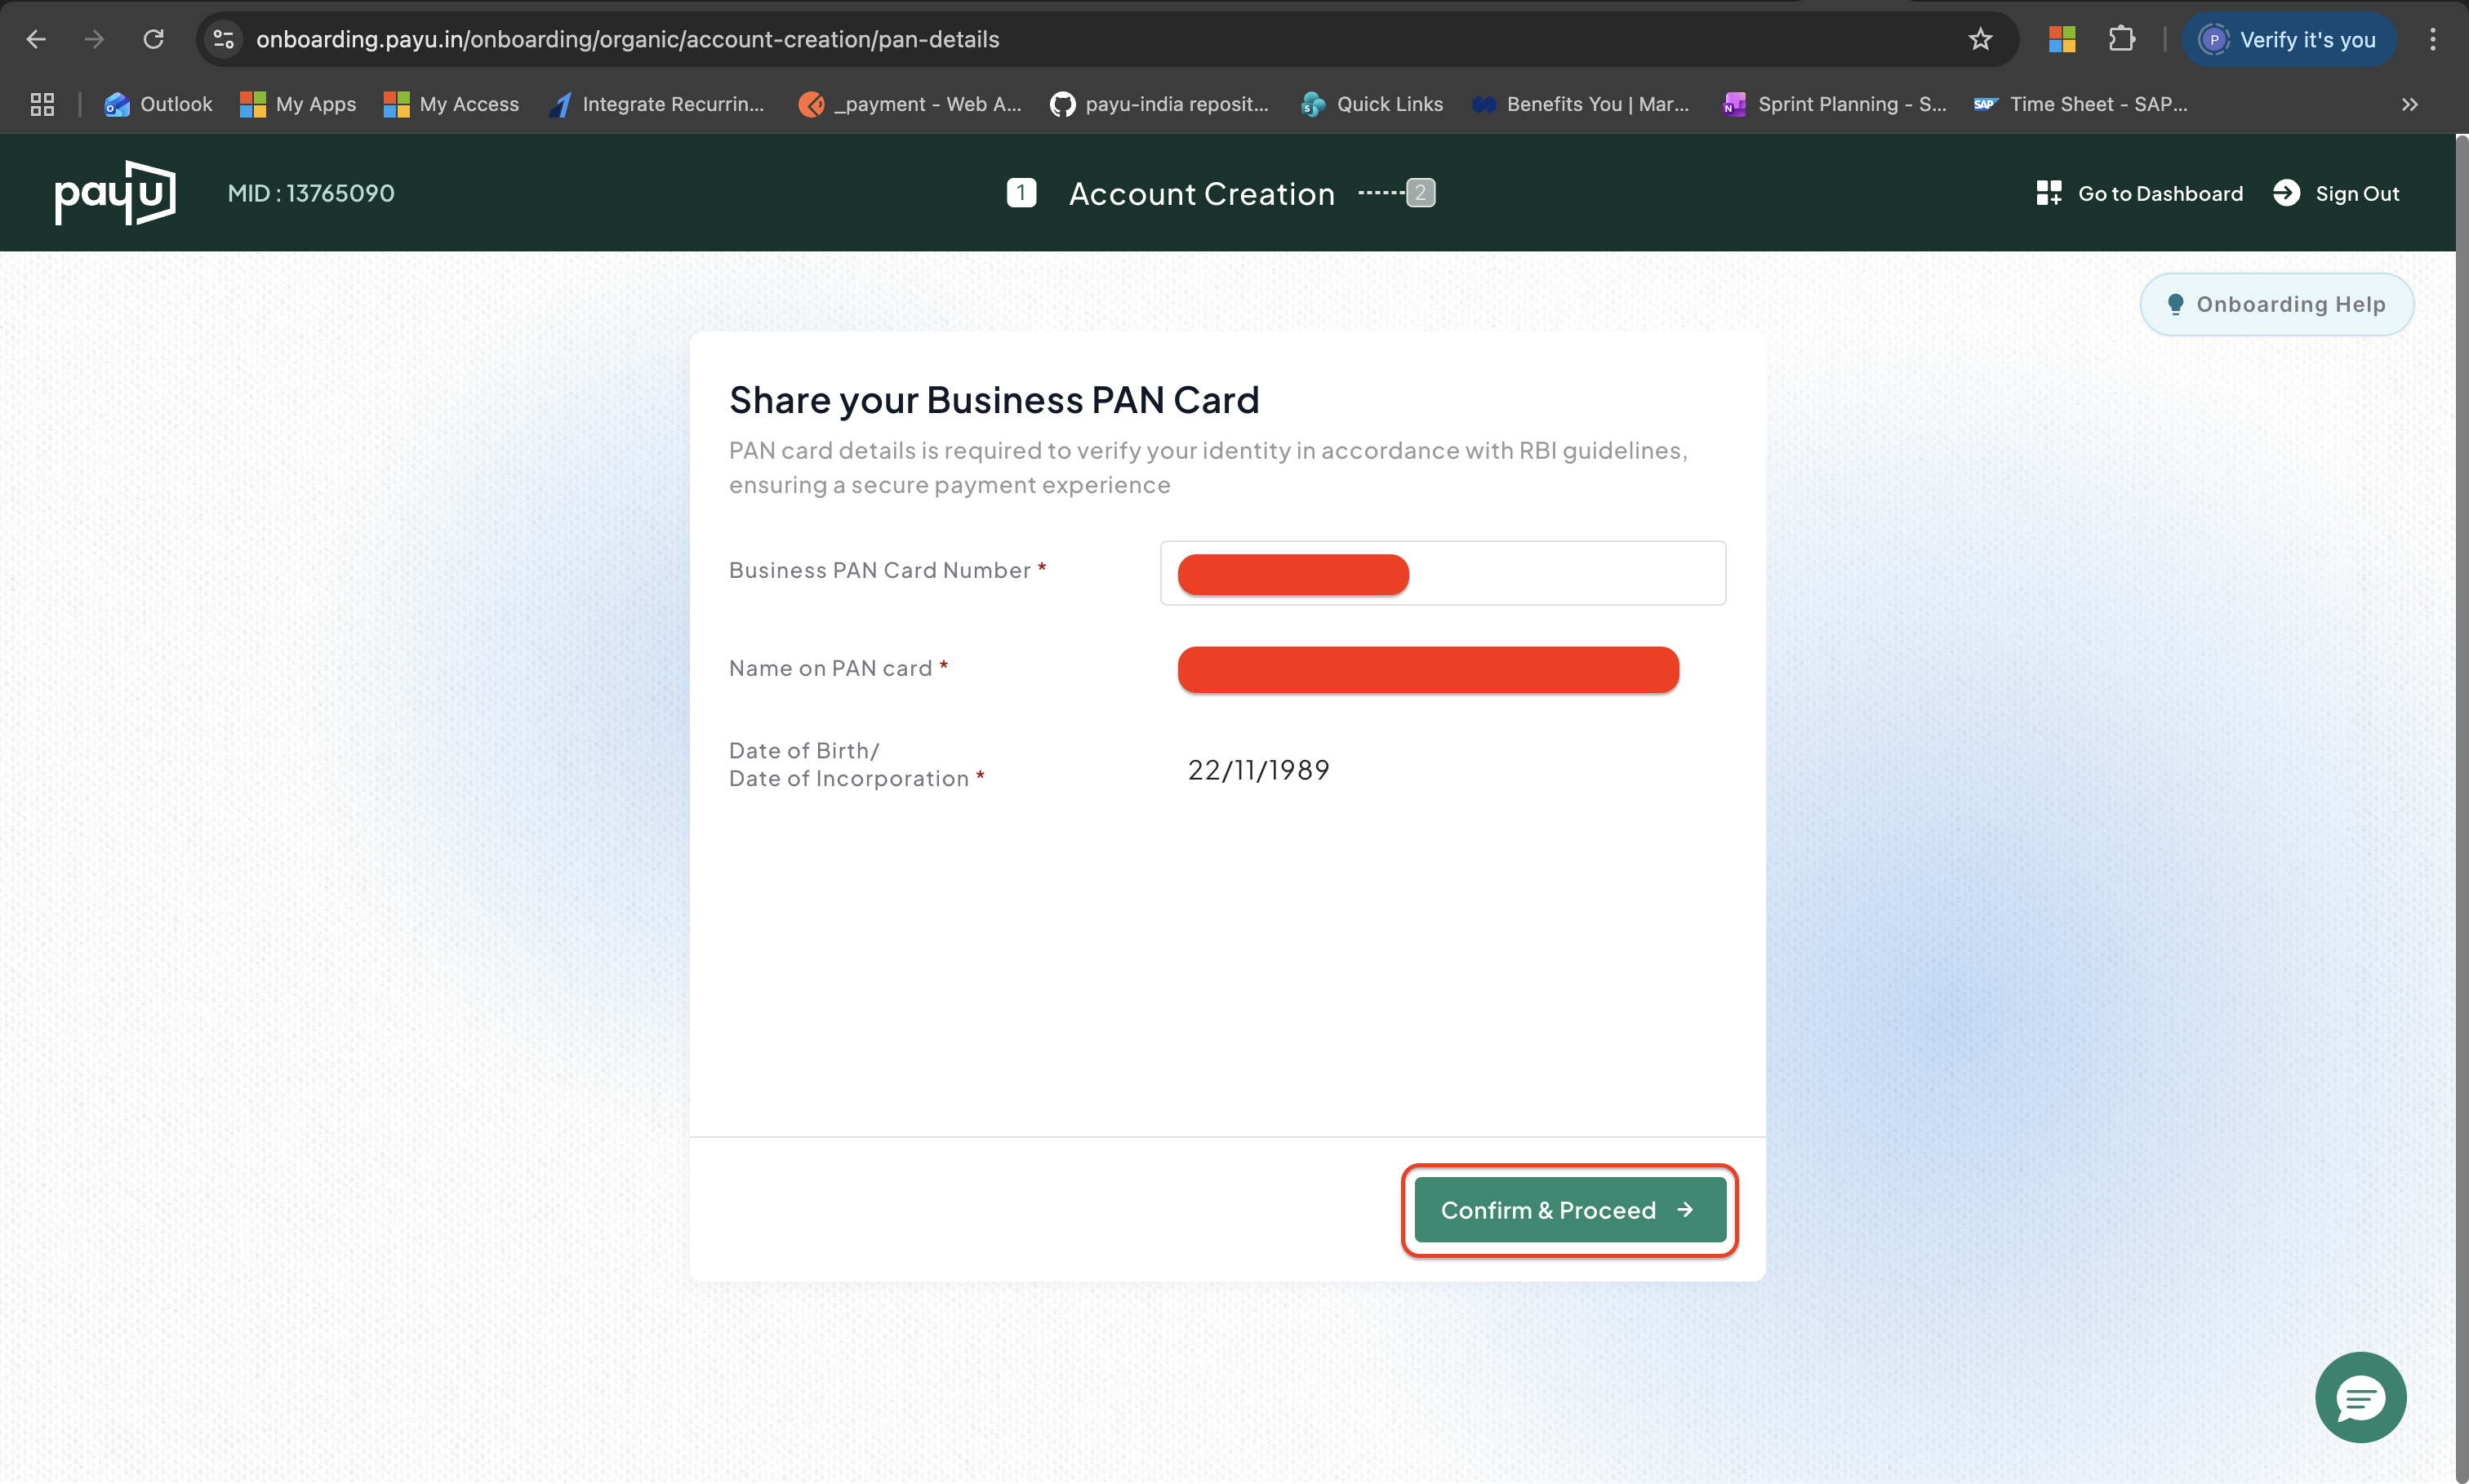
2. Business PAN Card Number
Enter your business PAN, verify the details and click Confirm & Proceed.
3. Please confirm your Business entity
Select any of the following business entity type and click Confirm & Proceed:
-
Individual
-
Sole Proprietorship
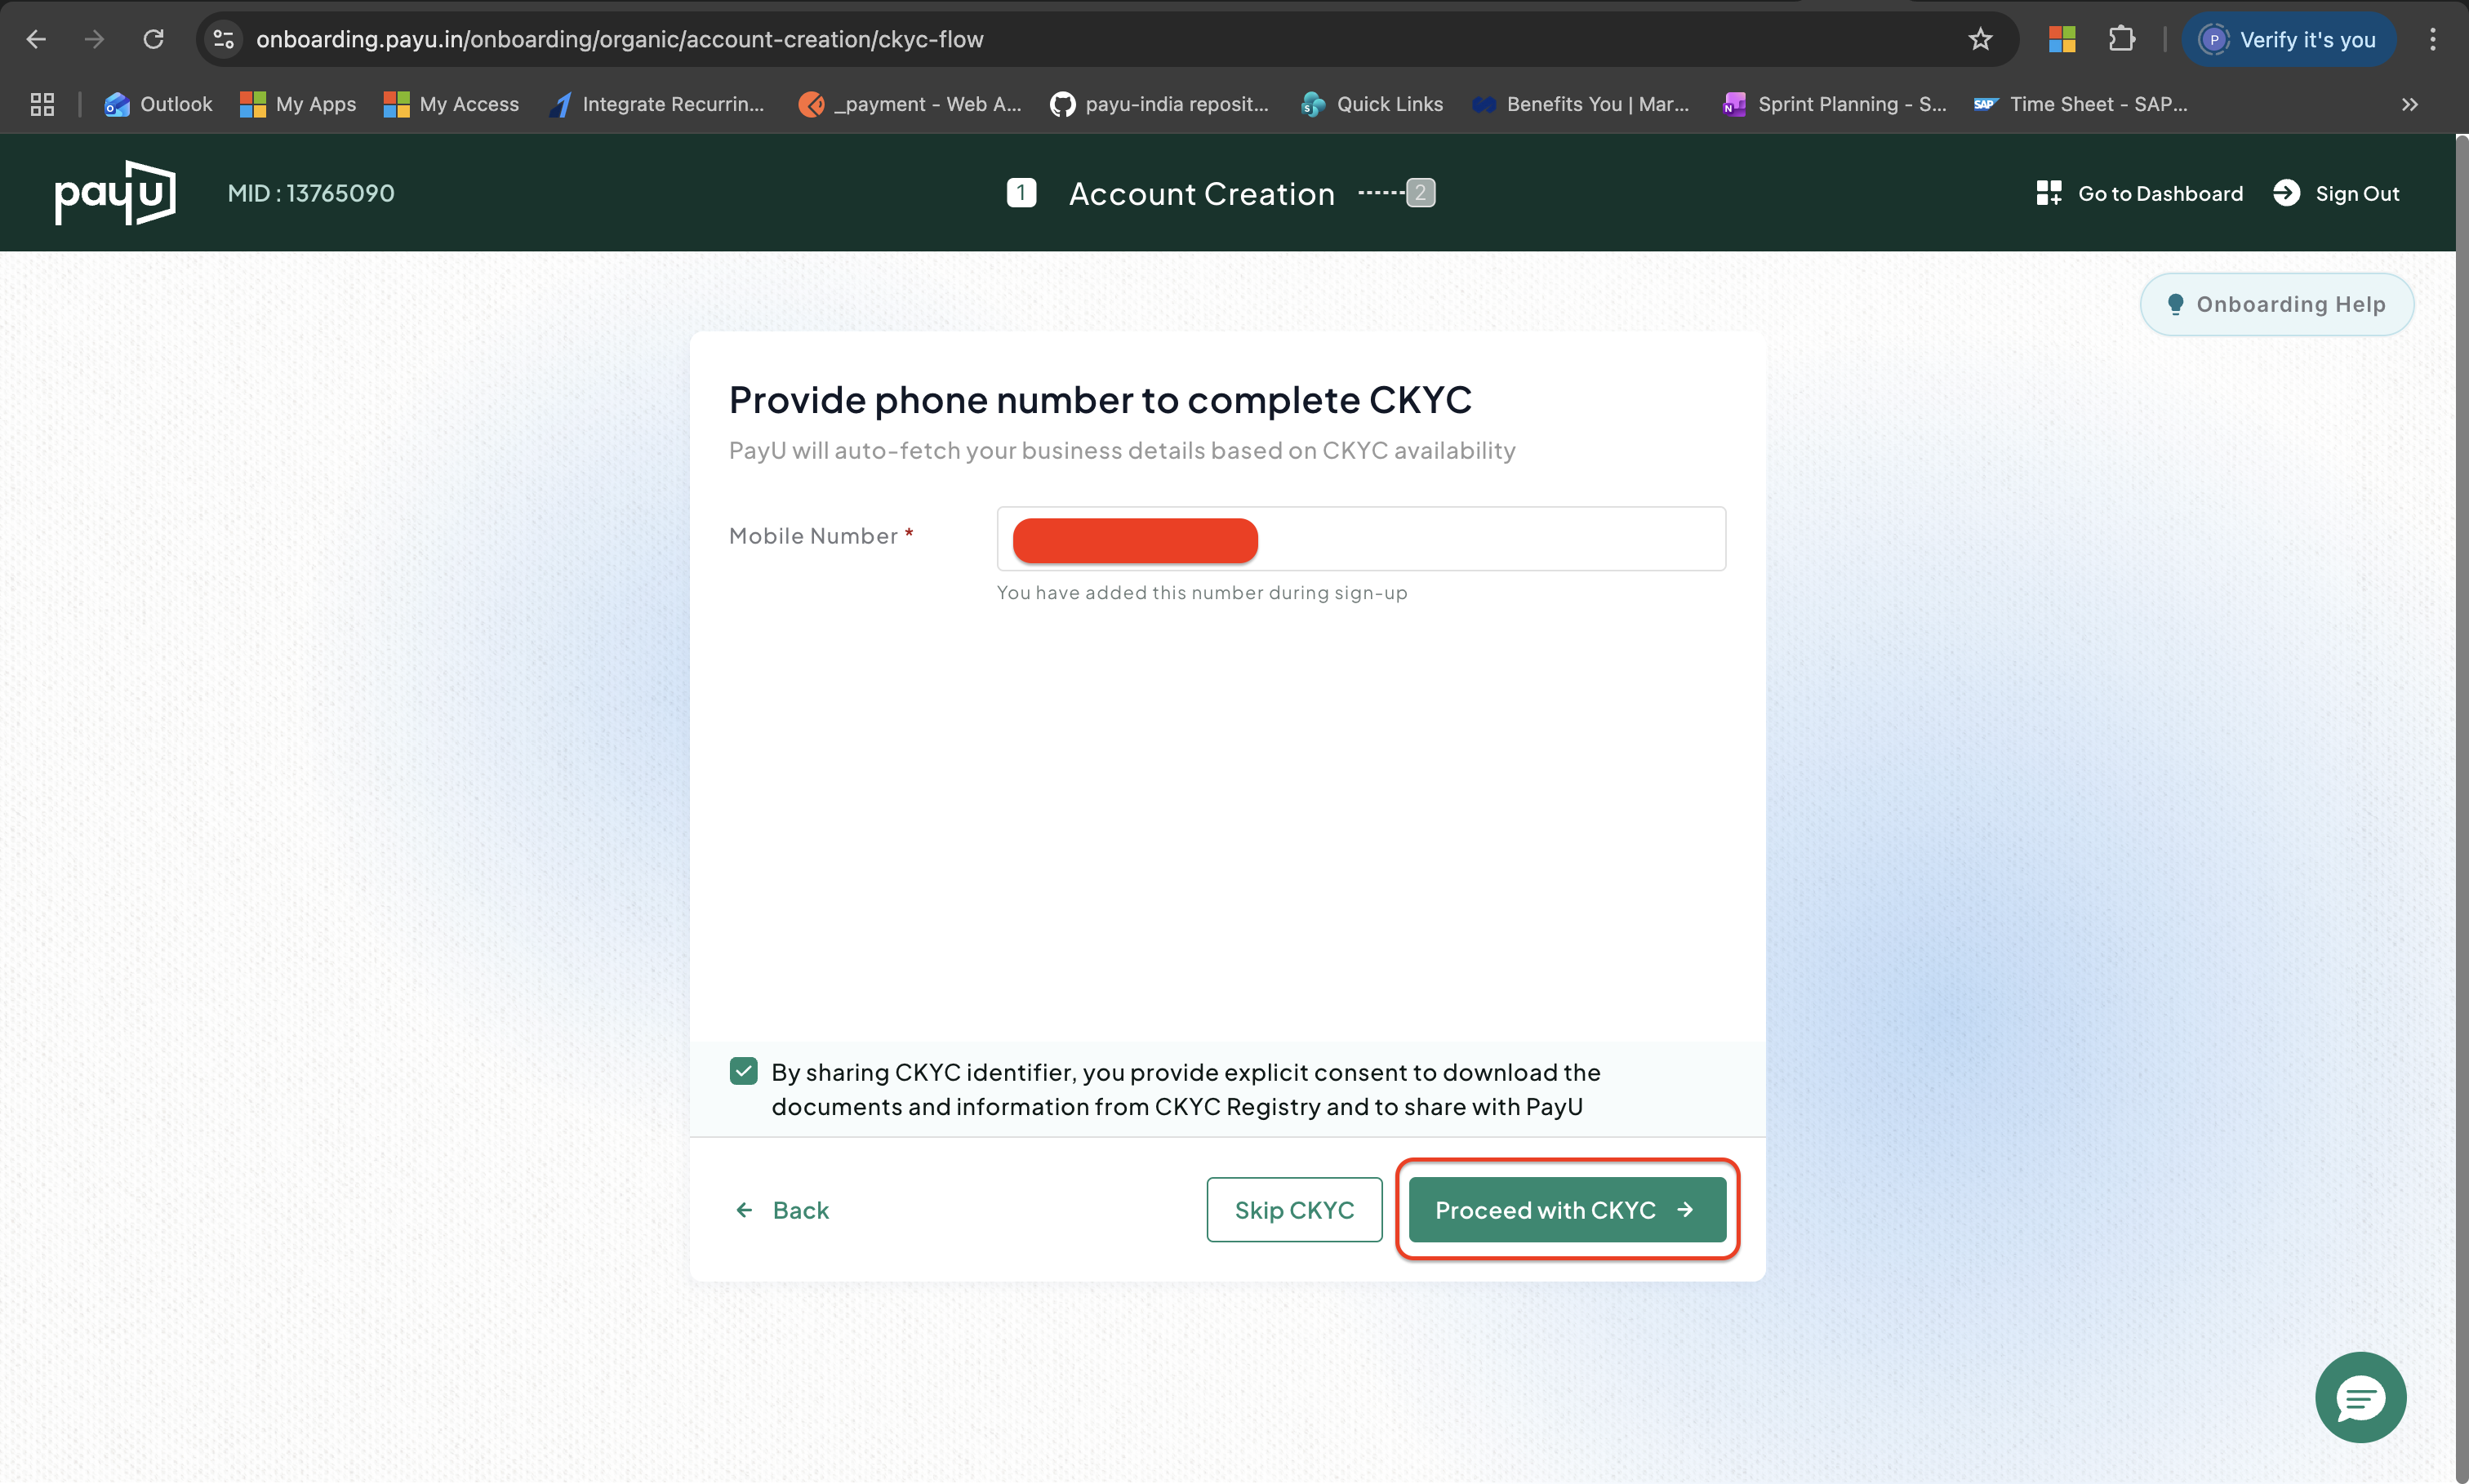
4. Provide phone number to complete CKYC
5. What category does your business fall under?
Search and select your business category from the search drop-down list and click Confirm & Proceed.
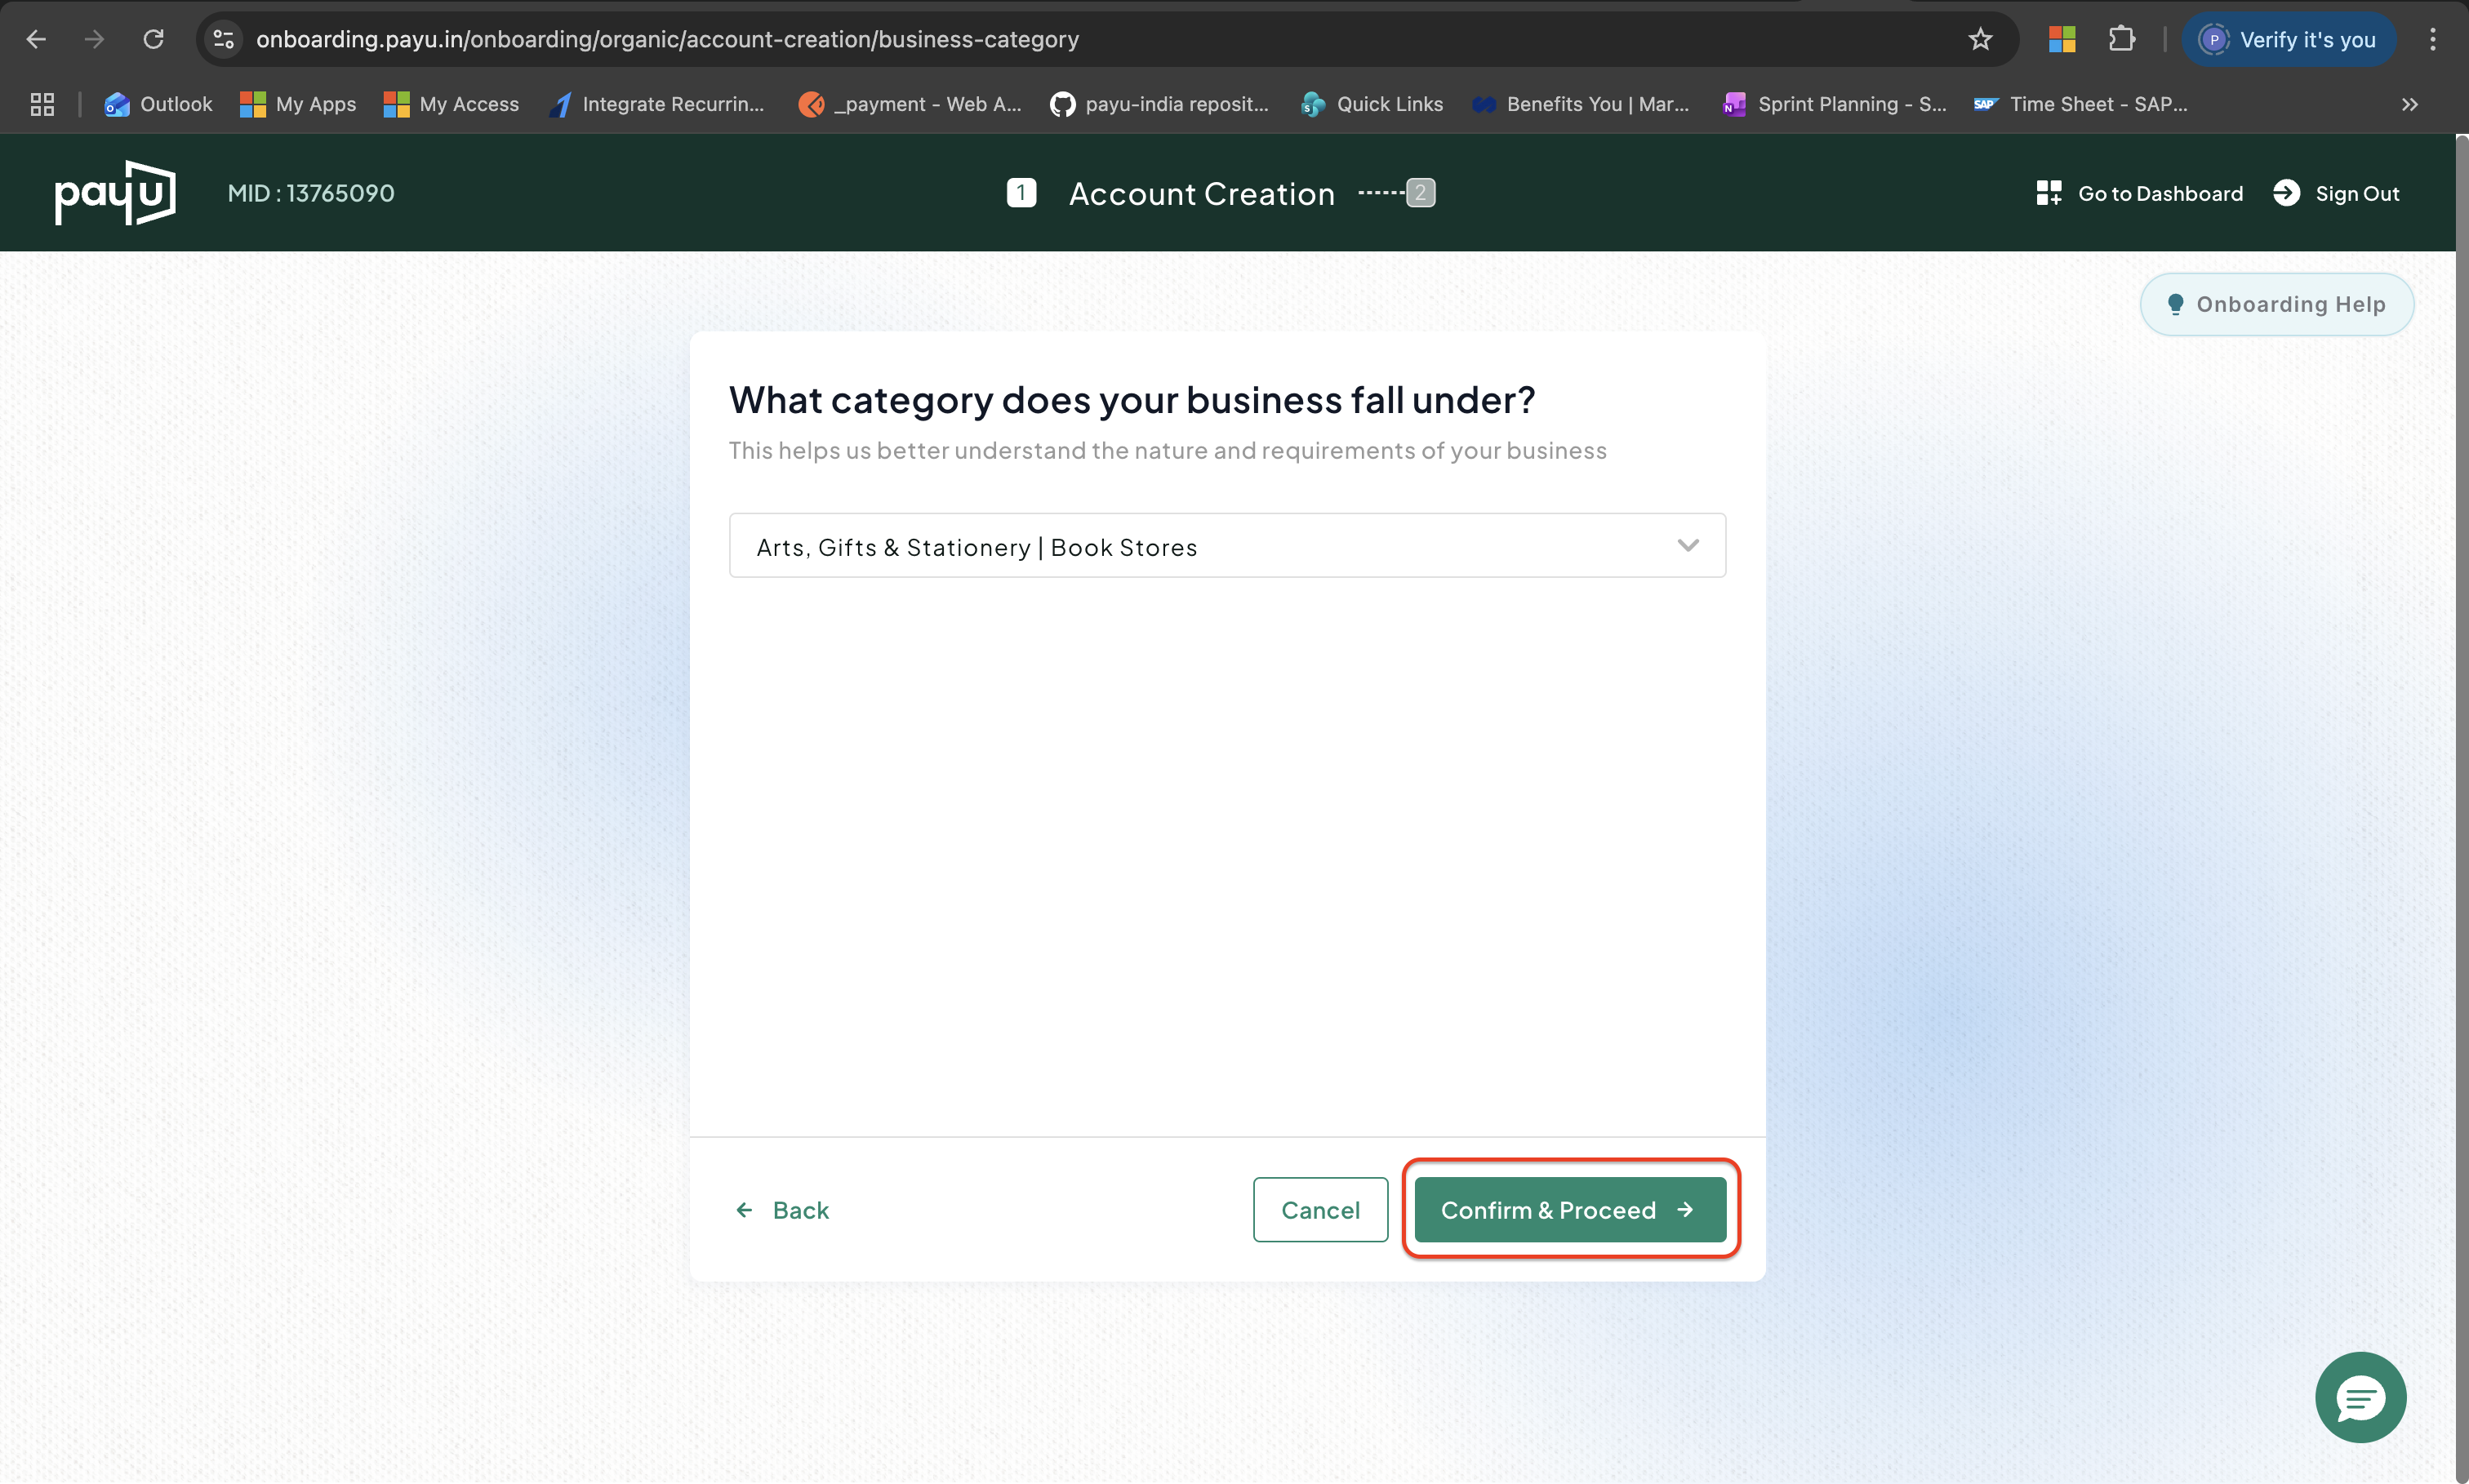
Select your Business Category
6. Share your business details
Provide the following details and click Confirm & Proceed.
- Expected Sales per month
- Do you have a GSTIN number?: Use the radio button to select your option.
- GSTIN (if applicable)
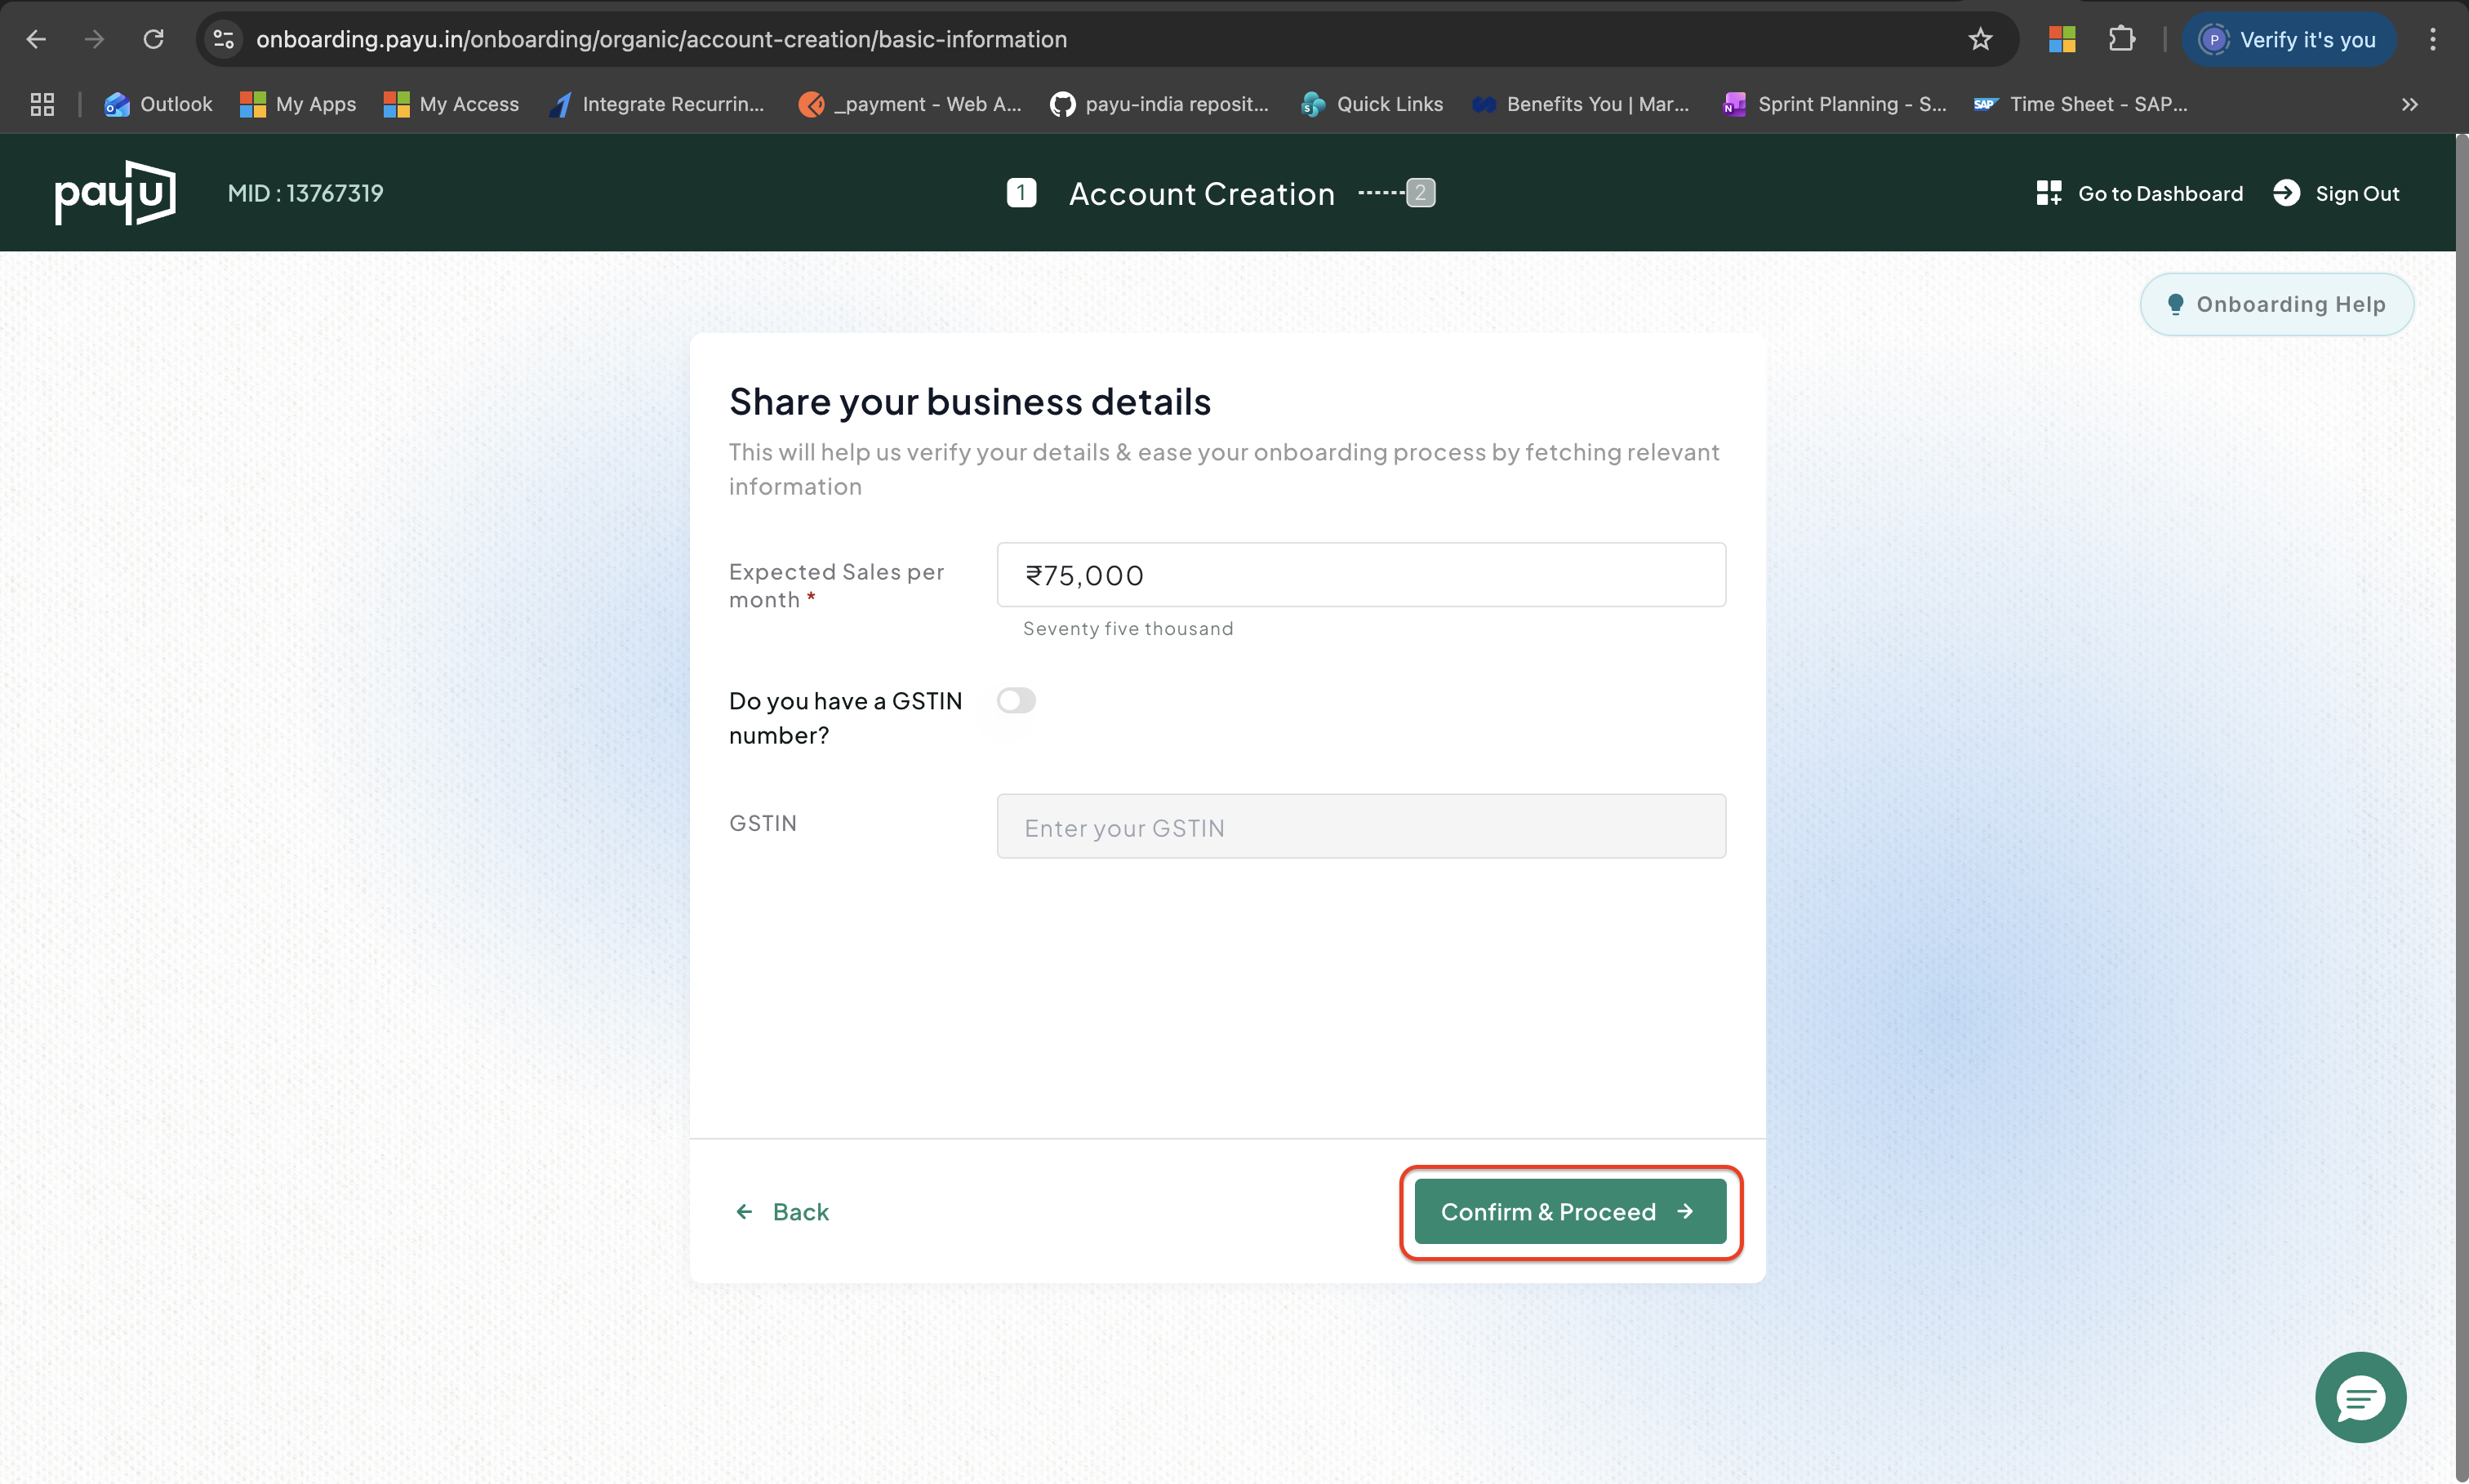
Business Information
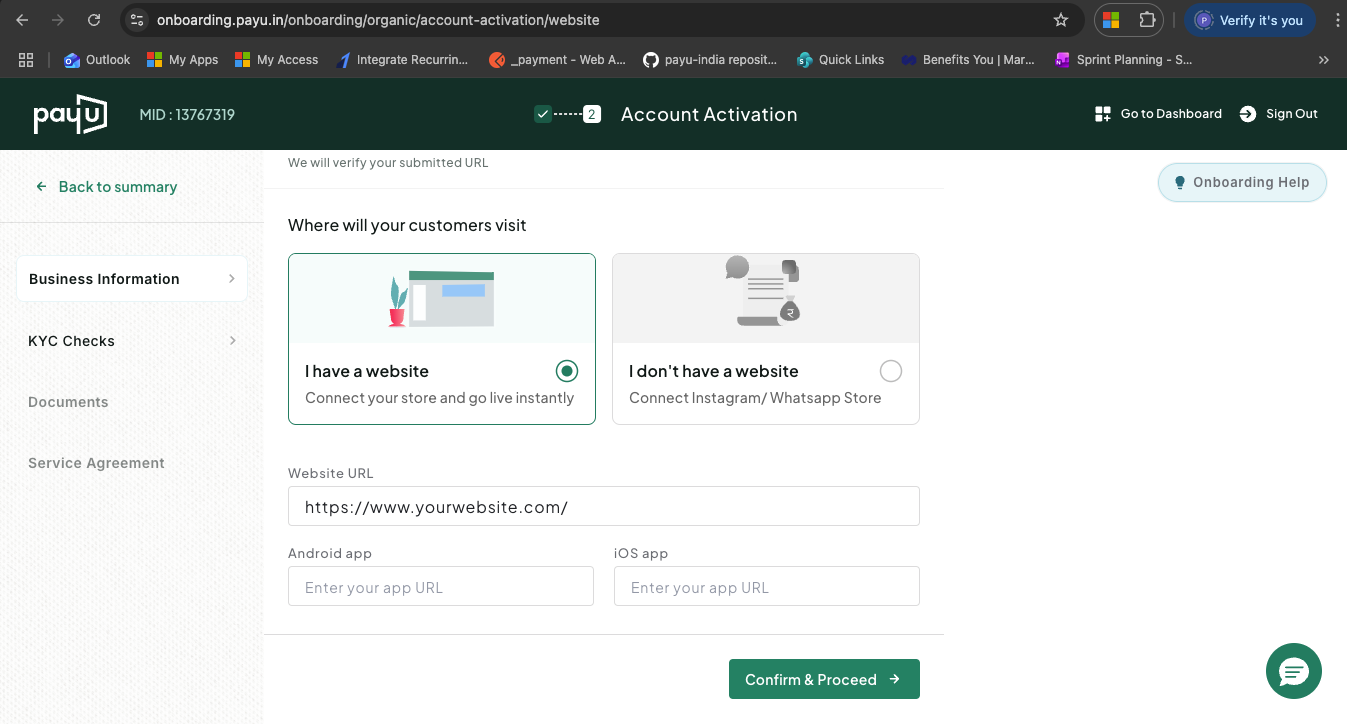
1. Connect Mobile App or Website
How do you want to collect payments? Select any of the following option, provide the required details and click Confirm & Proceed:
-
I have a website: select this option if you have a website to collect payments and provide the following details:
- Website URL
- Android app: Your android application URL if available.
- iOS app: Your iOS application URL if available.
-
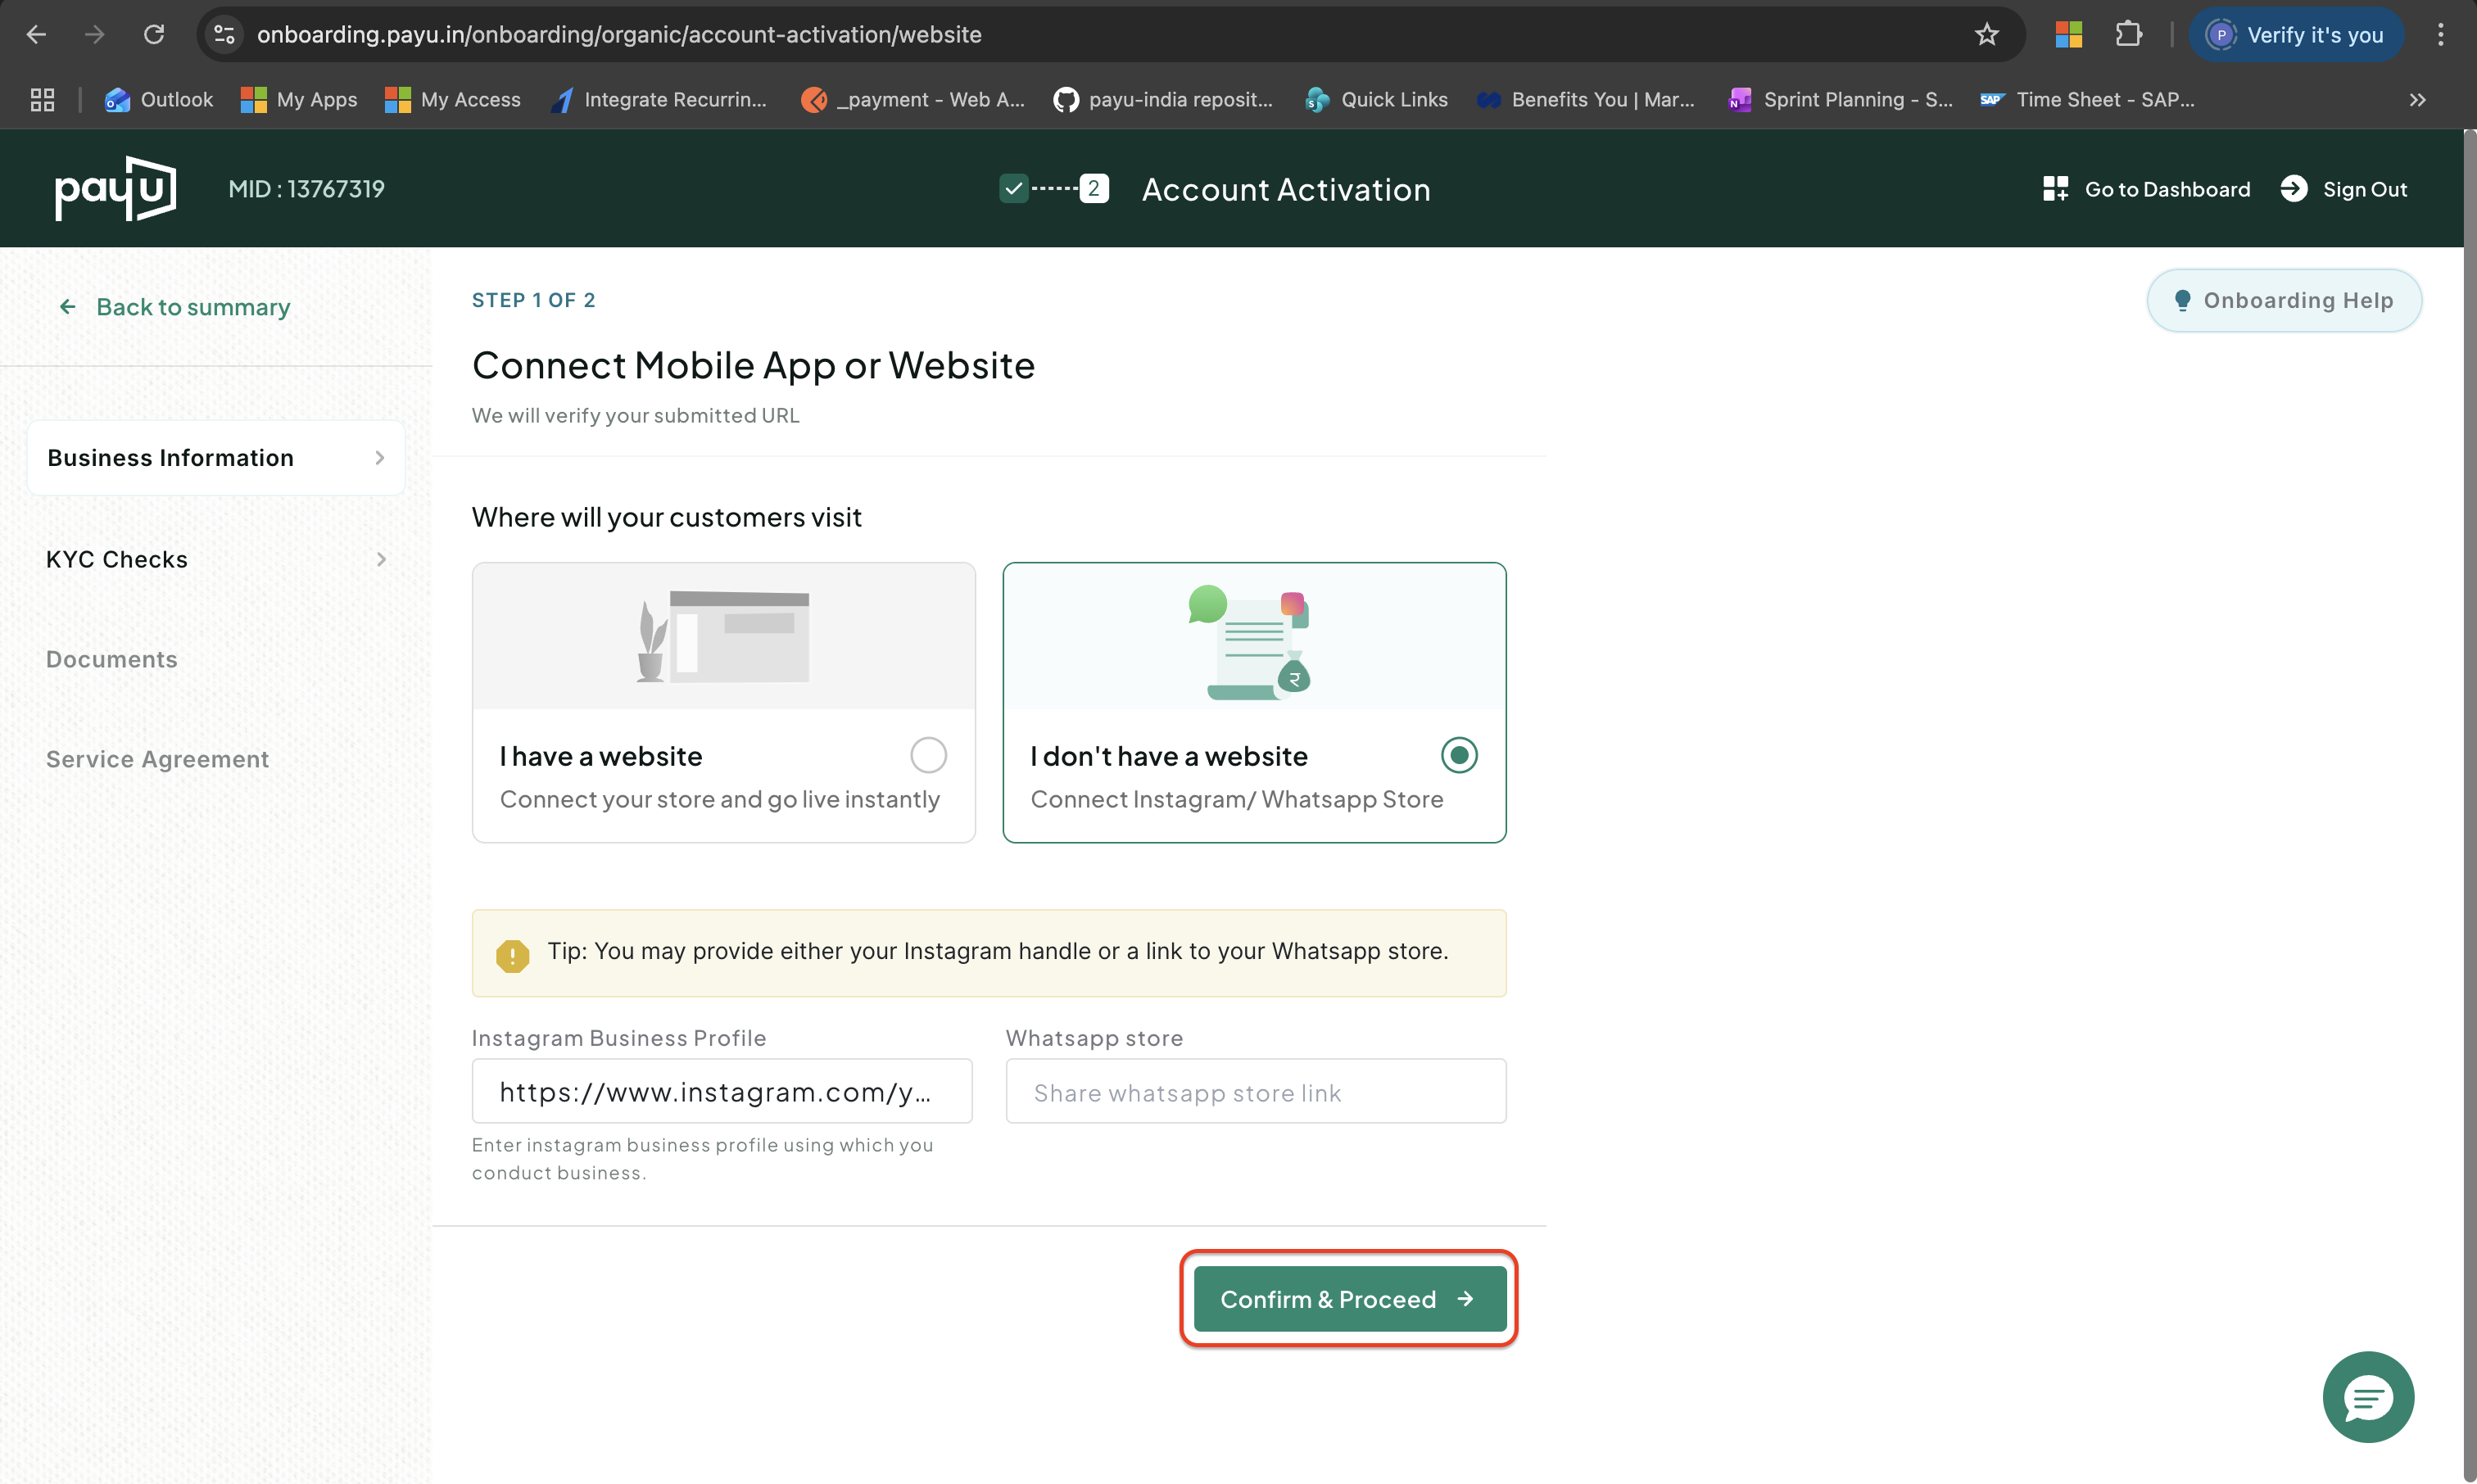
I don't have a website: Select this option if you do not have a website to collect payments and provide any of the following details:
- Instagram Business Profile
- Whatsapp store
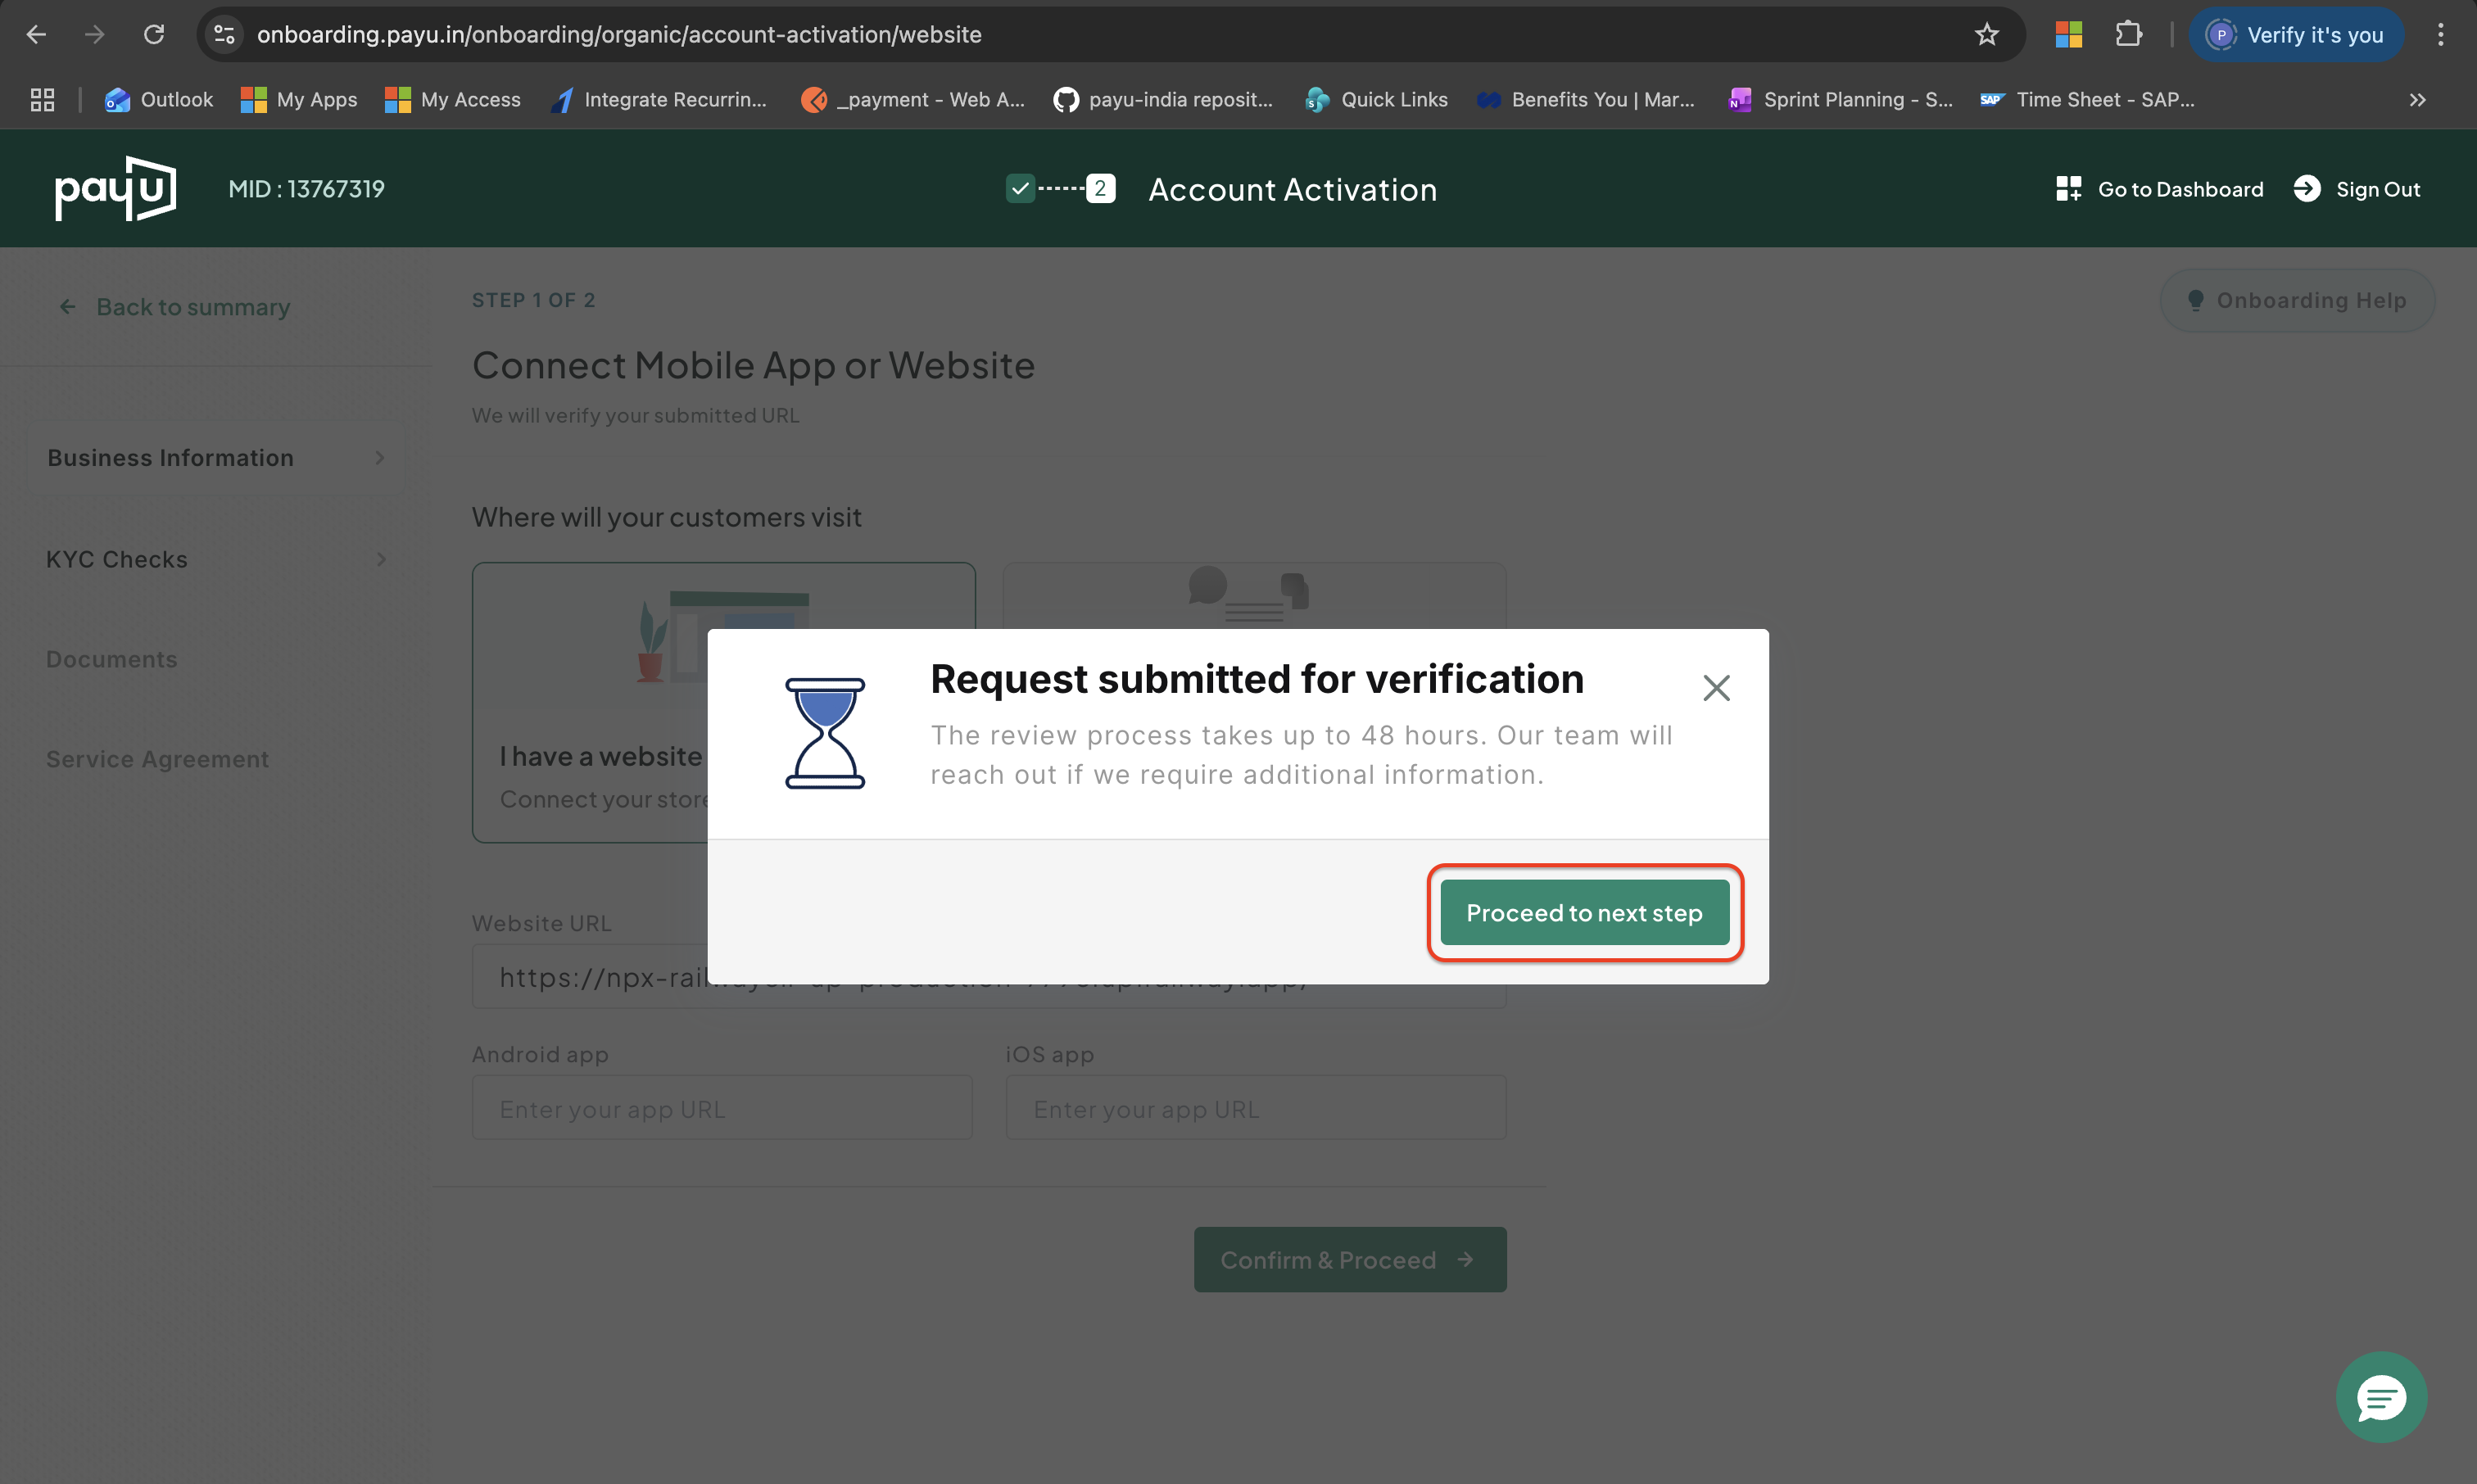
Request submitted for verification
Your provided website details goes through verification. You can continue to the next step by clicking the Proceed to next step button.
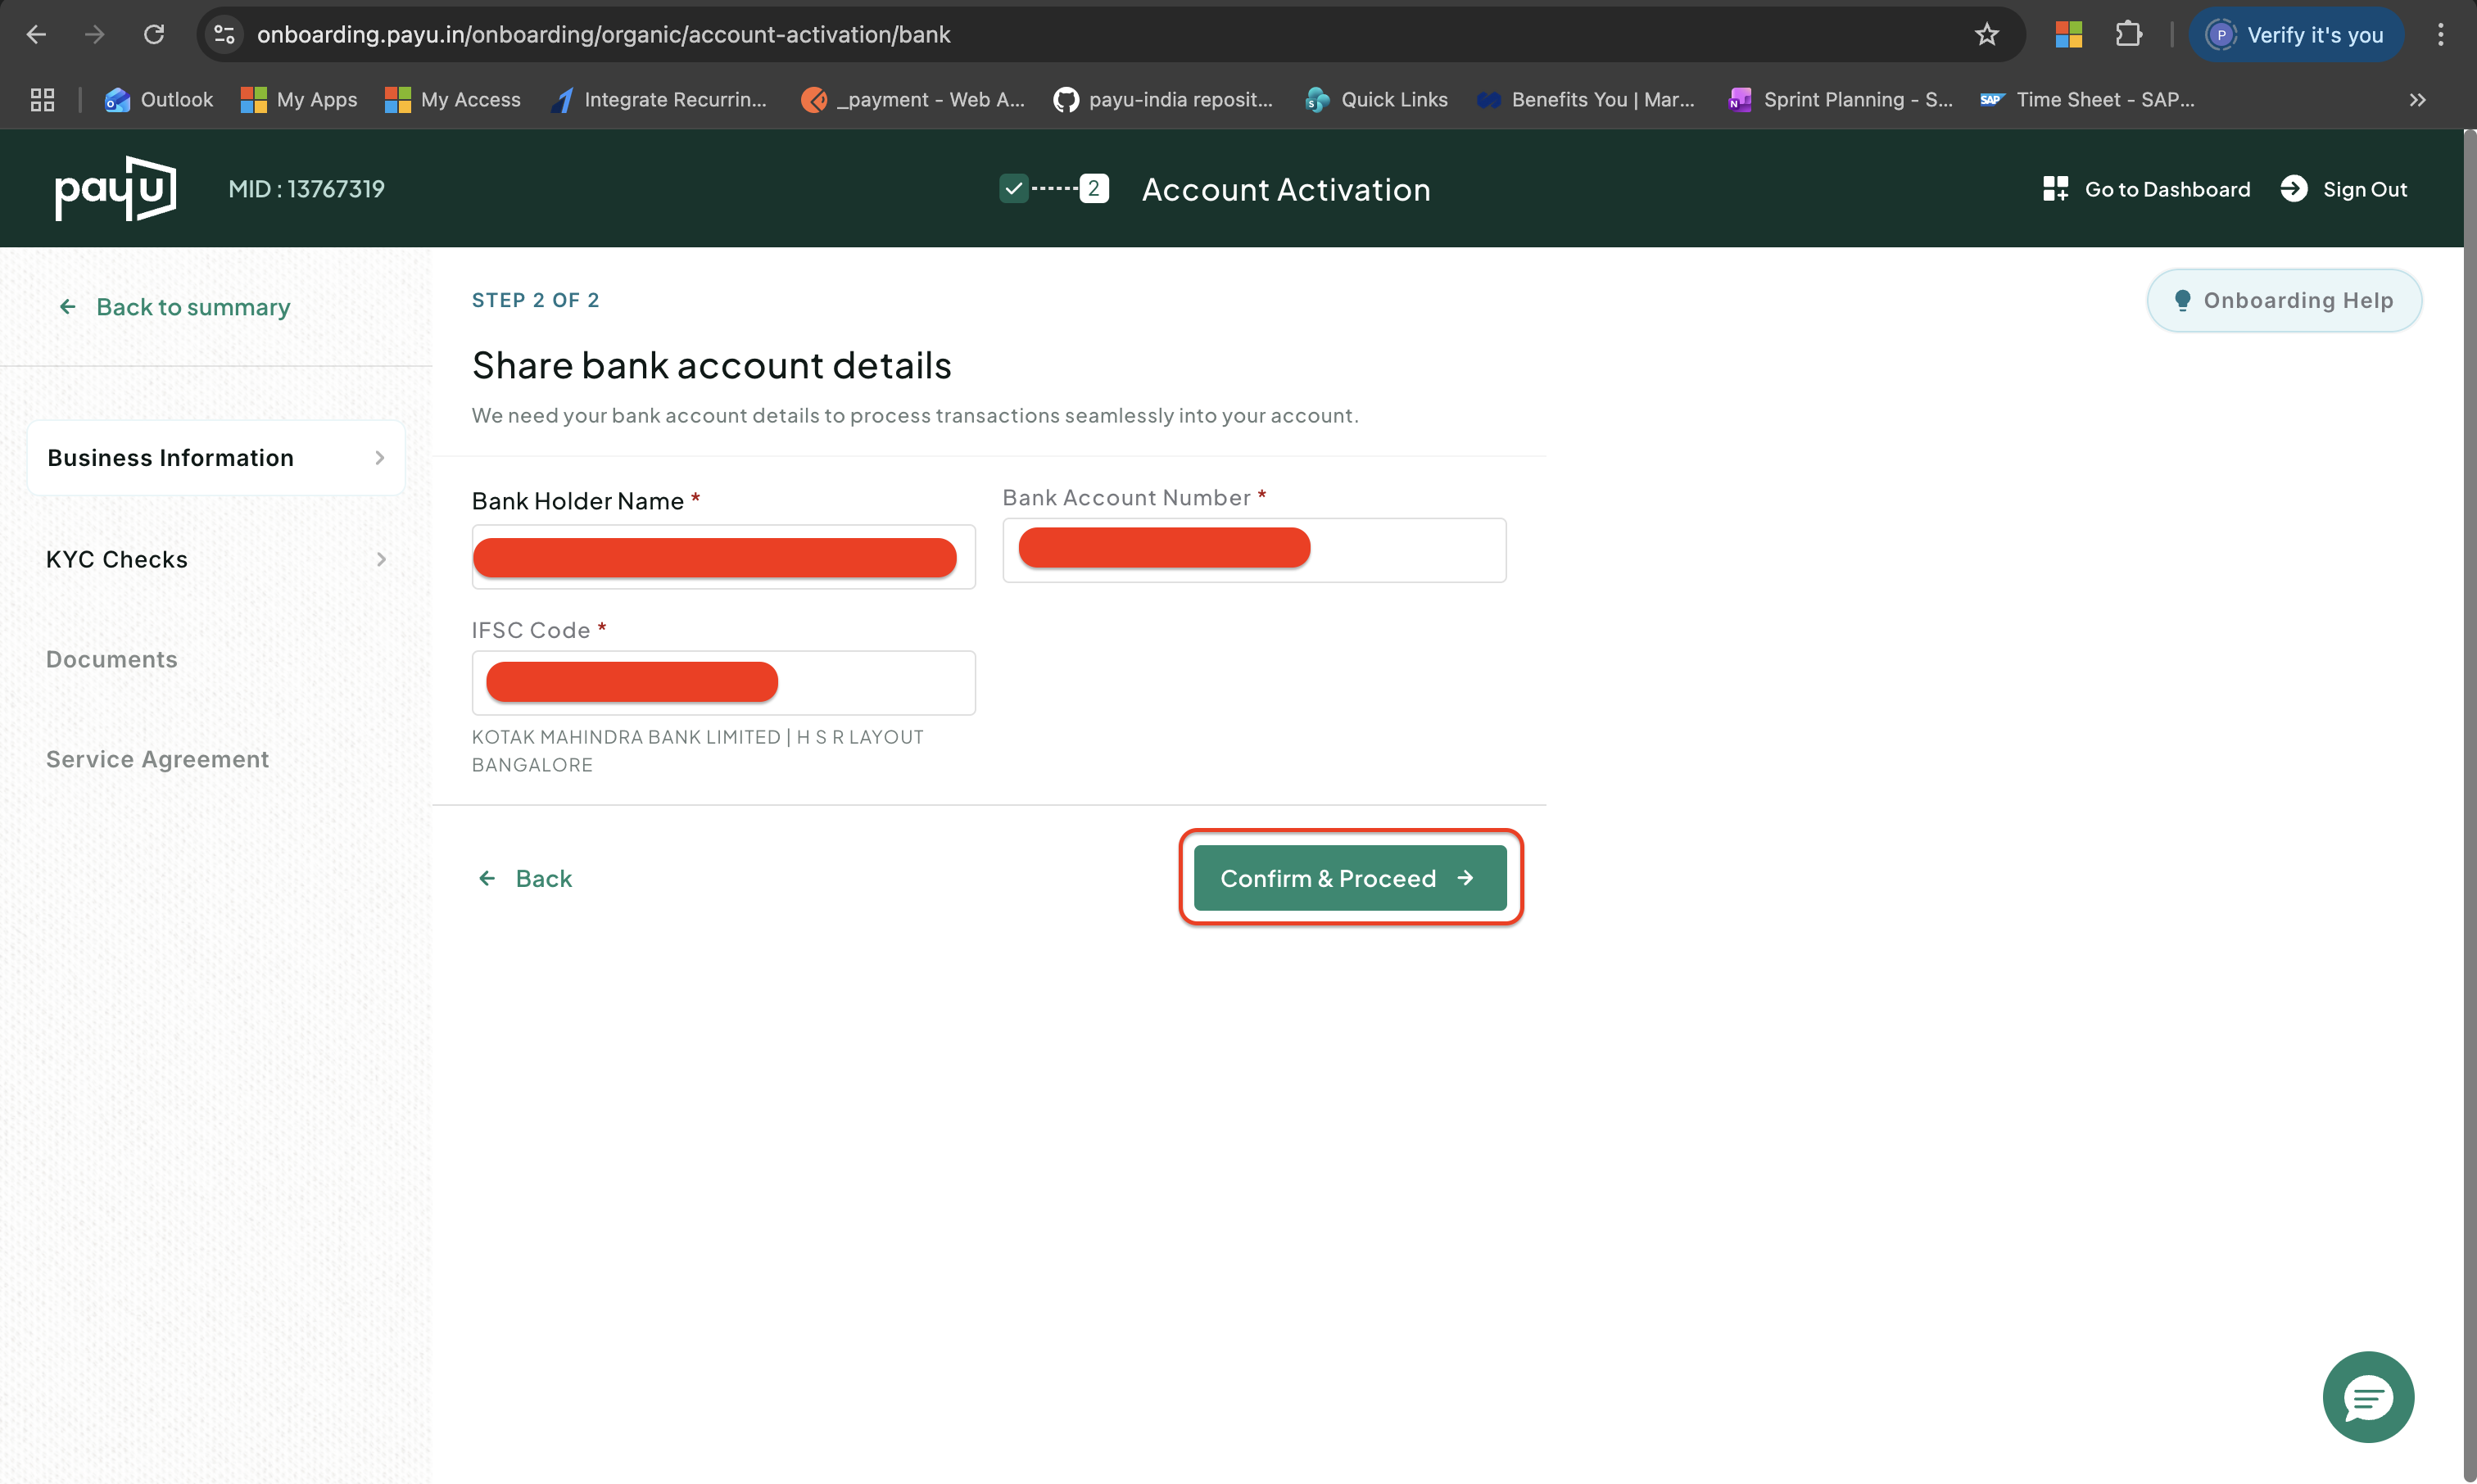
2. Share bank account details
provide these bank details to process funds to your account:
- Bank Holder Name: You can select the name from the drop-down list.
- Bank Account Number
- IFSC Code
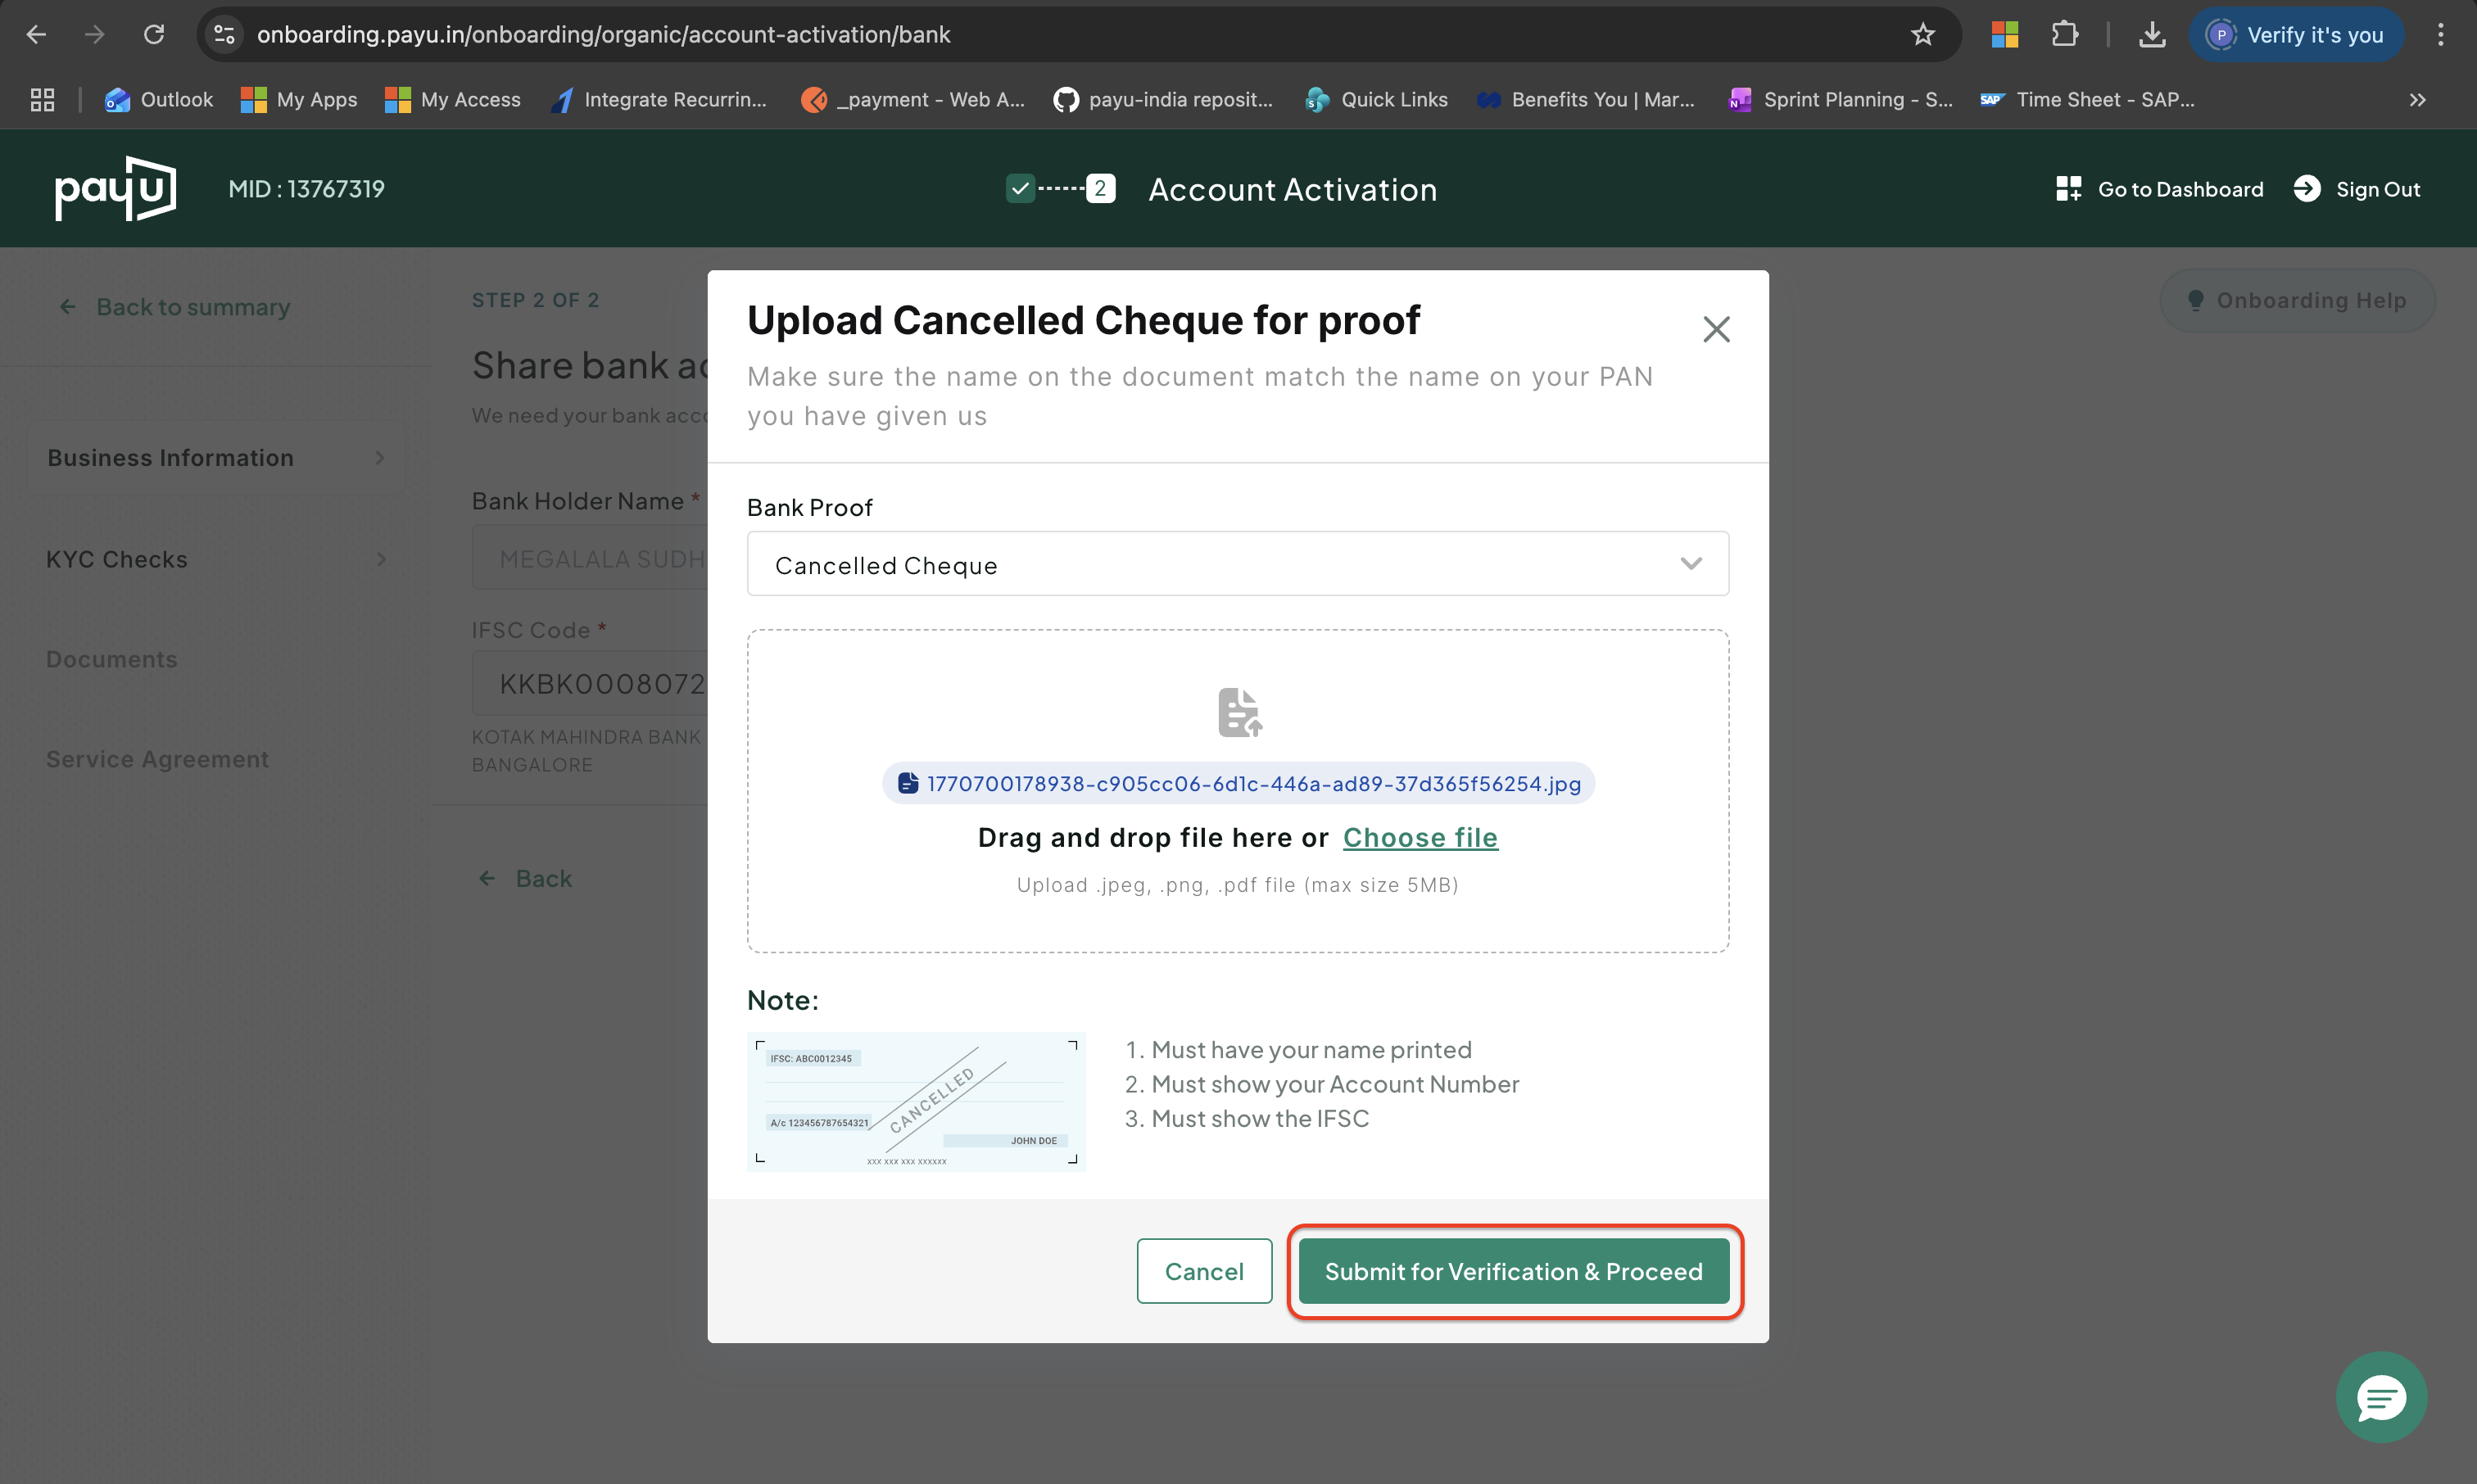
3. Upload the Bank Proof
You should verify your bank account to proceed. Upload any of the following and click Submit for Verification & Proceed.
- Cancelled Cheque
- Bank Statement
- Passbook
- Bank Verification Letter
KYC Checks
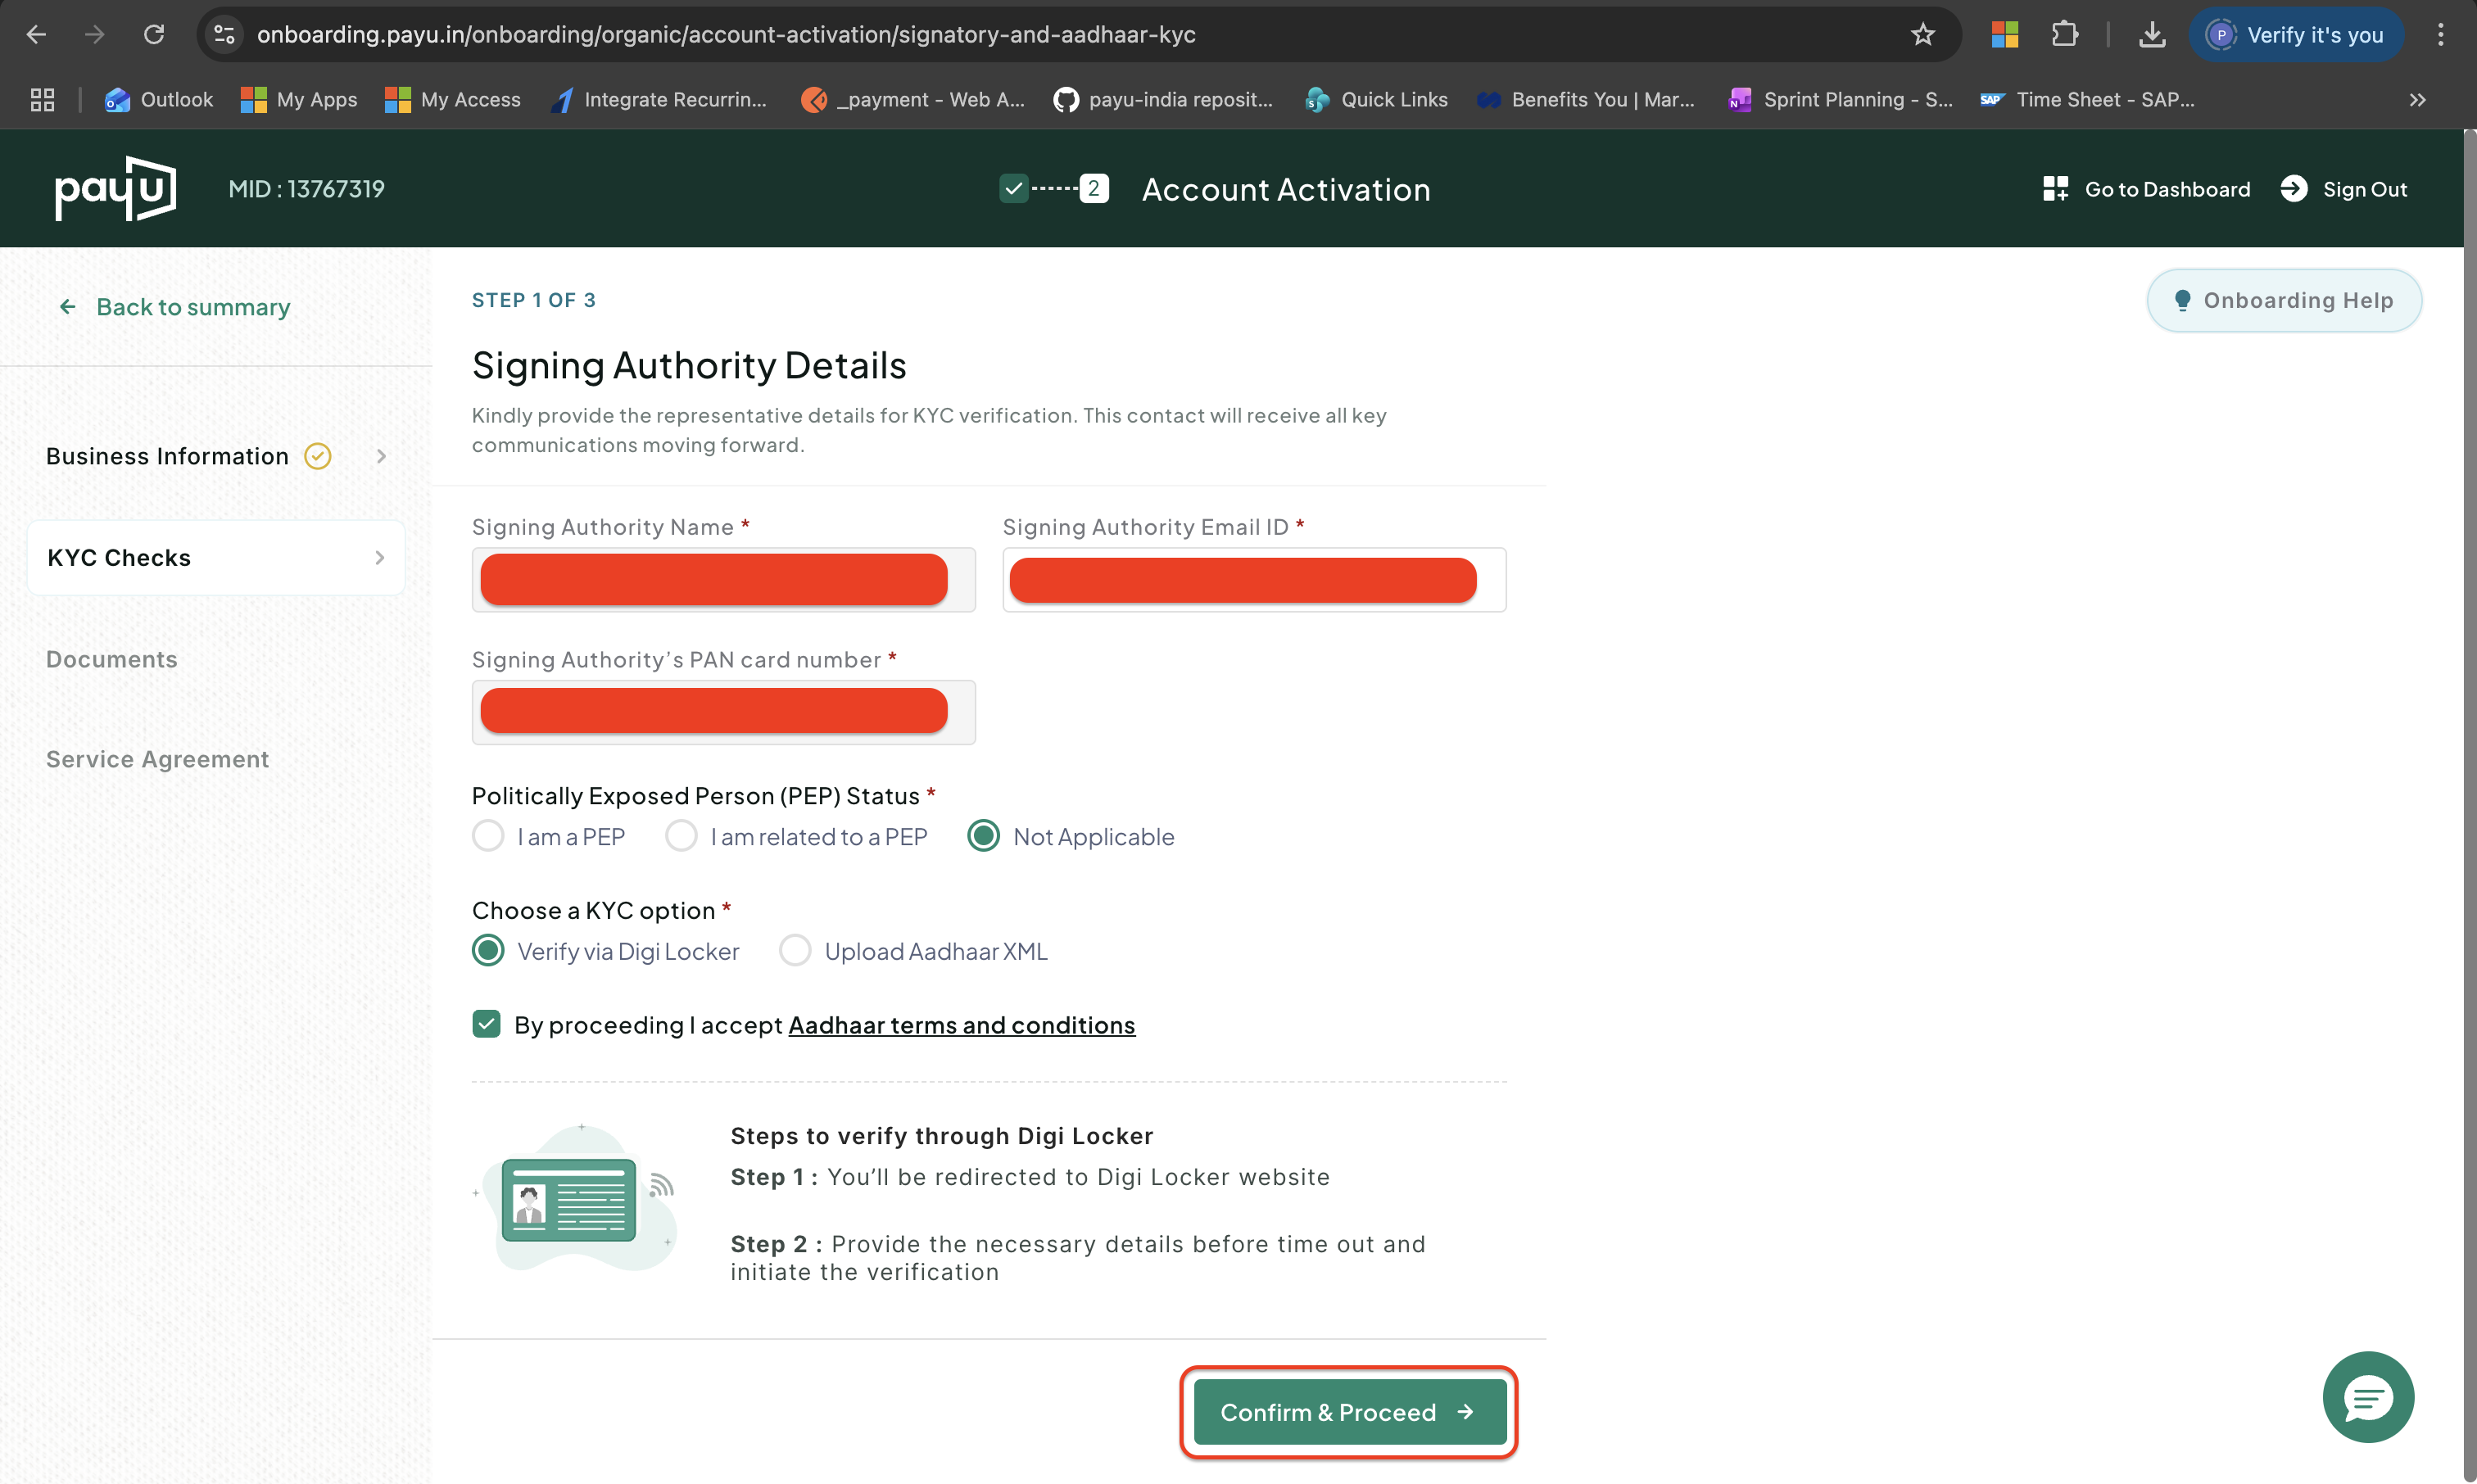
1. Signing Authority Details
Provide these details to which all the communications are sent in future. These details are essential for KYC verification. Enter the details and click Confirm & Proceed:
-
Signing Authority Name: Verify the name. You cannot edit this field.
-
Signing Authority Email ID: Enter the email address to receive the document and further communications.
-
Signing Authority’s PAN card number: Verify the PAN. You cannot edit this field.
-
Politically Exposed Person (PEP) Status: Select any of the following:
- I am a PEP: Select this if you are a politically exposed person.
- I am related to a PEP: Select this if you are a relative of any politically exposed person.
- Not Applicable
-
Choose a KYC option: Choose your way of KYC verification. These are the available options:
- Verify via Digi Locker
- Upload Aadhaar XML: Upload the XML and share the code for verification. Follow the steps mentioned on the page to download the Aadhaar XML.
-
By proceeding I accept Aadhaar terms and conditions: Select the checkbox to agree to the terms and conditions.
What's Next:
If you have chosen DigiLocker as a verification method, follow these steps to complete the verification:
- Enter your Adhaar number and verify it using OTP.
- Enter you DigiLocker PIN
- Select the associated Adhaar.
-
How you accept payments — Select one of the following:
-
On my website/app — enter your website URL, Android app URL, or iOS app URL.
-
I don't have a website/app — you can use Payment Links, Invoices, or Payment Buttons from the Dashboard.
-
Signing authority details — Verify the name, PAN, and email of your signing authority. Update the email if needed, then click Proceed to KYC.
-
KYC documents — Choose one of the following methods:
- Fetch from cKYC — enter your date of birth / incorporation date and authorise PayU to fetch documents automatically.
- Fetch from Aadhaar — accept Aadhaar terms and click Submit.
- Upload manually — verify your address details and upload PAN card, address proof, and any other requested documents.
-
Click Submit Documents.
Note:If you cannot complete KYC, contact your PayU Key Account Manager or visit PayU Support.
Documents checklist
Expand the section that matches your business entity type.
Individual
- PAN Card of the Signing Authority
- Address Proof of the Signing Authority
- Bank Account Proof
Sole Proprietorship
- Bank Account Proof
- Any two government proofs (GSTIN, MSME, IEC, FSSAI, ITR, Shop establishment, Trade licence, Tax document, Utility bill)
- Address Proof of the Signing Authority
- PAN Card of Signing Authority
Partnership
- Bank Account Proof
- PAN Card of Signing Authority
- Address Proof of Signing Authority
- Partnership Deed (complete, signed by all partners, on stamp paper, including profit-sharing ratios)
- Government Issued Certificate
- PAN Card of Partnership
- Authorization Letter / Board Resolution Letter
- Latest Shareholding Pattern
LLP
- PAN Card of Signing Authority
- Address Proof of Signing Authority
- Bank Account Proof
- Certificate of Incorporation
- LLP Deed (notarized or verified by registrar, including profit-sharing ratios)
- PAN Card of LLP
- Authorization Letter / Board Resolution Letter
- Latest Shareholding Pattern
Private Limited
- PAN Card of Signing Authority
- Address Proof of Signing Authority
- Bank Account Proof
- Certificate of Incorporation
- Memorandum of Association (complete, all pages)
- Articles of Association (complete, all pages)
- PAN Card of Company
- Authorization Letter (on company letterhead, signed/stamped by a director)
- Latest Shareholding Pattern
Public Limited
- PAN Card of Signing Authority
- Address Proof of Signing Authority
- Bank Account Proof
- Certificate of Incorporation
- Memorandum of Association (complete, all pages)
- Articles of Association (complete, all pages)
- PAN Card of Company
- Authorization Letter
- Latest Shareholding Pattern
Trust
- PAN Card of Signing Authority
- Address Proof of Signing Authority
- Bank Account Proof
- Government Issued Certificate
- Trust Deed (notarized or verified by registrar)
- List of trustees/beneficiaries/settlor/members (on letterhead, signed and stamped)
- PAN Card of Trust
- Authorization Letter
- List of Trustees with Shareholding Pattern
Society
- PAN Card of Signing Authority
- Address Proof of Signing Authority
- Bank Account Proof
- Government Issued Certificate
- Bye-Laws / Memorandum of Association (complete, all pages)
- PAN Card of Society
- Authorization Letter
- List of members certified by Registrar of Society with shareholding
Government
- PAN Card of Signing Authority
- Address Proof of Signing Authority
- Bank Account Proof
- Authorization Letter
- Registration Certificate / UGC Care certificate / GST
One Person Company
- PAN Card of Signing Authority
- Address Proof of Signing Authority
- Bank Account Proof
- Certificate of Incorporation
- Memorandum of Association (complete, all pages)
- Articles of Association (complete, all pages)
- PAN Card of Company
Hindu Undivided Family (HUF)
- PAN Card of Signing Authority
- Address Proof of Signing Authority
- Authorization Letter (signed and stamped by Karta)
- Bank Account Proof
- HUF Deed (if applicable); Power of attorney or suitable authorisation
Additional documents — industry-specific
Educational institutions (Schools, Colleges, Universities)
- Affiliation Certificate — must be active, valid, and name must match your KYC details
E-Commerce (Food, Groceries, Restaurants, Nutritional Supplements)
- FSSAI Certificate — must be active and valid
Donations / Crowdfunding (NGOs)
- Forms 80G, 12A, and 10AC issued by the Income Tax Department
Healthcare (Nutrition and Supplements)
- FSSAI Certificate
Additional compliance documents — regulated industries
| Industry | Required document |
|---|---|
| Stock Advisory / Trading | SEBI Approval |
| Prescribed Medicine | Form 20/21B |
| Ayurvedic products | Ayush Certificate |
| Jewellery (Gold/Silver) | BIS |
| Diamond | GIA |
| Insurance | IRDA |
| Real Estate | RERA |
| Bill Payment | BBPS |
| Forex | RBI Approval |
| Mutual Funds Broker | SEBI Approval |
| Banking / NBFC | RBI Approval |
| Drop Shipping | Supplier Agreement |
| Payment Facilitator | RBI Approval |
| Internet Service Provider | ISP |
| Cable TV Operator | DAS Licence |
| Bulk Messages | DLT Certificate |
Step 3: Get your credentials
Your Merchant Key and Salt are the credentials used by every PayU integration to authenticate requests and generate hashes. You need them before you can write any integration code.
What are Merchant Key and Salt?
- Key: A unique identifier for your merchant account. It is included in every payment request you send to PayU.
- Salt (32-bit / v1): Used to generate the SHA-512 hash that authenticates your requests. Use Salt v1 for standard integrations.
- Salt (256-bit / v2): A stronger variant of the Salt for integrations that require it.
Test vs Production Secrets
| Term | Description |
|---|---|
| Where to get them | PayU Dashboard (Test Mode) → Developer → API Keys |
| Available | Immediately after account creation — no KYC required |
| What they do | Authenticate requests in the test environment only. No real transaction. |
| Use when | Building your integration, running test transactions, validating your hash generation |
| Key prefix | Starts with a test-environment merchant key (different from your live key) |
| Transactions | Use test cards and UPI IDs. Real payment methods will not work. |
Note:Always build and test with Test secrets first. Your test key and live key are different values — double-check which you have loaded before going live.
| Term | Description |
|---|---|
| Where to get them | PayU Merchant Dashboard (Live Mode) → Developer → API Keys |
| Available | After PayU verifies your website. This can take up to 2 business days after registration. |
| What they do | Authenticate live payment requests with real transaction. |
| Use when | Your integration is tested and you are ready to accept real customer payments |
| Key prefix | Starts with your live-environment merchant key (different from your test key) |
| Transactions | Real customer payment methods (cards, UPI, net banking, wallets) |
Production Secrets are SensitiveNever expose them in frontend code, client-side JavaScript, or a public repository. Store them in environment variables on your server. If you share access with a developer or agency, ask your Key Account Manager about the correct way to do this securely.
How to Get Your Keys
Test credentials are available immediately after you create your account. You do not need to complete KYC.
To get test keys:
-
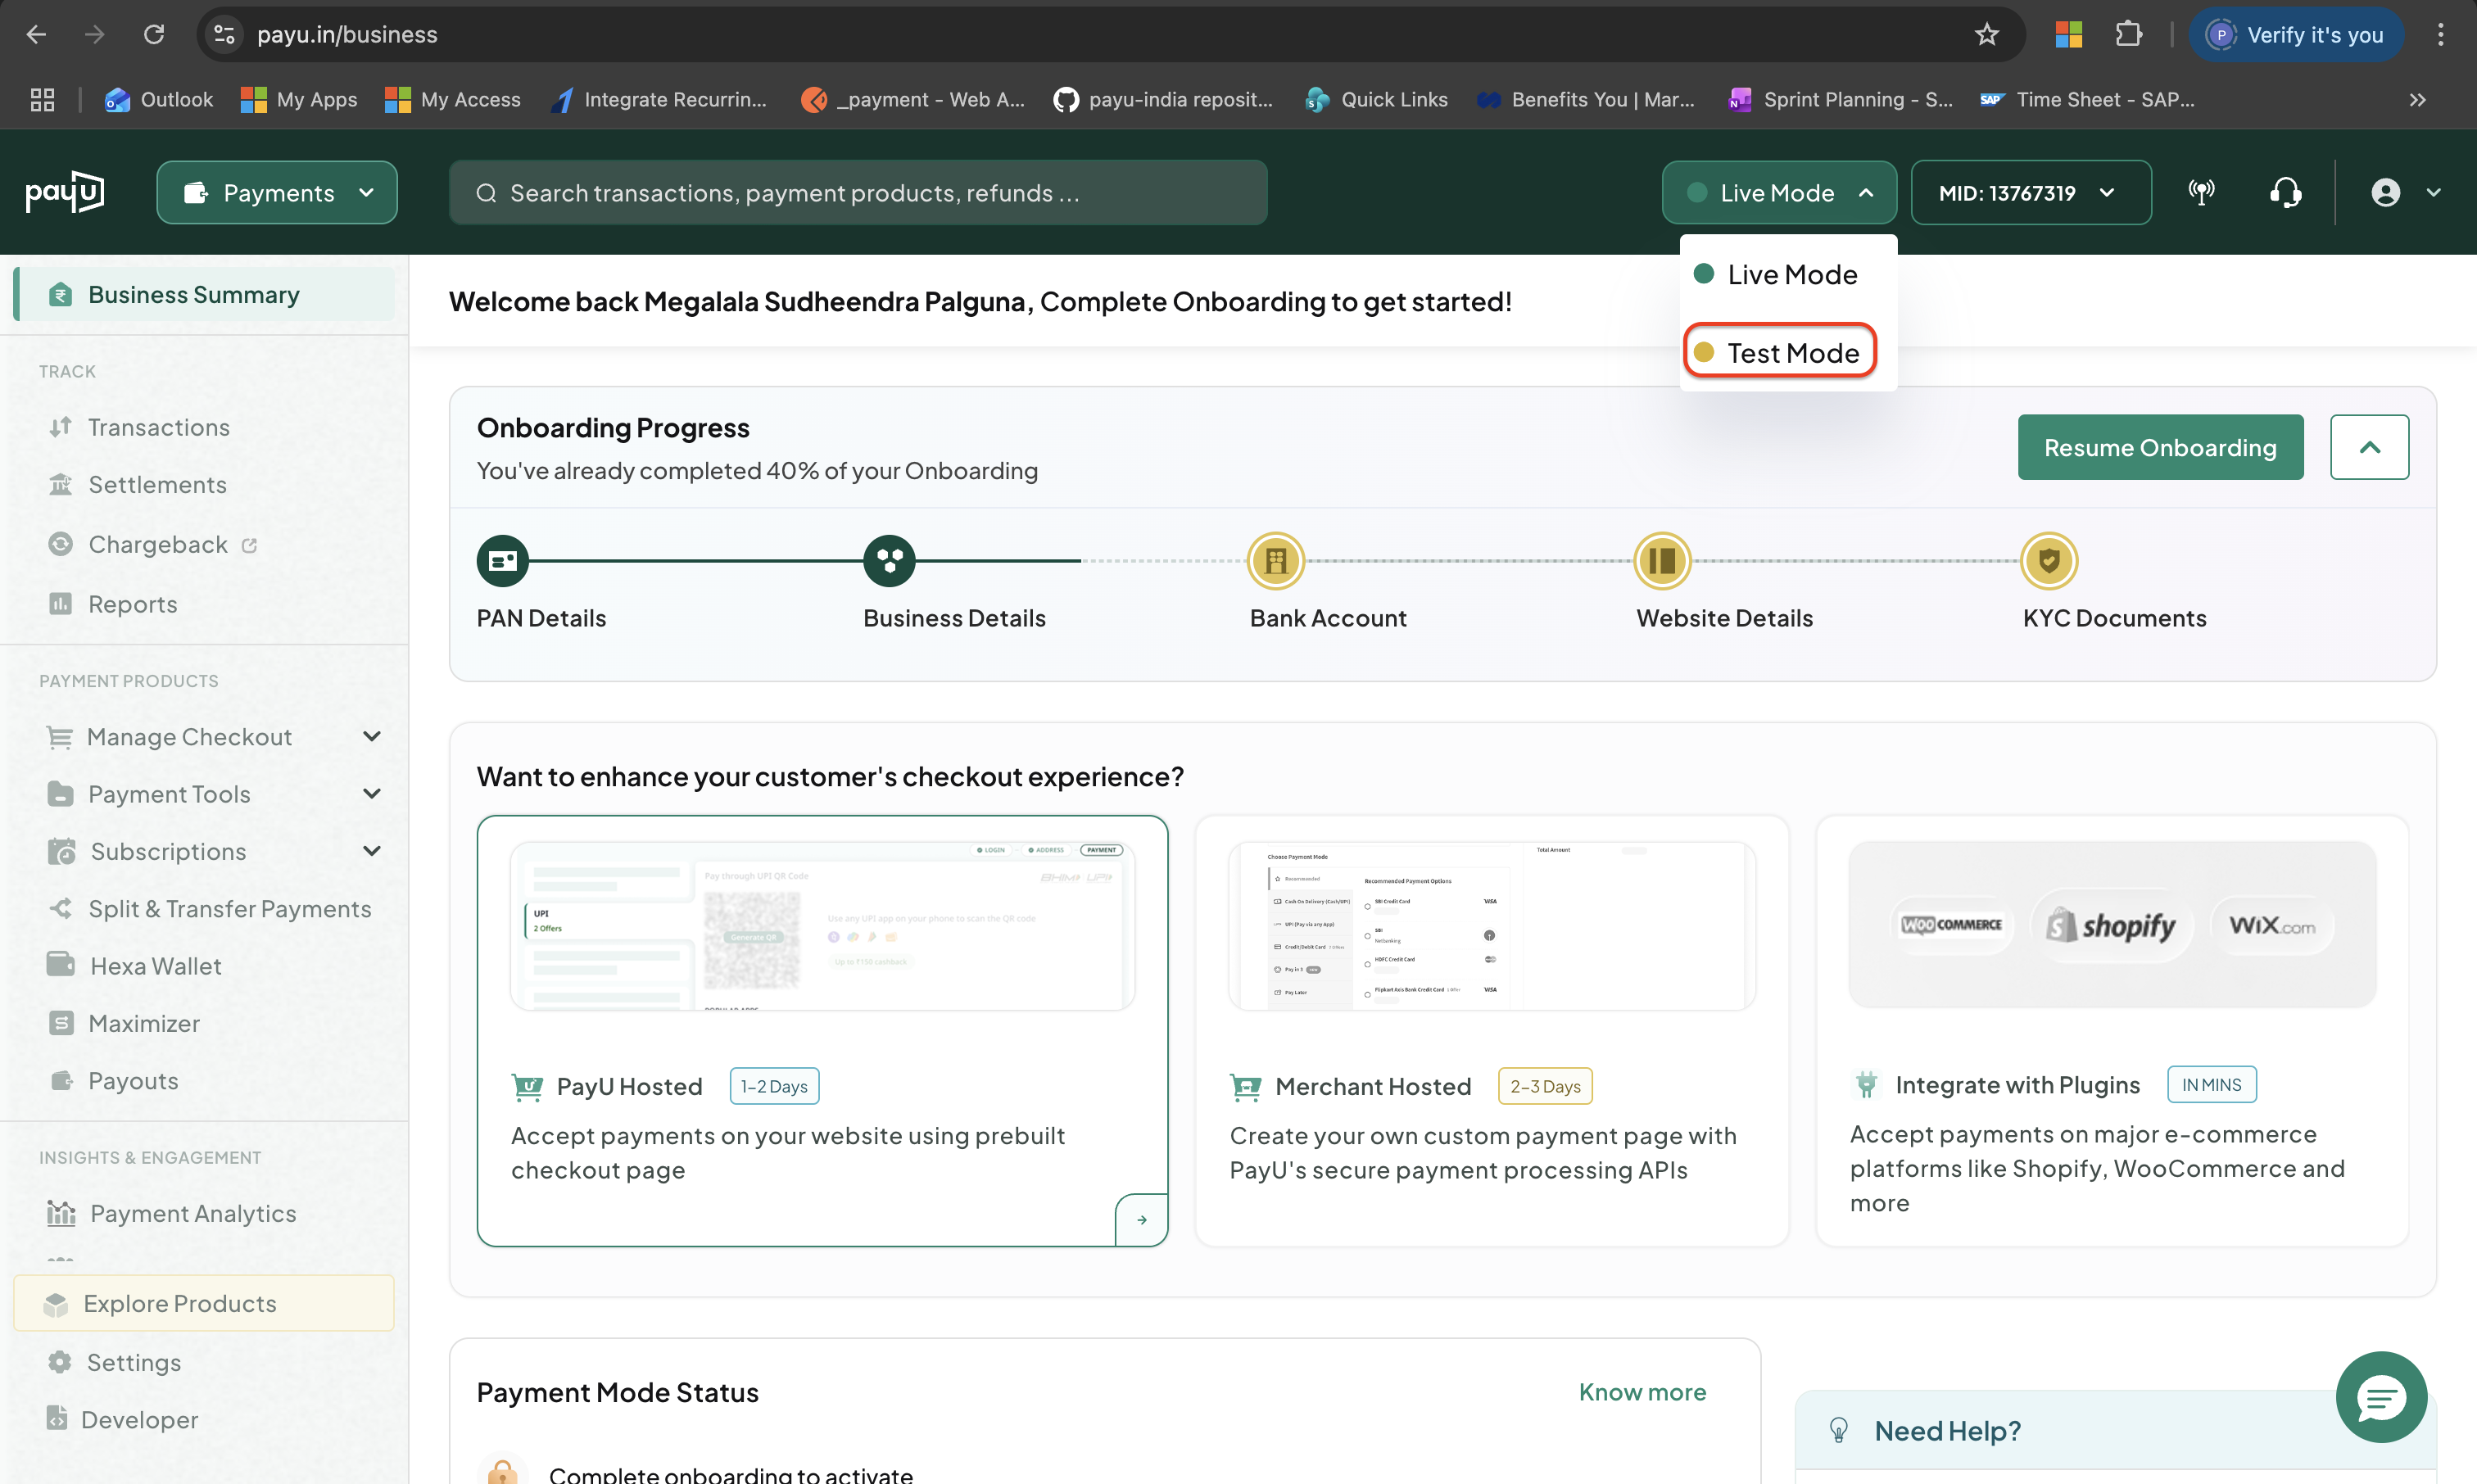
Log in to the PayU dashboard and select Test Mode from the drop-down menu in the top navigation bar.
-
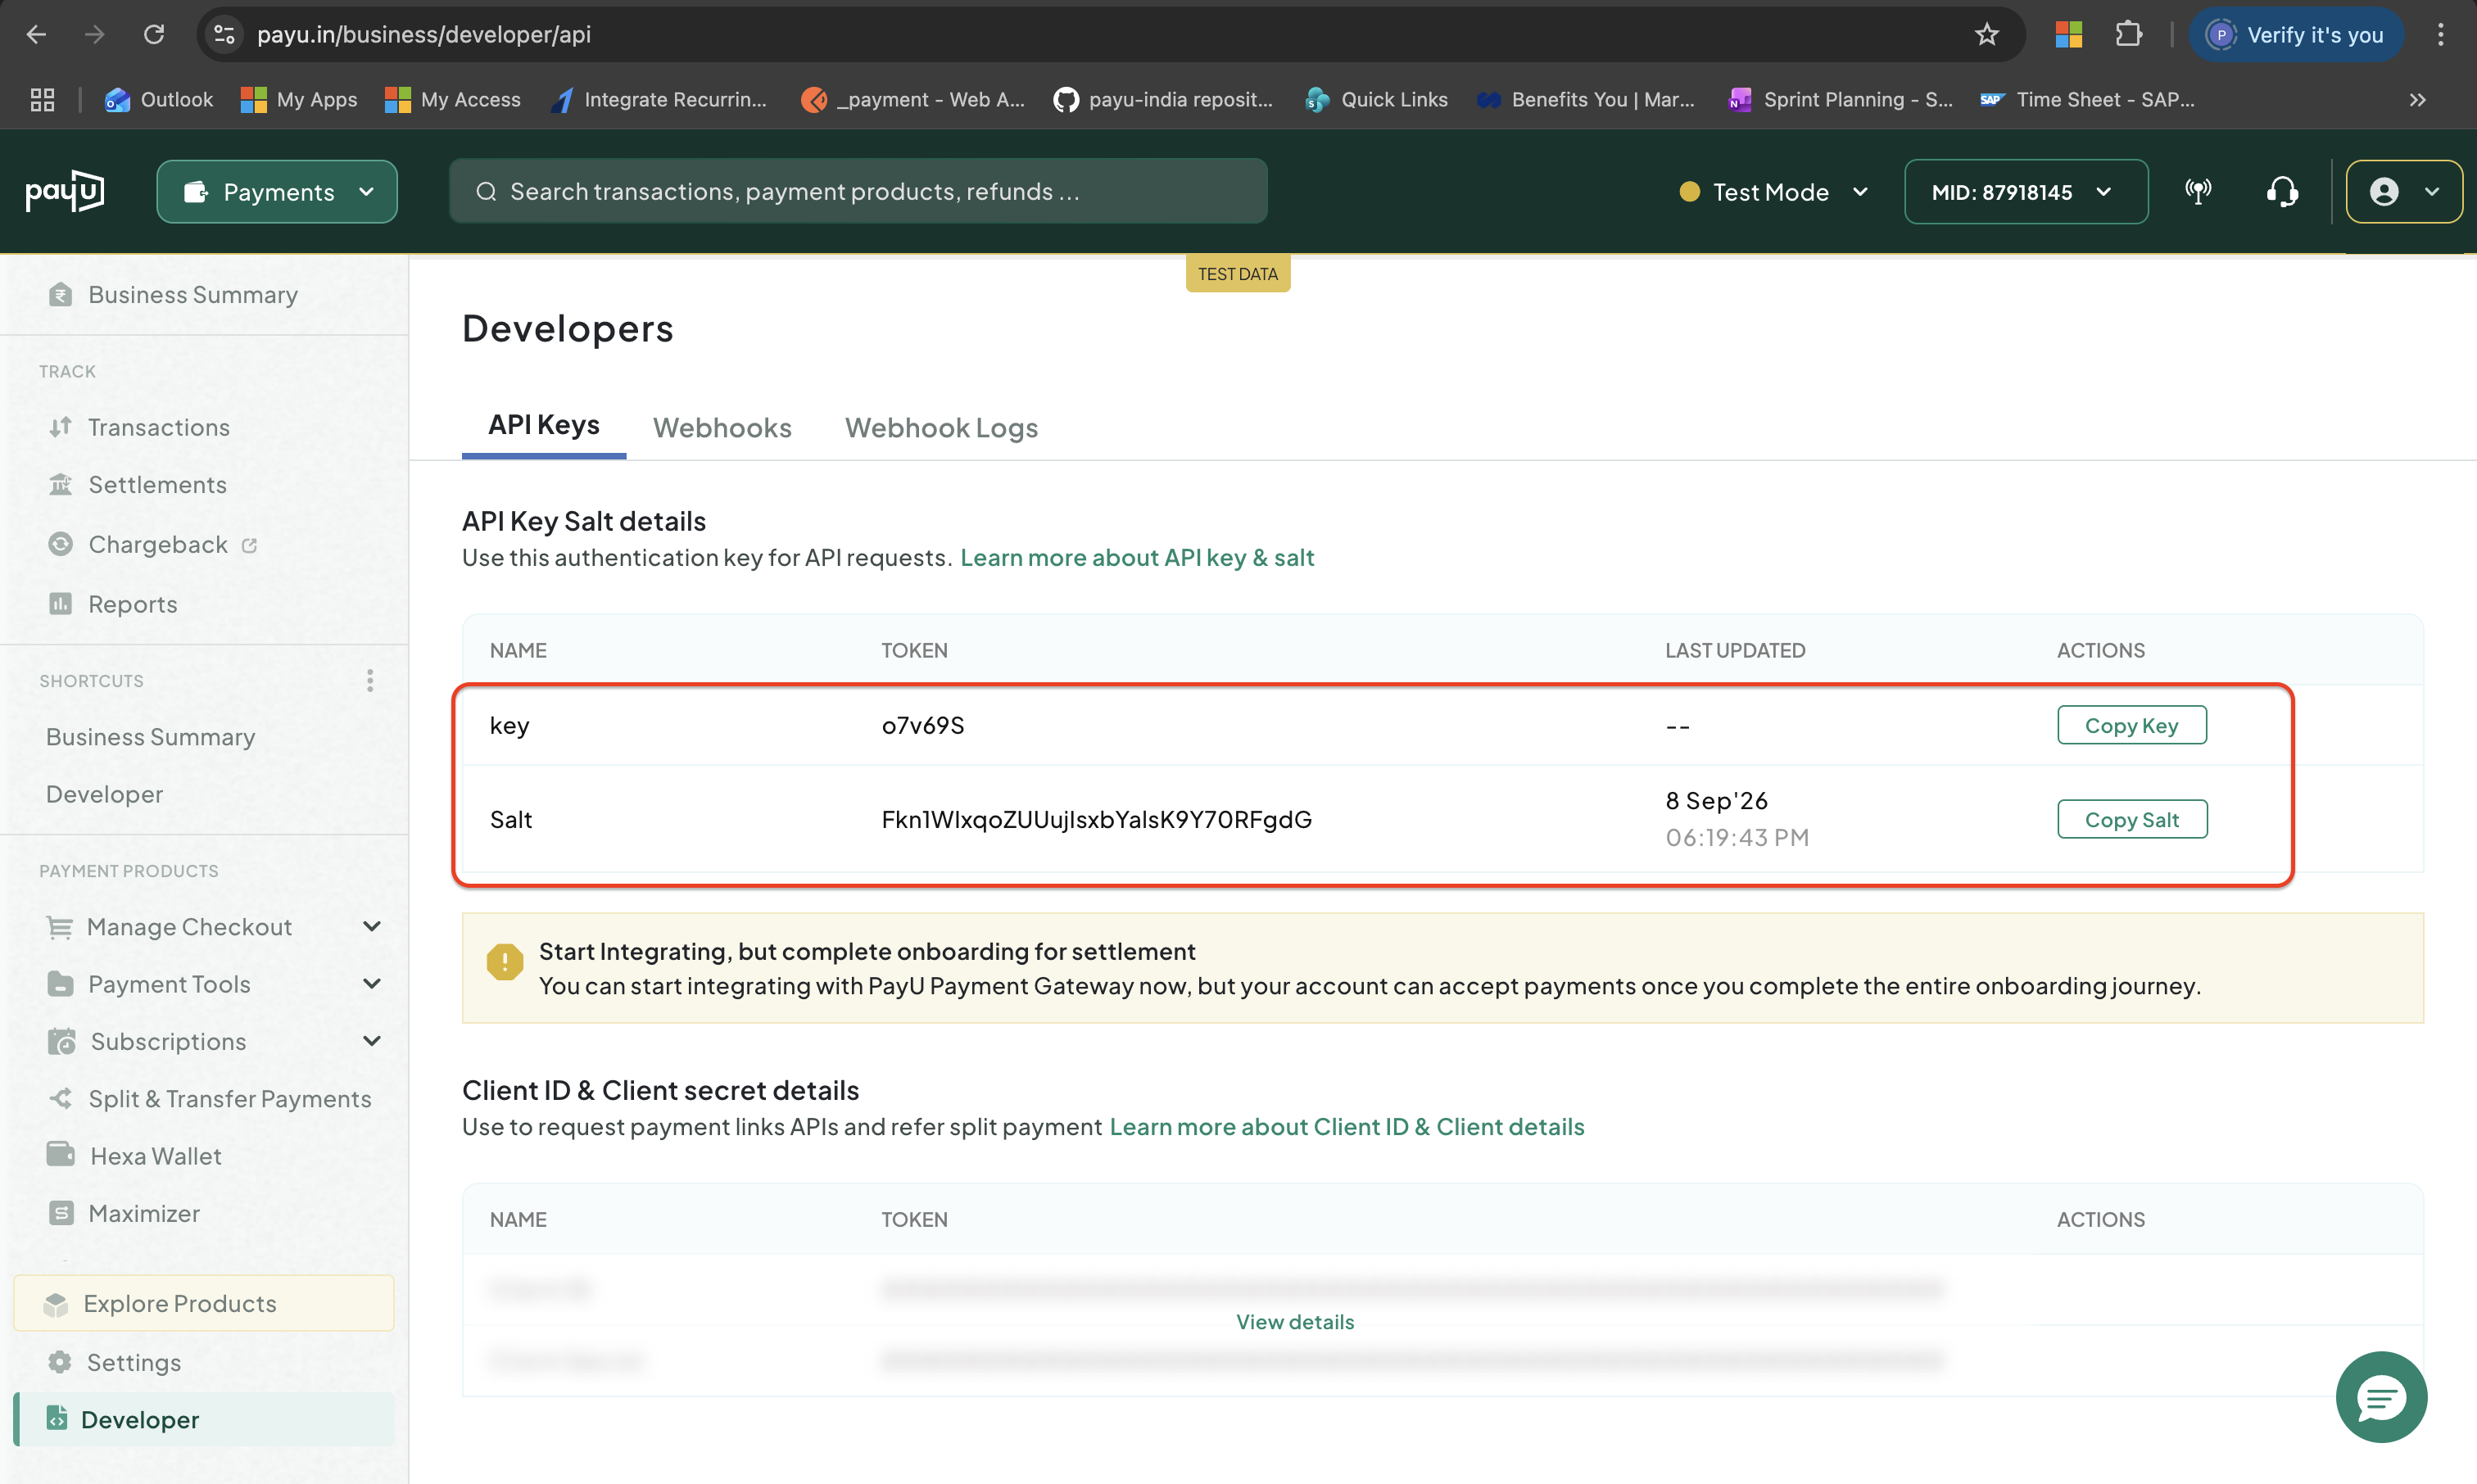
Click Developer from the left menu, the API Keys tab is displayed.
-
Click View Details displayed under API Key Salt details.
Your test Key and Salt are generated and displayed here on first access.
Note:Test credentials only work in the test environment. They cannot be used for live payments.
Production credentials are available once you complete your KYC and PayU has verified your website. This may take up to 2 business days after registration.
Note:You can make your first transaction only after your settlement is active.
To get production keys:
-
Log in to the PayU dashboard. By default you will be in the Live Mode. If not change to Live Mode from the top navigation bar.
-
Click Developer from the left menu, the API Keys tab is displayed.
-
Click View Details displayed under API Key Salt details.
Your test Key and Salt are generated and displayed here on first access.
Do Not Share!
- Do not share production secrets publicly or in frontend code.
- Store them securely on your server — use environment variables, not hardcoded values.
- If you share access with a developer or agency, ask your Key Account Manager about the correct way to do this securely.
Regenerate Your Salt
You can re-generate the Salt If it is compromised or you need to rotate it.
To re-generate the salt:
-
Log in to the PayU dashboard and switch to the relevant environment (Live or Test) using the drop-down menu in the top navigation bar.
-
Click Developer from the left menu, the API Keys tab is displayed.
-
Click Regenerate Salt.
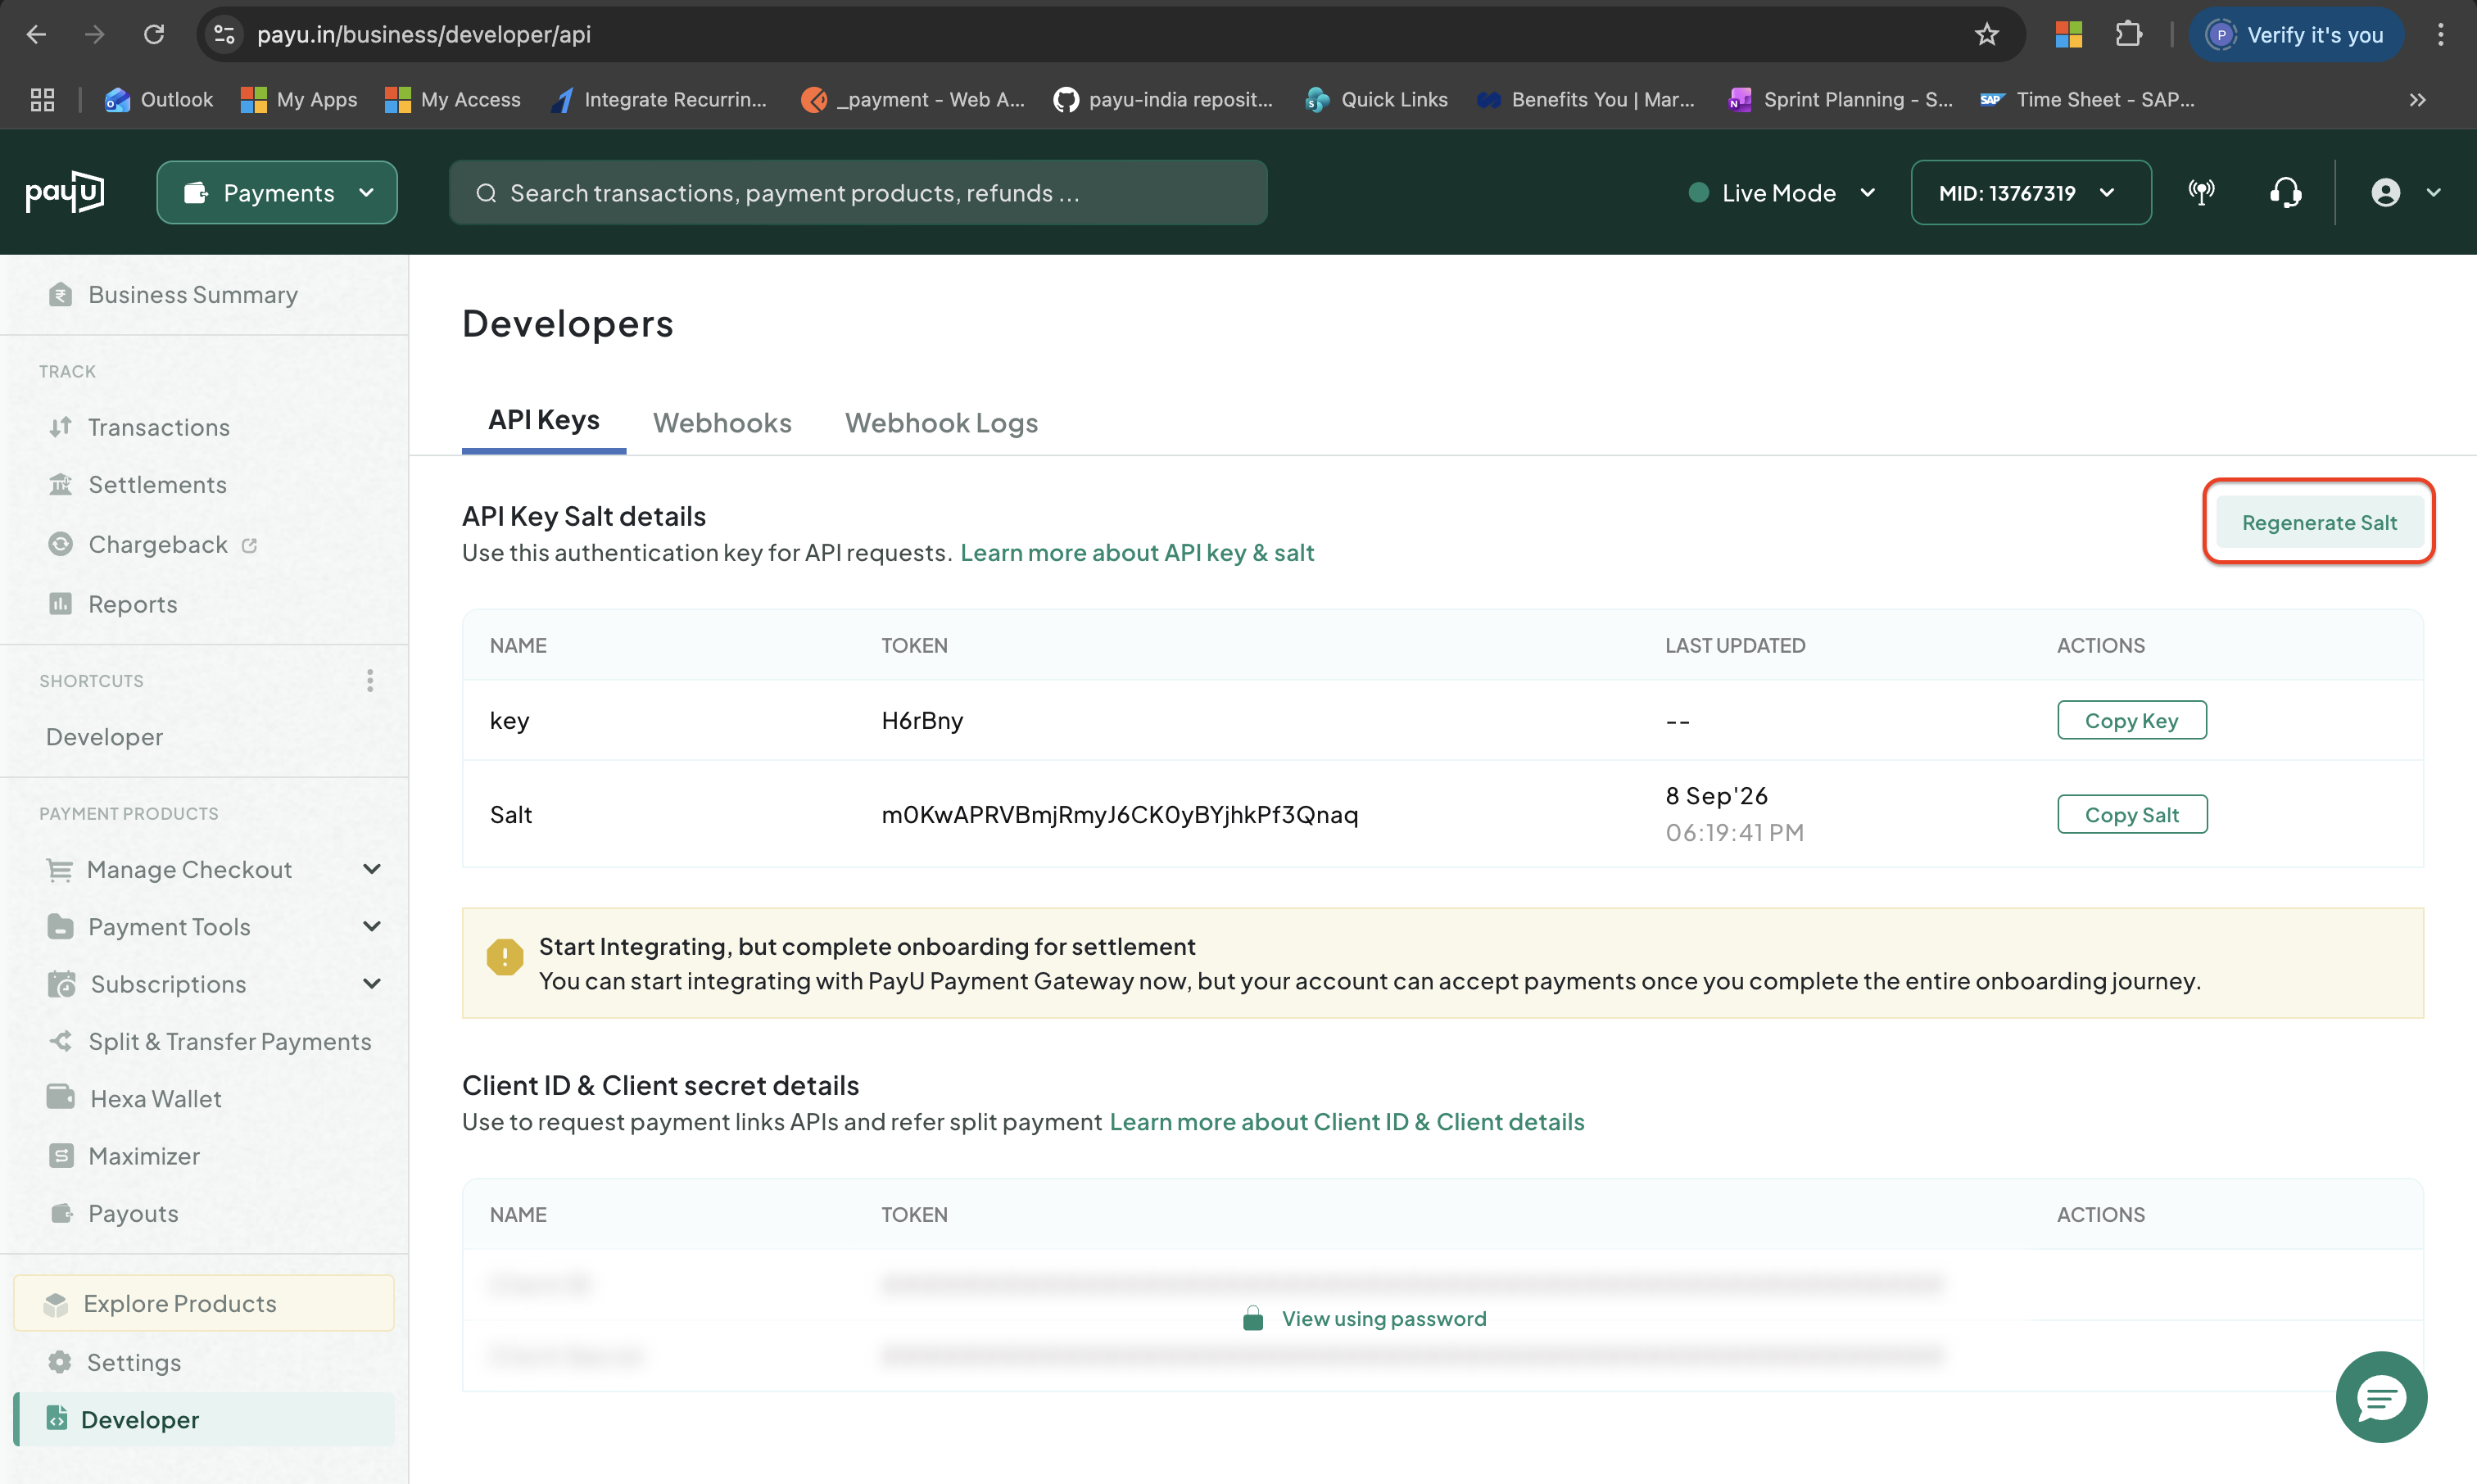
The confirmation menu appears.
-
Click Regenerate to regenerate the Salt.
Important:
- A regenerated Salt expires in 15 days if not activated.
- After activation, the new Salt replaces Salt v1.
- Update your application immediately after activating a new Salt to avoid payment failures.
What's next
You now have everything you need to start integrating.
- Haven't chosen an integration yet? Go back to Start Here and run the wizard.
- Ready to integrate? Open your product's integration guide and use your Test Key and Salt to build and test your first payment.
- Ready to go live? See the Pre-Launch Checklist to make sure your integration is production-ready.
Updated about 1 month ago
