
FAQs
This section provides answers for frequently asked questions about integrating PayU with Shopify, including hosted checkout, onsite card payments, offers, CommercePro, and cross-border payments.
General
1. What PayU capabilities are available on Shopify?
PayU supports hosted checkout (Cards, UPI, Net Banking via Cards, UPI, NB by PayU India), onsite card payments (Onsite Card Payments by PayU India), offers and affordability widgets, transaction reconciliation, SKU-based offers, CommercePro Checkout (OTP login and checkout), CommercePro COD with RTO intelligence, and cross-border payments for merchants outside India. For an overview, refer to Shopify.
2. Can I use multiple PayU apps on the same Shopify store?
Yes, depending on your use case. For example, you can use hosted checkout for UPI and Net Banking alongside onsite card payments for a seamless card experience. Some features have specific app requirements—for example, offers work with hosted checkout, not the onsite card app. Review prerequisites on each guide before installing multiple apps.
3. Where do I get my merchant key and salt for Shopify?
Generate production key and salt from PayU Dashboard. For testing, use test credentials. Refer to Access Production Key and Salt and Access Test Merchant Key and Salt.
4. How do I test my Shopify integration before going live?
Enable Test mode in the PayU app settings on Shopify and enter your test merchant key and salt. Complete a test transaction and verify it using the Verify Payment API. Refer to Integrate with Shopify.
5. Who do I contact for Shopify enablement or configuration issues?
Contact your PayU Key Account Manager (KAM) for enablement, offers widget embedding, SKU-based offer webhook setup, CommercePro COD enablement, and cross-border onboarding. For technical support, use PayU Support.
6. On Shopify, why are only card payment options showing while UPI, Net Banking, or wallets are missing?
Check the following:
- Confirm that UPI, Net Banking, and wallets are enabled for your merchant account.
- Review the payment methods selected in Shopify Admin > Settings > Payments > PayU.
- Check whether the integration request restricts the checkout to cards.
- Save the configuration and test again in a new browser session.
New merchant accounts can initially have a limited set of payment modes. Contact your PayU Key Account Manager (KAM) if a required mode is not enabled.
For more information, refer to Integrate with Shopify.
Integrate with Shopify
1. What are the two ways to integrate PayU on Shopify?
You can install the PayU plugin from Settings > Payments in Shopify admin, or install the app from the Shopify App Store at https://apps.shopify.com/payu-india. Both methods connect your store to PayU using your merchant key and salt. Refer to Integrate with Shopify.
2. Should I remove an existing PayU plugin before reinstalling?
Yes. If you previously installed a PayU plugin, remove it before installing again to avoid configuration conflicts. Refer to the prerequisites in Integrate with Shopify.
3. Which payment modes can I enable or disable in the PayU Shopify app?
During configuration, you can select or clear check boxes for the payment modes and card types you want to support. Uncheck modes you do not wish to offer to customers.
4. How do configure webhooks on Shopify?
-
Log in to your Shopify Admin Panel
-
Navigate to Settings > Notifications
-
Scroll down to the Webhooks section.
-
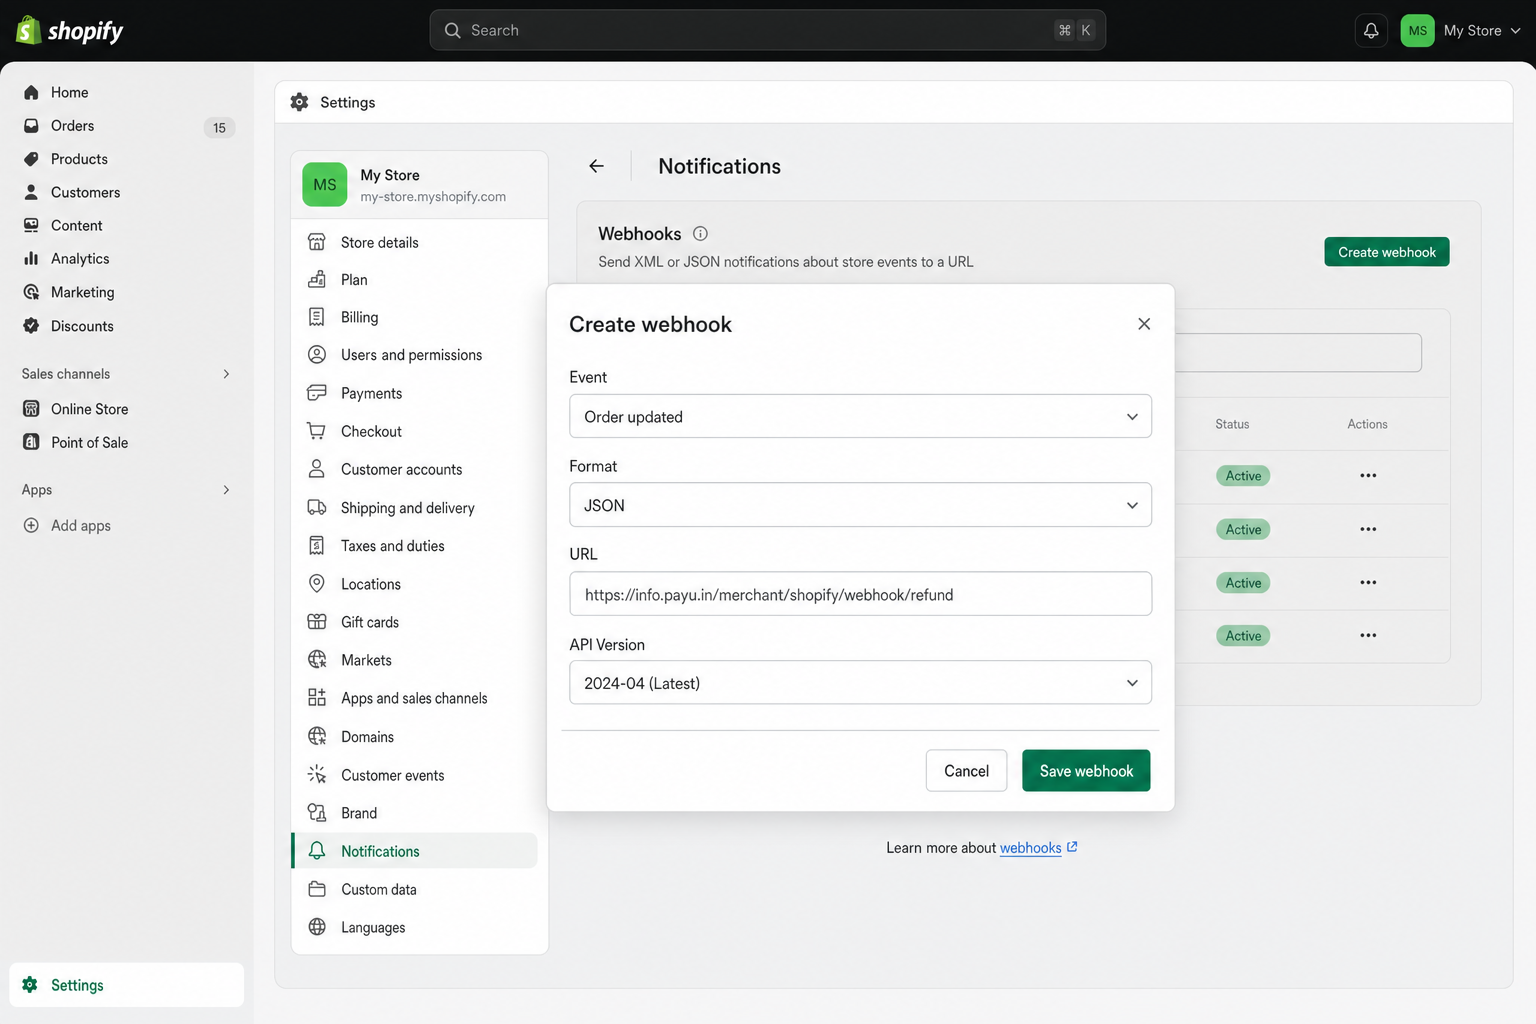
Click Create webhook.
-
Configure the webhook with the following details:
- Event: Select
Order updated - Format: JSON
- URL:
https://info.payu.in/merchant/shopify/webhook/refund - API Version: Use the latest available version
- Event: Select
-
Click Save webhook
5. How do I verify transactions after integrating PayU on Shopify?
Use the Verify Payment API or reconcile using Shopify and PayU transaction exports. Refer to Reconcile Shopify Transactions.
Refunds for Transactions on Shopify
1. How to initiate refund for transactions made on Shopify?
Method 1: Refund from Shopify Dashboard
Shopify can automatically notify PayU when you process a refund directly from the Shopify admin panel.
-
Log in to your Shopify Admin Panel
-
Navigate to Orders
-
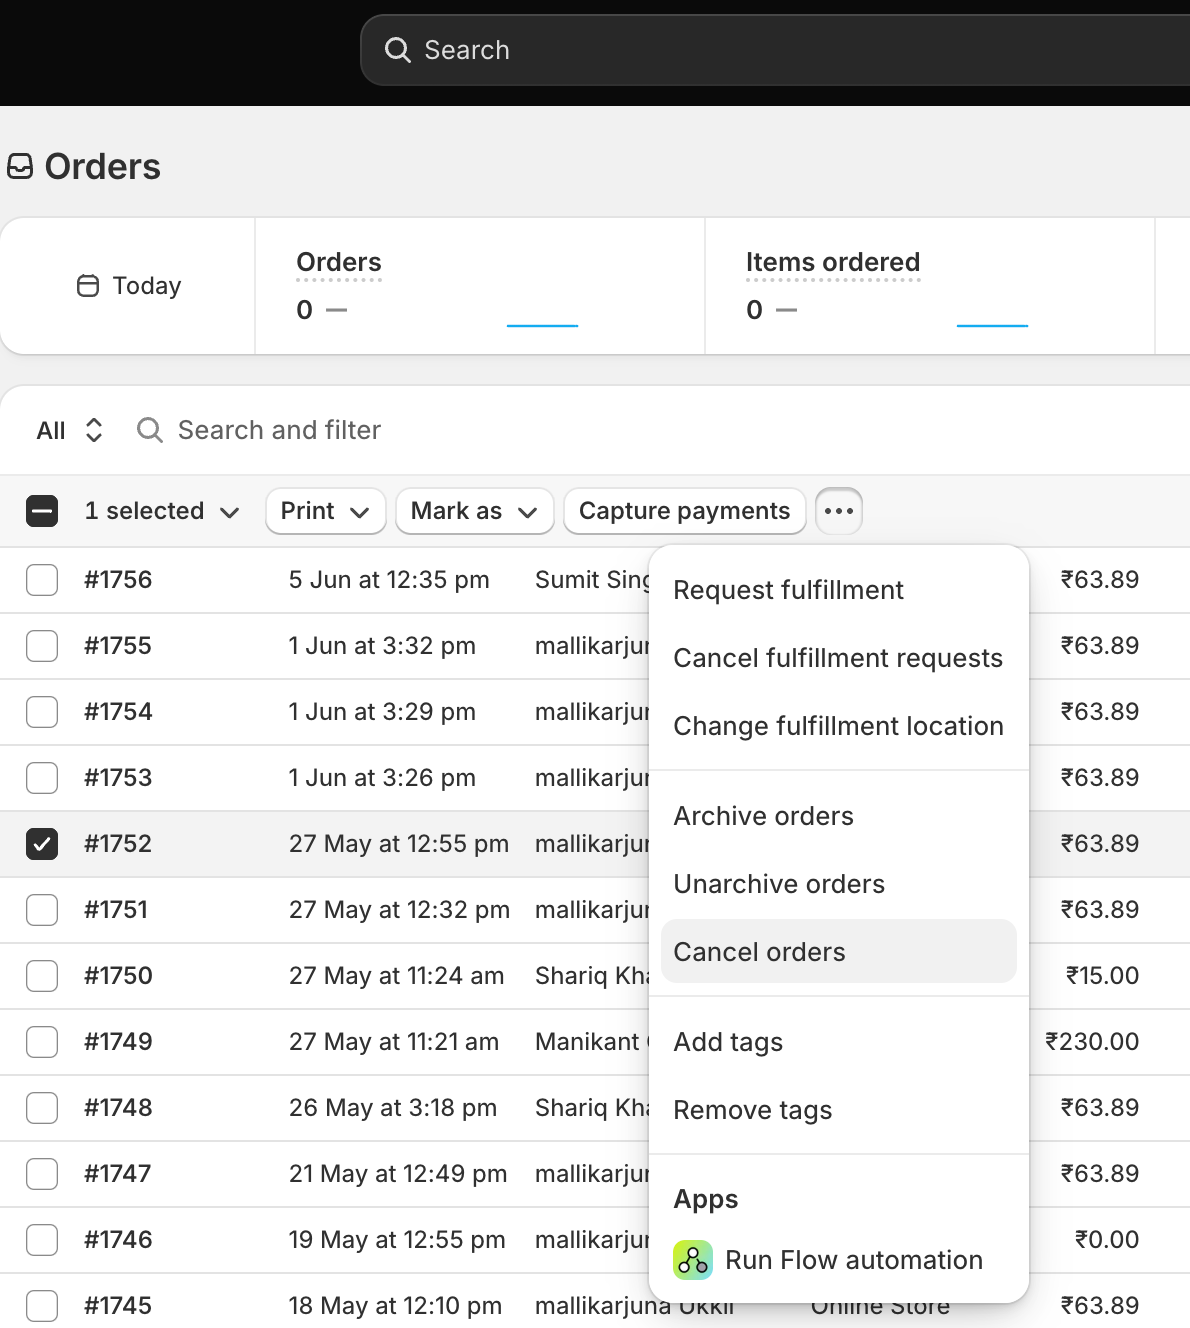
Right-click the order you want to refund and select Cancel orders.
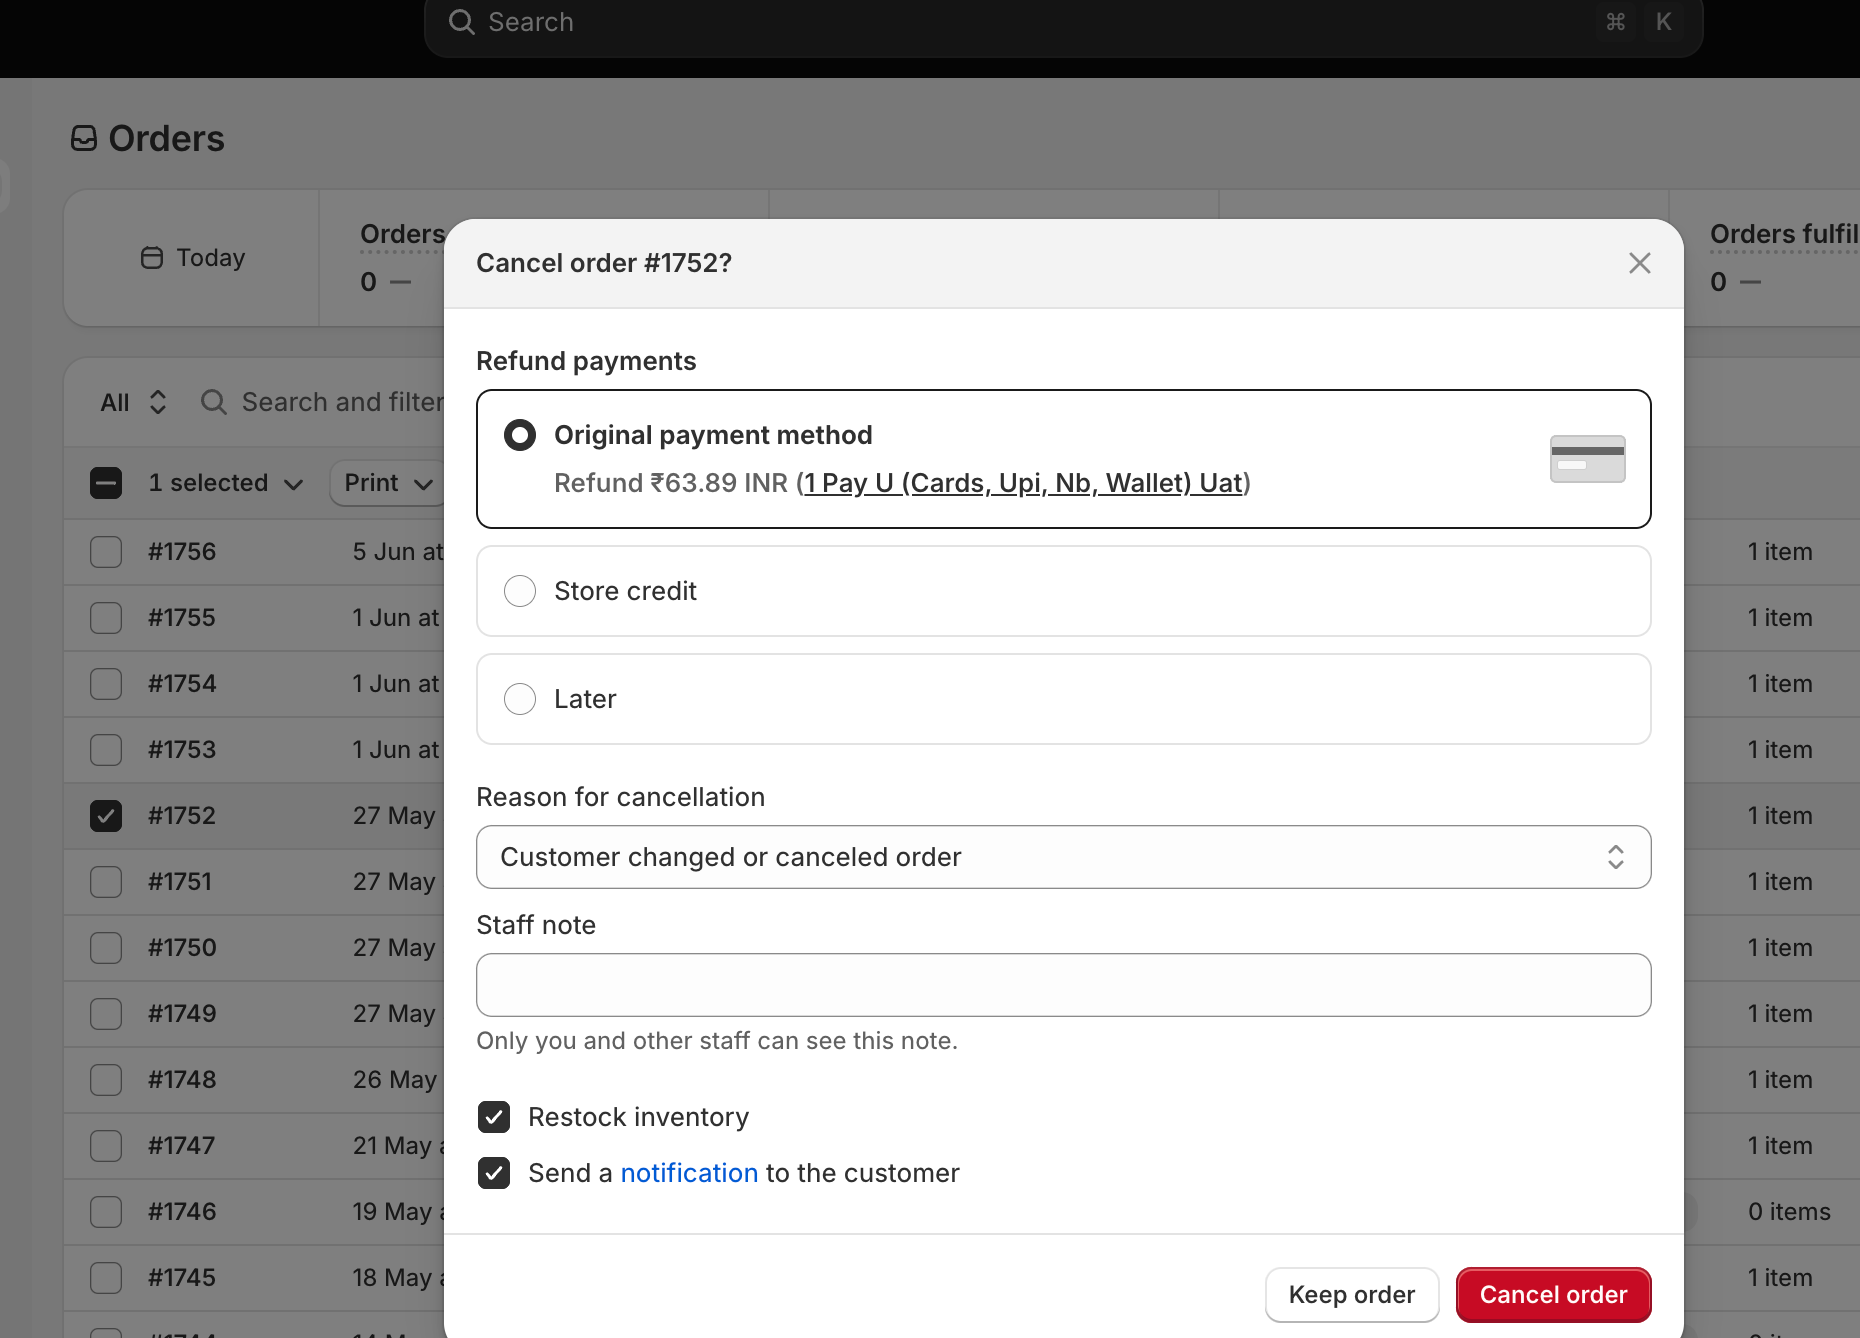
The Cancel order \
-
Select the required option in the Refund payments field based on refund.
-
Select the reason for cancelling the transaction from the Reason for cancellation field.
-
Enter the reason for cancelling the order in the Staff note field.
-
Enter the refund amount and select the items (for partial refunds).
-
Click Cancel order to process.
If webhooks are configured correctly, PayU will receive the refund notification and process it automatically. For more information, refer to Webhooks for Refunds.
Method 2: Refund from PayU Dashboard
You can also initiate refunds directly from the PayU Dashboard for Shopify transactions.
-
Log in to the PayU Merchant Dashboard
-
Navigate to Track > Transactions
-
Use the search function to find the transaction using:
- PayU Transaction ID
- Shopify Order ID (if mapped correctly)
- Customer email or phone number
-
Click the transaction ID to view transaction details
The transaction details page is displayed.
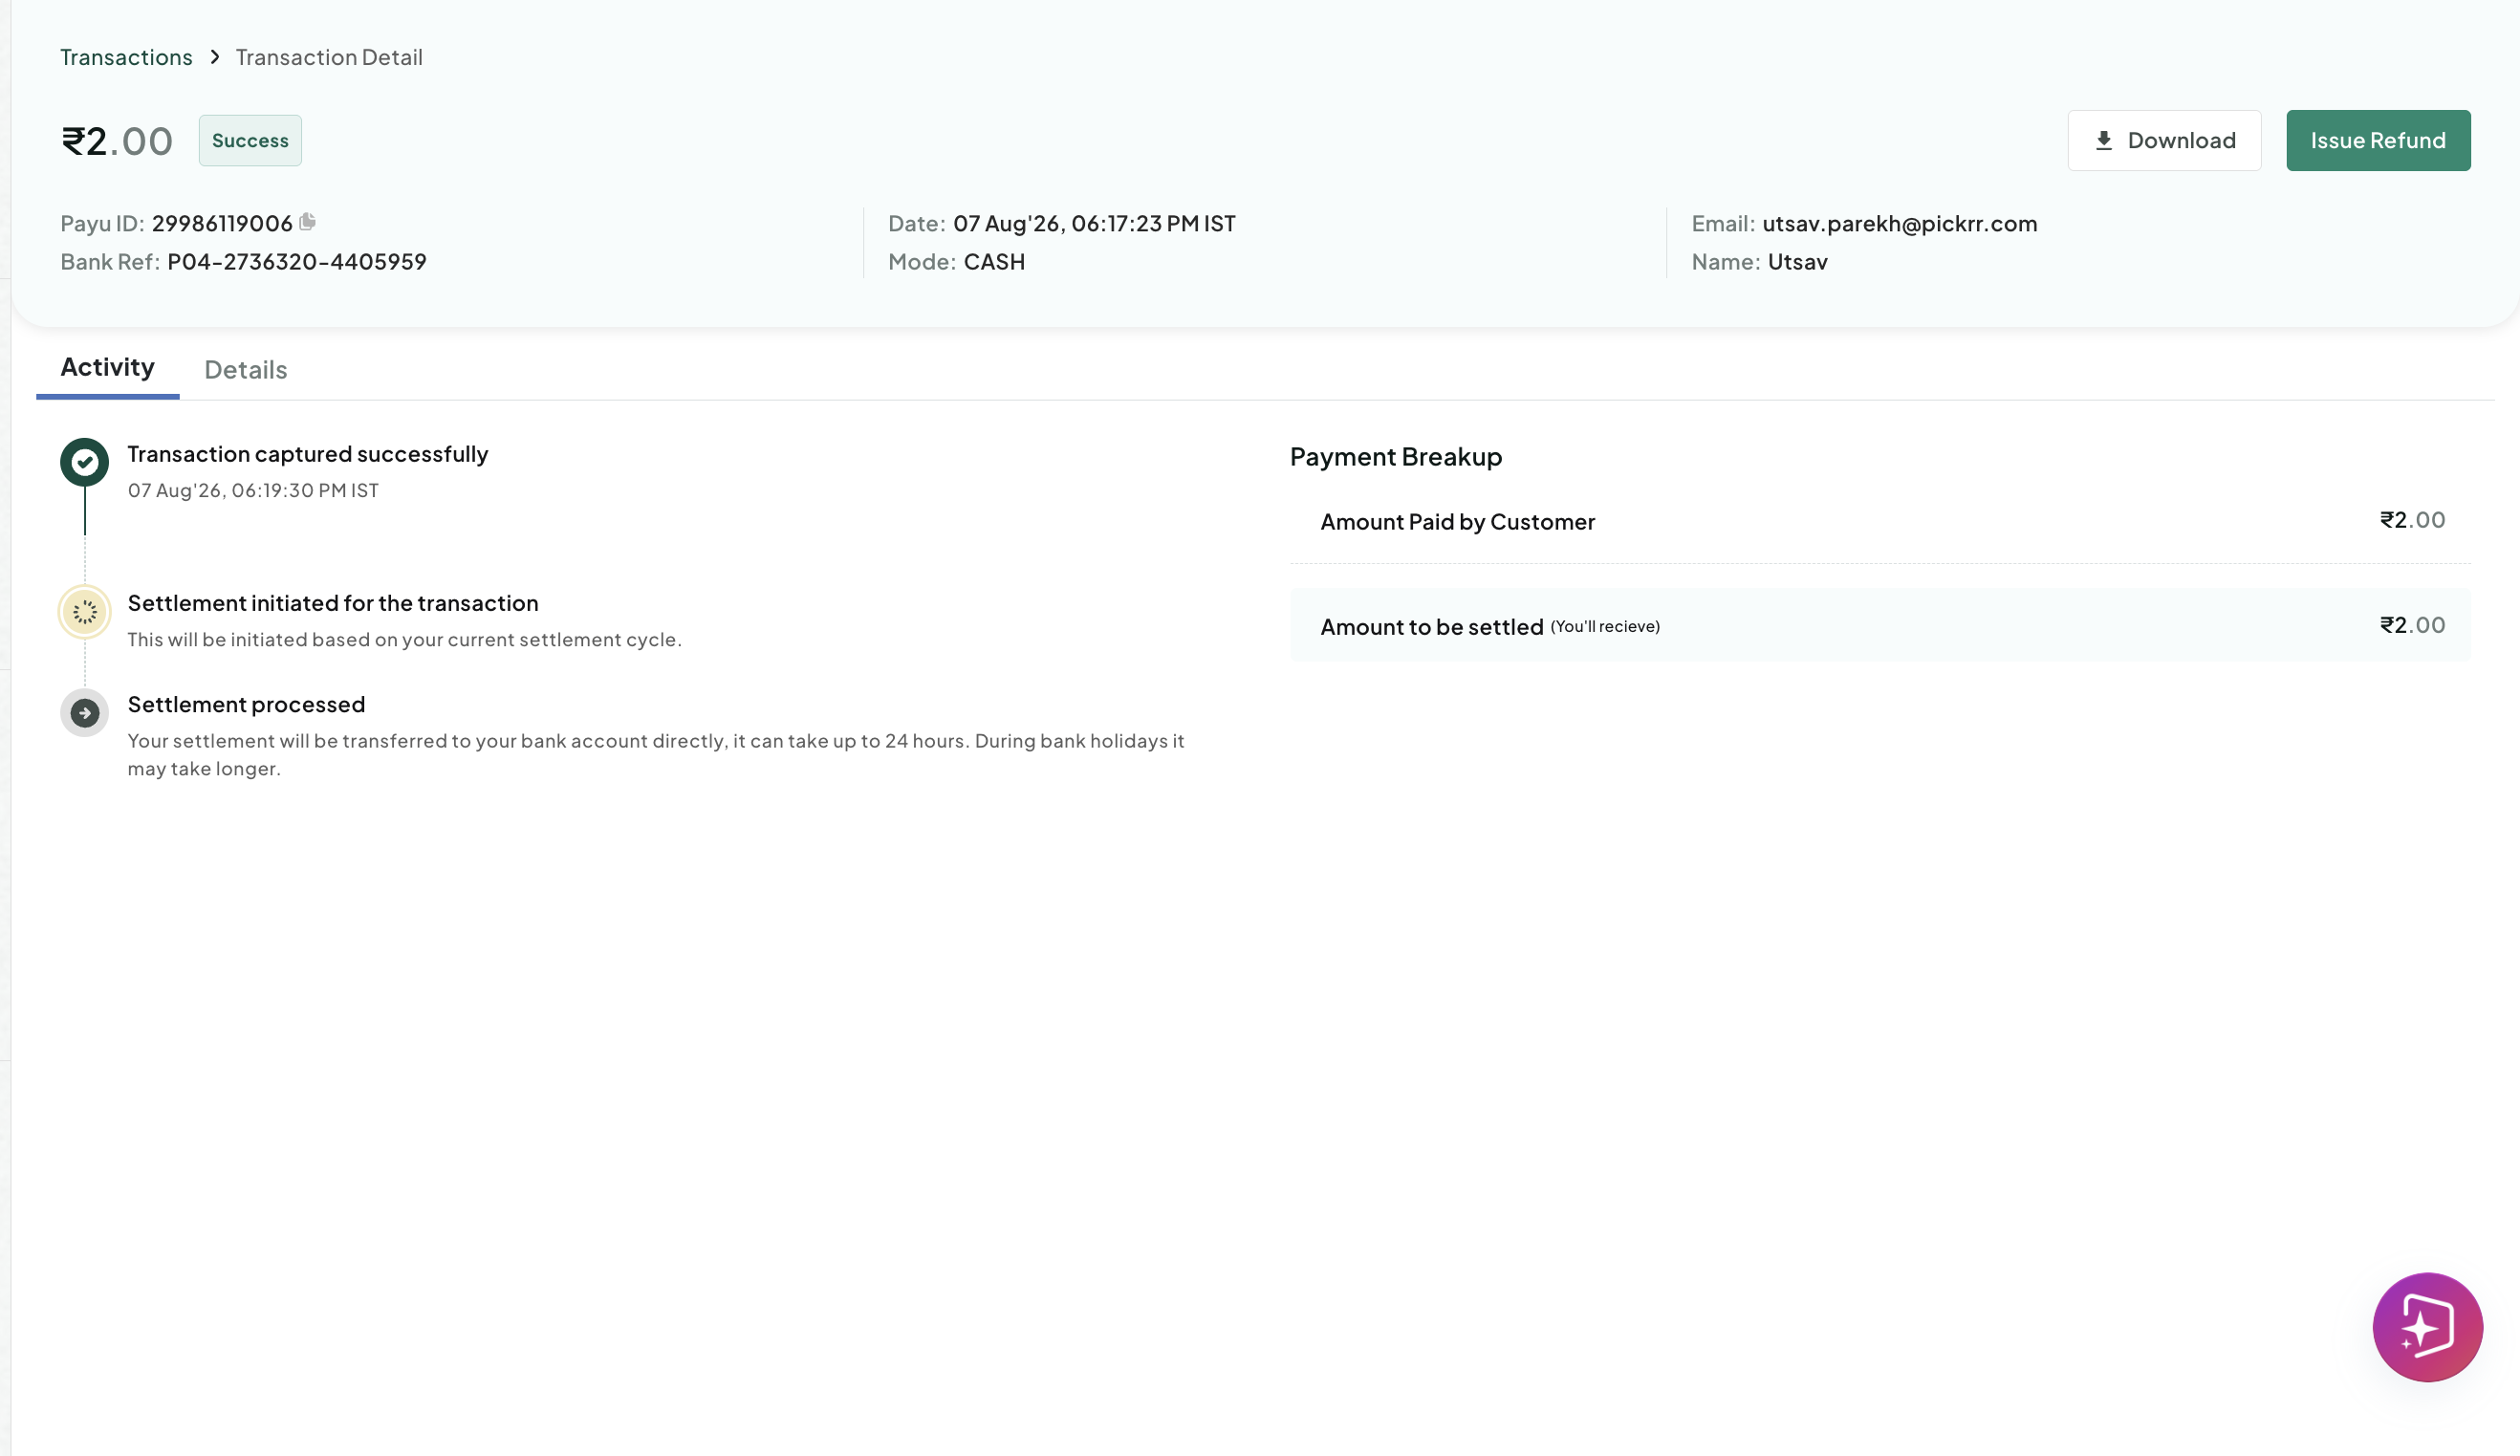
- Click Issue Refund at the top-right corner
The Refund Payment pop-up is displayed.
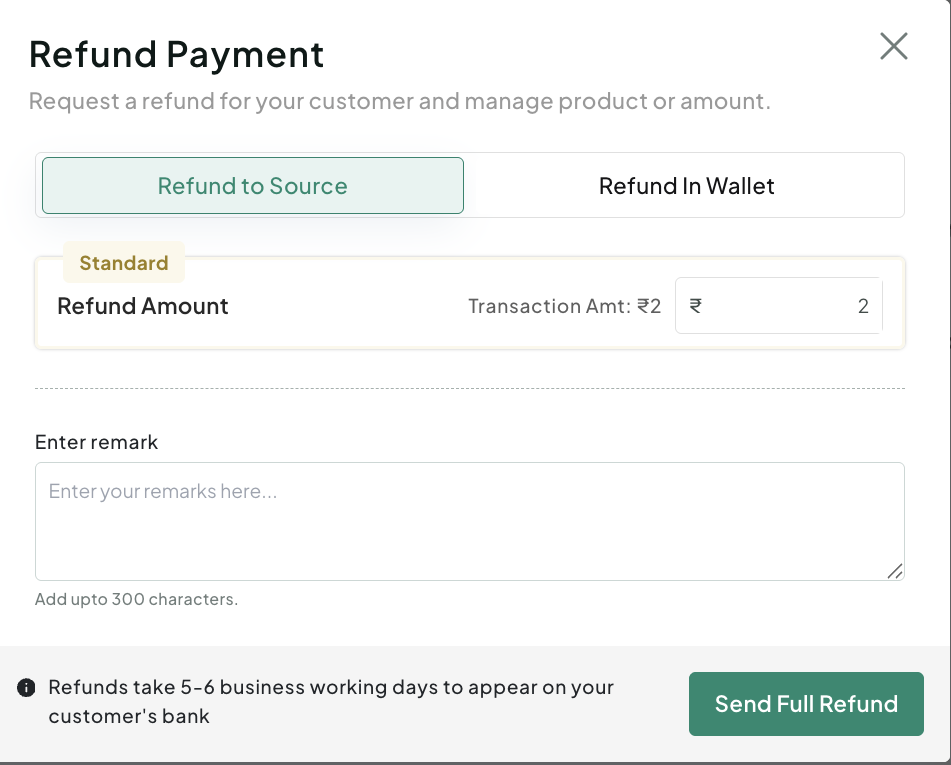
- Enter the amount to be refunded in the Refund Amount field
- Add an optional note describing the reason for refund in the Enter remark field.
- Click Send Full Refund for full amount or Send Partial Refund for partial amount
2. How long does it take for automated refunds to process?
Once the automated refund is triggered, it typically takes 5-7 working days for the refund amount to reflect in the customer's bank account. The timeline may vary based on the payment method:
- Credit Cards: 5-7 working days
- Debit Cards: 7-10 working days
- Net Banking: 5-7 working days
- UPI: 3-5 working days
- Wallets: Instant to 24 hours
3. Can I configure different refund rules for different order tags?
Yes, you can create multiple automated refund rules, each triggered by different Shopify order tags. For example:
- Tag "Defective-Product" → Full refund
- Tag "Partial-Return" → Partial refund based on items returned
- Tag "Customer-Cancelled" → Full refund minus processing fee
4. What happens if a customer disputes after an automated refund?
If a chargeback or dispute is raised after an automated refund has been processed:
- Contact PayU support immediately.
- Provide evidence of the refund, including the transaction ID and refund ARN.
- PayU will coordinate with the bank to resolve the dispute.
- Duplicate refunds will be recovered from the customer's bank account.
5. Can I set refund limits for automated rules?
Yes, you can configure maximum refund amounts per rule to prevent accidental large refunds:
- Edit your automated refund rule.
- Set the Maximum Refund Amount field.
- Refunds exceeding this amount will require manual approval.
6. How do I handle partial refunds for specific line items?
For partial refunds based on specific items returned:
- Configure your Shopify refund to specify which items are being refunded.
- The webhook will include line item details.
- PayU will calculate the refund amount based on the refunded items.
- Ensure your automated rule is set to Partial Refund mode.
7. Can I use automated refunds with Shopify subscriptions?
Yes, automated refunds work with Shopify subscription orders. However:
- Ensure each subscription charge has a unique transaction ID.
- Configure rules to handle recurring and one-time charges differently.
- Consider setting up separate rules for subscription cancellations.
8. What are the transaction mapping options?
You can map Shopify orders to PayU transactions using:
txnidparameter (recommended): Pass the Shopify order ID as the transaction ID.udf1toudf5fields: Store the Shopify order ID in user-defined fields.- Order reference number: Use the Shopify order name, such as
#1001.
9. Do automated refunds work for cross-border payments?
Yes, automated refunds are supported for cross-border payments made through PayU. However:
- Currency conversion rates at the time of the refund apply.
- Processing times may be longer, typically 7-14 working days.
- Additional documentation may be required for certain countries.
Enable Offers on your Shopify Page
1. Which PayU Shopify app supports offers?
Offers work with the hosted checkout app Cards, UPI, NB by PayU India. The onsite card app Onsite Card Payments by PayU does not support offers due to platform limitations.
2. How do I display the offers widget on my Shopify store?
Create offers on PayU Dashboard, then contact the PayU Integration team to schedule embedding of the offers widget JavaScript on your checkout. The widget displays available offers; customers apply them on PayU Hosted Checkout. Refer to Enable Offers on your Shopify Page.
3. Why does Shopify not show the discounted order value after an offer is applied?
Shopify does not include the discounted value in its order response. Integrate PayU APIs to fetch the payment response into your backend or CRM for accurate order values. Refer to Reconcile Shopify Transactions.
4. Can I initiate refunds for offer transactions from Shopify?
No. Refunds for transactions with offers must be initiated from PayU Dashboard. Refer to Refunds for Offers.
5. Should I disable automatic order emailers when using offers?
PayU recommends stopping automatic customer emailers after order placement because PayU can send them from the backend when offers are applied.
Reconcile Shopify Transactions
1. How do I find the PayU transaction ID for a Shopify order?
Export orders from Shopify admin and check the Payment Reference column in the CSV, or open individual order details in Shopify. You can also retrieve transaction details from PayU Dashboard or using PayU APIs. Refer to Reconcile Shopify Transactions.
2. How do I reconcile Shopify orders with PayU transactions in bulk?
Export orders from Shopify and transaction reports from PayU Dashboard, then map Shopify transaction IDs to the Merchant Ref ID in PayU using vLookup or similar tools in Excel. Refer to Reconcile Shopify Transactions.
3. Which PayU APIs can I use for Shopify reconciliation?
Affordability Widget Integration for Shopify
1. What is the PayU Affordability Widget on Shopify?
The Affordability Widget shows customers eligible payment offers (for example EMI or discounts) on product or cart pages before checkout. It is added through Shopify theme Liquid templates, snippets, and sections.
2. Do I need to duplicate my Shopify theme before adding the widget?
Duplicate your theme if you use a theme created in 2020 or later with product.json. Older themes without product.json can skip duplication and proceed to add the PayU snippet. Refer to Affordability Widget Integration for Shopify.
3. What is the difference between non-SKU-based and SKU-based affordability widget setup?
Non-SKU-based setup uses merchant key and cart or product amount. SKU-based setup additionally passes skusDetail with SKU IDs, amounts, and quantities so offers tied to specific products display correctly. Create the corresponding offer type on PayU Dashboard before configuring the widget.
4. Where can I display the Affordability Widget on my store?
You can show the widget on product pages and the cart page by updating product.json, cart.json, and the corresponding Liquid section files. Refer to Affordability Widget Integration for Shopify.
Install CommercePro Checkout App
1. What is PayU CommercePro Checkout for Shopify?
CommercePro Checkout is a Shopify app that connects your PayU account to your store for OTP-based customer login, checkout customisation, and related CommercePro features. Install it from https://apps.shopify.com/payu-commercepro-checkout. Refer to Install CommercePro Checkout App.
2. How long does the CommercePro customer sync take?
Customer sync duration depends on the total number of customers in your store. Check Apps > PayU CommercePro Checkout > Dashboard and confirm Customer Sync Process shows Complete before enabling the login widget.
3. What Shopify settings are required for the CommercePro login widget?
Enable Show login links under Online Store > Settings > Customer accounts (Classic accounts), disable guest checkout (Require customers to log in before checkout), disable captcha on login and registration pages, and hide default Shopify login and registration sections in your theme. Refer to Install CommercePro Checkout App.
4. How do I enable the CommercePro login widget from the theme editor?
In Online Store > Themes > Customize, open App embeds, search for Customer Login, enable Customer login – PayU, and save. Refer to Install CommercePro Checkout App.
5. Can I use Shopify's default COD or other payment gateways with CommercePro?
Yes. Deactivate PayU OTP Login under Settings > Payments > Payment method customization to allow non-PayU payment modes, including Shopify Cash on Delivery, on checkout.
Enable Onsite Payments on Shopify
1. What is onsite card payment on Shopify?
Onsite card payments let customers pay with cards directly on the Shopify checkout page without redirecting to PayU Hosted Checkout, improving conversion and payment experience for card transactions.
2. Which payment methods does the onsite card app support?
Onsite Card Payments by PayU India supports debit and credit cards. UPI, Net Banking, and other modes require the hosted checkout app Cards, UPI, NB by PayU India.
3. How do I enable test mode for onsite card payments?
Deactivate the plugin if active, enable the Test mode toggle, select Manage from More Actions, and enter test merchant key and salt. Refer to Enable Onsite Payments on Shopify.
4. Do onsite card payments support offers?
No. Offers are not supported on the onsite card app due to platform limitations. Use hosted checkout for offers. Refer to Enable Offers on your Shopify Page.
5. What should I do if I cannot activate the onsite card plugin?
Ensure the plugin is installed from Settings > Payments, credentials are correct, and the plugin is activated. If issues persist, contact PayU Support.
Configure SKU-Based Offers
1. What are SKU-based offers on Shopify?
SKU-based offers apply only when specific products (identified by Shopify SKU IDs) are in the cart. Multiple SKU-based offers can apply when multiple qualifying products are present. Refer to Configure SKU-Based Offers.
2. Which PayU app is required for SKU-based offers on Shopify?
You must install the hosted checkout app Cards, UPI, NB by PayU India. Your PayU MID must be active.
3. How do I get SKU IDs from Shopify for offer configuration?
Export products from Products in Shopify admin, download the export file, and use the SKU column values as Product ID when uploading offer details on PayU Dashboard. The Product ID in PayU must match the Shopify SKU.
4. Which Shopify webhooks are required for SKU-based offers?
Create webhooks for Checkout creation and Checkout update events with JSON format, pointing to https://partnerapilayer.payu.in/apilayer/shopify_app/shopifyWebhook. Share your MID and the webhook signature hash from Shopify with PayU to enable SKU-based offers.
5. How do I reconcile SKU-based offer transactions?
Use the Verify Payment API or follow manual reconciliation steps in Reconcile Shopify Transactions.
CommercePro COD App - Shopify
1. What are the prerequisites for CommercePro COD on Shopify?
Install PayU CommercePro Checkout app first. Contact your PayU Key Account Manager (KAM) or PayU Support to enable COD on CommercePro before installing the COD app from https://apps.shopify.com/payu-cash-on-delivery.
2. How does CommercePro COD reduce fraud and RTO?
The app checks customer eligibility for COD before allowing the payment mode. RTO intelligence can blacklist or whitelist customers by PIN code, address, mobile number, email, cart amount limits, and AI-based risk signals.
3. Where do I configure COD amount limits and blacklists?
On PayU Dashboard, go to CommercePro > Configuration > RTO Settings to set amount rules, blacklist users, and whitelist users manually or in bulk. Refer to CommercePro COD App - Shopify.
4. How do I mark a CommercePro COD order as paid in Shopify?
In Shopify admin, open the COD order with Payment pending status, select More actions > Open PayU Payment app, choose Mark as paid, and click Process.
5. How do I cancel a CommercePro COD order?
Open the order in Shopify admin, select More actions > Open PayU Payment app, choose Cancel transaction, and click Process.
6. Where can I view CommercePro COD orders?
View orders on PayU Dashboard under CommercePro > Orders, or manage payment status from Shopify admin order details.
Cross-Border Payments on Shopify
1. Can merchants outside India accept Indian payment methods on Shopify with PayU?
Yes. Shopify merchants located outside India can offer UPI, Net Banking, and cards to Indian buyers and receive settlements in offshore accounts in foreign currency through PayU's cross-border stack. Contact your PayU Key Account Manager (KAM) or [email protected] to onboard.
2. Which PayU Shopify apps support cross-border payments?
Use Cards, UPI, NB by PayU India (hosted) for Cards, UPI, Net Banking, and NEFT/RTGS, or Onsite Card Payments by PayU India for seamless card payments. Refer to Cross-Border Payments on Shopify.
3. What APIs must I integrate for cross-border Shopify transactions?
Implement the UDF Update API to pass Invoice ID (Var6, mandatory) and Airway-Bill Number (Var9, mandatory for physical goods). Refer to Cross-Border Payments on Shopify.
4. How should I price products for Indian customers on Shopify?
List catalogue SKUs in INR using Shopify Markets for India-specific pricing. Optionally limit PayU visibility to Indian customers using apps such as Localized Payments or HidePay.
5. How do I manage refunds for cross-border Shopify transactions?
Full and partial refunds process through the PayU plugin and can also be managed from PayU merchant dashboard.
6. Where do I find settlement status, currency, and FX rate for cross-border transactions?
Settlement information is available in the settlement tab on PayU merchant dashboard. APIs can be provided on request through your PayU Key Account Manager (KAM).
Updated about 2 months ago
