React-Native UPI Bolt UI SDK
PayU UPI Bolt SDK will provide a simpler and more efficient payment experience to the merchants. It will eliminate any third-party redirection and higher success rate. Profile management including accounts and balances for users. Enhancing the overall customer experience and decreasing customer drop-offs.
Advantages
- One-click payment journey and no hassle of redirection to a third-party UPI application.
- Quick completion of transactions because of direct integration with the bank.
- Seamless user experience to the customers with in-app payment.
- Easy to integrate and get the advantage of existing customer profiles created with banks.
- 5-6% higher success rate and better transaction conversion.
- Merchants can take advantage of a complete user funnel to understand user behavior.
User Journeys in PayU UPI Bolt
Registration and Pay
- Merchant Application can do the User registration for customers who are coming first time for PayU UPI Bolt. The Registration can be done during the checkout process or it can be called in a separate user journey. In case of Merchant is using PayU Checkout Pro SDK, PayU will take care of customer registration.
- Once the registration process is initiated, the user will be asked to accept the SMS sending permissions required to verify the SIM card. If the phone has dual SIM, the SIM card selection screen will be shown to customers to select the specific SIM card.
- After the device verification, UPI ID creation and the Bank selection will be done. Add bank journey will be completed after adding a bank account connected to the same mobile number used for device verification.
- Finally, customers can do a transaction using the added bank account. In case the customer is using the bank account for the first time they will need to set the MPIN as well.
- Finally, customers can make a transaction using the added bank account. If the customer is using the bank account for the first time, he will also need to set the MPIN.
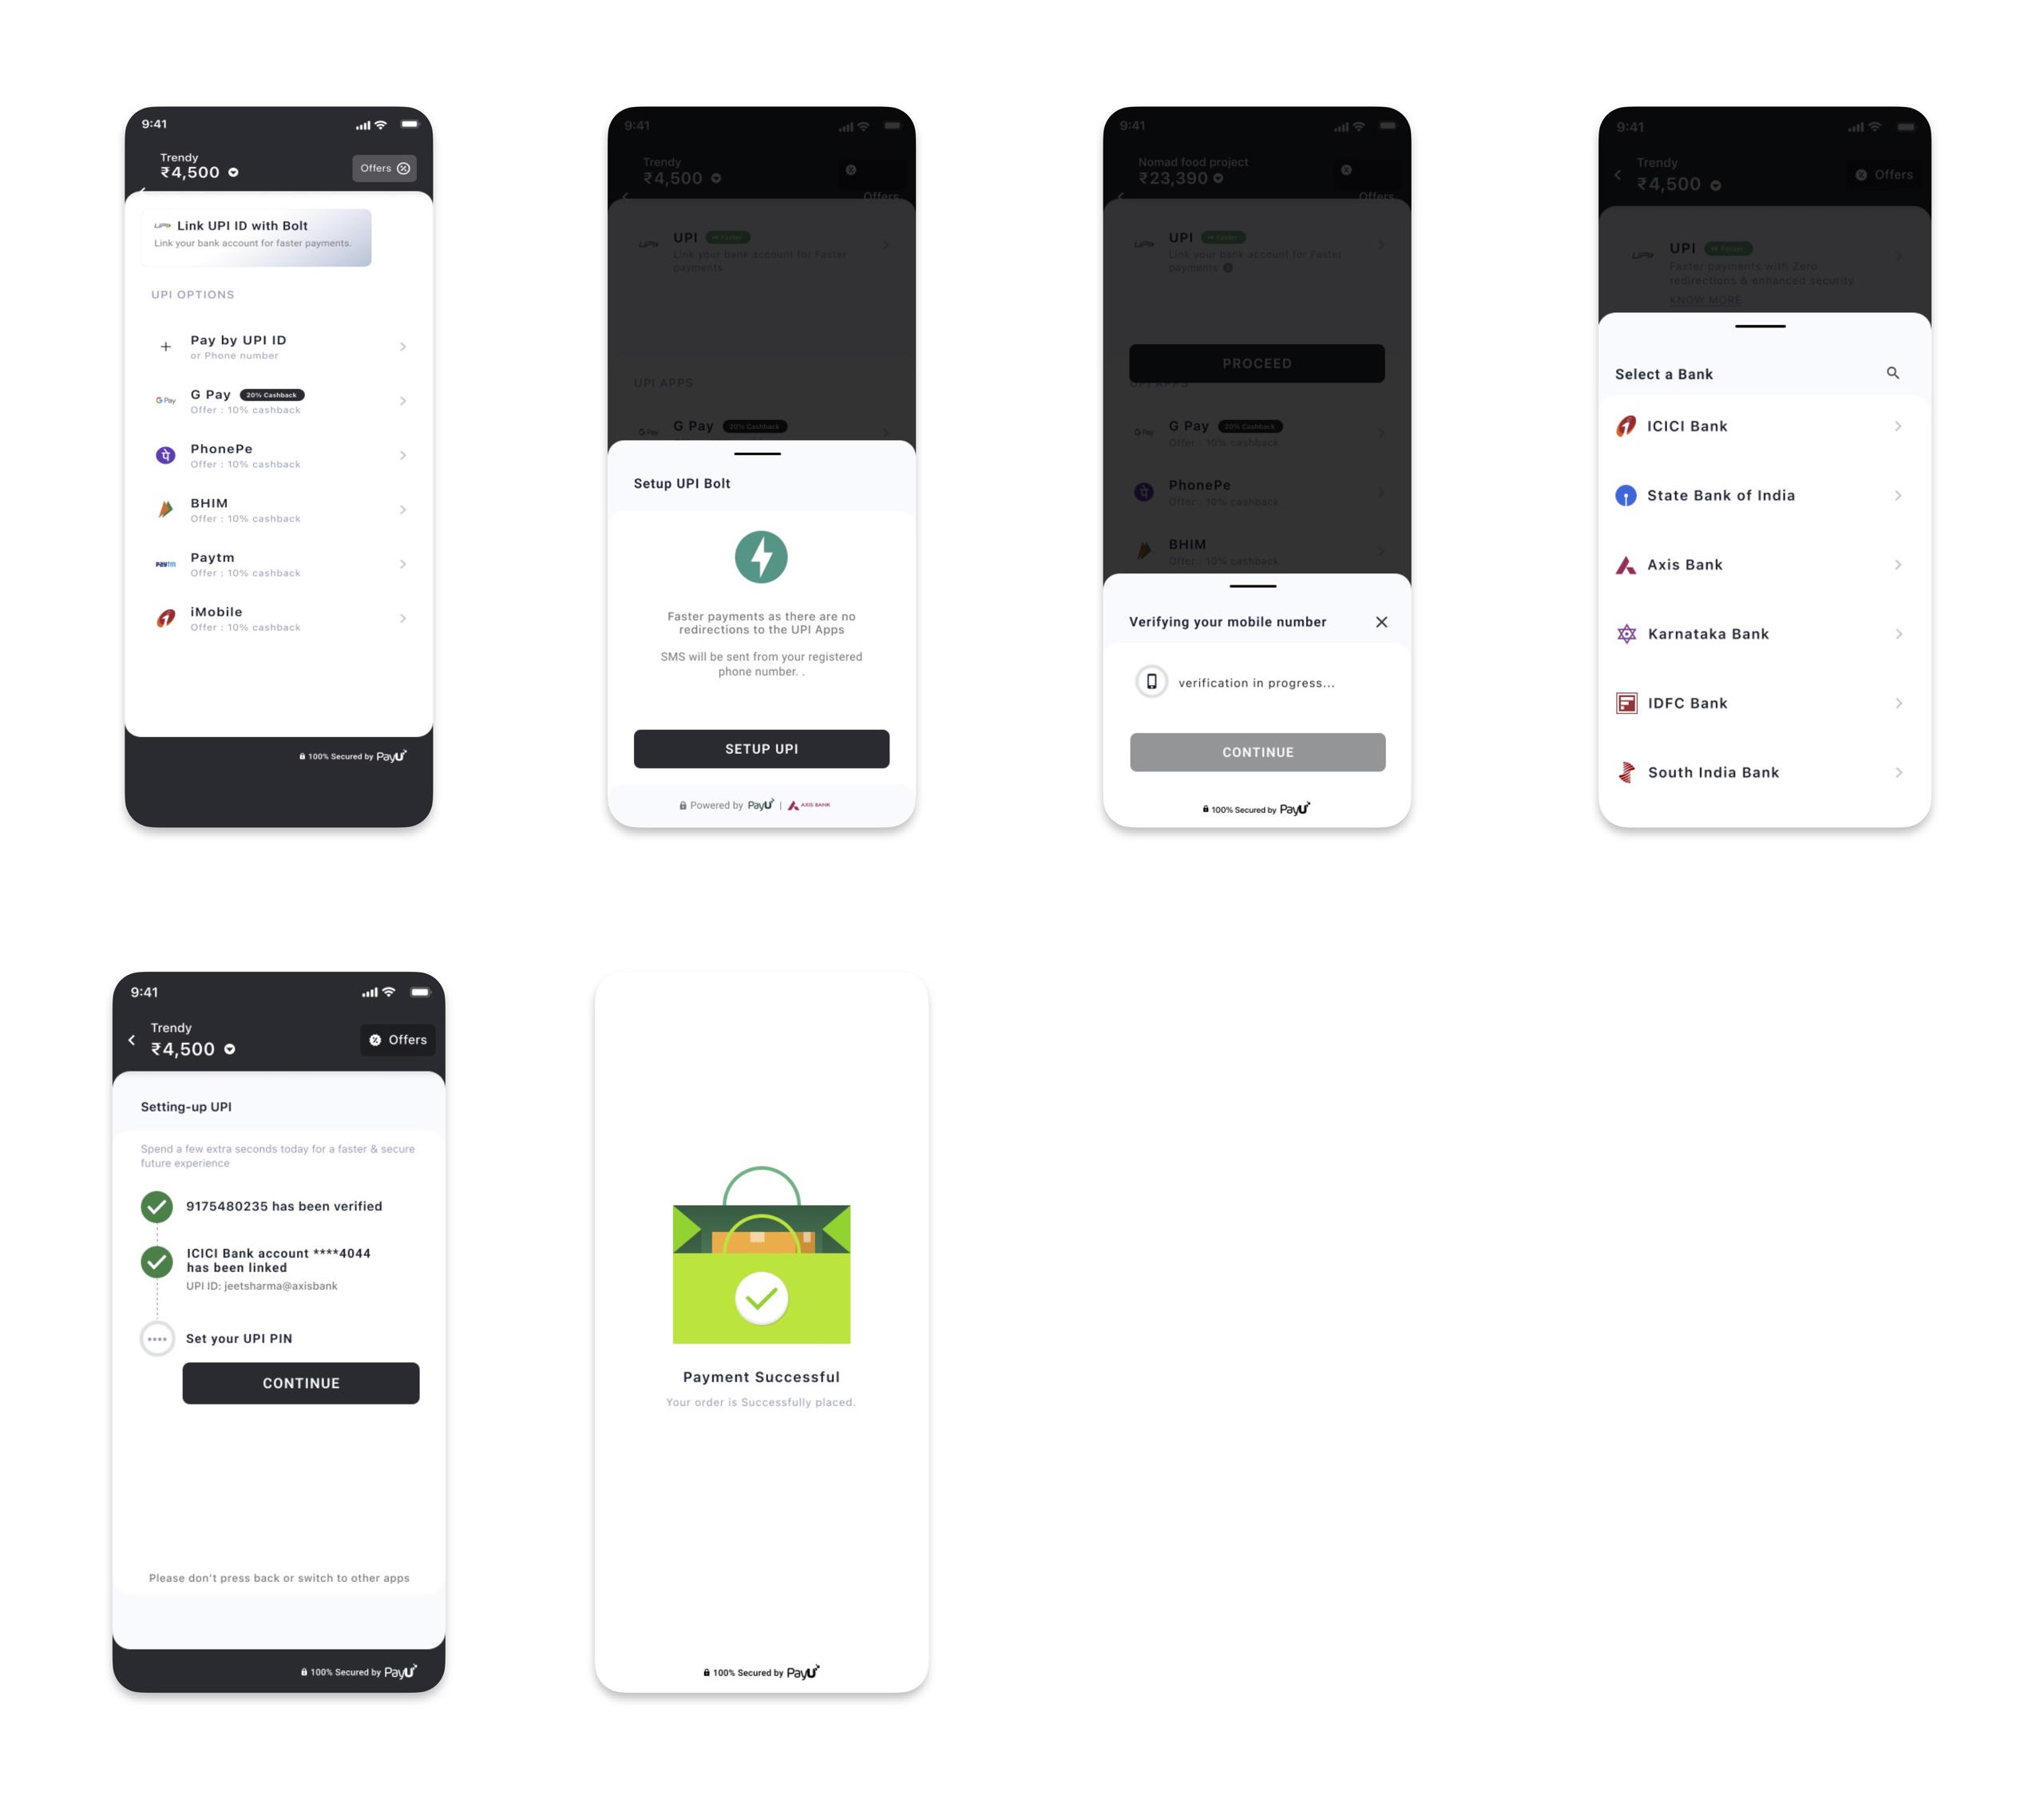
Pay
- Customers who are already registered with PayU UPI Bolt can make a One-click payment.
- The customer needs to select the already added bank account and enter the MPIN and the transaction will be completed.
- The customer can also check the balance before making a transaction to avoid low-balance transaction failure.

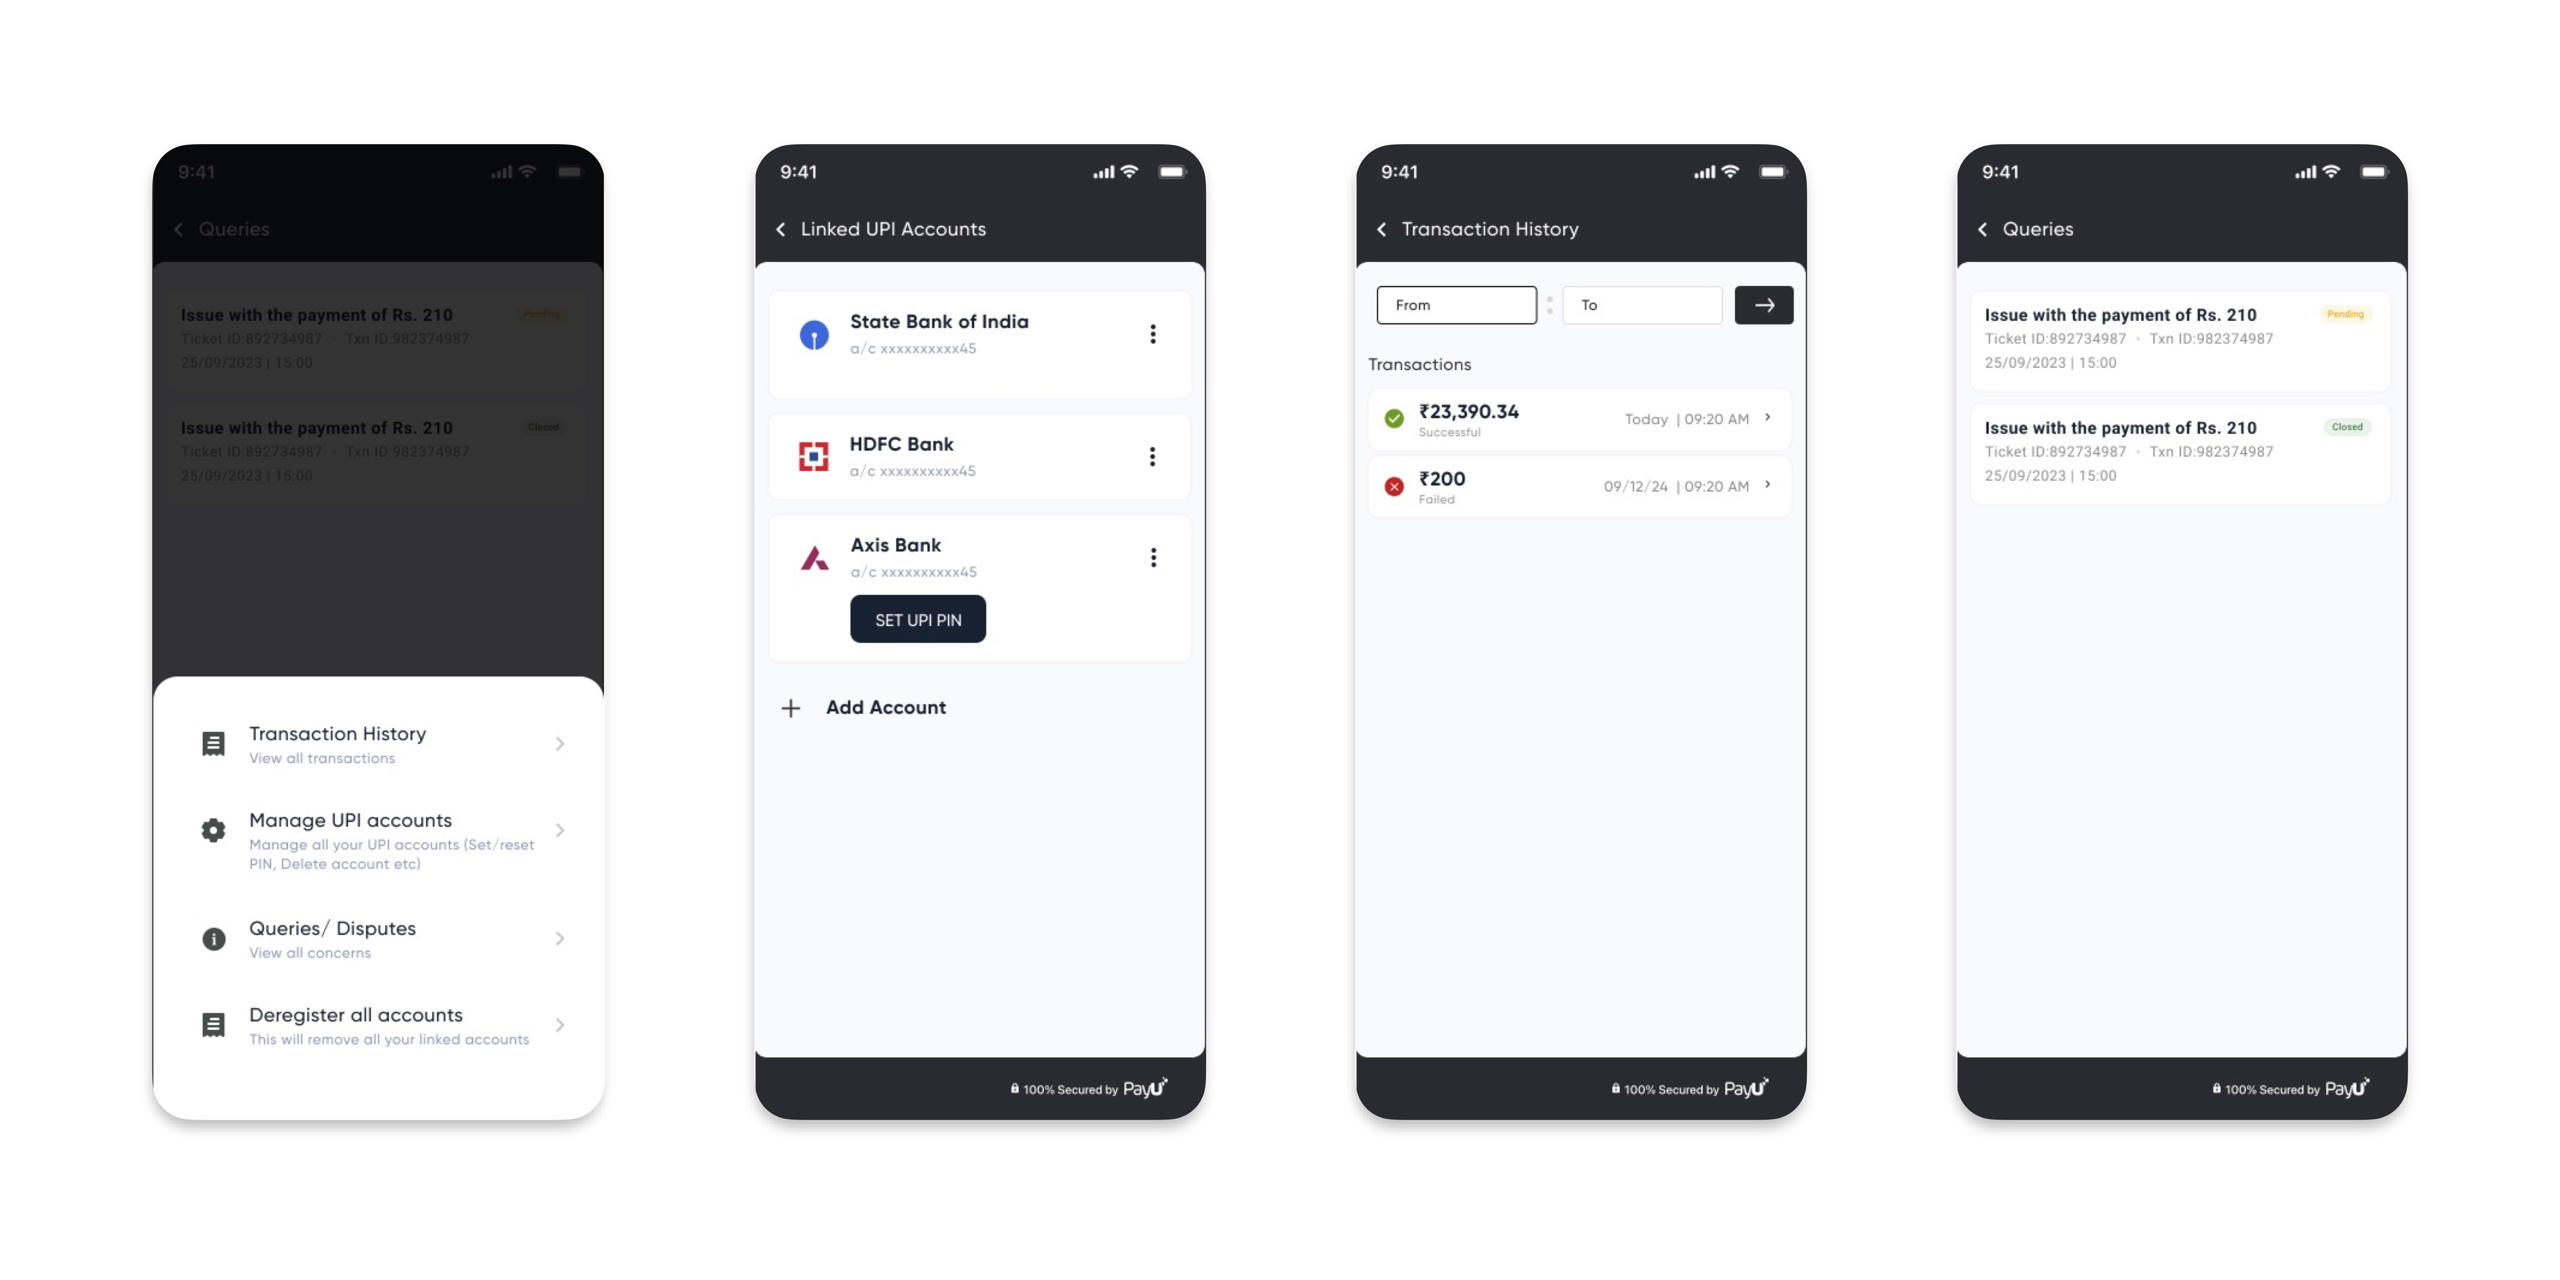
Profile Management Journey
- Customers can add new bank accounts, set MPIN, change MPIN, reset MPIN, delete accounts, and check the balance of already added bank accounts.
- Transaction history can be seen and queries can be raised and resolved within the PayU UI Bolt SDK.
- Customers can see all the raised disputes from the Dispute history screen.
- Customers can also deregister their all accounts with PayU UI Bolt SDK.
Steps to Integrate PayU Bolt SDK
Prerequisites
Supported iOS deployment target - iOS 17 and above.
Merchants who want to integrate only PayU UPI Bolt with their app. They can manage the checkout options on their checkout screen. Although they can use PayU UPI Bolt UI SDK for customer registration, payment, and profile management.
To include the PayU UPI Bolt UI SDK in your project, add the following dependency to your package.json file:
npm install payu-upi-bolt-ui-rn: 1.1.1 --save
react-native link payu-upi-bolt-ui-rn
Ensure that the application's minimum development target is set to version 13 or higher.
iOS Integration
To include the PayU UPI Bolt UI SDK in your project, add the following code snippet to your podfile.
Supported iOS deployment target - iOS 17 and above.
The following xcframework files will be provided by PayU during onboarding:
- NPCI - CommonLibrary.xcframework
Add these framework in your project. The added framework is similar to the following screeshot:
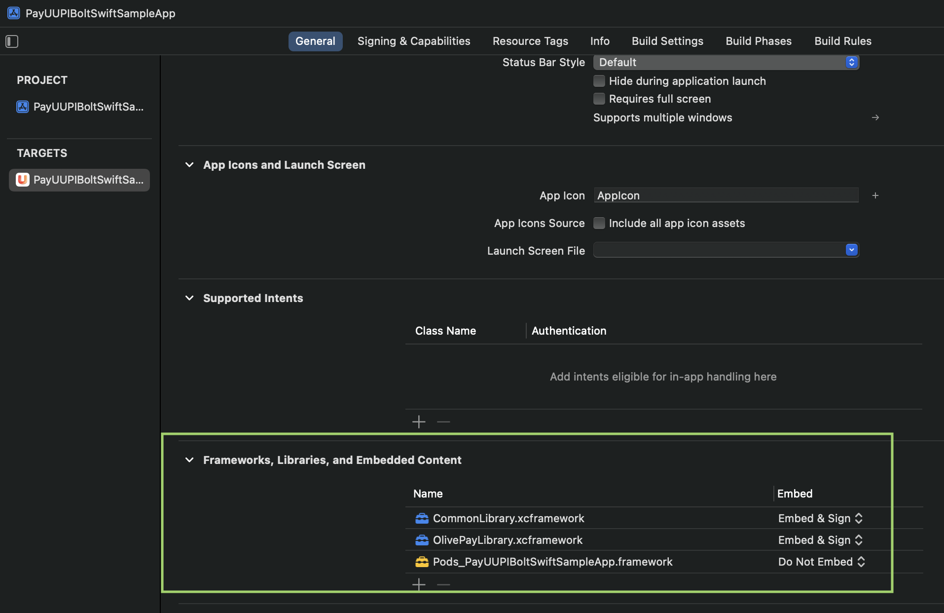
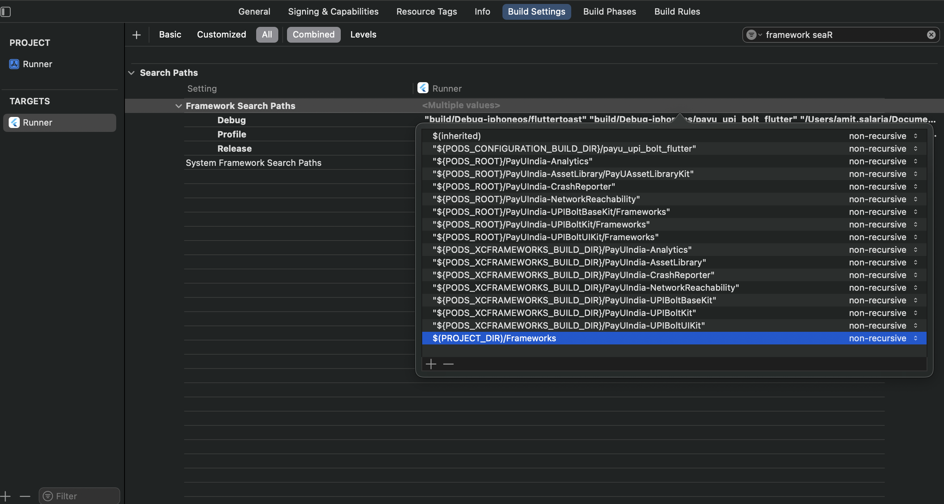
In Build Settings > Framework Search Path, add $(PROJECT_DIR)/Frameworks if it is not added automatically by Xcode.
Android Integration
Add the following permissions in your AndroidManifest file.
<uses-permission android:name="android.permission.SEND_SMS"/>
<uses-permission android:name="android.permission.ACCESS_NETWORK_STATE" />
<uses-permission android:name="android.permission.INTERNET" />
<uses-permission android:name="android.permission.READ_PHONE_STATE" />
<uses-permission android:name="android.permission.READ_PHONE_NUMBERS" />
<uses-permission android:name="android.permission.ACCESS_COARSE_LOCATION" />
<uses-permission android:name="android.permission.ACCESS_FINE_LOCATION" />
Add the following dependency in the build.gradle file of your android app module:
implementation(files('libs/SecureComponent-release-prod_05062024_9d3904ab.aar'))Add the given aar file in the libs folder of your android app module:
<your_project>/android/app/libs/SecureComponent-release-prod_05062024_9d3904ab.aarStep 1: Initialization
It is used to initialize the SDK. This method returns an object that will be used to access other methods available in PayUUPIBoltUI.
Add the following imports in the class where you need to initiate SDK:
import PayUUPIBoltUiSdk from 'payu-upi-bolt-ui-rn';Initialize the SDK with configuration:
// Function to create SDK configuration
  createSDKConfig = () => {
const requestId = 'payu_' + Math.random();

const config = {
  merchantName: merchantName,
  merchantKey: key,
  phone: phone,
  email: email,
  requestId: requestId,
  pluginTypes: ["BHIM"],
  issuingBanks: ["<issuingBanks>"], // Array<String>
  isProduction: true,
  excludedBanksIINs: [],
};

return config;
};

// Initialize the SDK
const initConfig = createSDKConfig();
PayUUPIBoltUISdk.initSDK(initConfig);

// To clear the SDK instance
PayUUPIBoltUISdk.reset(reactContext);
The following fields are needed as a request for this API:
| Parameter | Description | Example |
|---|---|---|
config |
|
{...} |
merchantName |
|
"MyStore Inc" |
merchantKey |
|
"gtKFFx" |
phone |
|
"+919876543210" |
email |
|
|
pluginTypes |
|
["AXIS", "HDFC", "BHIM"] |
isProduction |
|
true |
excludedBanksIINs |
|
["123456", "789012"] |
clientId |
|
"CLIENT_001" |
refId |
|
"REF_12345678" |
issuingBanks |
|
["AXIS", "HDFC"] |
Clear SDK Cache of PayUBolt SDK
The clearCache method is used to clear the cache corresponding to the passed PG value.
PayUUPIBoltUISdk.clearCache(pg);The following fields are needed as a request for this API:
| Field | Definition |
|---|---|
pg |
|
Response: Refer to SDK Response JSON Format
Check Plugin Registration Status of PayUBolt SDK
The isRegistered method is used to check pg registration status.
PayUUPIBoltUISdk.isRegistered(pg);| Field | Definition |
|---|---|
pg |
|
Response: Refer to SDK Response JSON Format
Callback: The callback will have the below response format.
Step 2. Check if UPI Bolt is Enabled
This method is used to check whether the upi bolt is enabled for the merchant or not.
PayUUPIBoltUISdk.isUPIBoltSDKAvailable((response) => {
if (response.code === 0) {
  console.log("SDK is available. Proceed with payment or other operations.");
} else {
  console.log("UPI Bolt SDK is not available.");
}
});
Response: Refer to SDK Response JSON Format
| Field | Definition |
|---|---|
code |
|
message |
|
Step 3. Register and Pay
This API allows you to initialize registration and payment flow. It will internally authenticate and register the customer. After successful authentication and registration, the user will follow the payment journey. Once payment is completed, based on the payment status the merchant will get a callback through the listener.
Payment Parameters
| Parameter | Description |
|---|---|
amount |
|
productInfo |
|
firstName |
|
surl |
|
furl |
|
ios_surl |
|
ios_furl |
|
initiationMode |
|
purpose |
|
txnId |
|
udf1 - udf6 |
|
isCCTxnEnabled |
|
Sample Code
const paymentParams = {
amount: "<amount>", // String
productInfo: "<productInfo>", // String
firstName: "<firstName>", // String
surl: "<successUrl>", // String (Android success URL)
furl: "<failureUrl>", // String (Android failure URL)
ios_surl: "<iosSuccessUrl>", // String (iOS success URL)
ios_furl: "<iosFailureUrl>", // String (iOS failure URL)
initiationMode: "<initiationMode>", // String (e.g., "10")
purpose: "<purpose>", // String (e.g., "00")
udf1: "<udf1>", // String (Optional)
udf2: "<udf2>", // String (Optional)
udf3: "<udf3>", // String (Optional)
udf4: "<udf4>", // String (Optional)
udf5: "<udf5>", // String (Optional)
txnId: "<txnId>", // String (Unique transaction ID)
isCCTxnEnabled: <trueOrFalse> // Boolean (Enable card fallback if supported)
};

PayUUPIBoltUISdk.payURegisterAndPay(paymentParams);
Response: Map Refer to SDK Response JSON Format.
| Field | Definition |
|---|---|
result |
Payment Response |
Step 4. Open UPI Management
This API allows you to manage UPI accounts and transaction history.
// Screen Types
const screenType = <screenType> // String

PayUUPIBoltUISdk.openUPIManagement(screenType);
Request Parameters
| Parameter | Description |
|---|---|
screenType |
• ALL • TRANSACTIONHISTORY • MANAGEUPIACCOUNTS • DISPUTE • DEREGISTERUPI |
Response: Map Refer to SDK Response JSON Format
Step 5. Listener/Callback logic
The listener/callback contains following methods where the merchant app will get the API response and hash-related callbacks.
// Register event emitters
useEffect(() => {
const eventEmitter = new NativeEventEmitter(PayUBizSdk);

onPayUSuccessListener = eventEmitter.addListener('onPayUSuccess', onPayUSuccess);
onPayUFailureListener = eventEmitter.addListener('onPayUFailure', onPayUFailure);
onPayUCancelListener = eventEmitter.addListener('onPayUCancel', onPayUCancel);
payUGenerateHashListener = eventEmitter.addListener('generateHash', generateHash);
permissionListener = eventEmitter.addListener('permissionCallback', permissionCallback);

// Clean up listeners on unmount or merchantSalt change
return () => {
  console.log("Unsubscribed!");
  onPayUSuccessListener.remove();
  onPayUFailureListener.remove();
  onPayUCancelListener.remove();
  payUGenerateHashListener.remove();
  permissionListener.remove();
};
}, [merchantSalt]);

// Handler: PayU success
onPayUSuccess = (response) => {
displayAlert('onPayUSuccess', JSON.stringify(response));
};

// Handler: PayU failure
onPayUFailure = (response) => {
displayAlert('onPayUFailure', JSON.stringify(response));
};

// Handler: PayU cancel
onPayUCancel = (response) => {
displayAlert('onPayUCancel', JSON.stringify(response));
};

// Handler: Generate hash event
generateHash = (e) => {
handleHashGeneration(e.hashName, e.hashString + merchantSalt);
}; Step 6. Hash Generation Logic
The PayU SDKs use hashes to ensure the security of the transaction and prevent any unauthorized intrusion or modification.
For generating and passing dynamic hashes, the merchant will receive a call from the generateHash method of PayUUPIBoltUiListener. The generateHash() method is called by the SDK each time it needs an individual hash.
function handleHashGeneration(hashName, hashString) {  // Merchant will get Map/ JSON with type of hash and hash string as value of dictionary.
  /*
   They have to sign that string using salt to create hash value and pass that to onCompletion
   In the map you have to check for three keys to generate hash.
   1. hashString
   2. hashName
   3. postSalt
   At the end of that hashString append your salt and use SHA-512 algo on that final string to generate hash.
   Note: If you got postSalt also in the map, first use hash string append salt and then append postSalt value to that string and use SHA-512 algo on that final string to generate hash.
   Once the hash is generated use hashGenerationListener parameter to pass the hash to SDK. Example code:
   */

  // get hash for "hashName" from server
  // get hash for "hashString" from server

  var hashValue = <fetch_hash_from_server>;

  // After fetching hash set its value in below variable "hashMap"

  const result = { "hashName": <hashName>, <hashName>: <hashValue> };
  PayUBizSdk.hashGenerated(result);
}
SDK Response JSON Format
| Field | Data Type | Definition |
|---|---|---|
| result | Any? | Contains response model if received success callback |
| code | Int | Ref. Response Codes and Messages section |
| message | String? | Ref. Response Codes and Messages section |
| responseType | Int | Ref. ResponseType : |
Response Type
| Response Type | Response Code | Definition |
|---|---|---|
| REQUEST_UPI_BOLT | 100 | UPI Bolt Status |
| REQUEST_TRANSACTION | 124 | Register And Pay |
| REQUEST_MANAGE | 125 | UPI Management |
Error Codes and Error Message List
| Response Code | Message |
|---|---|
| 0 | Success |
| 1 | Fail/ Invalid Response/ Missing params |
| 2 | User cancelled the transaction |
| 100 | Transaction timeout |
| 103 | Handshake failed |
| 104 | UPI bolt not supported |
| 105 | Device not supported for UPI Bolt |
| 500 | Something went wrong |
| 501 | No internet connection |
| 502 | SDK not found |
Updated 13 days ago