
Refer Merchants Manually using Partner Portal
Onboard merchants manually through the PayU Partner Portal. Complete the steps below to register as a partner, configure your app, log in, refer merchants, and track incentives.
Step 1: Register a Partner Account
You need to create a partner account in the Test and Production environment to become a partner. A partner account connects you with PayU and enables access to Partner Dashboard and merchant onboarding.
Steps to Register a Partner Account
To create a Partner Account:
-
Navigate to the following PayU Affiliate Partner Program URL:
The PayU Affiliate Partner Program page is displayed.

- Click Become a Partner.
- Enter your email address in the Enter Email field and click Next.

The Tell us more about yourself page is displayed.
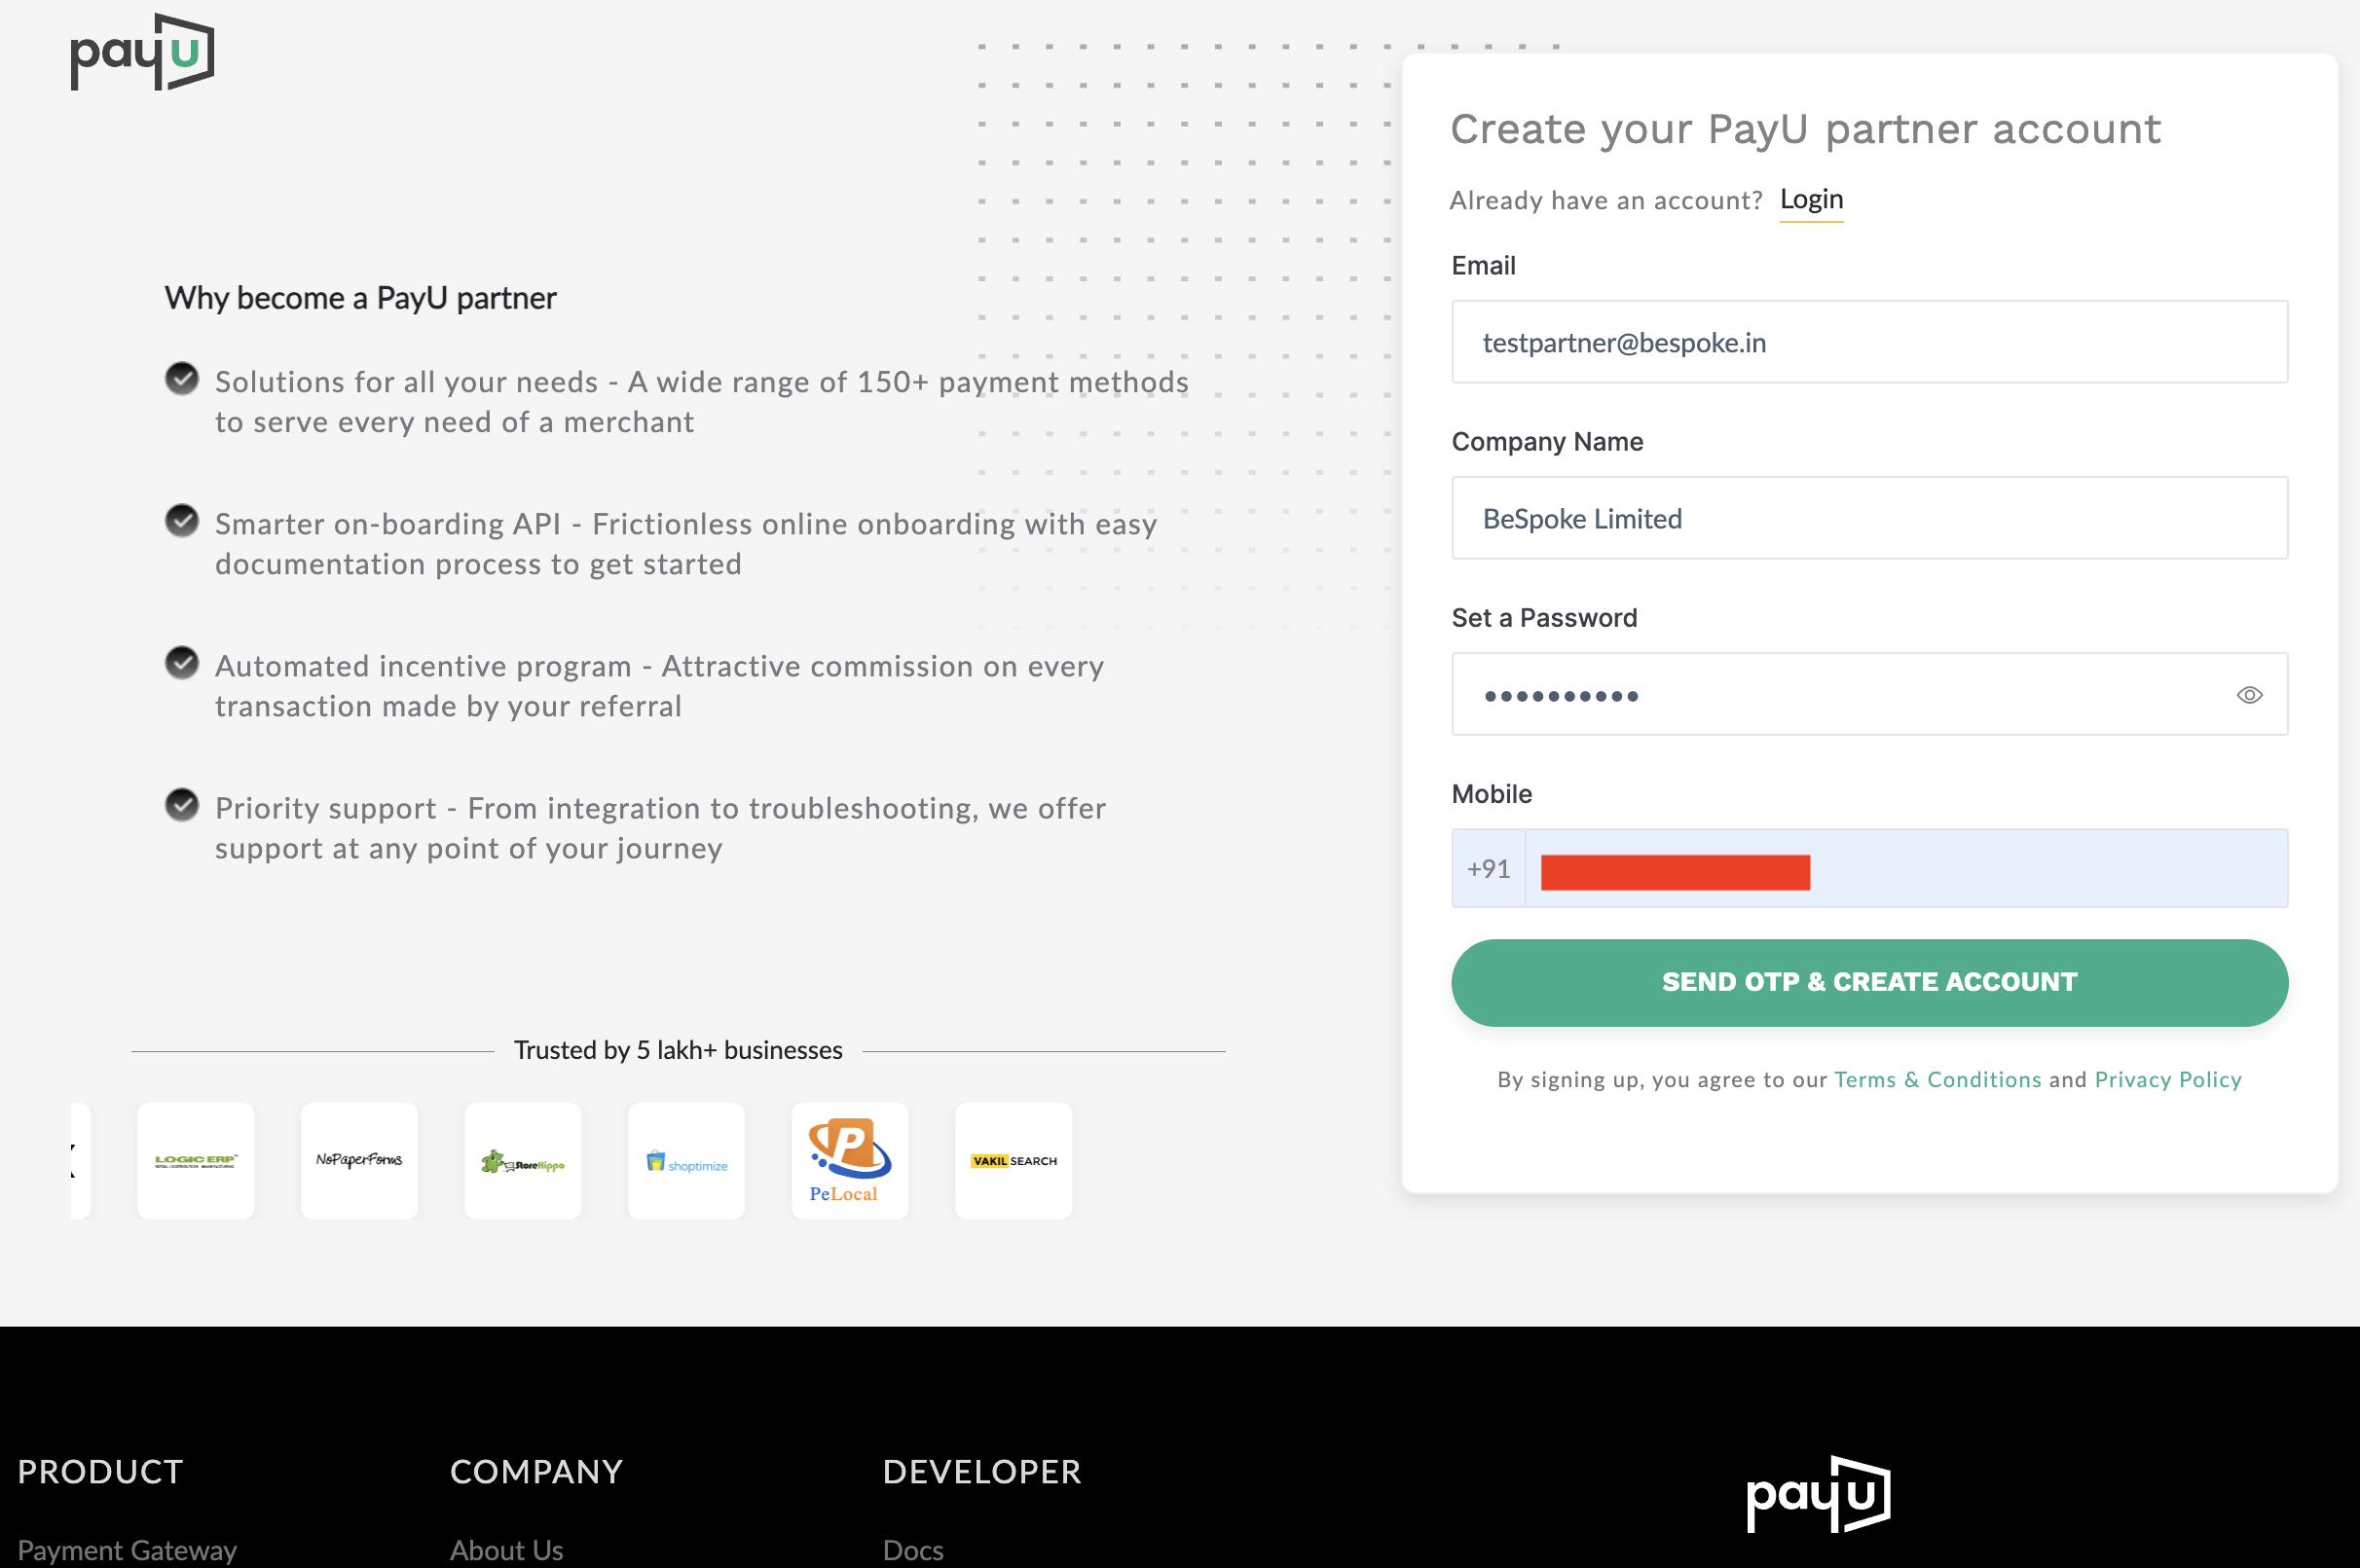
- Provide the details for the fields as described in the following table:
| Field | Description |
|---|---|
| Enter Name | Enter your name in this field. |
| Phone Number | Enter your mobile phone number in this field. PayU will send an OTP on this number for verification. |
| Enter Password | Enter the password that you wish to use while logging into your merchant account with PayU. Your password must meet these requirements: at least eight characters; at least one uppercase alphabet; at least one lowercase alphabet; at least one numeral; at least one special character. |
-
Click Next.
The OTP is sent to the mobile number you specified in the Phone Number field.
-
Enter the OTP sent to that mobile number.
-
Click Verify Mobile.
Registration for the partner account in PayU is complete.
Note: If you have already registered for the PayU Partner Program using the entered phone number, the following message is displayed:
“Mobile Number already exists with PayU. Please continue with your old password to add merchant account.”
Complete your profile on Partner Portal
After registering as a partner, complete your profile. Completing your profile is mandatory to generate your partnership agreement with PayU.
The Profile tab contains the following sections:
Steps to Complete Profile
If you have not completed your profile, the Get Paid > Complete your onboarding tile is displayed on the top after you log in. Click Get Paid to complete your profile.
Or click your profile photo at the top-right corner and select My Profile from the drop-down menu.

The Profile tab is displayed with Fill the details below to generate your partnership agreement as the title.
General Details
The details on the General Details pane are automatically updated based on the details you filled in during registration. You can update these details if required.
Business details
- Expand the Business Details pane.

- Select your business registration type from the Select Business Registration Type drop-down list.
- Enter your business name in the Business Registration Name field.
- Enter your business registration address in the Business Address field.
- Enter the PIN code in the Pincode field.
- Enter your GSTIN in the GSTIN field (optional).
- Select the domain from the Domain drop-down list.
- Click Submit.
PAN details
- Expand the PAN Details pane.

- Enter the name in the Name on PAN Card (PAN card of the signing authority) field.
- Enter your PAN number in the Number on PAN Card field.
- Click Submit to verify.
Bank details
- Expand the Bank Details pane.

- Enter your business name in the Account Holder’s Name (Same as Registered Business Name) field.
- Enter your account number in the Bank Account Number field.
- Confirm your account number in the Re-enter Bank Account Number field.
- Enter your bank IFSC code in the IFSC Code field. Search the IFSC code using the Search IFSC option, or find the IFSC code on the cheque book provided by your bank.
- Click Submit.
For the full standalone guide, see Register a Partner Account.
Step 2: Configure URLs and Logo
Configure the following:
- URLs required to redirect to your partner platform website after merchant registration
- Company logo displayed on the left side of the merchant dashboard

Steps to Configure the Logo
To configure the URLs and brand logo:
- Log in at partner.payu.in and navigate to the user menu.
- Click your profile picture on the top-right corner and select My App from the drop-down menu.
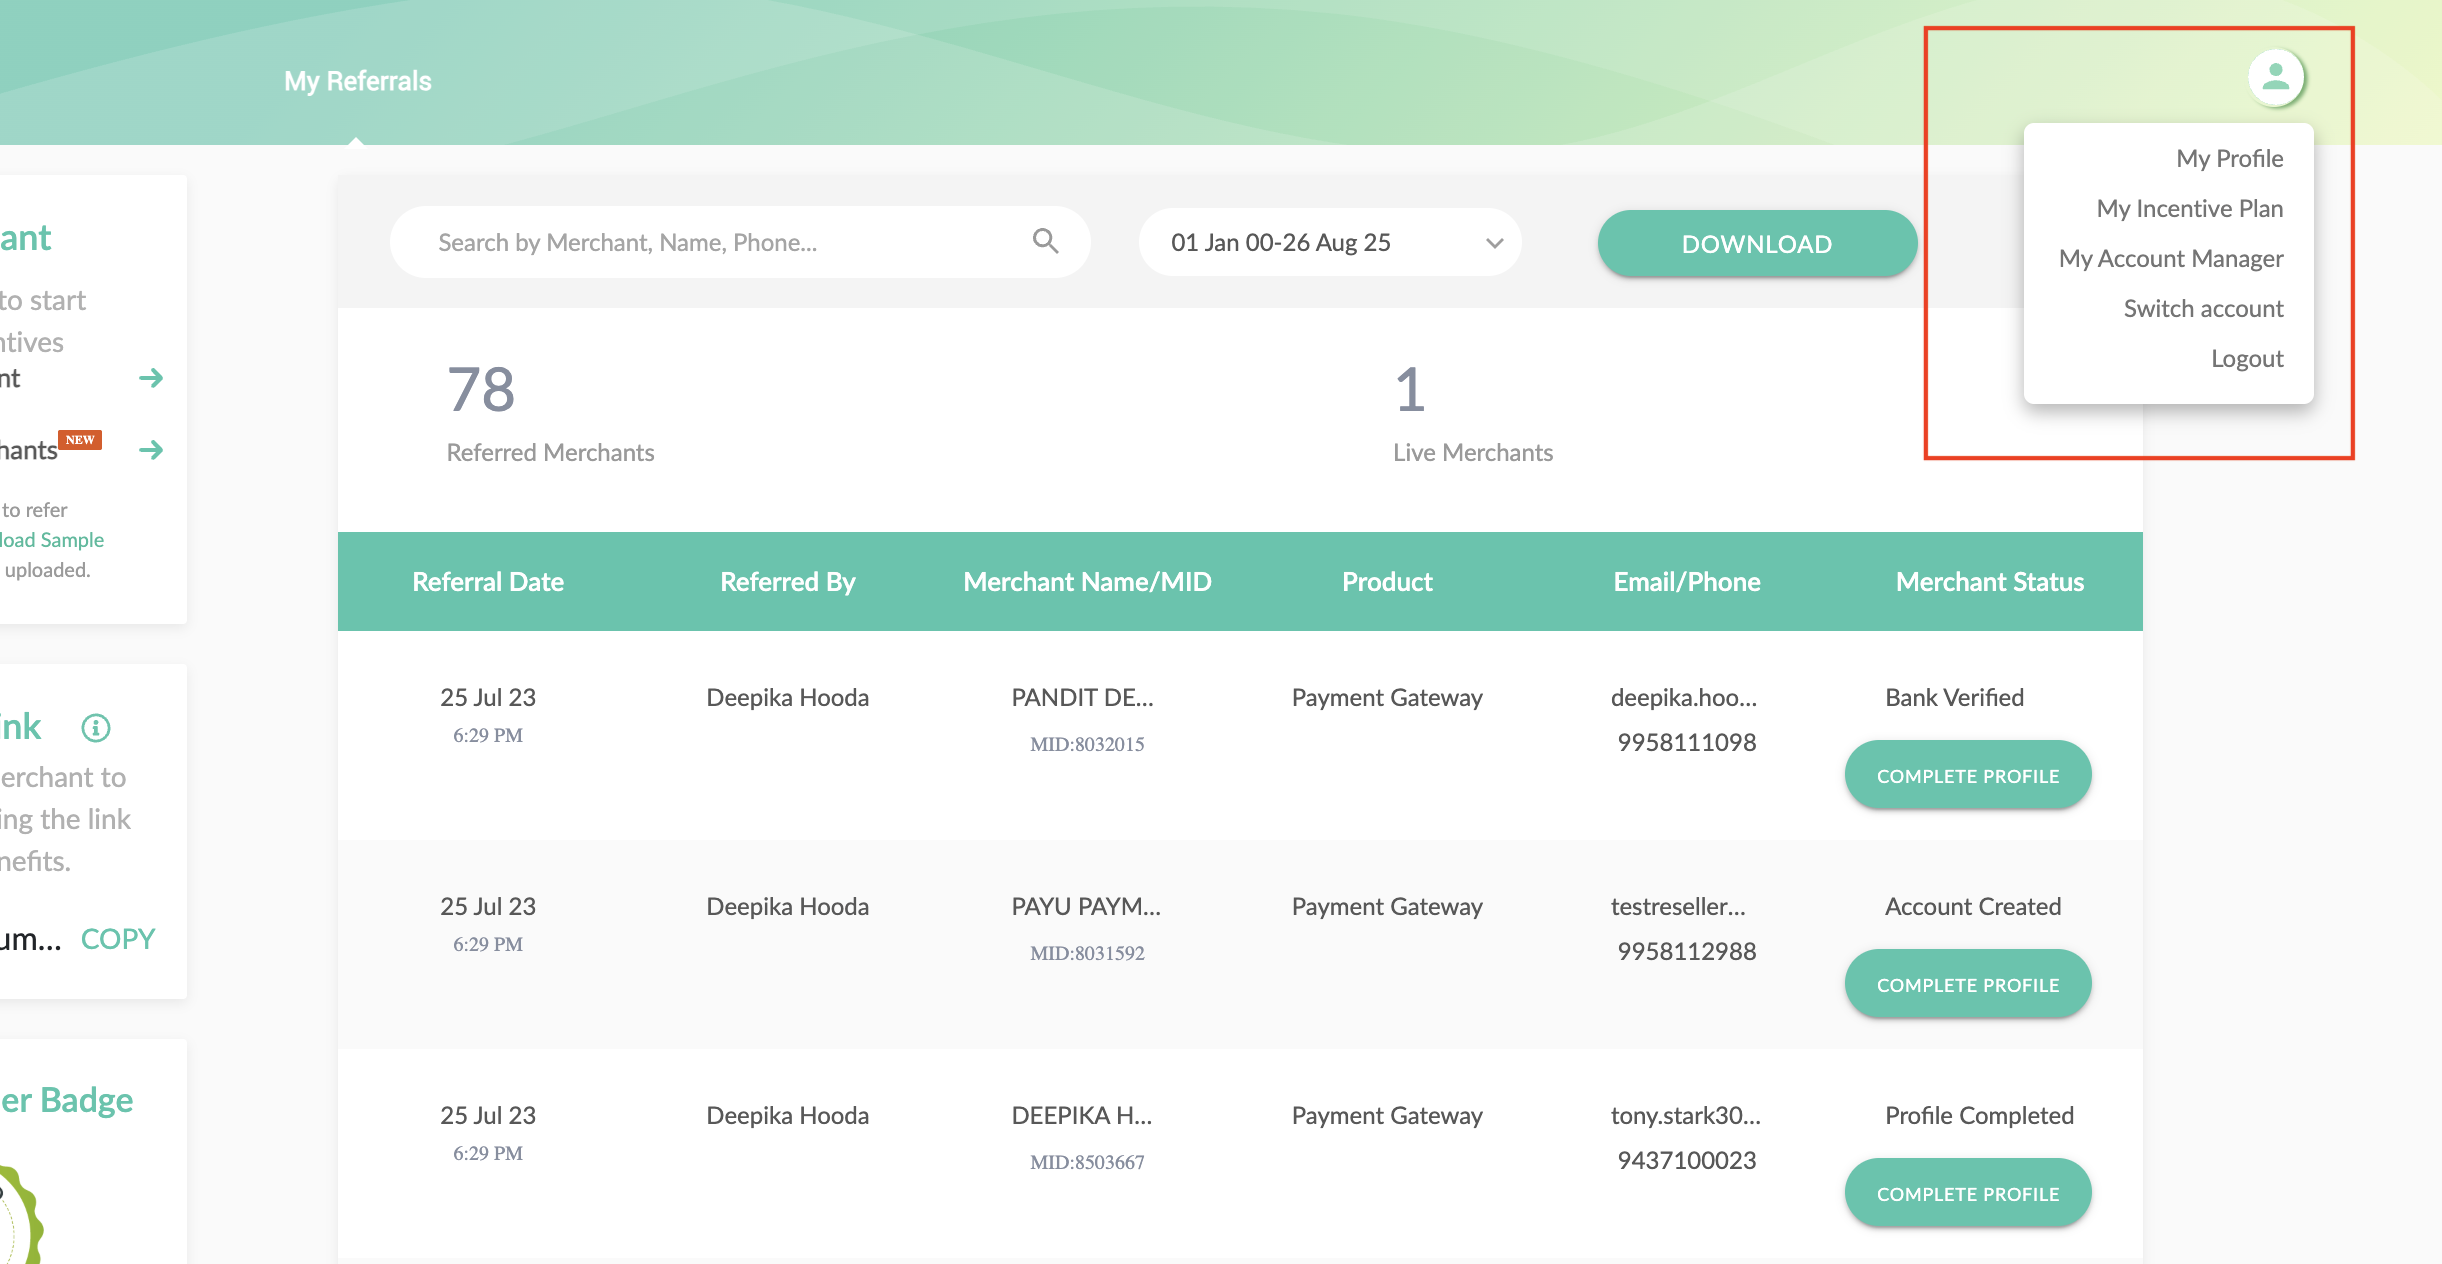

- Expand the Application Details pane (if required).
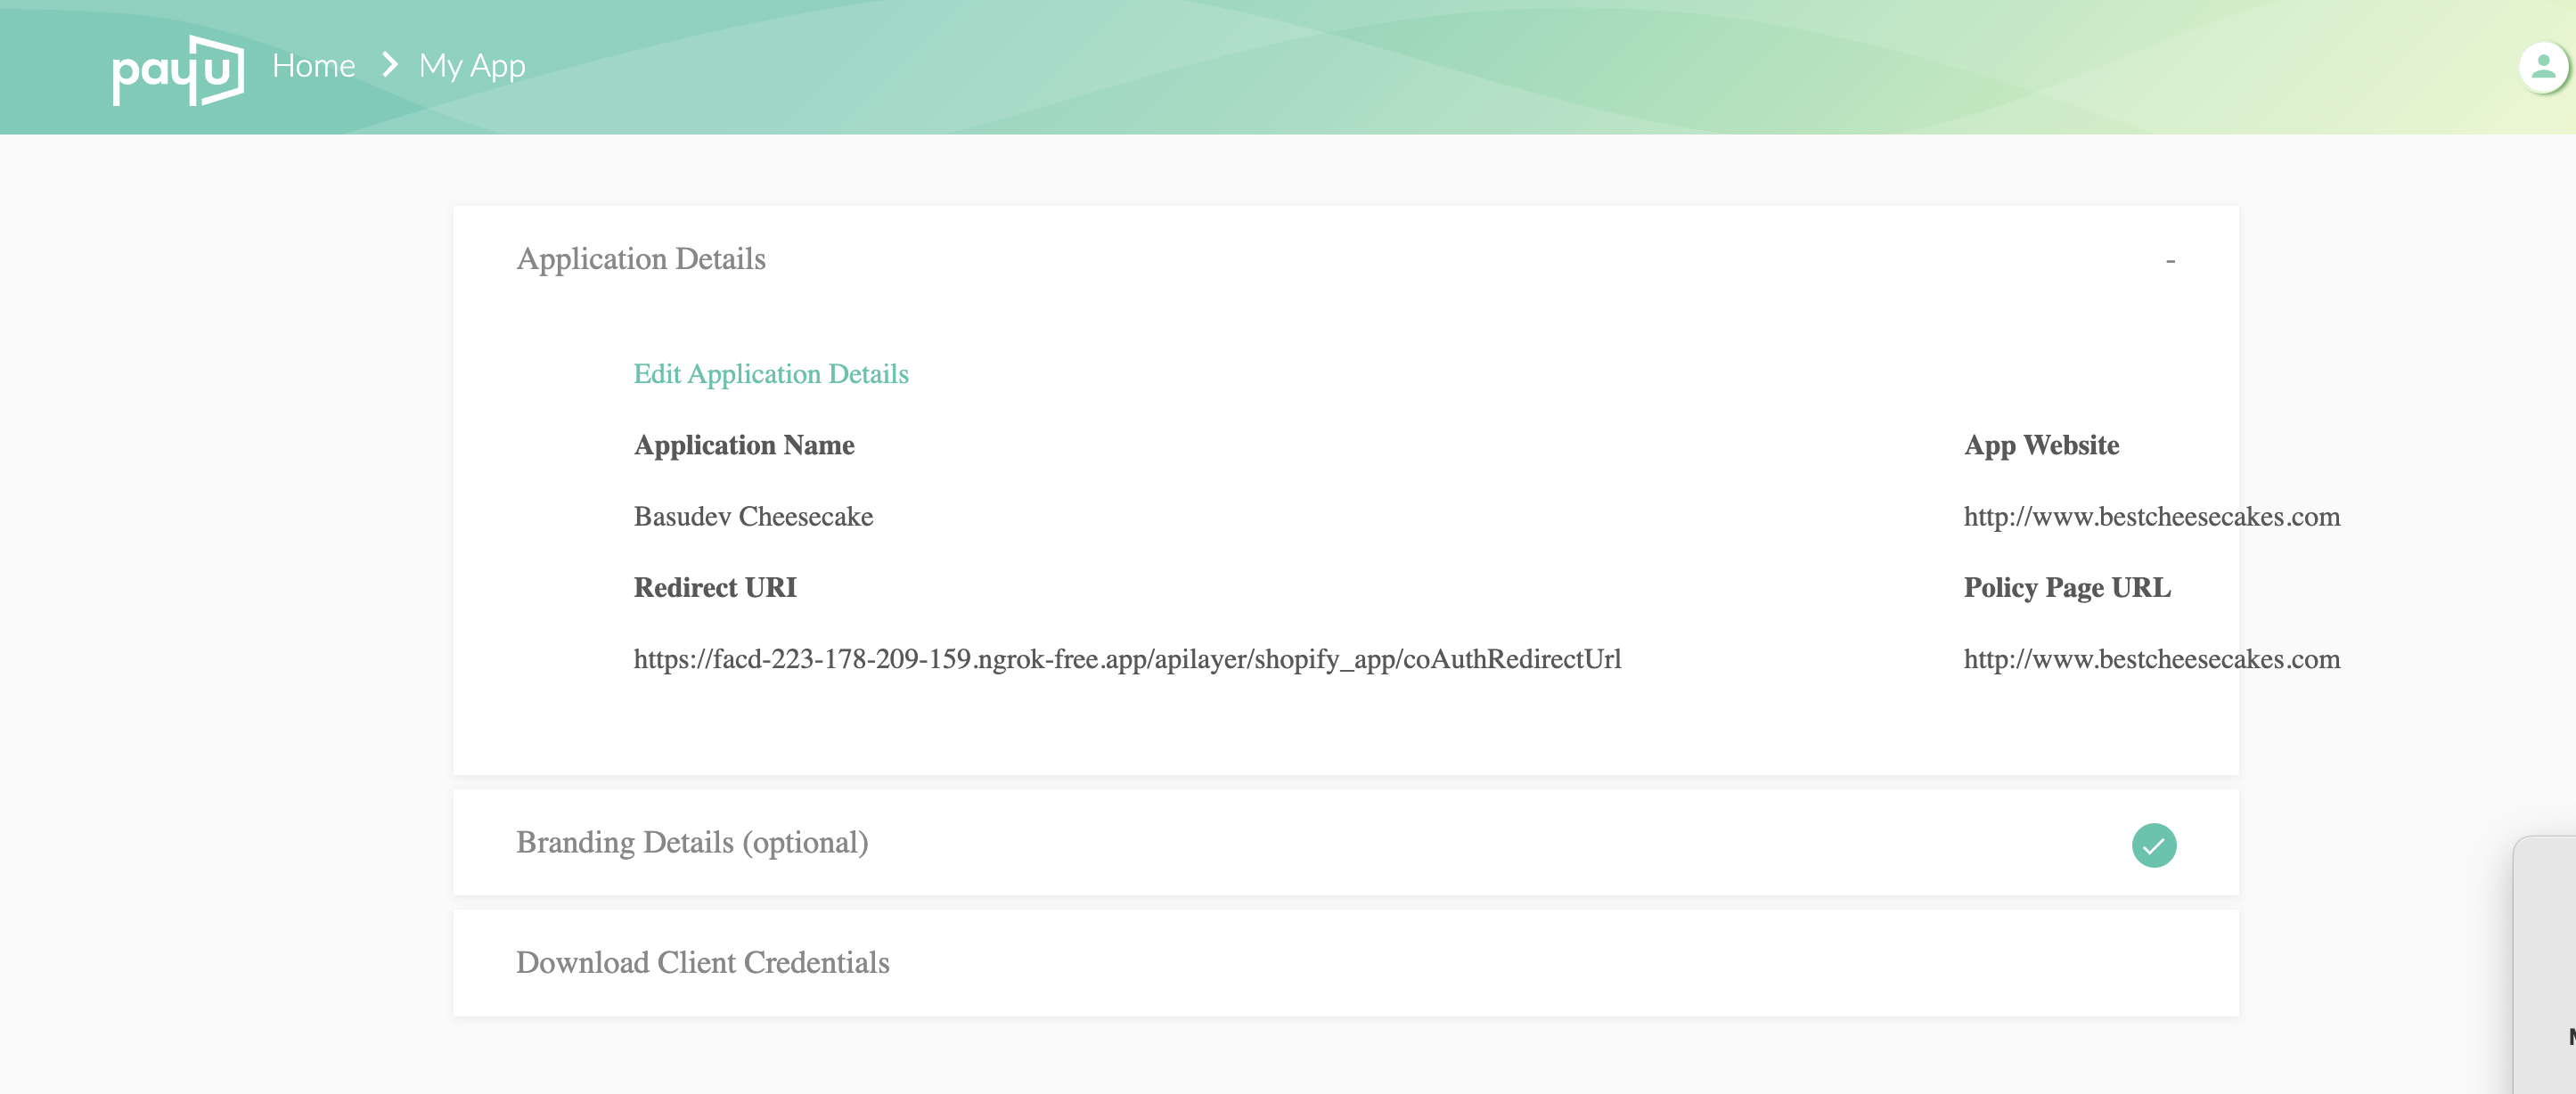
- Update the following details to complete your app registration:
| Field | Description | Example |
|---|---|---|
| Application name | Enter your application name. | PayU Payments Pvt. Ltd. |
| Application website | Enter your application website. | https://www.payu.in/ |
| Redirect URL | URL used to redirect back to the partner platform. | https://www.xyz.in/ |
| Policy Page URL | Link to your privacy policy. | https://policy.xyz.in/ |
- Click Submit.
- Verify your identity with your password after submission so the details are updated.
- Expand the Branding Details pane.

- Click Browse in the Add a brand logo field and select a brand logo.
Note: The brand logo should be JPG/JPEG, less than 5 MB, and 90 × 90 pixels.
- Click the colour chooser in the Pick color field for the theme.
For the full standalone guide, see Configure URLs and Logo.
Step 3: Log in to Partner Portal
To log in to your Partner Account:
Steps to Log in Partner Portal
-
Navigate to the following PayU Affiliate Partner Program URL:
The PayU Affiliate Partner Program page is displayed.
-
Click Log In.
The Enter your email to create account or login page is displayed.
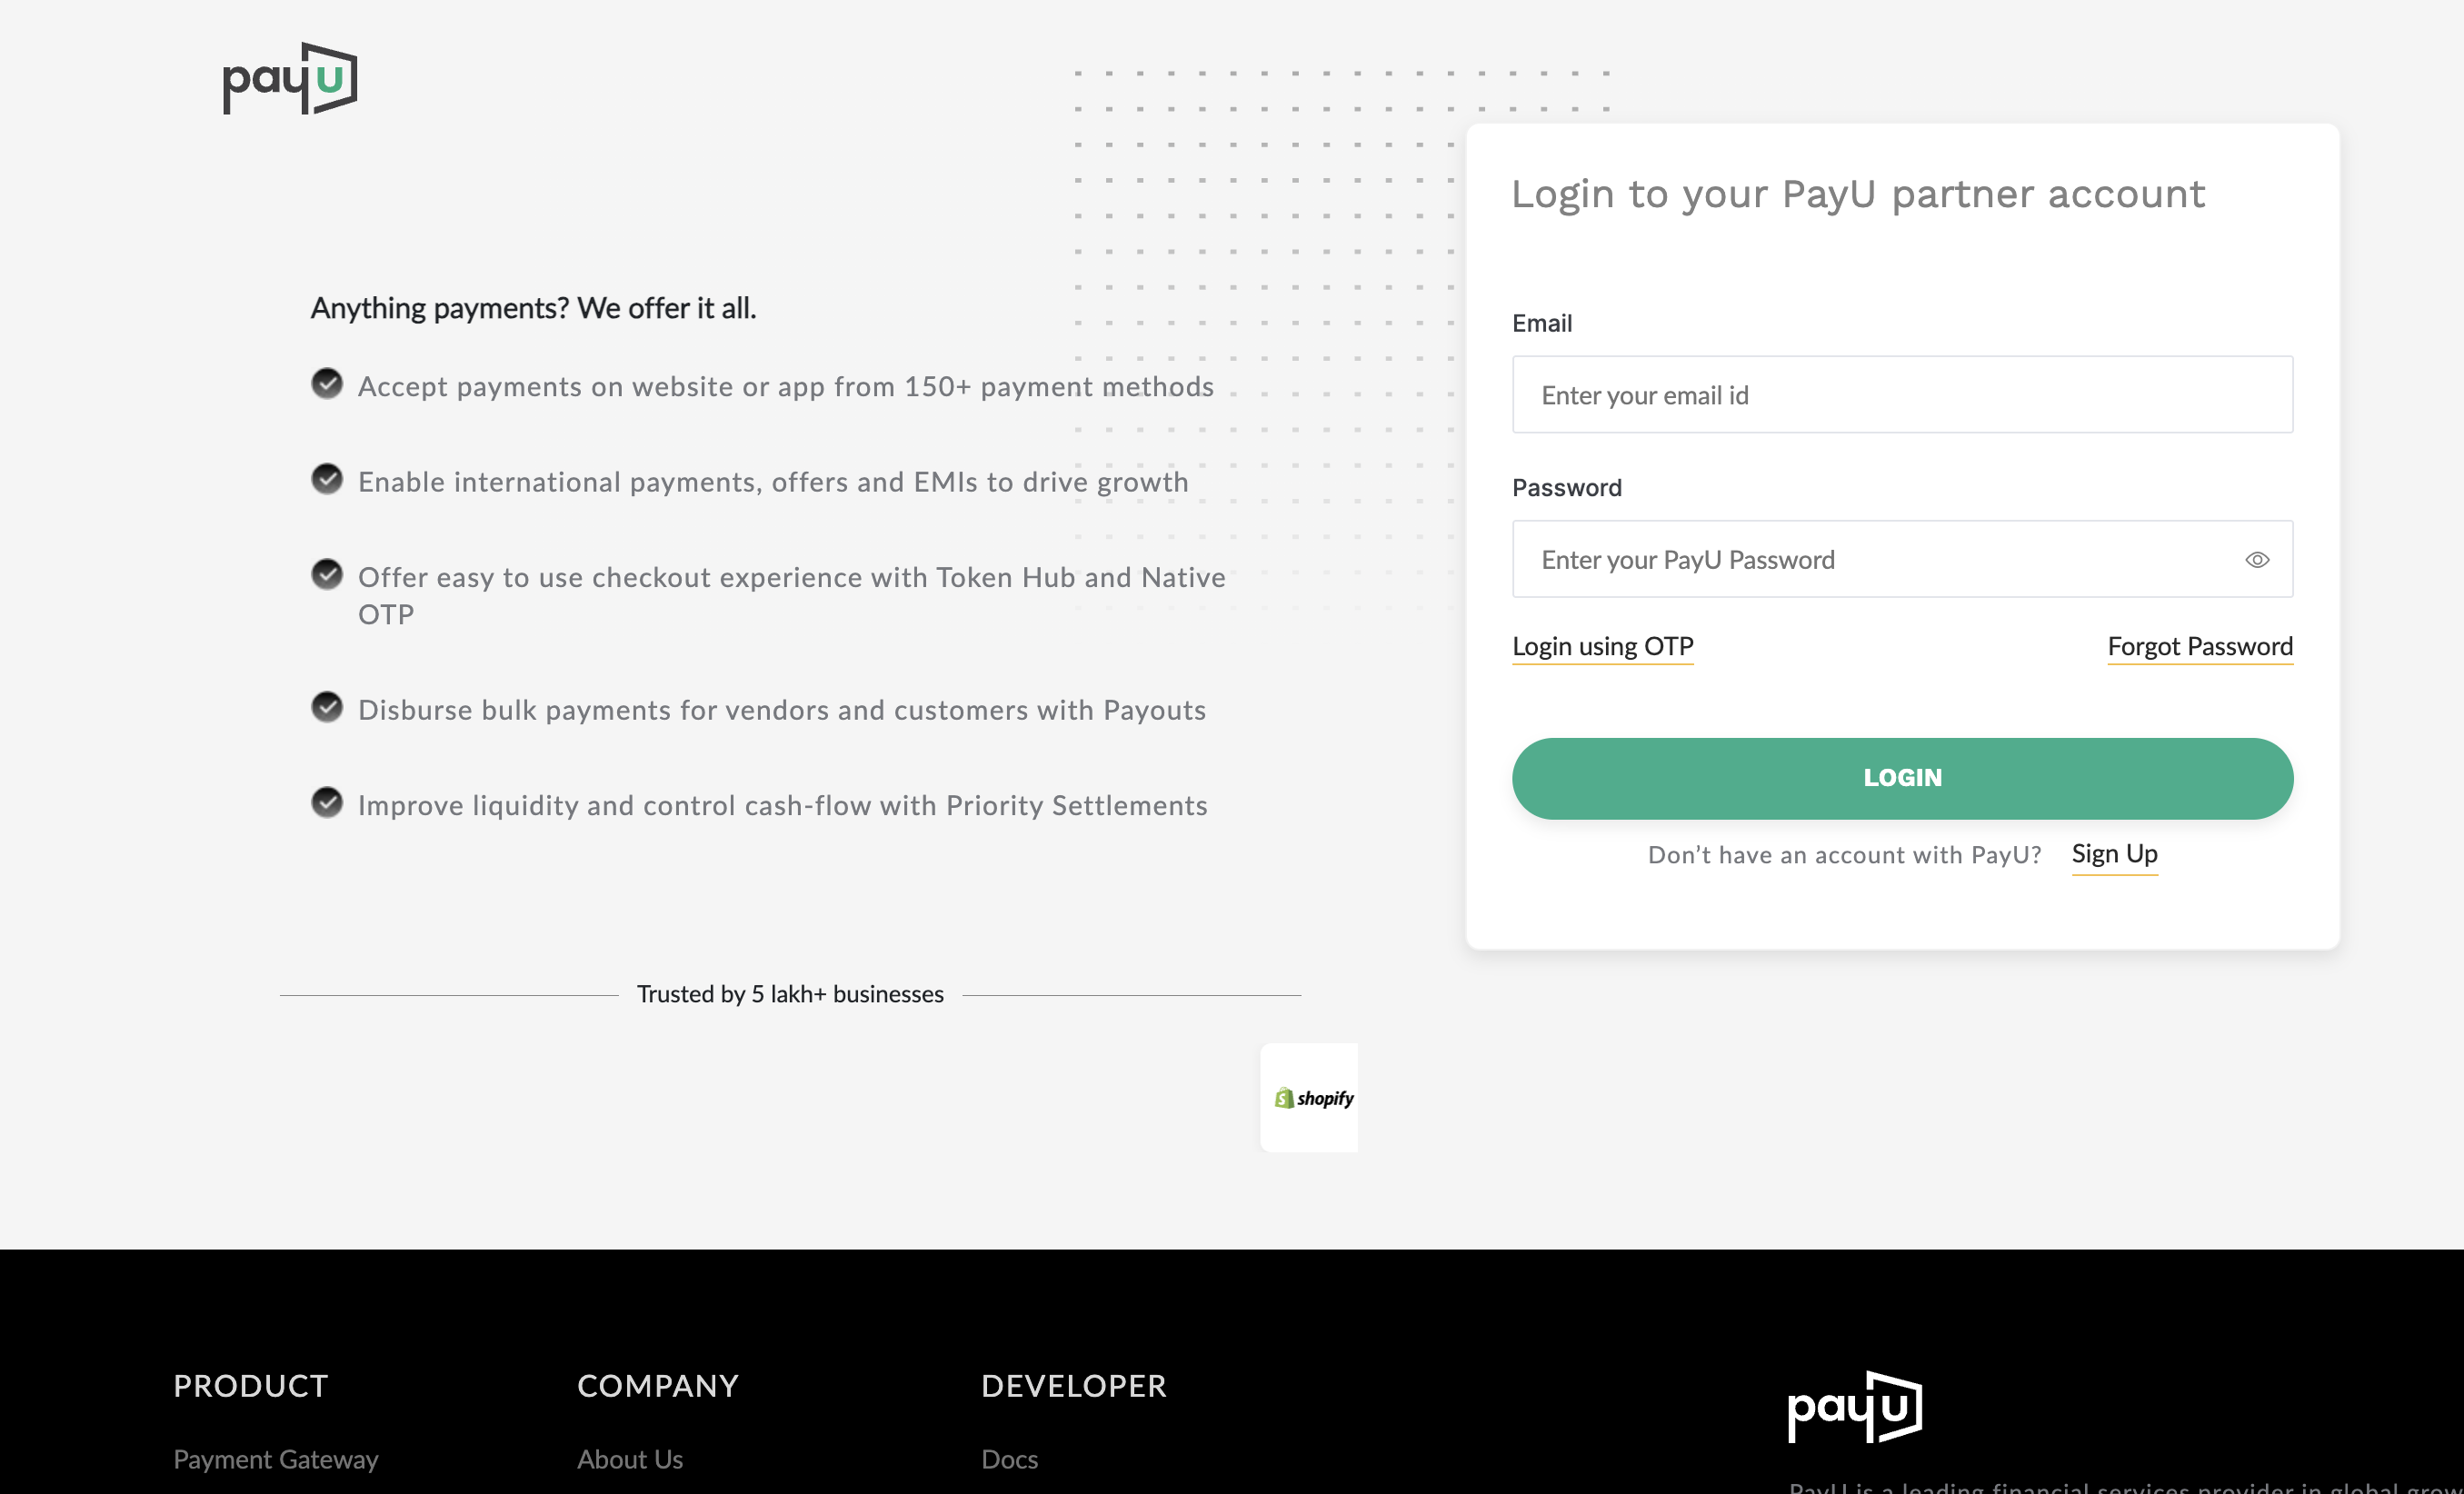
-
Enter your email address in the Enter Email field and click Next.
A page requesting your password is displayed.
Note: If you do not have an account or are not registered, the Tell us more about yourself page is displayed. For more information, see Step 1: Register a Partner Account.
- Enter your password in the Enter Password field and click Login.
Note: If you forgot your password or wish to log in using OTP, click Login with OTP. Enter the OTP sent to your registered mobile number in the Enter OTP field and click Verify Mobile.
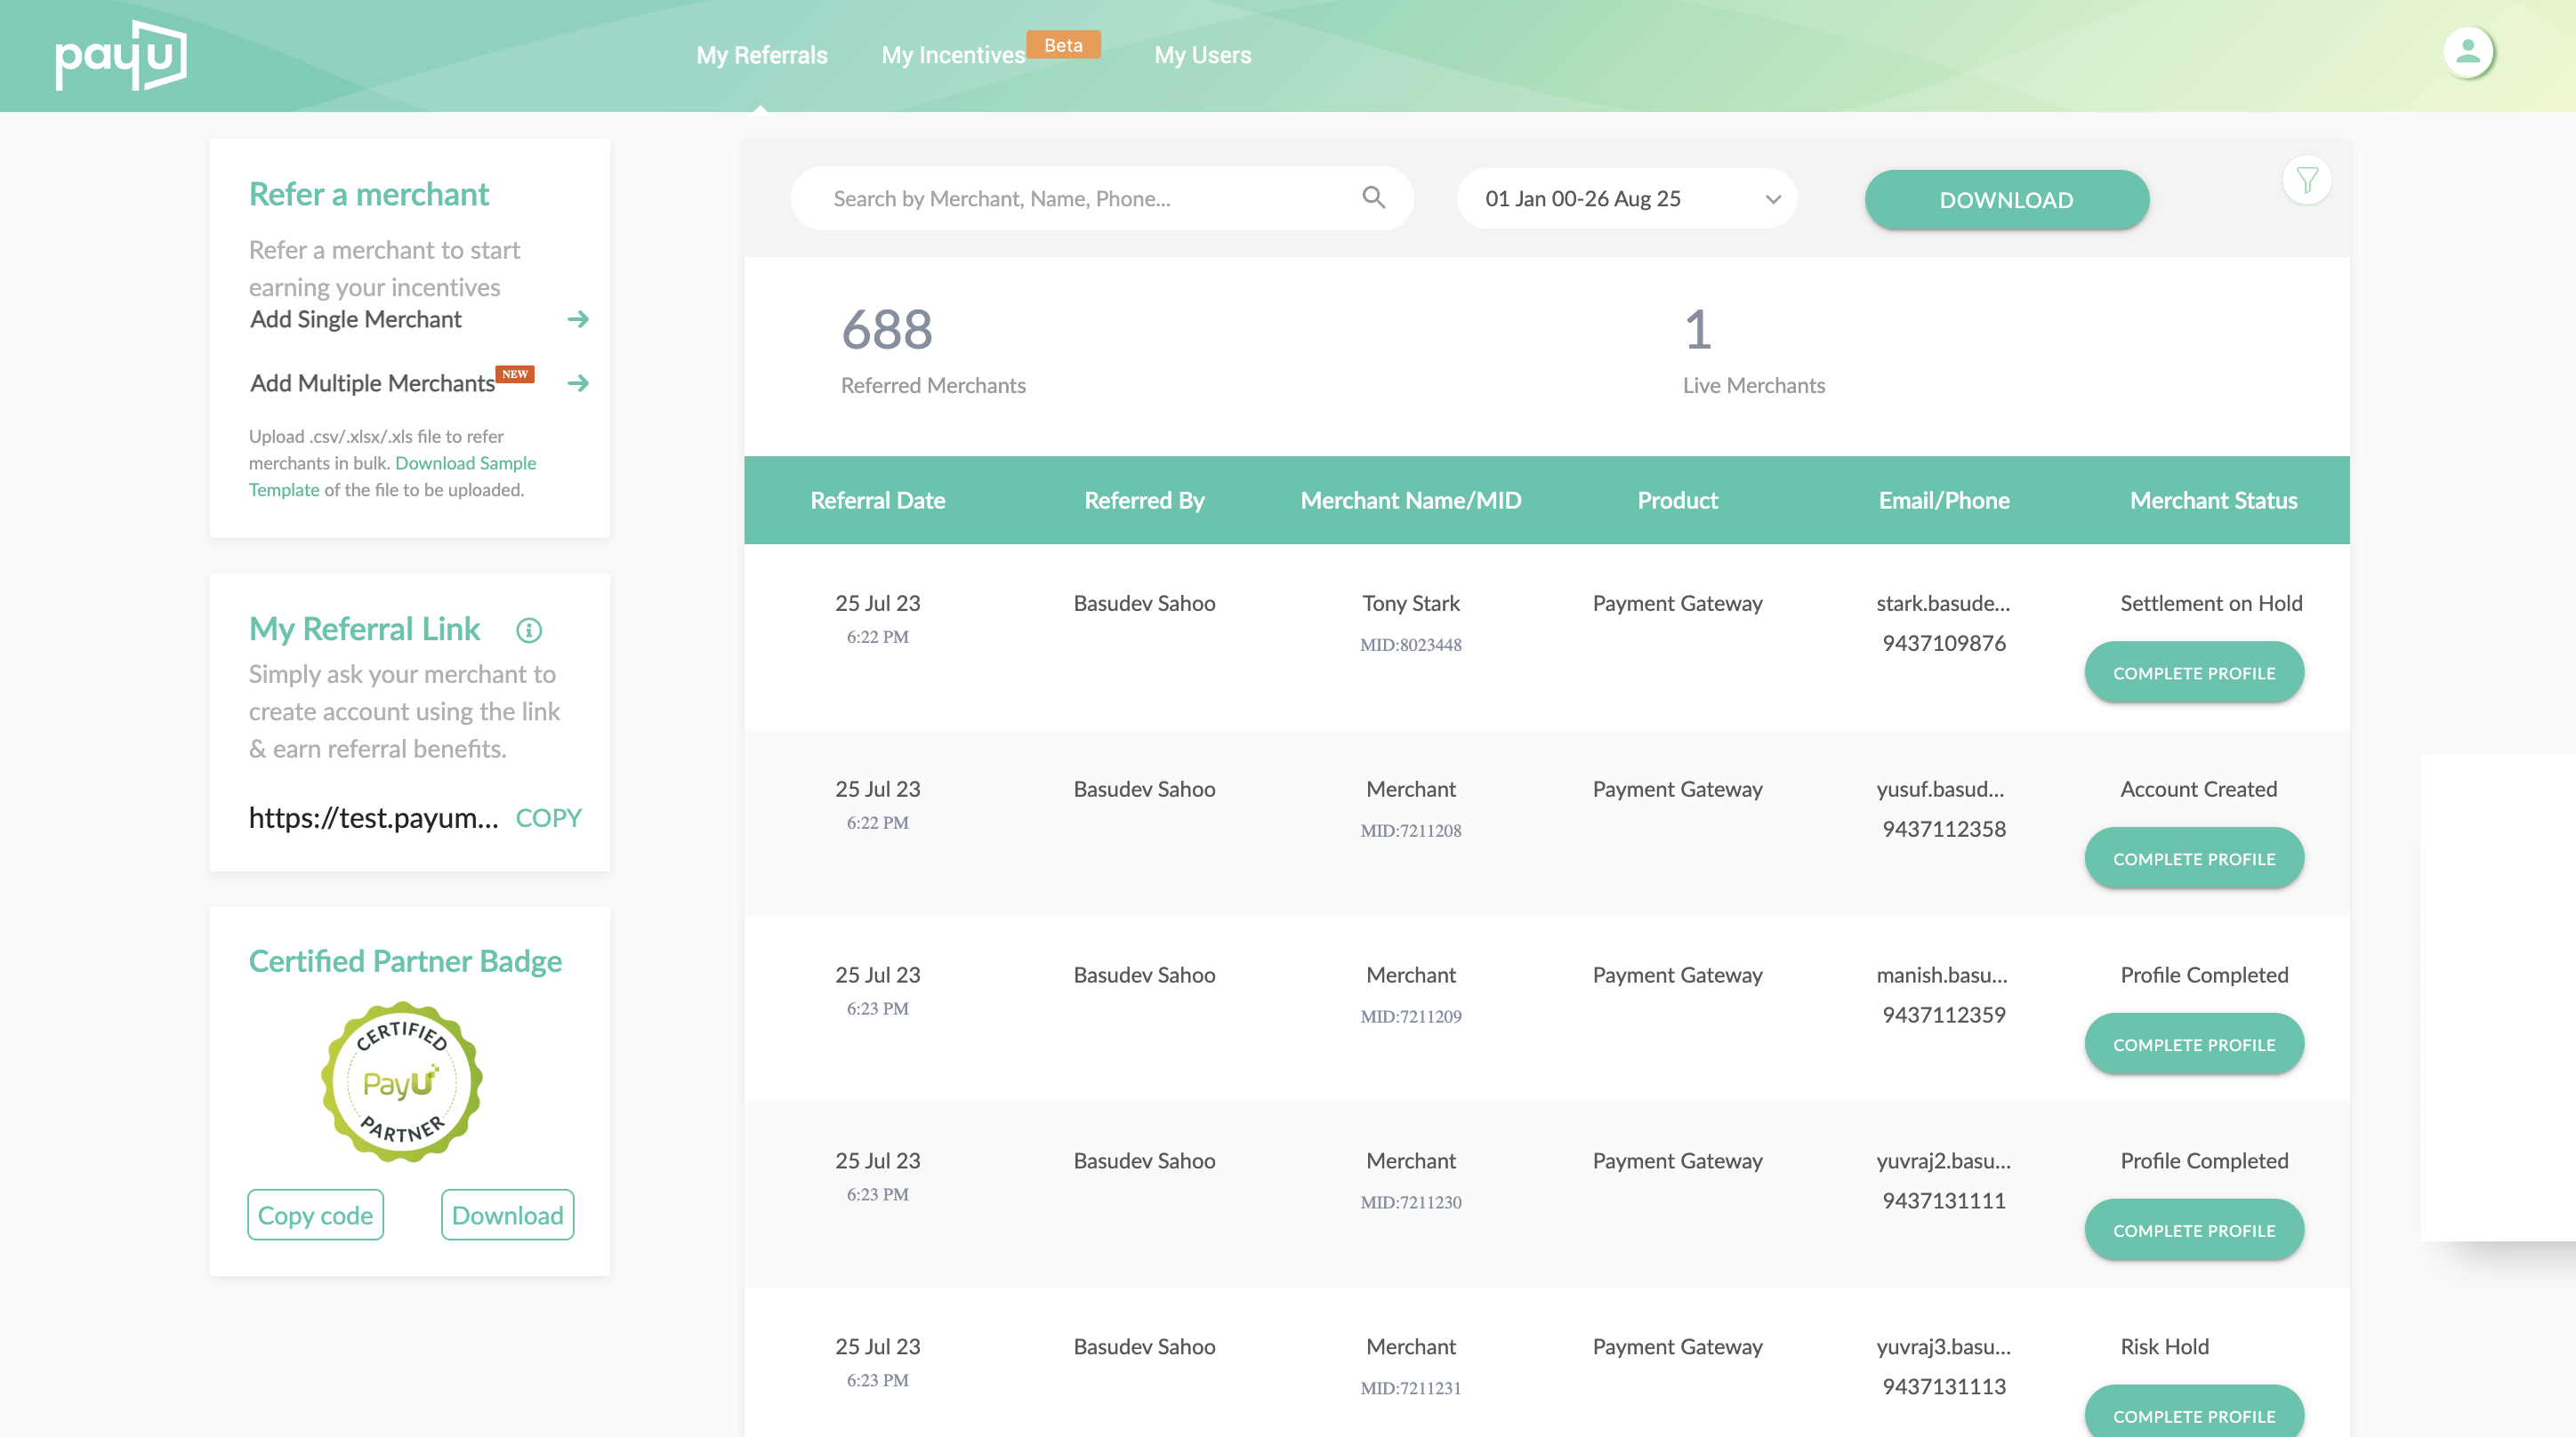
The Partner Dashboard page is displayed.
Step 4: Track Incentives
You can view your incentive plan and manage incentives on the My Incentives tab of the Partner Portal.
Note: Your net incentive is: (Client TDR – Base Rate) × Transaction Value, where Client TDR is the rate given to your referrals.
View your Incentive Plan
PayU provides incentives for onboarding merchants and for payments made by customers through your merchants.
- Log in to Partner Portal.
- Click your profile picture at the top-right and select Incentive Plan from the drop-down menu.
The Here is your incentive plan page is displayed.
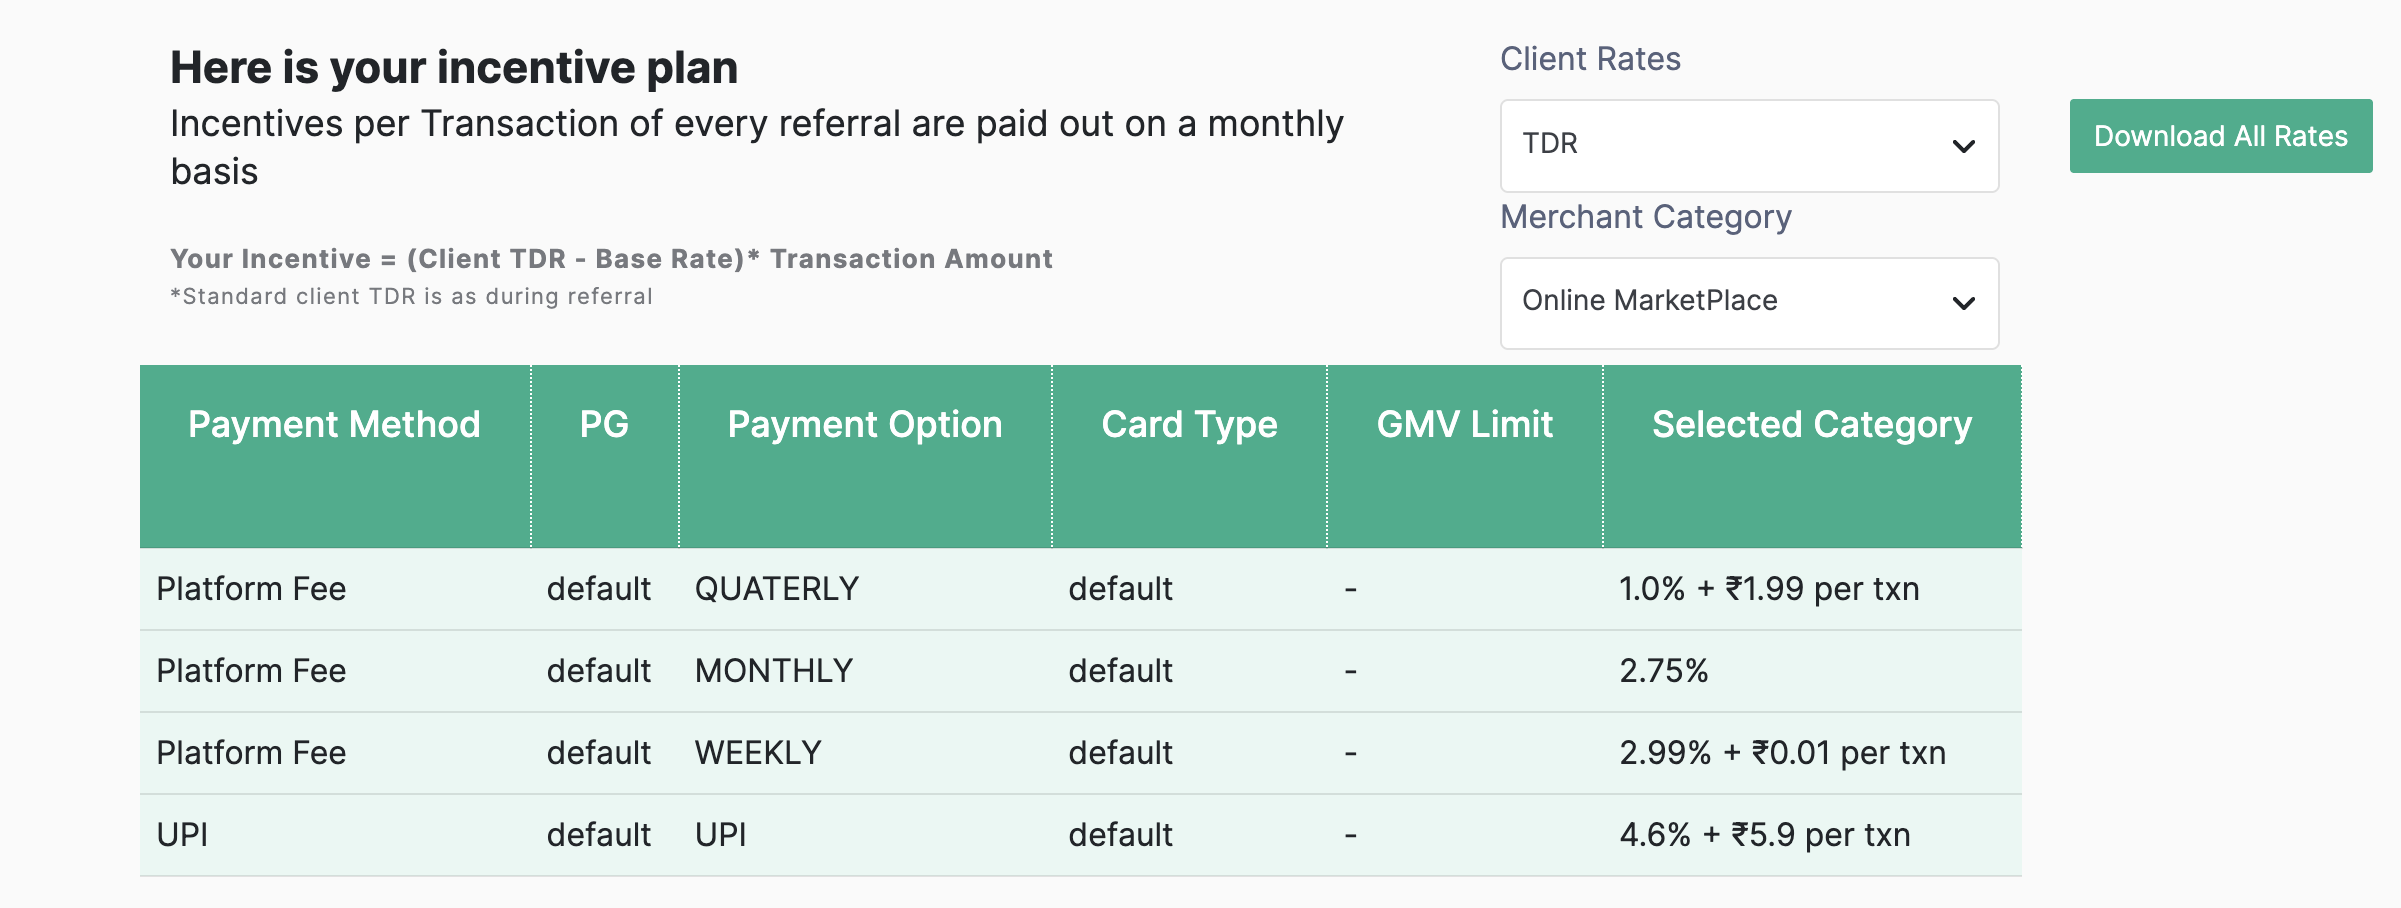
The base rate is listed for various payment methods.
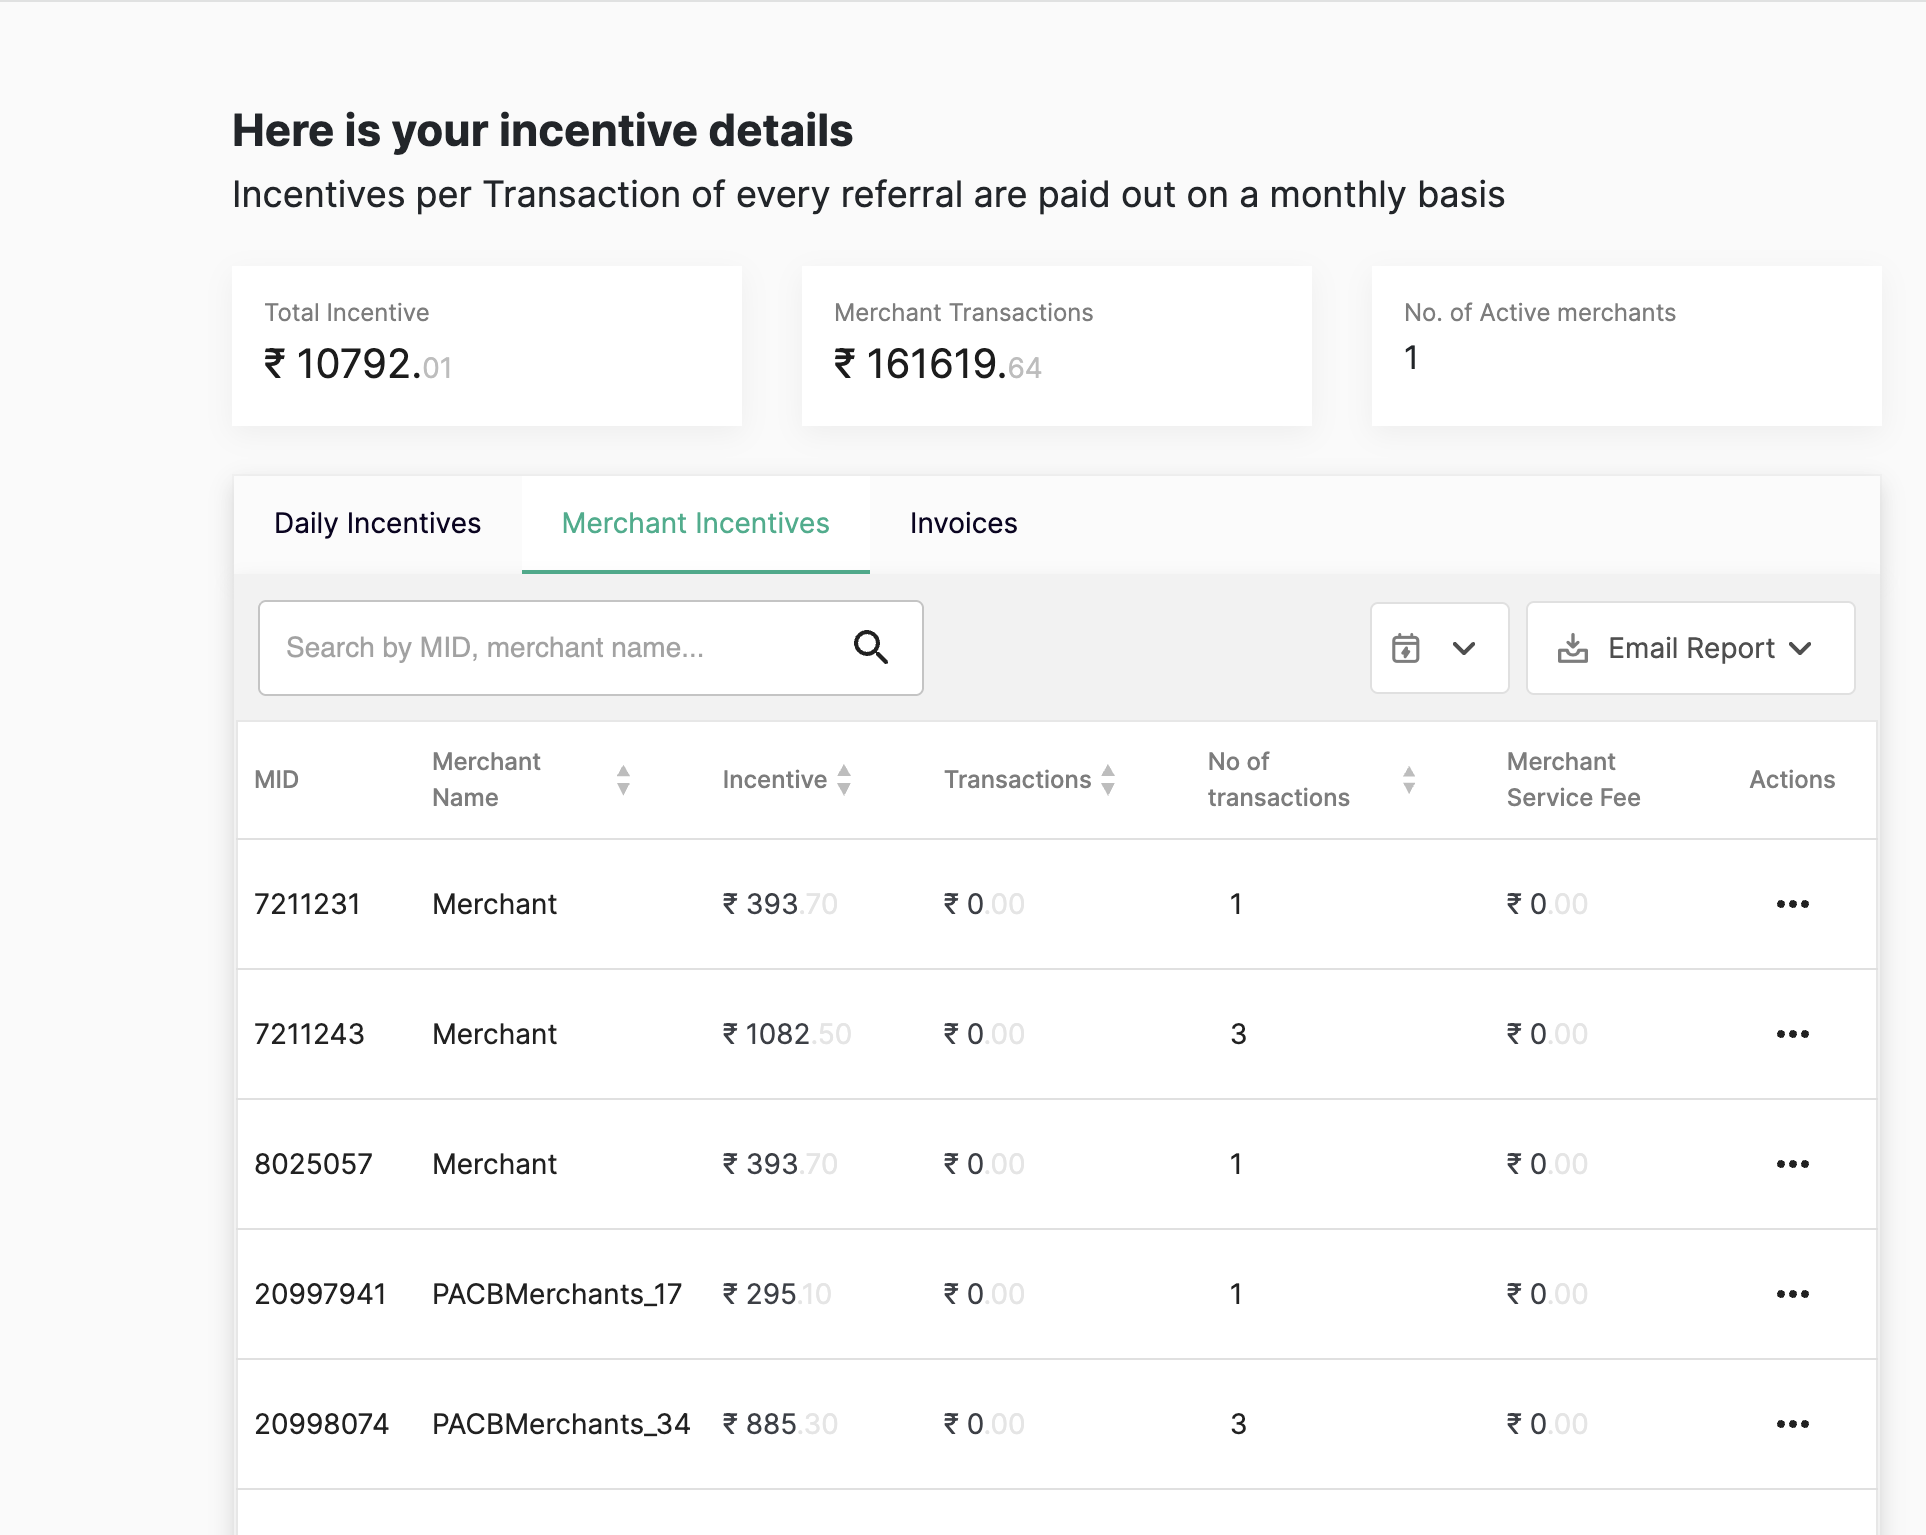
View your incentives
Incentives refresh at the end of the day. To view incentives for a custom period, see View incentives for a custom period.
- Perform any of the following:
- Select the My Incentives tab on top.
- Click your profile picture on the top-right corner and select My Incentives from the drop-down menu.

- Select any of the following tabs for different views of incentives:
- My Incentives
- Merchant Incentives
View the Incentive Details
To view specific incentive details, including the settlement breakup:
- Enter the merchant MID or merchant name in the search column and click Search.
- Select the hamburger menu on the incentive entry and select View Details.

Note: You can export the detailed settlement record to PDF using the Download Details option on the hamburger menu.
View Incentives for a Custom Period
The My Incentives tab shows incentives for the past seven days by default. You can select a date range, month, or year using the calendar view.
- Click Calendar to open the calendar view.
- Select any of the following options:
- Today
- Yesterday
- Past 7 days
- Past 30 days
- Click Apply to view the results.
Referral Onboarding
You will find an option available on the Partner Dashboard as Refer a Merchant. Using this, you can either onboard a single merchant or multiple merchants with a single click. Enter your merchant’s primary details, and you are done with creating a merchant account. You can onboard a merchant or multiple merchants as described in the following sections:
Add a Referral Merchant
This section describes the procedure add a single referral merchant.
To onboard a referral merchant:
-
Log in to your partner account.
On the left pane, the Add Single Merchant and Add Multiple Merchant options are displayed under Refer a Merchant.
-
Click Add Single Merchant on the left pane to add a single merchant.

The _Refer a merchant_ pop-up page is displayed.
- Enter the following merchant’s details:
| Field | Description |
|---|---|
| Name | Enter the name of the merchant. |
| Email Address | Enter the email address of the merchant. |
| Phone Number | Enter the merchant’s phone number. |
| Payment Service | Enter the payment service from the drop-down list that the merchant will use. |
| Business Category | Select the business category from the drop-down list to which the merchant belongs. |
-
Click Next to proceed further.
The Merchant Plan page is displayed.

- Click Add Merchant button to add the merchant with the Standard plan (free), where the transaction charges listed on the page are applicable. Before adding, check default merchant plan details.
Note: Select the Click Here option at the bottom of the Merchant Plan page to see the benefits (similar to the following screenshot) if you are a registered partner. You can avail of these benefits only if you are a registered partner. For more information, contact PayU Support.

The referral merchant gets added to the Home page.

- Click Complete Profile to complete the merchant’s profile.
You will be redirected to the Complete Your KYC page as in PayU Dashboard. For more information, refer the to Activate Account section of the PayU Dashboard User Guide.
Add Multiple Referral Merchants
You can upload multiple referral merchants by entering their details in the provided template. If you want to add a merchant (single), refer to Onboarding APIs
To add multiple referral merchants:
-
Log in to your partner account.
On the left pane, the Add Single Merchant and Add Multiple Merchant options are displayed under Refer a Merchant.
-
Click Add Multiple Merchants on the left pane to add multiple merchants.
The Add Multiple Merchants pop-up page is displayed.

- Select the Download Sample Template option to download the spreadsheet template in which you need to fill in the details of multiple merchants.
Note: If you try to upload using any other spreadsheet or template, the upload will be successful only if the columns (marked mandatory and same order) as in the template mentioned in Step 3.
- Click Browse to select the spreadsheet containing the multiple merchant details.
Note: The values for the following columns in the spreadsheet are mandatory. You can fill in the other details.
- Merchant Name
- Merchant Email
- Merchant Phone
- Click Submit.
Complete your Referral Details
You have to complete the following sections (in the following sequence) on the KYC page to complete KYC for your merchant with PayU:
Navigate to the KYC page for a Referral
To open the KYC page for a referral:
- Log in to Partner Portal.
The list of referrals are displayed.

-
Click Complete Profile next on the referral entry that you wish to complete KYC details.
A page is displayed with a message, “Your account is active. Complete your full KYC.” The PAN Verification section is displayed requesting your PAN details.
PAN Verification
To verify your PAN on the PAN verification section:
- Enter your PAN in the Business PAN Card field.

- Click Proceed to Verify.
After the PAN is verified, the section name gets updated to “Your PAN is verified. Way yo Go!” and Tell us a little bit about your business section is enabled.
Tell us a little bit about your business
To enter information on your business in the Tell us a little bit about your business section:
- Select your business category from the Business Category drop-down list.

- Select your business sub category from the Business Sub Category drop-down list.
- Enter your GSTIN in the GSTIN field (optional).
- Enter the estimated sales or revenue per month of your business in the Expected Sales per month field.
- Click Proceed.
The section name gets updated to Business details submitted successfully. The Enter Bank details of<your name> section is enabled, where <your name > is substituted with your name as in PAN.
Enter Bank Details
To enter your bank details on the Enter bank details of<your name> section:
- Enter your account number in the Bank Account Number field.

- Enter your bank IFSC code in the IFSC Code field. You can find the IFSC code on the cheque book provided by your bank.
- Click Connect Bank Account.
How do you Wish to Accept Payments
To specify how do wish to accept payments from your customers, select any of the following on the How do you wish to accept payments section:
- On my website/app: Enter the URL for the following fields:
- Website
- Android App
- iOS App

Note: You have to ensure that the list of pages are created on your website as indicated under the Important – Your website must have the following pages.
- I don’t have a website/app: You can use the following features of Dashboard to collect payments if you don’t have website or app:

Click Next to proceed to the Verify signing authoring details section.
The section title gets updated to “Signing authority details captured” and the Verify signing authority details section is enabled.
Verify signing authority details
To verify your business signing authority details in the Verify signing authority details section:
- Verify the details in the following fields:
- Signing Authority Name
- Signing Authority’s PAN card number
- Signing Authority Email ID

- Update the email ID in the Signing Authority Email ID field if required.
- Click Proceed to KYC.
The section name gets update to “Signing authority details captured” and the Complete the KYC section is enabled.
Complete the KYC
To fetch your KYC documents automatically from the cKYC/Aadhaar database or upload the documents manually, select any of the following options:
- Fetch from cKYC: To fetch your automatically from the cKYC database:
- Enter your date of birth or company’s incorporation date in the Date of Birth/ Date of Incorporation field.
- Select the I hereby authorize PayU … check box to authorize PayU to fetch the KYC documents from cKYC.
- Click Submit.

- Fetch from Aadhaar: To fetch your automatically from the Aadhaar database:
- Select the By proceeding I accept Aadhar Terms and Conditions check box to accept Aaadhar Terms & Conditions.
- Click Submit.

- Upload documents manually: To upload the KYC documents manually:
- Verify the details in the following fields:
- Name
- Address
- Postal Code
- City
- State
- Update the Address and Postal Code fields if required.
- Choose Yes in the Do you have a different Operating Business Address ? field if the business address is different and enter the following details:
- Address
- Postal Code
- Click Confirm and Proceed.
- Verify the details in the following fields:
An additional section, Additional documents required is displayed. For more information, refer to Additional Documents Required.
Additional documents required
To submit the documents manually:

- Select each of the following drop-down list and select the document by clicking Select file from your library:
- PAN Card: Select a scanned copy or photo of your PAN card.
- Address Proof: Select a scanned copy or photo of a government issued ID cards such as Passport or Driving License.
- Government issued certificate copy (only if requested): Select your Income Tax returns scanned document (80G).
- Click Submit Documents.
A message similar to the following is displayed at the bottom right-corner of your browser.

Managing Users
You can invite users and provide permissions to manage or maintain your Partner Portal. You can perform the following to manage users:
Add a User
To add a user on Partner Portal:
- Click your profile picture on the top-right corner and select Invite a user from the drop-down menu.
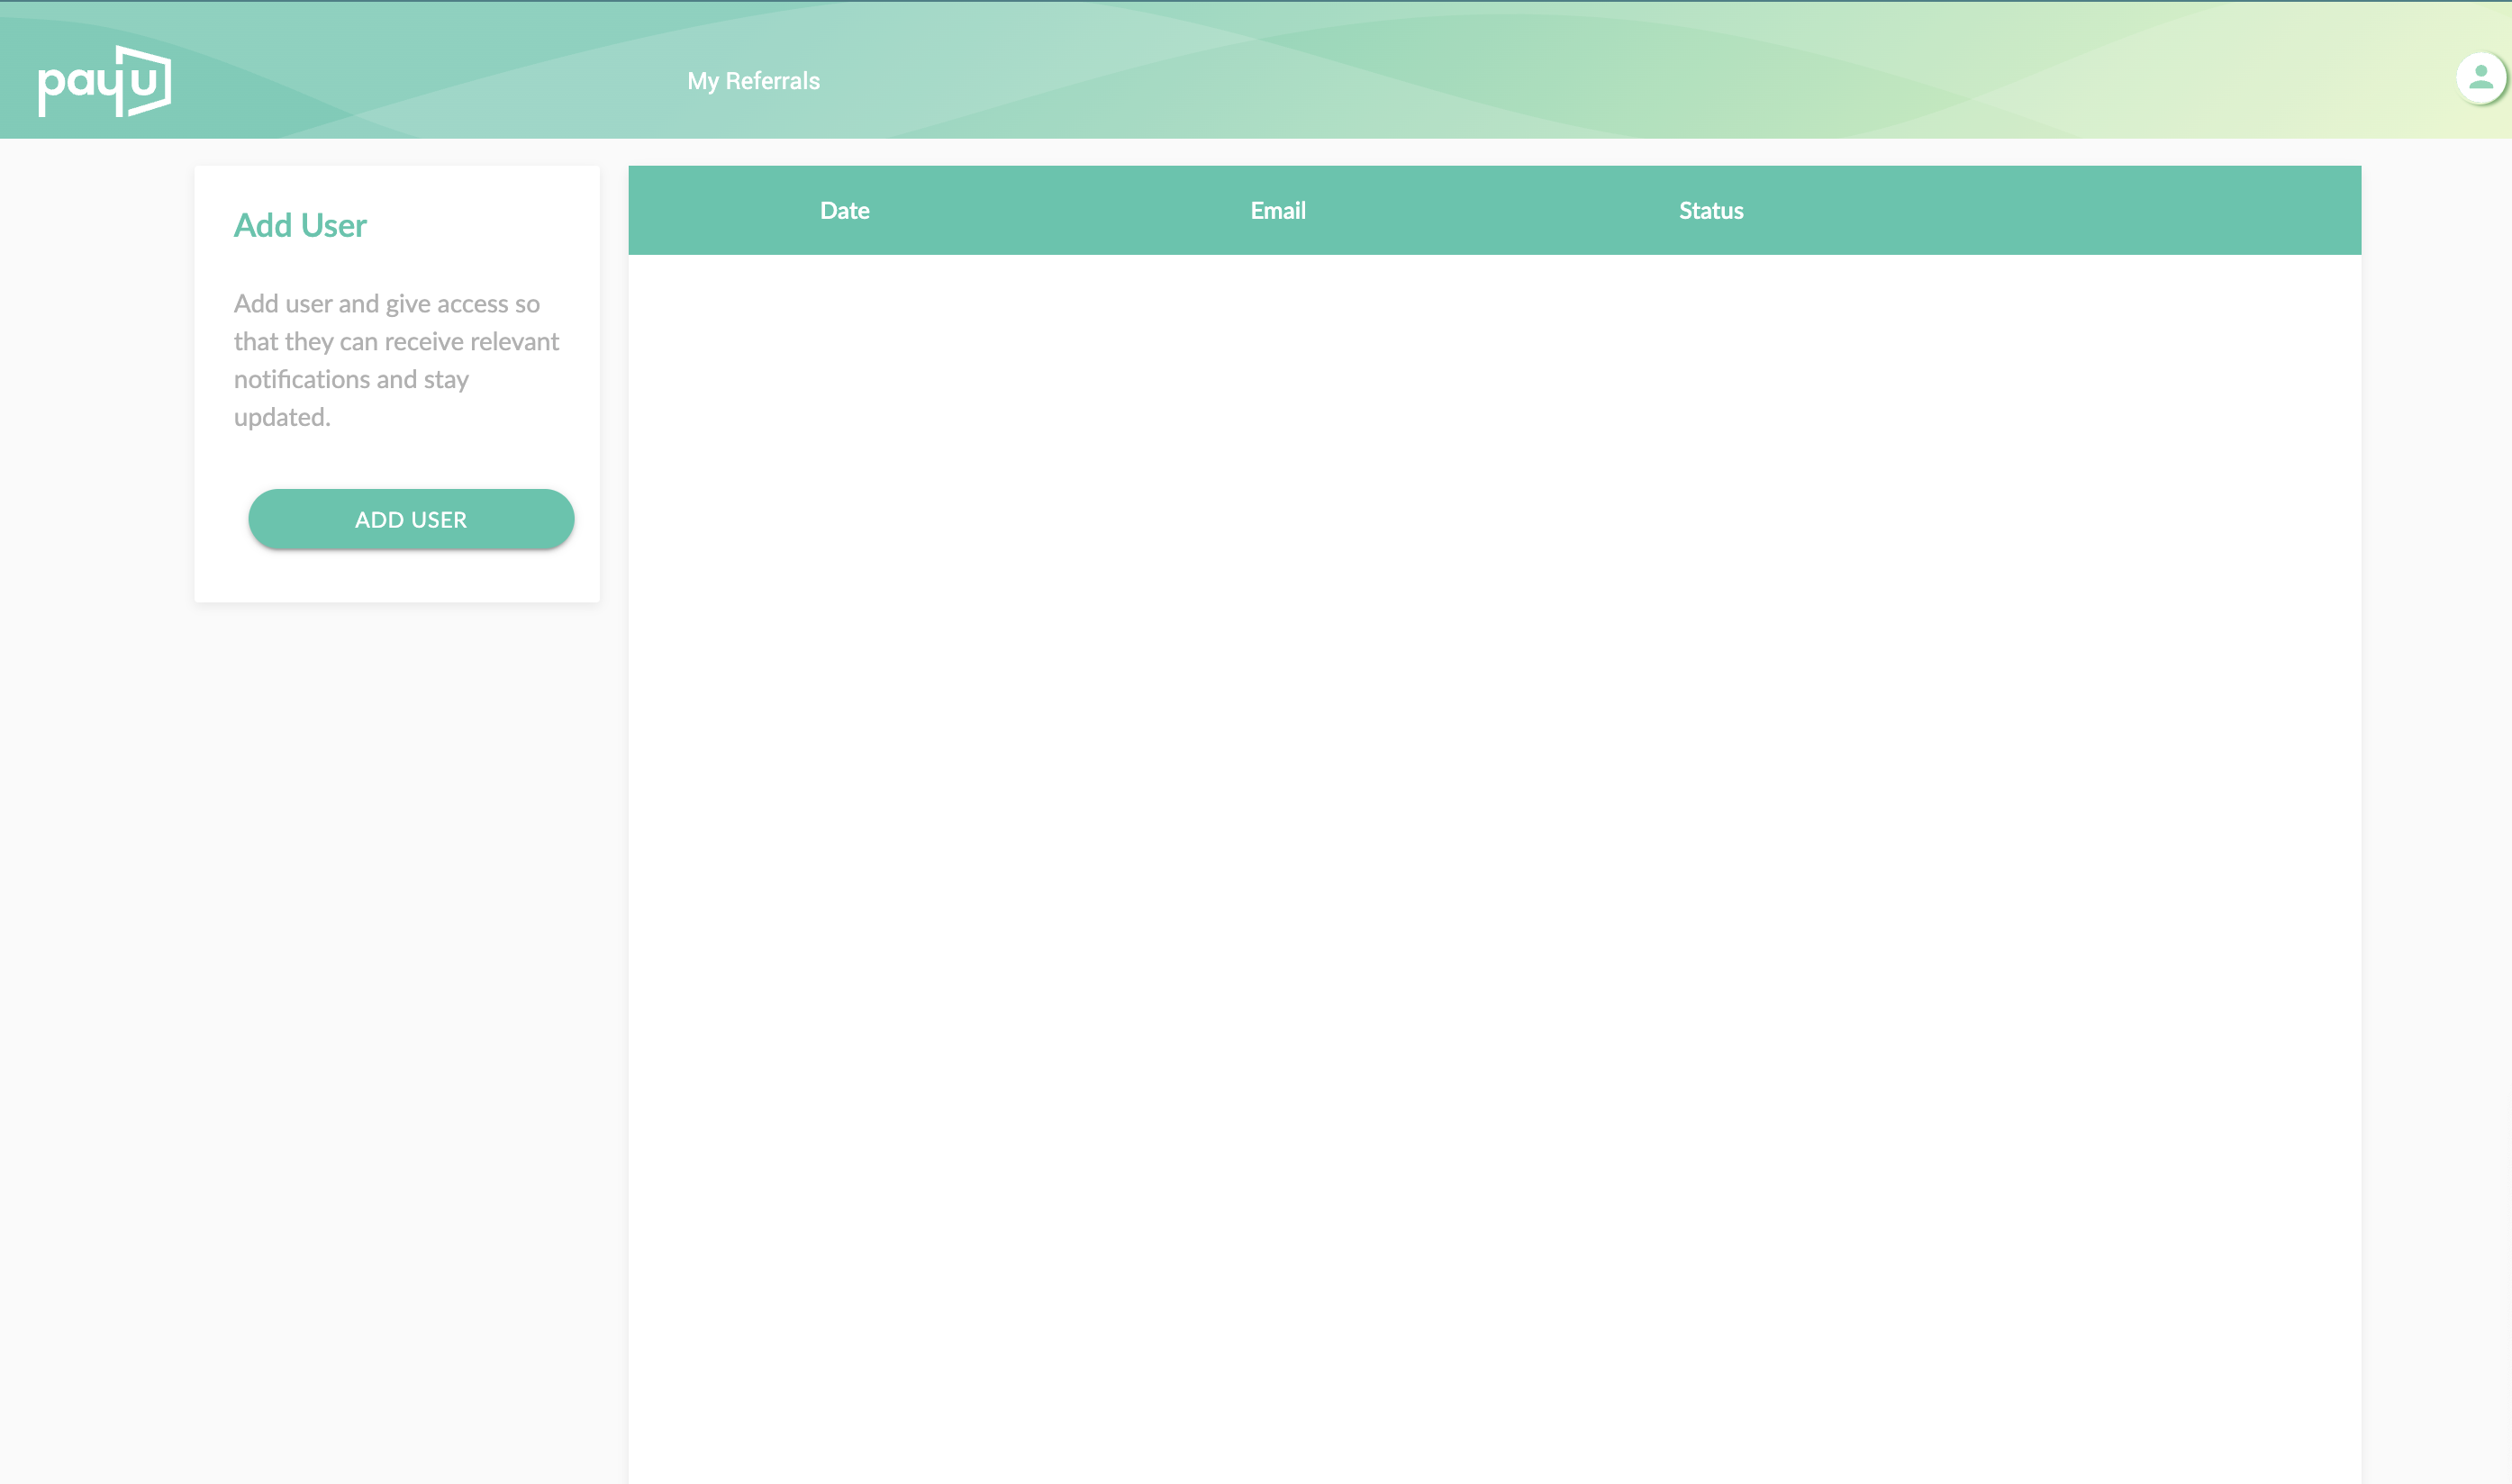
The My Users page is displayed.

-
Click Add User from the left pane.
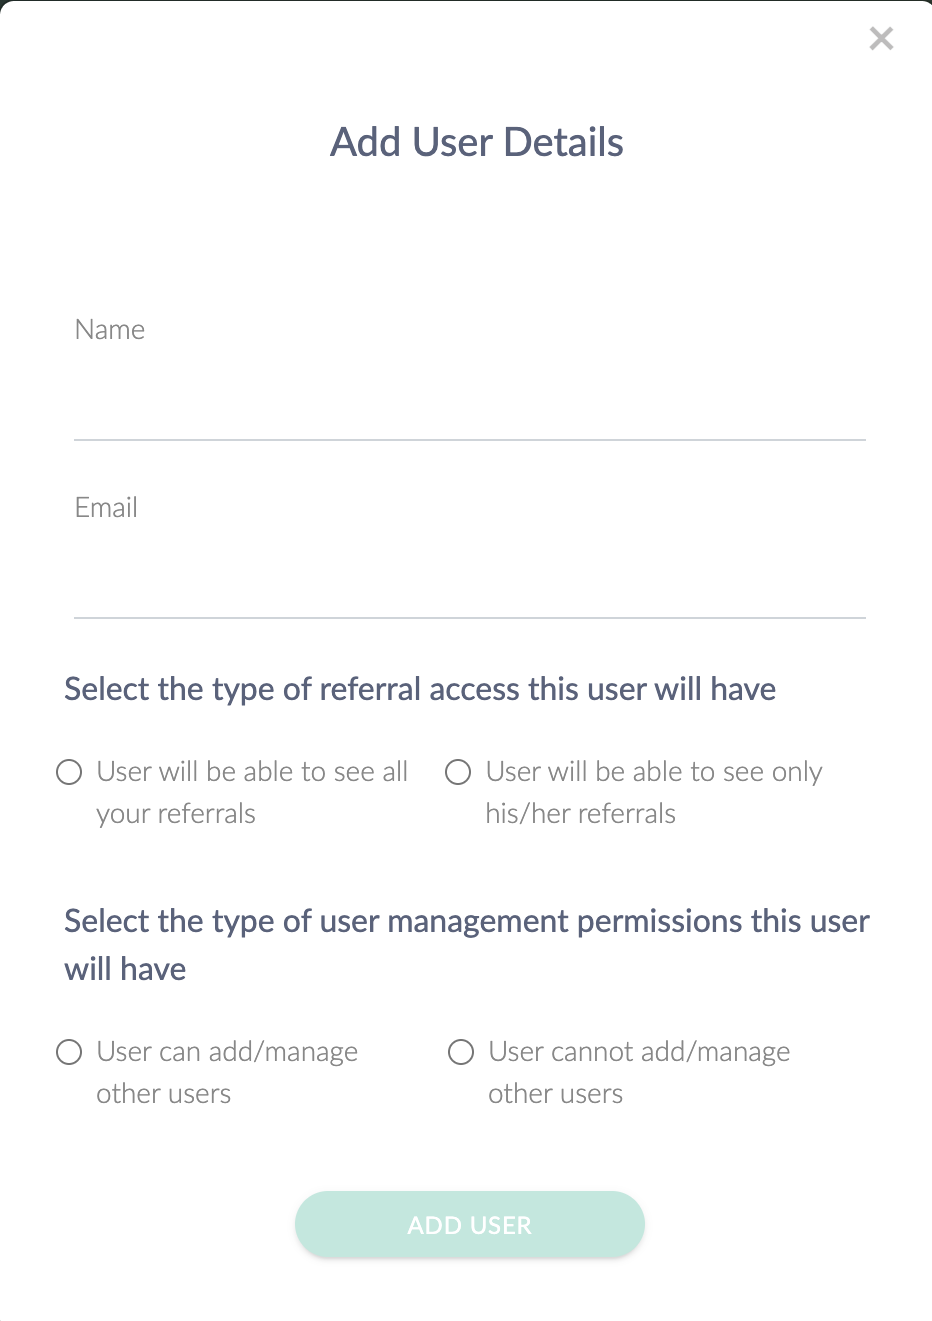
The Add User Details pop-up page is displayed.

-
Enter the user’s name in the Name field.
-
Enter the user’s email ID in the Email ID field.
-
Select any of the following options from the Select the type of referral access this user will have the field:
- The user will be able to see all your referrals
- The user will be able to see only their referrals
-
Select any of the following user’s permissions from the Select type of user management permissions this user will have field.
- The user can add/manage other users
- The user cannot add/manage other users
-
Click Add User to add the user.
A confirmation message is displayed, and a link is sent to the e-mail ID that was entered in Step 4.
Revoke a User
To revoke a user or make the user inactive on Partner Portal:
- Click your profile picture on the top-right corner and select Invite a user from the drop-down menu.

The My Users page is displayed.- Click the hamburger menu next to the user you wish to revoke and select Revoke Access.
Edit Permissions for a User
To edit permission for a user on Partner Portal:
- Click your profile picture on the top-right corner and select Invite a user from the drop-down menu.
The _My Users_ page is displayed.-
Click the hamburger menu next to the user you wish to revoke and select Edit Permission.
The Add User Details page is displayed.

- Select any of the following user’s permissions from the Select type of user management permissions this user will have field.
- The user can add/manage other users
- The user cannot add/manage other users
- Click Add User.
Updated 16 days ago
