UPI Bolt Capacitor-Ionic-Angular SDK Integration
UPI Bolt UI SDK allows you to manage the checkout options on their checkout screen. You use PayU UPI Bolt UI SDK for customer registration, payment, and profile management. This integration involves the following steps:
- Add SDK Dependency
- Platform-Specific Setup
- Initialize SDK
- Check UPI Bolt Availability
- Implement Payment Flow
- Profile Management
- Implement Callbacks
- Hash Generation
Prerequisites
Before integrating PayU UPI Bolt SDK, ensure you have:
- iOS deployment target: iOS 17 or higher
- Capacitor: Latest stable version
- Ionic-Angular: Compatible version
- PayU merchant account with valid merchant key
- Required permissions for SMS and device access
Step 1: Add SDK Dependency
Add the PayU UPI Bolt Capacitor plugin to your project:
npm add [email protected]Step 2: Platform-Specific Setup
iOS Setup
-
Add Dependencies to Podfile
pod 'PayUIndia-UPIBoltCoreKit', '1.0.0-alpha.7' -
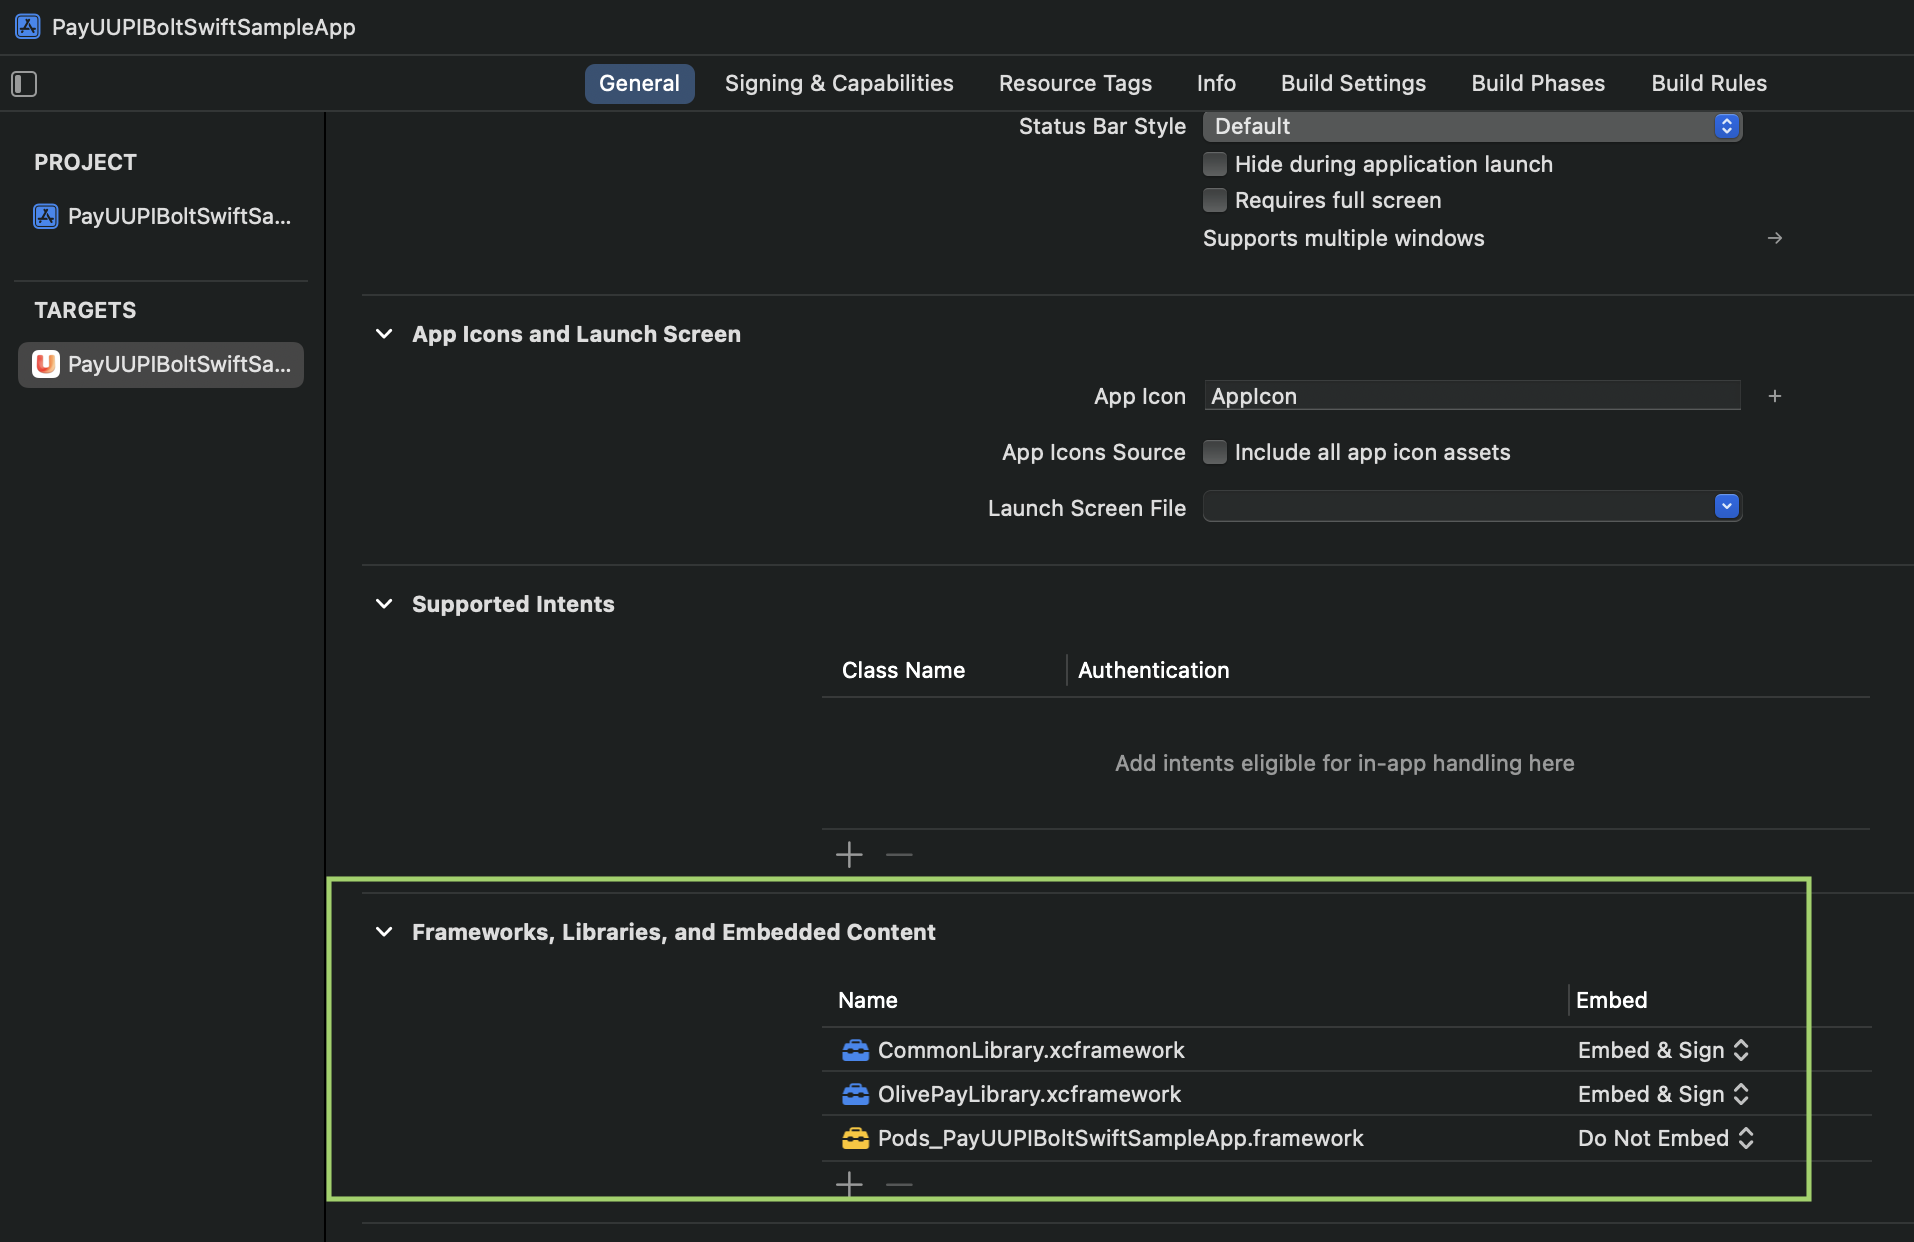
Add Framework Files
Include the following
.xcframeworkfiles in your iOS project:CommonLibrary.xcframework(NPCI)OlivePayLibrary.xcframework(AXIS)
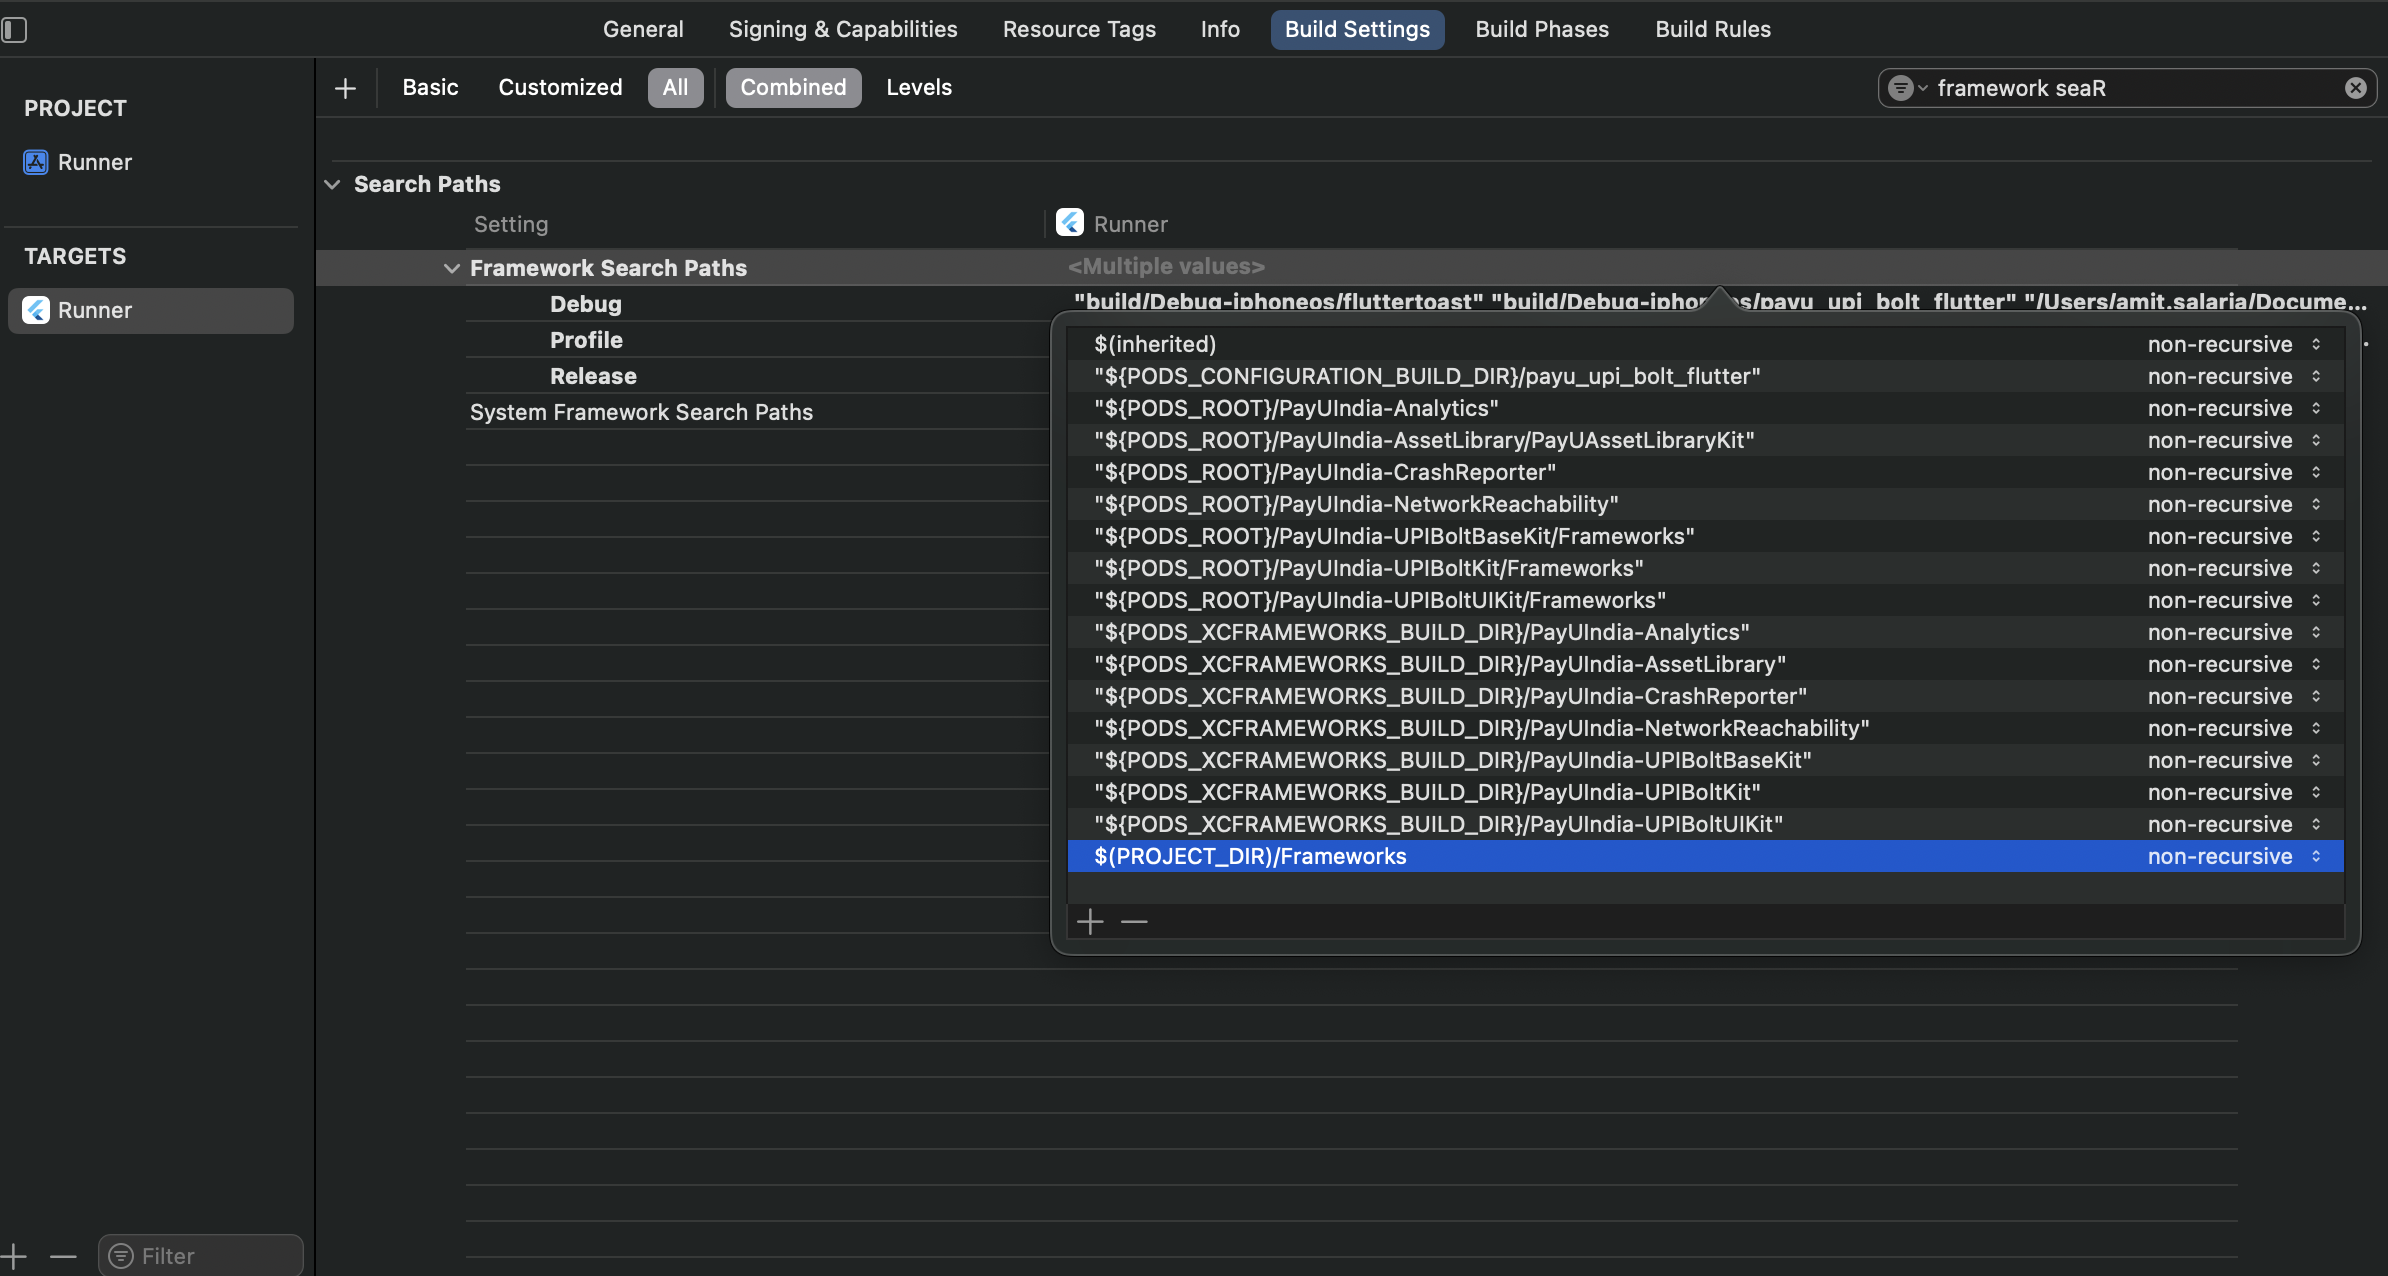
-
Update Framework Search Path
In Xcode, update the Framework Search Path to:
$(PROJECT_DIR)/Frameworks
Android Setup
-
Add Permissions
Add the following permissions to your
AndroidManifest.xml:<uses-permission android:name="android.permission.SEND_SMS"/> <uses-permission android:name="android.permission.ACCESS_NETWORK_STATE" /> <uses-permission android:name="android.permission.INTERNET" /> <uses-permission android:name="android.permission.READ_PHONE_STATE" /> <uses-permission android:name="android.permission.RECEIVE_SMS" /> -
Add Dependencies
Add the following dependencies to your
build.gradlefile:dependencies { implementation 'in.payu:payu-upi-bolt-core-sdk:0.0.1-dev4' implementation(files('libs/SecureComponent-release-prod_05062024_9d3904ab.aar')) } -
Add AAR File
Place the
SecureComponent-release-prod_05062024_9d3904ab.aarfile in thelibsfolder of your Android app module.
Step 3: Initialize SDK
Initialize the PayU UPI Bolt SDK with your configuration:
import { PayUUPIBoltUICapacitorPlugin } from 'payu-upi-bolt-ui-capacitor';

const config = {
  merchantName: "<merchantName>",
  merchantKey: "<merchantKey>",
  phone: "<phone>",
  email: "<email>",
  refId: "<refId>",
  pluginTypes: ["<pluginType>"], // e.g., ["AXIS", "HDFC"]
  clientId: "<clientId>",
  issuingBanks: ["<issuingBanks>"],
  excludedBanksIINs: ["<excludedBanksIIN>"],
  isProduction: <trueOrFalse>, // true for production, false for staging
};

PayUUPIBoltUICapacitorPlugin.initSDK({ config: JSON.stringify(config) });

// Optional: Clear SDK instance
PayUUPIBoltUICapacitorPlugin.reset();
Configuration Parameters:
| Parameter | Description |
|---|---|
merchantNamemandatory
|
StringName of your merchant |
merchantKeymandatory
|
StringPayU merchant key |
phonemandatory
|
StringPhone number for registration |
emailmandatory
|
StringCustomer Email ID |
refIdmandatory
|
StringReference ID |
pluginTypesmandatory
|
Array<String>List of Supported Plugin (e.g., [AXIS, HDFC]) |
isProductionmandatory
|
BooleanTrue (Production), false (Staging) |
clientIdoptional
|
StringUnique Client ID |
issuingBanksoptional
|
Array<String>List of Issuing Banks |
excludedBanksIINsoptional
|
Array<String>Excluded Bank IINs |
Step 4: Check UPI Bolt Availability
Before proceeding with payment flows, verify if UPI Bolt is enabled:
PayUUPIBoltUICapacitorPlugin.isUPIBoltEnabled();Step 5: Implement Payment Flow
Register and Pay
For first-time users or new transactions:
const paymentParams = {
  amount: "<amount>",
  productInfo: "<productInfo>",
  firstName: "<firstName>",
  surl: "<successUrl>",
  furl: "<failureUrl>",
  ios_surl: "<iosSuccessUrl>",
  ios_furl: "<iosFailureUrl>",
  initiationMode: "<initiationMode>",  // e.g., "10"
  purpose: "<purpose>",              // e.g., "00"
  txnId: "<uniqueTransactionId>",
  isCCTxnEnabled: true               // Enable fallback for card transactions
};

PayUUPIBoltUICapacitorPlugin.registerAndPay({ paymentParams: JSON.stringify(paymentParams) });
Payment Parameters:
| Parameter | Description |
|---|---|
amountmandatory
|
StringTransaction amount |
txnIdmandatory
|
StringUnique transaction identifier |
productInfomandatory
|
StringDescription of Product |
firstNamemandatory
|
StringCustomer First Name |
surloptional
|
StringSuccess Callback URL |
furloptional
|
StringFailure Callback URL |
ios_surloptional
|
StringiOS Success Callback URL |
ios_furloptional
|
StringiOS Failure Callback URL |
initiationModeoptional
|
StringPayment initiation mode (e.g., "10") |
purposeoptional
|
StringPayment purpose code (e.g., "00") |
isCCTxnEnabledoptional
|
BooleanEnable fallback for card transactions |
Step 6: Profile Management
UPI Management Screens
Open various UPI management screens:
PayUUPIBoltUICapacitorPlugin.openUPIManagement({
  screenType: "ALL" // Alternatives: TRANSACTIONHISTORY, MANAGEUPIACCOUNTS, DISPUTE, DEREGISTERUPI
});
Available Screen Types:
| Screen Type | Description |
|---|---|
| ALL | Complete profile management interface |
| TRANSACTIONHISTORY | Transaction history view |
| MANAGEUPIACCOUNTS | UPI account management |
| DISPUTE | Dispute resolution interface |
| DEREGISTERUPI | Account deregistration |
Step 7: Implement Callbacks
Implement the required callback methods:
import { Plugins } from '@capacitor/core';

  private listeners: { remove: () => void }[] = [];

  ngOnInit() {
    // Helper to register listeners and push them to the array for easy cleanup
    const addListener = (eventName: string, handler: (data: any) => void) => {
      const listener = Plugins['PayUUPIBoltUICapacitorPlugin']['addListener'](eventName, handler);
      this.listeners.push(listener);
    };

    // Specific handler for generateHash
    addListener('generateHash', (data: any) => this.handleHashGeneration(data));

    // Common handler for all other events
    const alertHandler = (data: any) => this.showAlert(data);

    // Attach other PayU event listeners using the shared alert handler
    const eventNames = [
      'onPayUSuccess',
      'onPayUCancel',
      'onPayUFailure',
      'reset',
      'clearCache',
      'isRegistered',
      'isUPIBoltEnabled'
    ];

    eventNames.forEach(event => addListener(event, alertHandler));
  }

  ngOnDestroy() {
    // Clean up all event listeners
    this.listeners.forEach(listener => listener.remove());
  }
Callback Methods:
| Callback Method | Description |
|---|---|
onPayUSuccess
|
Called if payment succeeds |
onPayUFailure
|
Triggered on payment failure |
onPayUCancel
|
Called when the transaction is cancelled |
onErrorReceived
|
Invoked when an error occurs |
onUPIBoltEnabled
|
Checks if UPI Bolt is enabled |
onReset
|
Confirms SDK has been reset |
generateHash
|
Invoked to compute required hash |
Step 8: Hash Generation
Implement secure hash generation for transaction security:
async handleHashGeneration(data: HashData): Promise<void> {
  const { hashString, hashName, postSalt } = data;

  // Generate hash on your secure server
  const finalHash = await this.generateSecureHash(hashString + "<salt>" + postSalt);

  const response = { [hashName]: finalHash };
  PayUUPIBoltUICapacitorPlugin.hashGenerated({ hashData: JSON.stringify(response) });
}

private async generateSecureHash(input: string): Promise<string> {
  // Implement SHA-512 hash generation
  // This should be done on your secure server
  return "<SHA-512-Hash>";
}Note: Always generate hashes on your secure server. Never expose your salt values in client-side code.
SMS Hash Generation for Android
For Android OTP auto-read functionality, add the AppSignatureHelper class to your project:
public class AppSignatureHelper {
    private static final String HASH_TYPE = "SHA-256";
    private static final int NUM_HASHED_BYTES = 9;
    private static final int NUM_BASE64_CHAR = 11;
    private Context context;

    public AppSignatureHelper(Context context) {
        this.context = context;
    }

    public ArrayList<String> getAppSignatures() {
        ArrayList<String> appCodes = new ArrayList<>();
        try {
            String packageName = context.getPackageName();
            PackageManager packageManager = context.getPackageManager();
            Signature[] signatures = packageManager.getPackageInfo(packageName,
                    PackageManager.GET_SIGNATURES).signatures;

            for (Signature signature : signatures) {
                String hash = hash(packageName, signature.toCharsString());
                if (hash != null) {
                    appCodes.add(String.format("%s", hash));
                }
            }
        } catch (PackageManager.NameNotFoundException e) {
            Log.e("AppSignatureHelper", "Unable to find package to obtain hash.", e);
        }
        return appCodes;
    }

    private static String hash(String packageName, String signature) {
        String appInfo = packageName + " " + signature;
        try {
            MessageDigest messageDigest = MessageDigest.getInstance(HASH_TYPE);
            messageDigest.update(appInfo.getBytes(StandardCharsets.UTF_8));
            byte[] hashSignature = messageDigest.digest();

            hashSignature = Arrays.copyOfRange(hashSignature, 0, NUM_HASHED_BYTES);
            String base64Hash = Base64.encodeToString(hashSignature, Base64.NO_PADDING | Base64.NO_WRAP);
            base64Hash = base64Hash.substring(0, NUM_BASE64_CHAR);

            return base64Hash;
        } catch (NoSuchAlgorithmException e) {
            Log.e("AppSignatureHelper", "Hash algorithm does not exist.", e);
        }
        return null;
    }
}
Usage:
Log.d("appSignature", new AppSignatureHelper(requireContext()).getAppSignatures().get(0));Share the generated signature with PayU team for SMS integration setup.
Error Handling
Handle various error scenarios with these error codes:
| Code | Message | Description |
|---|---|---|
0 |
Success | Transaction completed successfully |
1 |
Fail/Invalid Response | Request failed due to invalid or missing parameters |
2 |
User cancelled | User cancelled the transaction |
100 |
Transaction timeout | Transaction exceeded time limit |
104 |
UPI Bolt not supported | Feature not available for merchant |
500 |
Something went wrong | Unexpected error occurred |
Error Handling Example:
handleError(data: any) {
  const errorCode = data.errorCode || -1;
  const errorMessage = data.errorMessage || "Unknown error";

  switch (errorCode) {
    case 100:
      this.showTimeoutError();
      break;
    case 104:
      this.showUPIBoltNotSupported();
      break;
    default:
      this.showGeneralError(errorMessage);
  }
}
Testing
Test Environment Setup
-
Use Test Configuration
isProduction: false -
Test Phone Numbers
Use sandbox phone numbers provided by PayU for testing -
Test Scenarios
- First-time registration and payment
- Repeat payments for registered users
- Error scenarios (network issues, timeouts)
- Profile management flows
Best Practices
Implementation Tips
- Always validate user inputs before SDK calls
- Implement proper error handling for all callback methods
- Use secure hash generation on server-side
- Test thoroughly in sandbox environment before production
- Handle device permissions gracefully
- Implement proper loading states during SDK operations
- Always cleanup listeners in ngOnDestroy to prevent memory leaks
SDK Methods Reference
| Method | Description | Parameters |
|---|---|---|
initSDK() |
Initialize the SDK | Configuration object |
isUPIBoltEnabled() |
Check UPI Bolt availability | None |
registerAndPay() |
Register user and process payment | Payment parameters |
openUPIManagement() |
Open profile management screens | Screen type |
hashGenerated() |
Provide generated hash to SDK | Hash object |
reset() |
Reset SDK instance | None |
Support
For additional support and documentation:
- PayU Developer Portal: https://docs.payu.in
- Support Email: [email protected]
- Integration Help: Contact your PayU integration manager
Updated 4 months ago